Applies To: Locally-managed Fireboxes
If you use multiple Active Directory domains, you must specify the domains to use for Single Sign-On (SSO). After you have installed the SSO Agent, you can specify the domains to use for authentication and synchronize the domain configuration with the SSO Agent. You can also specify options to use SSO without the SSO Client. This is known as clientless SSO. You configure settings for clientless SSO when you configure the SSO Agent. To configure the SSO Agent settings, you must have administrator privileges on the computer where the SSO Agent is installed.
When you first launch the SSO Agent, it generates the Users.xml and AdInfos.xml configuration files. These configuration files are encrypted and store the domain configuration details you specify when you configure the SSO Agent.
The SSO Agent has two default accounts, administrator and status, that you can use to log in to the SSO Agent. To make changes to the SSO Agent configuration, you must log in with the administrator credentials. After you log in for the first time, we recommend that you change the passwords for the default accounts.
The default credentials (username/password) for these accounts are:
- Administrator — admin/readwrite
- Status — status/readonly
For more information about Active Directory, go to Configure Active Directory Authentication.
IPv6 Support
IPv6 is supported in Fireware v12.3 or higher. If user computers on your network have both IPv4 and IPv6 addresses, we recommend that you enable both IPv4 and IPv6 support on servers where Event Log Monitor or the SSO Agent are installed.
IPv4 and IPv6 traffic is processed separately in environments that use both. For example, a user named jsmith has a computer with both IPv4 and IPv6 addresses. In the Authenticated Users list on the Firebox, two different sessions appear for the user jsmith.
To see the IPv6 address of an authenticated user:
- Fireware Web UI — Select System Status > Authentication List.
- Firebox System Manager — Select the Authentication List tab.
Log In to the SSO Agent Configuration Tool
- Select Start > WatchGuard > Authentication Gateway > WatchGuard SSO Agent Configuration Tool.
The SSO Agent Configuration Tool login dialog box appears. - In the User Name text box, type the administrator user name admin.
- In the Password text box, type the administrator password readwrite.
The SSO Agent Configuration Tools dialog box appears.
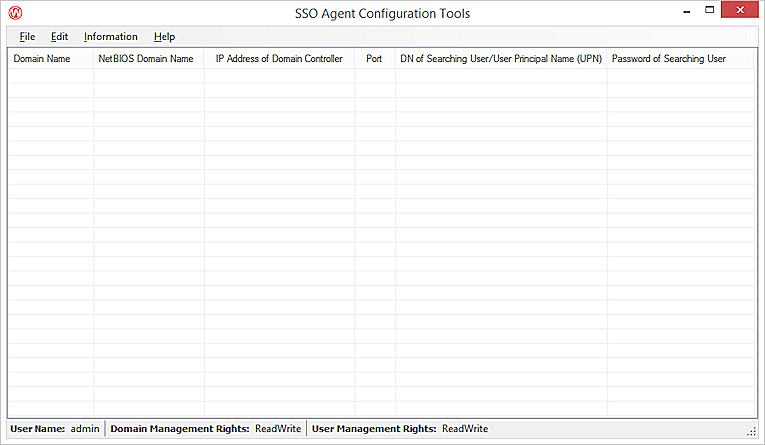
- Configure your SSO Agent as described in the next sections.
Changes to the configuration are automatically saved.
Manage User Accounts and Passwords
After you log in for the first time, you can change the password for the default accounts. Because you must log in with the administrator credentials to change the SSO Agent settings, make sure you remember the password specified for the administrator account. You can add new user accounts and change the settings for existing user accounts. You can also use both the admin and status accounts to open a telnet session to configure the SSO Agent.
For more information about how to use telnet with the SSO Agent, go to Use Telnet to Debug the SSO Agent.
Change a User Account Password
For the admin and status accounts, you can only change the password for the account; you cannot change the user name.
From the SSO Agent Configuration Tools dialog box:
- Select Edit > User Management.
The User Management Form dialog box appears.
- Select the account to change.
For example, select admin. - Click Change Password.
The Change Password dialog box appears. - In the Password and Confirm Password text boxes, type the new password for this user account.
- Click OK.
Add a New User Account
From the SSO Agent Configuration Tools dialog box:
- Select Edit > User Management.
The User Management Form appears. - Click Add User.
The Add User dialog box appears. - In the User Name text box, type the name for this user account.
- In the Password and Confirm Password text boxes, type the password for this user account.
- Select an access option for this account:
- Read-Only
- Read-Write
- Click OK.
Edit a User Account
When you edit a user account, you can change only the access option. You cannot change the user name or password for the account. To change the user name, you must add a new user account and delete the old user account.
From the SSO Agent Configuration Tools dialog box:
- Select Edit > User Management.
The User Management Form appears. - Select the account to change.
- Click Edit User.
The Edit User dialog box appears. - Select a new access option for this account:
- Read-Only
- Read-Write
- Click OK.
Delete a User Account
From the SSO Agent Configuration Tools dialog box:
- Select Edit > User Management.
The User Management Form appears. - Select the account to delete.
- Click Delete User.
The Delete User dialog box appears. - Verify the User Name is for the account you want to delete.
- Click OK.
Configure Domains for the SSO Agent
To configure your SSO Agent, you can add, edit, and delete information about your Active Directory domains. When you add or edit a domain, you must specify a user account to use to search your Active Directory server. We recommend that you create a specific user account on your server with permissions to search the directory and with a password that never expires.
Add a Domain
From the SSO Agent Configuration Tools dialog box:
- Select Edit > Add Domain.
The Add Domain dialog box appears. - In the Domain Name text box, type the name of the domain.
For example, type my-example.com.
The domain name of your Active Directory server is case-sensitive. Make sure you type the domain name exactly as it appears in your Firebox Authentication Servers settings on the Active Directory tab. For more information, see Configure Active Directory Authentication. - In the NetBIOS Domain Name text box, type the NetBios domain name for your domain.
To find the NetBios domain name:
- On the Active Directory server for the domain, select Start > Administrative Tools > Active Directory Domain and Trusts.
- In the list of domains, right-click your domain and select Properties.
- Find the Domain name (pre-Windows 2000) value. This is the NetBios domain name for your domain.
- In the IP Address of Domain Controller text box, type the IPv4 address of the Active Directory server for this domain. In v12.3 or higher, you can type an IPv6 address.
To specify more than one IP address for the domain controller, separate the IP addresses with a semicolon, without spaces. - In the Port text box, type the port to use to connect to this server.
The default port is 389. - In the Searching User section, select an option:
- Distinguished Name (DN) (cn=ssouser,cn=users,dc=domain,dc=com)
- User Principal Name (UPN) ([email protected]
- Pre-Windows 2000 (netbiosDomain\ssouser)
- In the text box, type the user information for the option you selected.
Make sure to specify a user who has permissions to search the directory on your Active Directory server. - In the Password of Searching User and Confirm password text boxes, type the password for the user you specified.
This password must match the password for this user account on your Active Directory server. - To add another domain, click OK & Add Next. Repeat Steps 2–8.
- Click OK.
The domain name appears in the SSO Agent Configuration Tools list.
Edit a Domain
When you edit an SSO domain, you can change all the settings except the domain name. If you want to change the domain name, you must delete the domain and add a new domain with the correct name.
From the SSO Agent Configuration Tools dialog box:
- Select the domain to change.
- Select Edit > Edit Domain.
The Edit Domain dialog box appears. - Update the settings for the domain.
- Click OK.
Delete a Domain
From the SSO Agent Configuration Tools dialog box:
- Select the domain to delete.
- Select Edit > Delete Domain.
A confirmation message appears. - Click Yes.
Configure Clientless SSO
If the SSO Client is not installed or is not available, you can configure the SSO Agent to use clientless SSO to get user login information from the Event Log Monitors or Exchange Monitors installed in your network. The Event Log Monitors are also installed on one or more domain member servers in each domain. The Exchange Monitor is installed on the same computer where your Microsoft Exchange Server is installed.
If you use the Event Log Monitor, when a user tries to authenticate, the SSO Agent sends the IP address of the client computer to the Event Log Monitor. The Event Log Monitor then uses this information to query the client computer over TCP port 445 and retrieve the user credentials from the Windows security event log file on the client computer. The Event Log Monitor gets the user credentials from the client computer and contacts the domain controller to get the user security group information for the user. If you have installed more than one Event Log Monitor, and the first Event Log Monitor that the SSO Agent queries does not have the correct user credentials, the SSO Agent queries the next Event Log Monitor in the Contact Domains list. The SSO Agent continues to contact each Event Log Monitor in the list until it finds the correct user credentials. The Event Log Monitor then provides this information to the SSO Agent.
If you do not install the SSO Client on your user's computers, make sure the Event Log Monitor is the first entry in the SSO Agent Contacts list. If you specify the SSO Client as the primary contact, but the SSO Client is not available, the SSO Agent queries the Event Log Monitor next, but this can cause a delay.
For users with devices that run macOS 10.6 and higher, iOS, or Android platforms, you can use the Exchange Monitor to get login information for those users. Because the Exchange Monitor is installed on the same computer where your Microsoft Exchange Server is installed, the Exchange Monitor tracks the domain account log on/log off actions for each user and notifies the SSO Agent in real time of these events.
After you install the SSO Agent, you must add the domain information of the domains where the Event Log Monitors and Exchange Monitors are installed to the SSO Agent configuration in the Contact Domains list. If you have only one domain and the SSO Agent is installed on the domain controller, or if you have more than one domain and the Event Log Monitor and Exchange Monitor are on the same domain as the SSO Agent, you do not have to specify the domain information for the domain controller in the SSO Agent configuration Contact Domains list. If you have more than one Event Log Monitor or Exchange Monitor in the Contact Domains list, the SSO Agent queries the first entry in the list for the user credentials and group information. If the first Event Log Monitor or Exchange Monitor is not available, the SSO Agent contacts the next monitor in the list. This process continues until the SSO Agent finds an available monitor.
For more information about how to install the Event Log Monitor and Exchange Monitor, go to Install the WatchGuard Single Sign-On (SSO) Agent and Event Log Monitor.
For more information about load balancing and failover for the Event Log Monitor, go to the Event Log Monitor section in How Active Directory SSO Works.
Before you configure and enable the settings for clientless SSO, you must make sure the client computers on your domain have TCP 445 port open, or have File and printer sharing enabled, and have the correct group policy configured to enable the Event Log Monitor to get information about user login events. If this port is not open and the correct policy is not configured, the Event Log Monitor cannot get group information and SSO does not work correctly.
On your domain controller computer:
- Open the Group Policy Object Editor and edit the Default Domain Policy.
- Make sure the Audit Policy (Computer Configuration > Windows Settings > Security Settings > Local Policies > Audit Policy) has the Audit account logon events and Audit logon events policies enabled.
- At the command line, run the command gpupdate/force /boot.
When the command runs, this message string appears:
Updating Policy… User Policy update has completed successfully. Computer Policy update has completed successfully.
You can add, edit, and delete domain information for clientless SSO. For each domain name that you add, you can specify more than one IP address for the domain controller. If the Event Log Monitor cannot contact the domain controller at the first IP address, it tries to contact the domain controller at the next IP address in the list.
From the SSO Agent Configuration Tools dialog box:
- Select Edit > SSO Agent Contacts Settings.
The SSO Agent Contacts Settings dialog box appears.
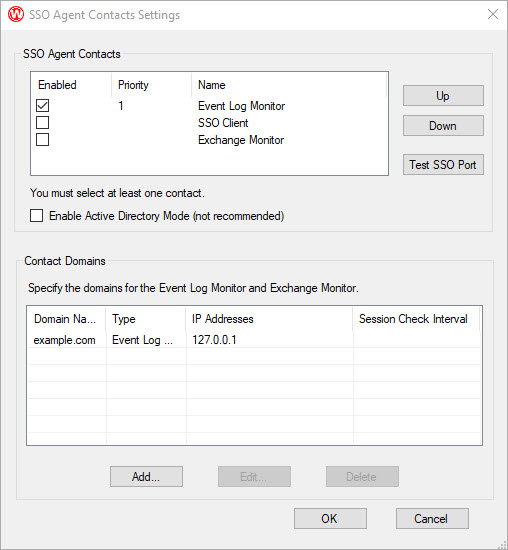
- In the SSO Agent Contacts list, select the check box for each contact for the SSO Agent:
- SSO Client
- Event Log Monitor
- Exchange Monitor
- To change the order of the SSO Agent Contacts, select a contact and click Up or Down.
You cannot change the position of the Exchange Monitor. - Add, edit, or delete a contact domain, as described in the next sections.
- Click OK to save your settings.
Add a Contact Domain
You can specify one or more domains for the Event Log Monitor or the Exchange Monitor to contact for user login information.
When you add a domain for the Exchange Monitor, you must specify the IP addresses and the session check interval for the Microsoft Exchange server. The session check interval specifies the amount of time before the Exchange Monitor logs off a user that does not appear as active in the IIS log messages on your Exchange server. The default setting is 40 minutes. You must specify an interval of at least 5 minutes.
From the SSO Agent Contact Settings dialog box:
- Click Add.
The Domain Settings dialog box appears.
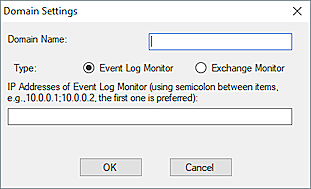
- For the Type option, select Event Log Monitor.
- In the Domain Name text box, type the name of the domain that you want the Event Log Monitor to contact for user credentials.
You must type the name in the format domain.com. - In the IP Addresses of Domain Controller text box, type the IPv4 addresses for the domain. In Fireware v12.3 or higher, you can type IPv6 addresses.
To specify more than one IP address for the domain controller, separate the IP addresses with a semicolon, without spaces. - Click OK.
The domain information you specified appears in the Contact Domains list.
From the SSO Agent Contact Settings dialog box:
- Click Add.
The Domain Settings dialog box appears. - For the Type option, select Exchange Monitor.
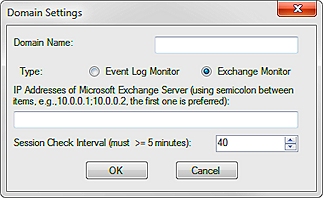
- In the Domain Name text box, type the name of the domain that you want the Exchange Monitor to contact for user credentials.
You must type the name in the format domain.com. - In the IP Addresses of Microsoft Exchange Server text box, type the IPv4 addresses for the domain.
To specify more than one IP address for the Exchange server, separate the IP addresses with a semicolon, without spaces. - To change the Session Check Interval setting from the default setting of 40 minutes, type or select a new interval.
- Click OK.
The domain information you specified appears in the Contact Domains list.
Edit a Contact Domain
From the SSO Agent Contact Settings dialog box:
- From the Contact Domains list, select the domain to change.
- Click Edit.
The Event Log Monitor Settings dialog box appears. - Update the settings for the domain.
- Click OK.
Delete a Domain
From the SSO Agent Contact Settings dialog box:
- From the Contact Domains list, select the domain to delete.
- Click Delete.
The domain is removed from the list.
Test the SSO Port Connection
To verify that the SSO Agent can contact the Event Log Monitor and the Exchange Monitor, you can use the SSO Port Tester tool. With the SSO Port Tester tool, you can verify whether the SSO Agent can contact a server at a single IP address, or servers at multiple IP addresses or a range of IP addresses.
To verify the connection for a single IP address or multiple IP addresses, rather than a range of addresses, you import a plain text file that includes the IP addresses to test. You can also specify the ports to test and the connection timeout interval.
From the SSO Agent Contacts Settings dialog box:
- Click Test SSO Port.
The SSO Port Tester dialog box appears.
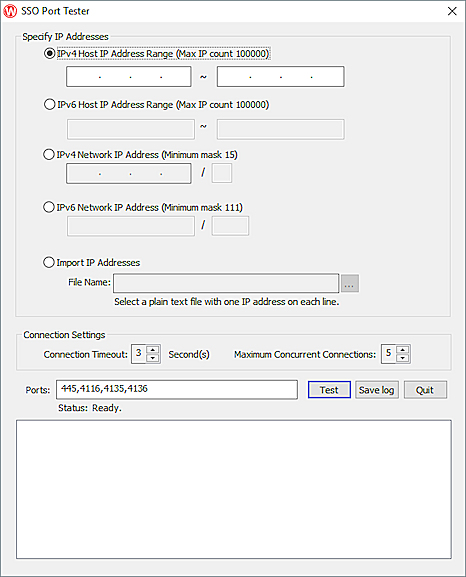
- In the Specify IP Addresses section, select an option:
- IPv4 Host Address Range
- IPv6 Host Address Range (Fireware v12.3 or higher)
- IPv4 Network IP Address
- IPv6 Network IP Address (Fireware v12.3 or higher)
- Import IP Addresses
- If you selected IPv4 Host IP Address Range or IPv6 Host Address Range, in the adjacent text boxes, type the range of IP addresses to test.
If you selected IPv4 Network IP Address or IPv6 Network IP Address, in the adjacent text box, type the network IP address to test.
If you selected Import IP Addresses, click , and select the plain text file with the list of IP addresses to test.
 - In the Ports text box, type the port numbers to test.
To test more than one port, type each port number, separated by a comma, without spaces. - Click Test.
The results of the port test appear in the SSO Port Tester window. - To save the test results in a log file, click Save log and specify the file name and location to save the log file.
- To stop the port tester tool process, click Quit.
Enable Active Directory Mode
For the most reliable SSO deployment, you must install the SSO Client, Event Log Monitor, or Exchange Monitor. If at least one of these components is not installed, or not configured correctly, the SSO Agent must use Active Directory (AD) Mode for SSO. AD Mode is disabled by default in v12.7.2 or higher of the SSO Agent.
To enable AD Mode, from the SSO Agent Contacts Settings dialog box:
- In the SSO Agent Contacts section, select the Enable Active Directory Mode check box.
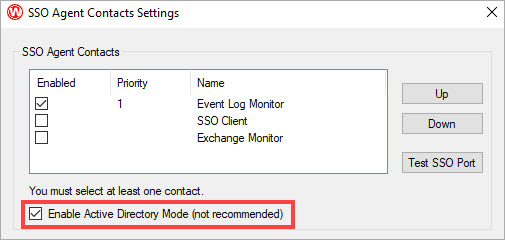
- Click OK to save your settings.
See Status Information about SSO Components
In v12.2 or higher of the SSO Agent, you can view the connection status for SSO components on your network. For example, if you have Event Log Manager (ELM) installed, you can see whether the SSO Agent and Event Log Monitor are connected. This information is refreshed every 3 seconds.
In v12.3 or higher of the SSO Agent, you can also view the version number of the SSO Agent and the version and build number of each SSO component.
In v12.4 or higher of the SSO Agent, you can view the status of authentication requests:
- Authentication Info — Information about currently authenticated users, which includes the domain name, IP address, type, user name, and authentication time for each request
- Pending IP list — Requests sent to SSO Agent that have not been processed
- Processing IP list — Requests that are in process with Event Log Manager, Exchange Monitor, the SSO client, or Active Directory
In most cases, the Pending IP and Processing IP lists are empty because authentication requests typically move through pending and processing states faster than the refresh interval.
(SSO Agent v12.4 or higher) To configure the refresh interval, from the Refresh Interval drop-down menu, select 5 seconds, 10 seconds, 30 seconds, 60 seconds, 2 minutes, or 5 minutes.
To see this information in the SSO Agent, select Information > Status.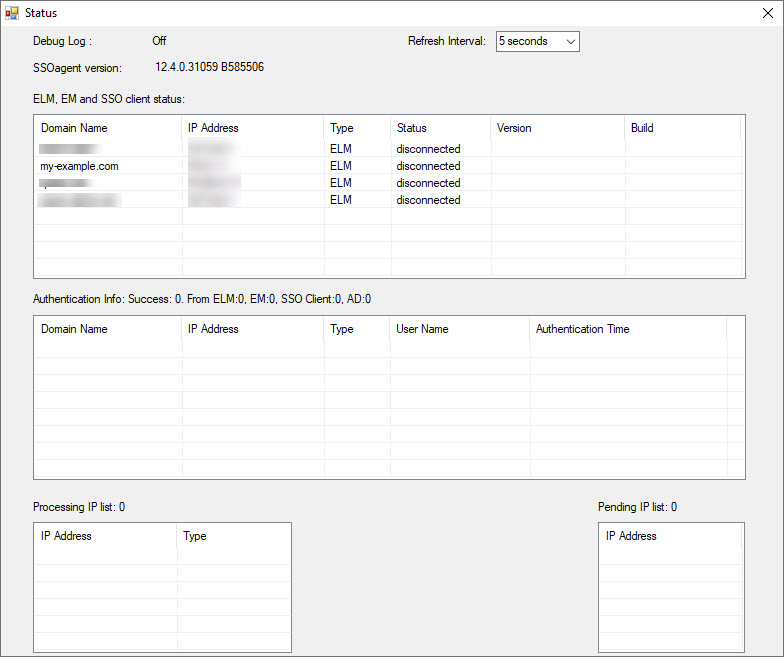
Configure the API Used for Communication with Event Log Monitor
In v12.5.4 or higher of the SSO Agent, you can choose to use a newer Microsoft API (Microsoft Windows Event Log API) for communication with the Event Log Monitor. This new API can interpret additional event types and can filter only logon and logoff events to reduce traffic between the agent and the server.
The SSO Agent still uses the Microsoft Event Logging API by default. To use the newer Microsoft Windows Event Log API, you must select it in the SSO Agent Configuration Tool.
To select which Microsoft API the Event Log Monitor uses for communication:
- Select Start > WatchGuard > Authentication Gateway > WatchGuard SSO Agent Configuration Tool.
The SSO Agent Configuration Tool login dialog box appears. - In the User Name text box, type the administrator user name.
- In the Password text box, type the administrator password.
The SSO Agent Configuration Tools dialog box appears.
- Select Edit > SSO Agent Info.
- Select the API you want to use. The Microsoft Windows Event Log API is the newer API.The newer API (Microsoft Windows Event Log API) supports these operating systems:
- Windows Vista
- Windows 7
- Windows 8
- Windows 10
- Windows 11
The current API (Microsoft Event Logging API) supports these operating systems:- Windows XP
- Windows 2003 Server
- Windows Vista
- Windows 7
- Windows 8
- Windows 10
- Windows 11
We recommend that each instance of the SSO Agent use a different Event Log Monitor. If multiple SSO Agents use the same Event Log Monitor, each SSO Agent must use the same API for communication.
About Active Directory Single Sign-On (SSO)
How Active Directory SSO Works
Install the WatchGuard Single Sign-On (SSO) Agent and Event Log Monitor
Install the WatchGuard Active Directory SSO Client
Install the WatchGuard Active Directory SSO Exchange Monitor