This guide demonstrates how to integrate WatchGuard Wi-Fi Cloud with Purple Wi-Fi authentication to enable guest users to authenticate to a captive portal.
Contents
Platform and Software
The hardware and software used to complete the steps in this document include:
- Purple Wi-Fi:
- Purple Wi-Fi Management Portal
- WatchGuard:
- WatchGuard AP325
- WatchGuard Wi-Fi Cloud Account
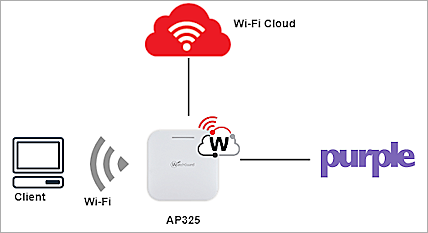
Test Topology
Purple Wi-Fi Configuration
- Log in to the Purple Wi-Fi Management Portal.
- Click
 .
.

- Select Management > Locations (or Venues, depending on the browser language settings).
- Select Venues and Groups.
- Click
 > Add venue.

- Follow the instructions in the wizard to add a new venue.
- Select your new venue from Venues and Groups.
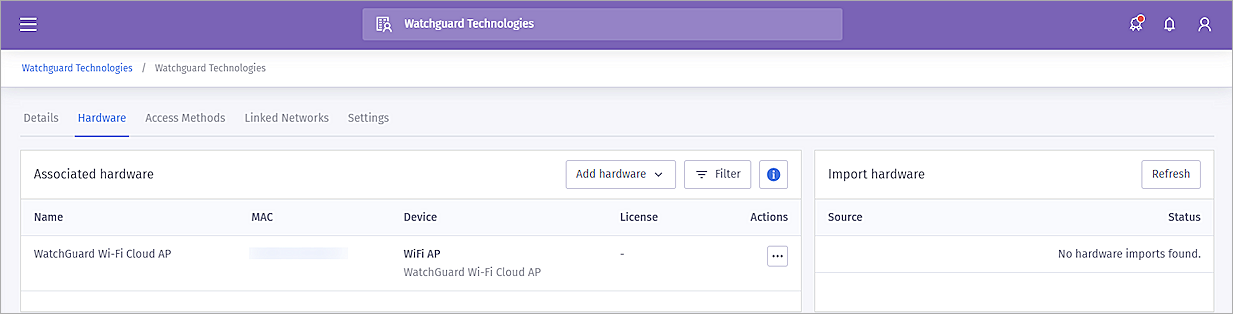
- From your venue, select Hardware.
- Click Add hardware > Add new hardware.
- From the WiFi AP type drop-down list, select WatchGuard Wi-Fi Cloud AP.
- In the Name text box, edit the name of the AP if required. The default name is added automatically when you select the Hardware type.
- In the WiFi AP Mac Address text box, add the MAC address of your WatchGuard AP.
- Click View Manual Online or Download Manual to view the configuration steps and information required for the WatchGuard Wi-Fi Cloud configuration.
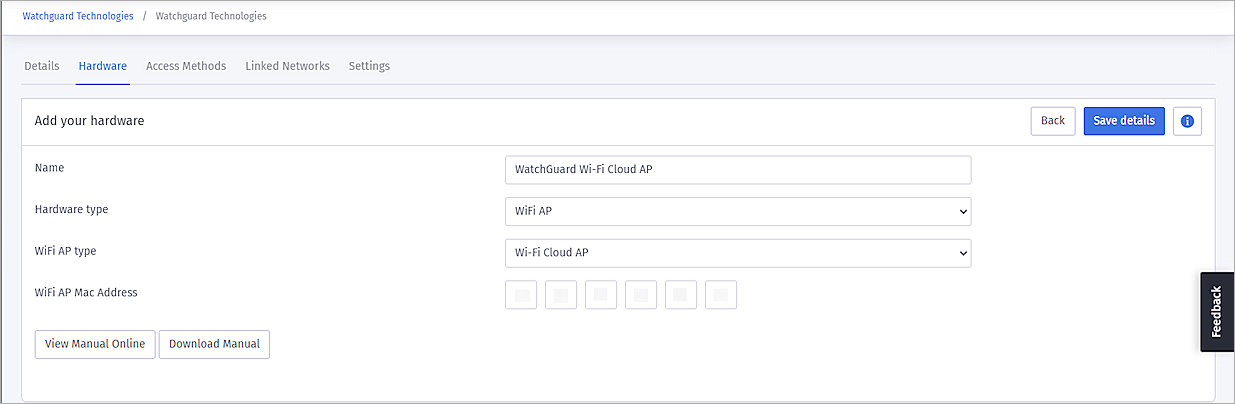
- Click Save details.
WatchGuard Wi-Fi Cloud Basic Configuration
These sections describe how to configure Wi-Fi Cloud to integrate with Purple Wi-Fi.
For detailed information on WatchGuard Wi-Fi Cloud AP deployment, go to the Getting Started Guide.
Configure WatchGuard Wi-Fi Cloud to Integrate with Purple Wi-Fi
The information required in these steps is detailed in the manual that you downloaded from Purple Wi-Fi in the previous step. For more information, go to Purple Wi-Fi Configuration.
Add RADIUS Servers
To add RADIUS servers to Wi-Fi Cloud:
- Log in to WatchGuard Wi-Fi Cloud.
- Open Discover.
- Select the location where to apply the settings.
- Select Configure > Network Profiles > RADIUS.
- Click Add RADIUS Server.
- Type the RADIUS Server Name, IP Address/FQDN, Authentication Port, Accounting Port, and Shared Secret of the Purple RADIUS server.
The Purple Wi-Fi RADIUS settings and other integration information are provided in the manual for the WatchGuard Cloud configuration available in the Purple Wi-Fi Configuration.
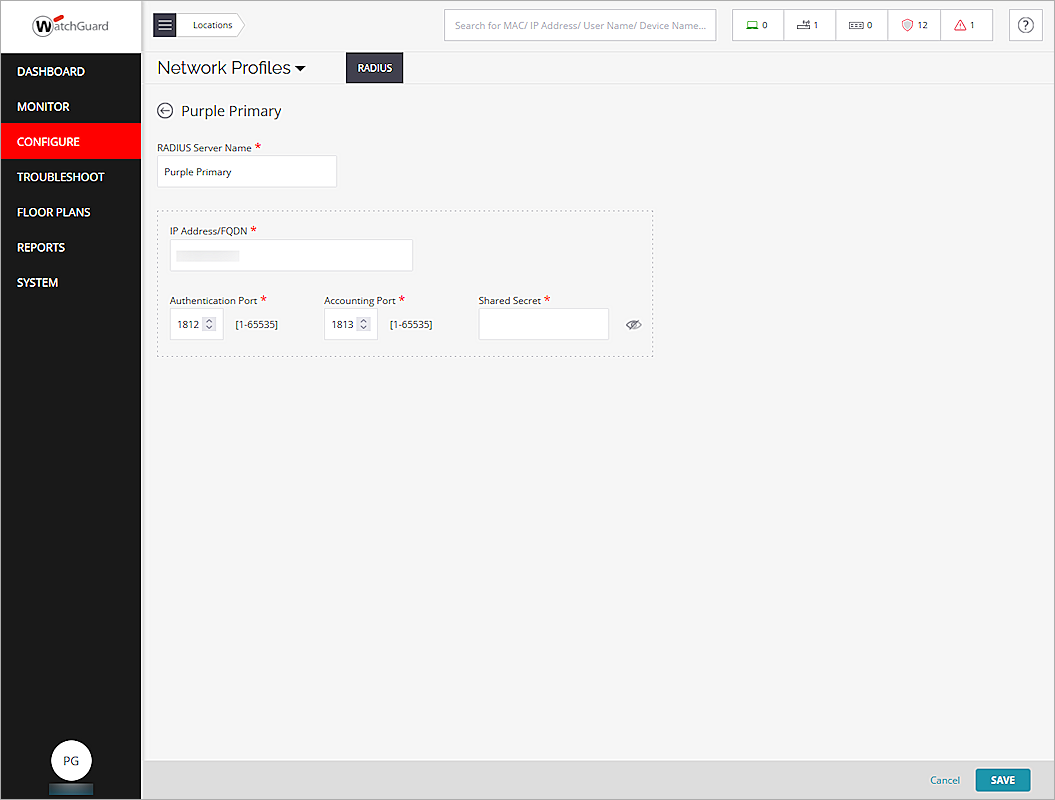
- Click Save.
- Repeat these steps for the second Purple Wi-Fi RADIUS server.
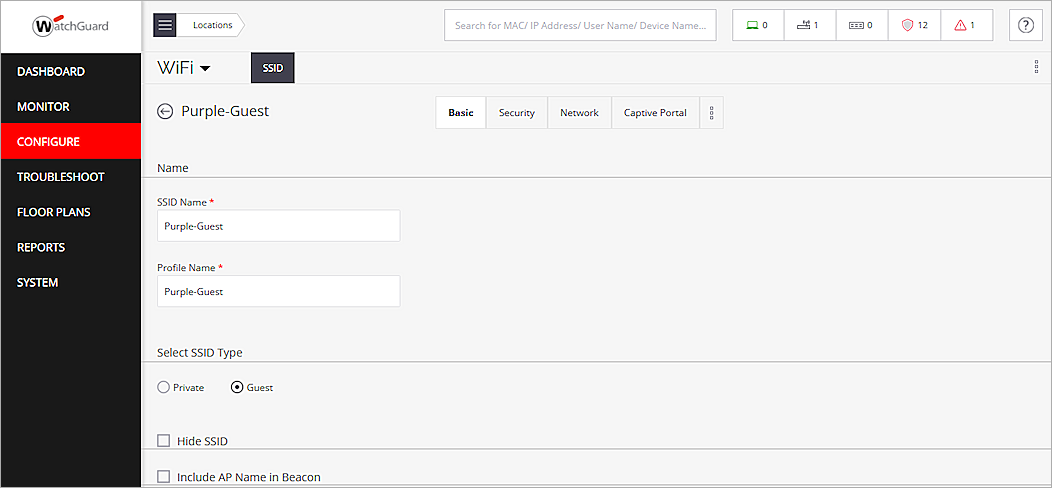
Add an SSID
To add an SSID in Wi-Fi Cloud:
- Open Discover.
- Select the location where to apply the settings.
- Select Configure > WiFi, then select the SSID tab.
- Click Add SSID.
- Type an SSID Name and Profile Name.
- In the Select SSID Type section, select Guest.
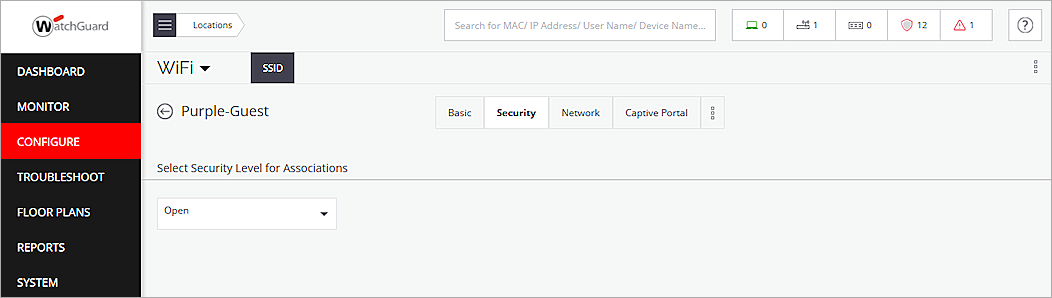
- Select the Security tab.
- From the Select Security Level for Associations drop-down list, select Open.
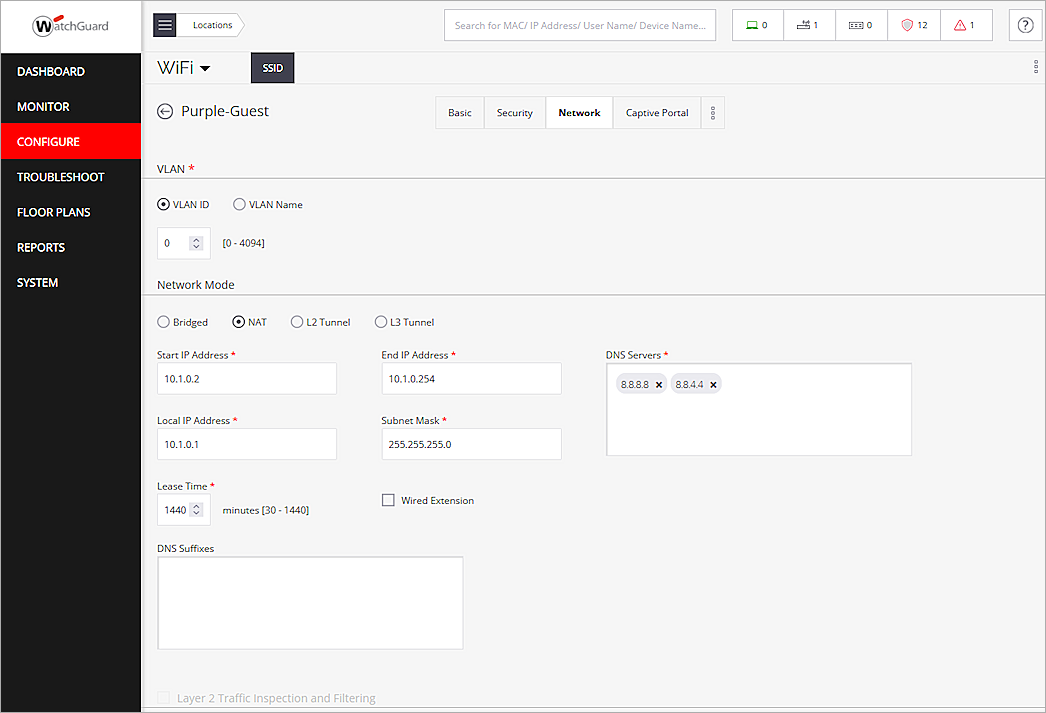
- Select the Network tab.
- Select NAT, then configure the IP address range and DNS server details:
- Start IP Address
- End IP Address
- Local IP Address
- Subnet Mask
- Lease Time
- DNS Servers
- Select the Captive Portal tab.
- Enable Captive Portal.
- From the Cloud Hosted drop-down list, select Third-Party Hosted.
- Select With RADIUS Authentication.
- In the Splash Page URL text box, type or paste the URL provided by Purple Wi-Fi.
For example: https://region1.purpleportal.net/access/ - In the Shared Secret text box, type or paste the shared key for Purple Wi-Fi. Verify the shared secret with the current Purple Wi-Fi manual for the WatchGuard Wi-Fi Cloud AP.
- Clear the HTTPS Redirection check box.
- In the Websites that users can access before login section (Walled Garden), add the basic configuration domains provided by Purple Wi-Fi.
To support social network logins, make sure you add these domains for each network you plan to support.- Basic Configuration
- region1.purpleportal.net
- venuewifi.com
- openweathermap.org
- cloudfront.net
- stripe.com
- Facebook
- facebook.com
- fbcdn.net
- akamaihd.net
- connect.facebook.net
- Twitter
- twitter.com
- twimg.com
- LinkedIn
- linkedin.com
- licdn.net
- licdn.com
- Instagram
- instagram.com
- Basic Configuration
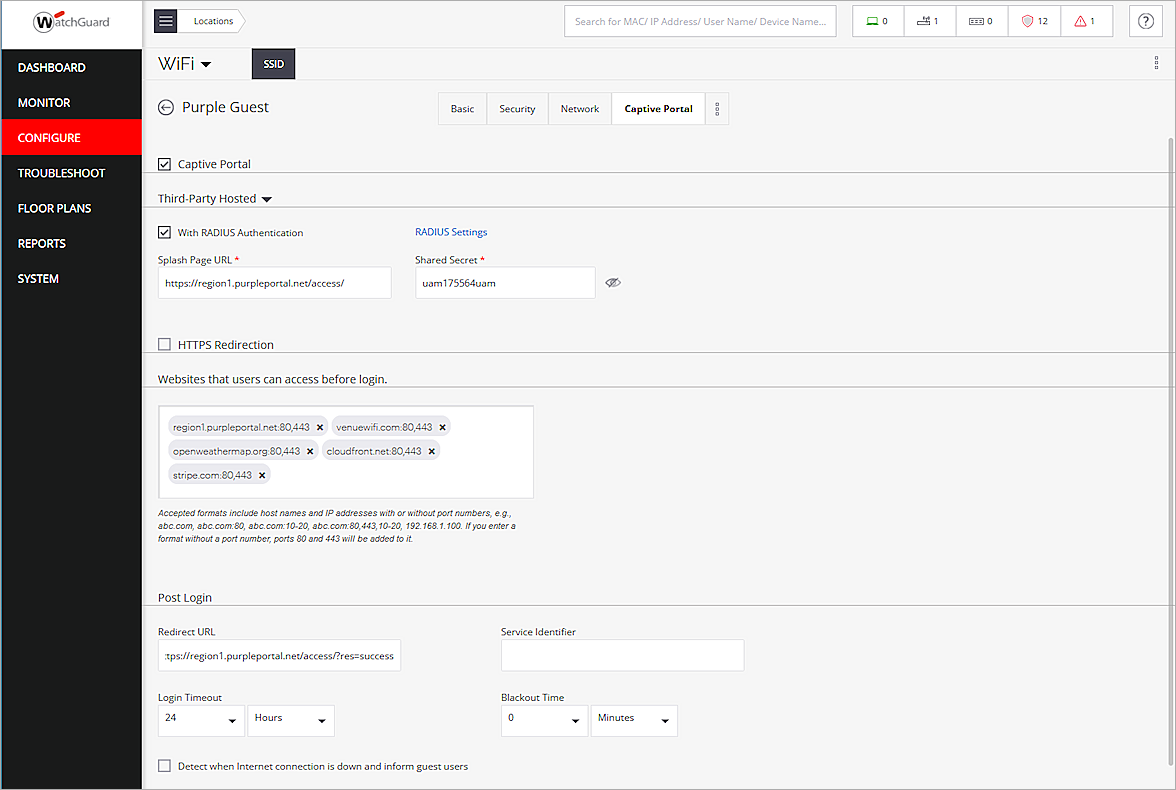
- In the Redirect URL text box, type the URL provided by Purple Wi-Fi.
For example: https://region1.purpleportal.net/access/?res=success - Click the RADIUS Settings link.
- From the Primary and Additional Authentication Server and Accounting Server drop-down list, select the RADIUS server configuration you created for Purple Wi-Fi.
- Set the Accounting Interval to 2 minutes.
- Set the Called Station ID to %m.
- Leave other settings at the default values.
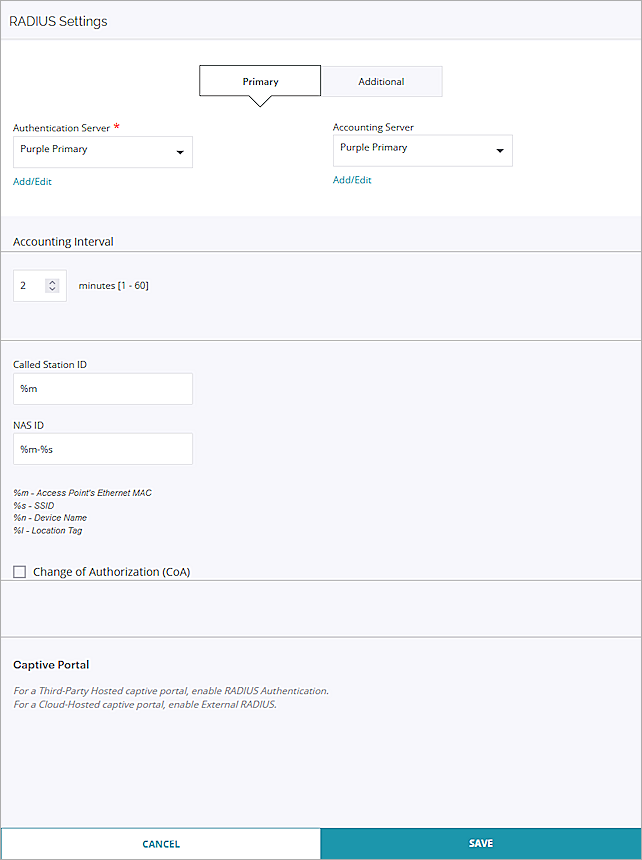
- Click Save to save the RADIUS settings
- Click Save to save the SSID.
The SSID will be applied to APs in the selected location. Make sure you configure radio and device settings for your APs if you have not already configured these settings. For more information, go to Configure Radio Settings.
Test Purple Wi-Fi Integration
To test the Purple Wi-Fi integration with Wi-Fi Cloud:
- From your wireless client device, to connect to the SSID you created in Wi-Fi Cloud.
- Your browser redirects to the Purple Wi-Fi splash page.
- Log in with your existing Purple Wi-Fi account or you can register for a new account.
- After successful authentication, you can connect to the Internet through the captive portal.
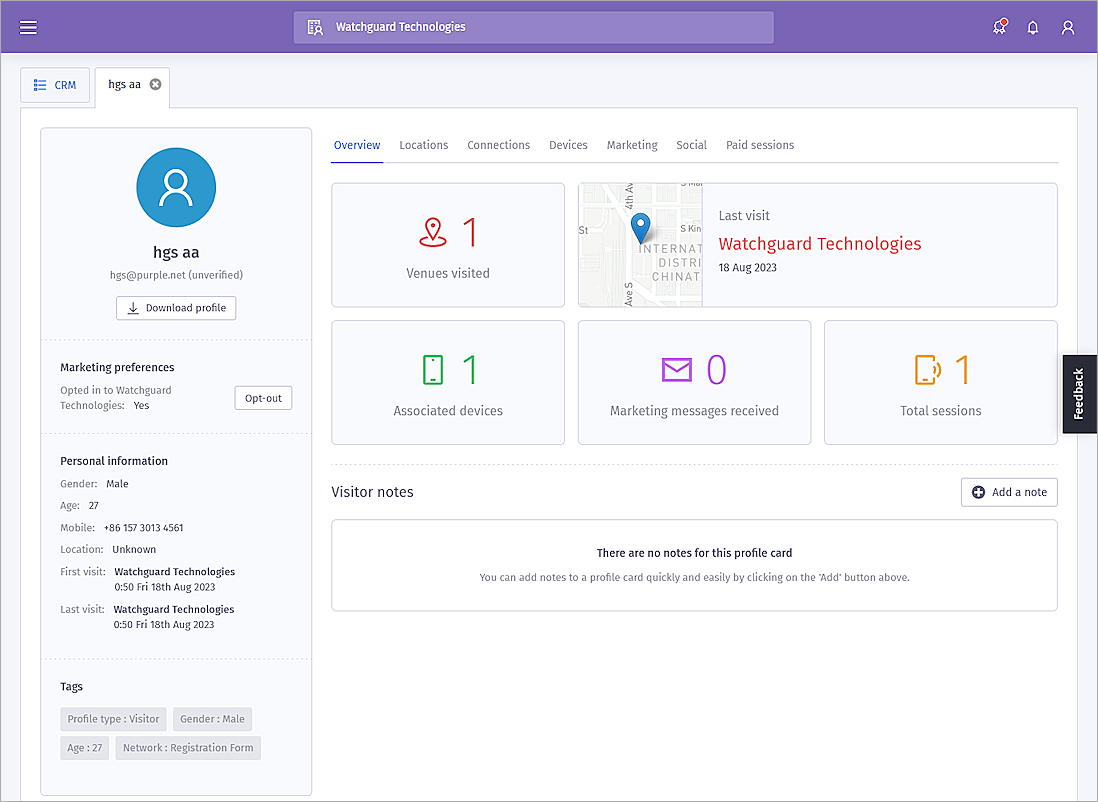
For the wireless client details, go to Marketing > CRM and filter the CRM records.