Made for companies that sell, service, and support technology, users rely on ConnectWise® to achieve greater accountability, operational efficiency, and profitability. Leveraging the cloud, the ConnectWise platform fully integrates business-process automation, help desk and customer service, sales, marketing, project management, and business analytics that dramatically streamline a company's operations. ConnectWise also gives users access to a powerful network of ideas, experts, and solutions.
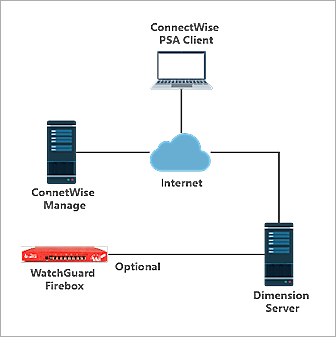
This document describes the steps to integrate ConnectWise and WatchGuard Dimension™ with your WatchGuard Firebox.
Platform and Software
The hardware and software used to complete the steps outlined in this document include:
- Firebox that runs Fireware v12.8.1 or higher
- ConnectWise online server
- ConnectWise PSA Client v2022.1
- WatchGuard Dimension v2.2.1
Test Topology
Before You Begin
Before you begin these procedures, make sure that:
- Your instance of WatchGuard Dimension and your Firebox can communicate with each other.
- Dimension has a connection to ConnectWise Manage.
- The ConnectWise PSA Client is installed on your client computer.
Set Up ConnectWise
Log in to ConnectWise
To log in to ConnectWise:
- Start the ConnectWise PSA Client.
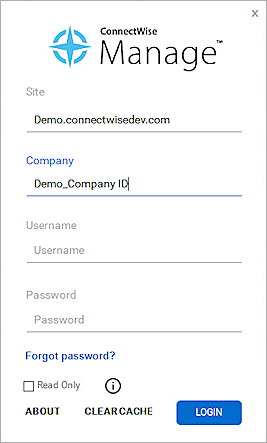
- In the Site text box, type the URL of your ConnectWise server.
- In the Company, Username, and Password text boxes, type your Company ID and ConnectWise account credentials.
- Click Login.
Add Company Contacts
To add company contacts:
- From the navigation menu, select Companies > Companies.
- In the Company Search page, click
 .
.
The New Company page opens.
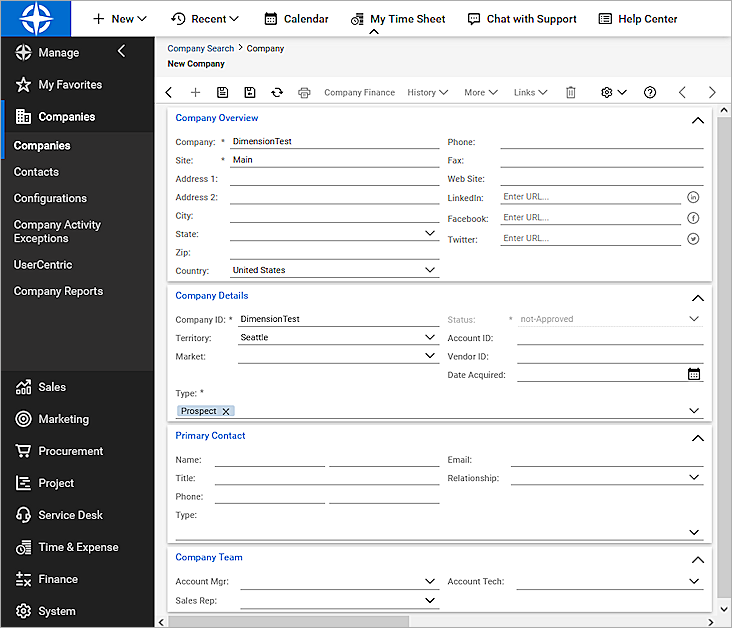
- In the Company text box, type the name of the company. In our example, we type DimensionTest.
- In the Company ID text box, type the company ID. You can type a different company ID from the company name. In our example, we keep the company ID the same as the company name.
- Click
 .
.
Activate New Company Contacts
To activate new company contacts:
- From the navigation menu, select System > Mass Maintenance.
The Mass Maintenance Screens page opens to show the Screen Maintenance List.
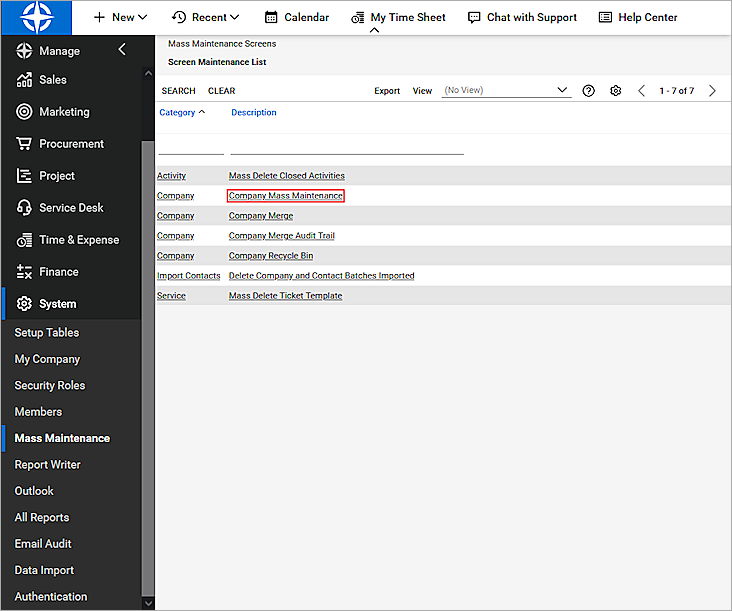
- Click Company Mass Maintenance.
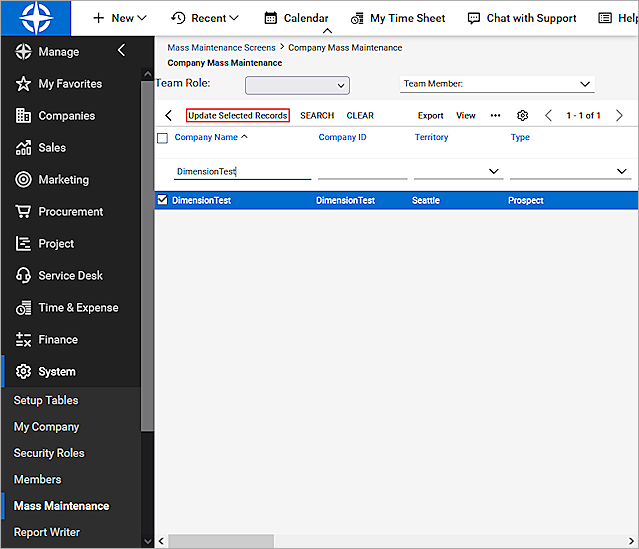
- To find the record for your company, in the Company Name text box, type the name of the company. In our example, we type DimensionTest.
- Click Search.
- In the search results, select the check box next to the company name.
- Click Update Selected Records.
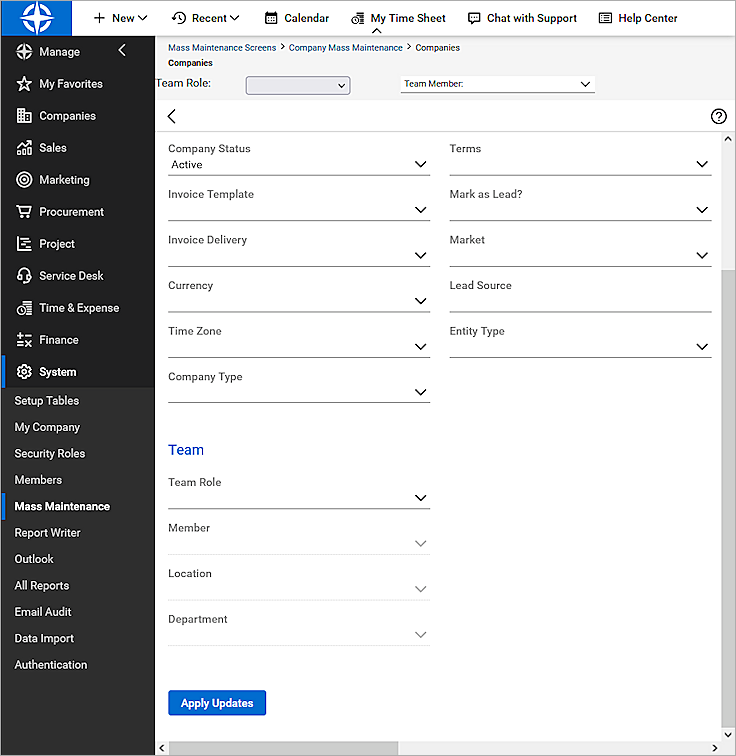
- From the Company Status drop-down list, select Active.
- Click Apply Updates.
- In the dialog box, select Yes.
- Click Close Window.
Get ConnectWise API Keys
To get your API keys from your current ConnectWise account, see the Get ConnectWise API Keys section of About ConnectWise Integration and Configuration.
Log in to ConnectWise from a web browser. Make a note of the public and private keys. You must have these keys to configure your Firebox to connect to ConnectWise. After you save the key pair, you cannot see the private key again.
Add a Firebox to Dimension
To add a Firebox to Dimension:
- Log in to Dimension Web UI.
The Devices page opens to show the List tab.

- Click Add.
The Add Managed Device wizard opens. - Click Next.
The Select Provisioning Method dialog box opens.
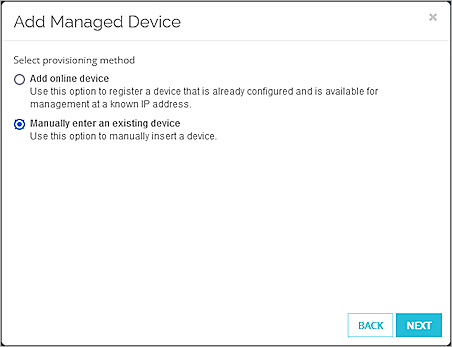
- Select Manually enter an existing device.
- Click Next.
The Input the information for the single device or FireCluster to add to Dimension dialog box opens.
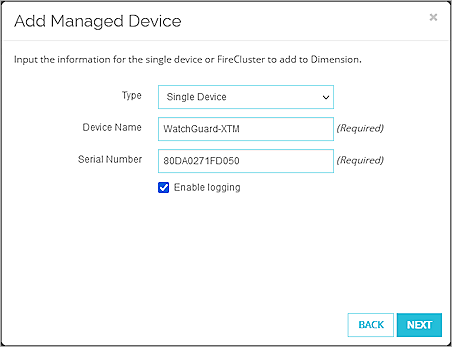
- From the Type drop-down list, select Single Device.
- In the Device Name text box, type the friendly name for the Firebox.
- In the Serial Number text box, type the serial number for this Firebox.
- Click Next.
The Firebox is added to Dimension as a managed device and the Download dialog box opens.
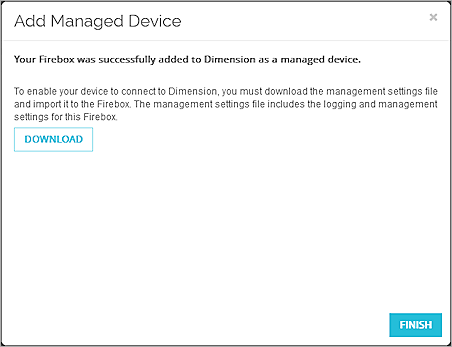
- To download the WGD file for the Firebox, click Download and select a location to save the file. You must import the WGD file to the Firebox to complete the process to manage it with Dimension. For more information, see the Fireware Help.
- Click Finish.
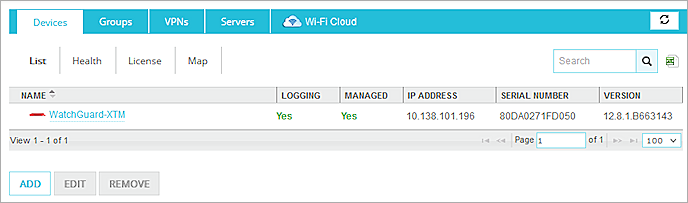
The Firebox appears in the Devices List but is not yet connected to Dimension for logging or management. - Connect to Fireware Web UI for the Firebox.
- Select System > Managed Device.
The Managed Device page opens.
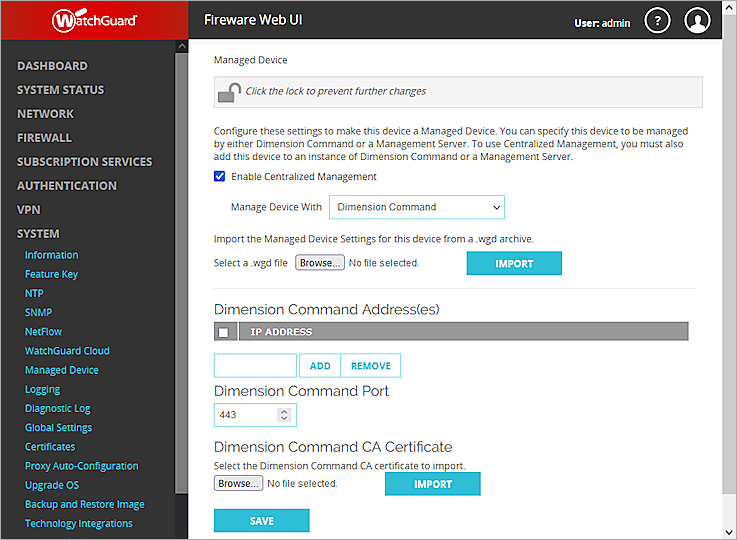
- Select the Enable Centralized Management check box.
- From the Manage Device With drop-down list, select Dimension Command.
- Click Browse and select the WGD file you downloaded for this Firebox from Dimension.
- Click Import.
The management settings from the WGD file are imported to the Firebox, and the Logging and Managed status on the Device List page change to Yes.
Set Up Dimension
Configure the ConnectWise Settings in Dimension
To configure the ConnectWise settings in Dimension:
- Log in to Dimension with a user account that has administrator credentials.
- Select
 > Server Management.
The Server Management page opens.
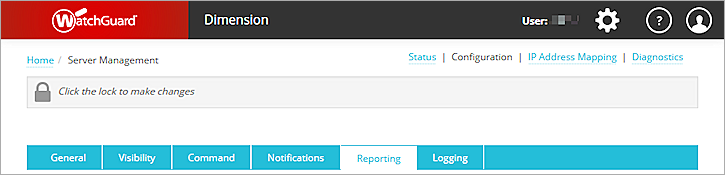
- Select Configuration.
- Select the Reporting tab.
- To unlock the configuration so you can make changes, click
 .
. - Select the Enable ConnectWise Integration check box.
- In the ConnectWise Server (Site) text box, type the address of your ConnectWise server. This is the ConnectWise Site information you specified in the Log in to ConnectWise section.
- In the Company ID text box, type the ConnectWise ID for your company. This is the Company ID you specified in the Log in to ConnectWise section.
- In the Public API Key text box, type or paste the Public API key from ConnectWise.
- In the Private API Key text box, type or paste the Private API Key from ConnectWise.
- To add the Managed ID, click Add.
The New Company dialog box opens.
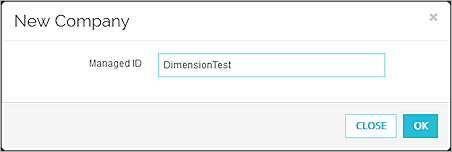
- In the Managed ID text box, type or paste the Company ID. This is the Company ID you specified in the Add Company Contact section.
- Click OK.
This Managed ID for the company appears in the Company Names list.

- To import a CA certificate for your ConnectWise server, click Import Certificate.
Note: For the ConnectWise Manage cloud service, you cannot export a certificate because the service uses a public certificate available from the Amazon Web Services (AWS) repository signed by the Starfield Services Root CA. You must import this CA certificate to enable the ConnectWise configuration in the Report Server to validate the certificate chain for the SSL handshake. - Click Browse and select the CA certificate for your ConnectWise server.
- Click OK.
- Click Save.
Create a Report Schedule in Dimension
To create a report schedule to send reports to your ConnectWise server:
- Select > Manage Tasks.
The Manage Tasks page opens.
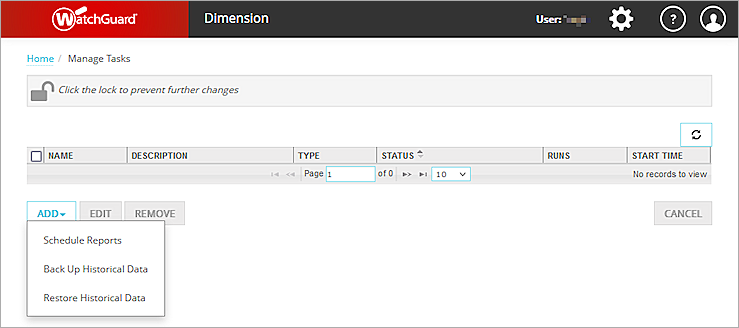
- To unlock the configuration so you can make changes, click .
- From the Add drop-down list, select Schedule Reports.
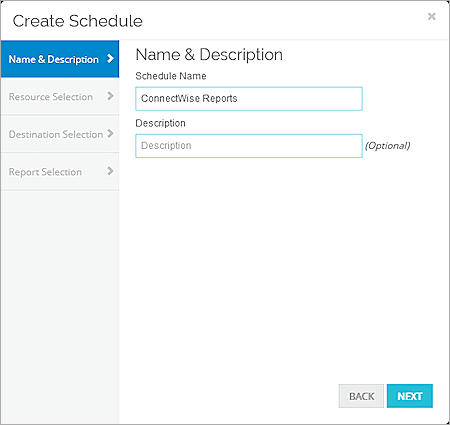
- In the Schedule Name text box, type a descriptive name for this report schedule.
- In the Description text box, type a description to help you identify this schedule.
- Click Next.
The Resource Selection dialog box opens.
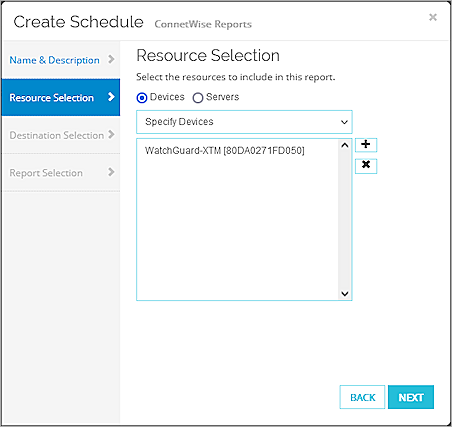
- Select Devices.
- To add the devices to include in the schedule, click and select one or more devices. For this example, select the device you specified in the Add a Firebox to Dimension section. You can also add device groups, or FireClusters to a report schedule.
- Click Next.
- Select the Send reports to ConnectWise check box.
- From the drop-down list, select the Company ID. This is the Company ID you specified in the Add Company Contact section.
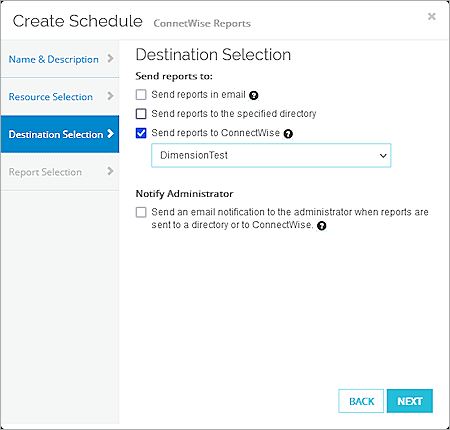
- Click Next.
The Report Selection dialog box opens.
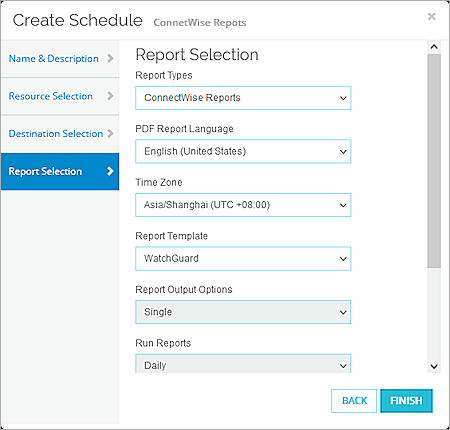
- From the Report types drop-down list, select ConnectWise Reports.
- From the PDF Report Language drop-down list, select the language for the reports.
- From the Time Zone drop-down list, select the time zone for the reports.
- From the Report Template drop-down list, select the template to use for the reports.
- Select the Start Time for the reports to generate.
- Click Finish.
Test the Integration
When you send reports to ConnectWise, you can choose to include any of these WatchGuard reports:
- Device Statistics
- Intrusion Prevention Service Summary
- Most Popular Domains
- WebBlocker (Summary, by Category and by Client)
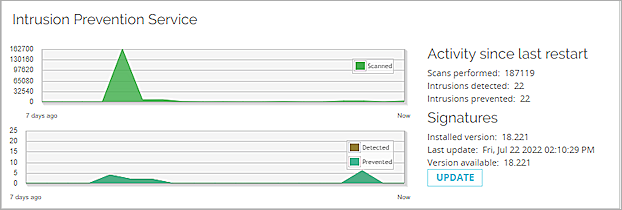
In this example, we review only the Intrusion Prevention Service Summary report sent to ConnectWise.
- Configure your Firebox to send log messages for Intrusion Prevention Service traffic, then send traffic through the Firebox to generate log messages for the Intrusion Prevention Service. For more information about how to configure your Firebox to send log messages for this traffic, see Configure Intrusion Prevention.
- After the Firebox generates your report and sends it to ConnectWise, log in to ConnectWise Manage.
- From the navigation menu, select Companies > Companies.
- In the Company Name text box, type the name of the company. In our example, we type DimensionTest.
- Click Search.
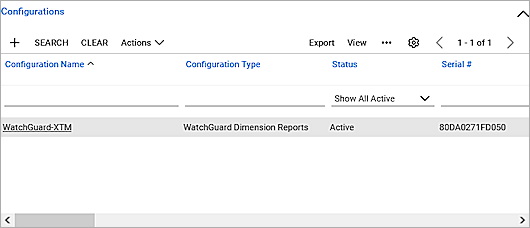
- In the upper right Corner, locate the Configurations section.
- In the Configuration Name column, click the name of your Firebox. In our example, we click WatchGuard-XTM.
The Configuration WatchGuard-XTM page opens.
- In the Configuration Questions section, the information sent from Dimension in the Intrusion Prevention Summary report appears.
