
Related Topics
TDR Host Sensor Manual Installation
You can manually install a Host Sensor for Windows, Mac, or Red Hat Linux. After the initial installation, Host Sensors for Windows and Mac update automatically when an update is available. The Host Sensor for Linux does not update automatically. You must manually update it.
If your network has an Active Directory server, you can use AD Helper to automate installation of Host Sensors on your Windows hosts. For more information, see TDR Host Sensor Automated Installation
For information about TDR Host Sensor OS compatibility, see the Threat Detection & Response Release Notes on the Fireware Release Notes page.
Some TDR features described in this version of Fireware Help are available only to participants in the WatchGuard Beta program. If a feature described in this section is not available in your TDR account, it is a beta-only feature. For information about how to enable beta features, see Enable TDR Beta Features.
Download the Host Sensor Installer
You can manually download the Host Sensor installation file from the Hosts page or from the Host Sensors page in the TDR web UI. When you download the host sensor installer, you must also copy the Account ID and Controller ID address required to install the Host Sensor.
On the Host Sensor page you can also set the Age Off For Quarantined Files. This setting controls how long quarantined files remain on a host. For more information, see Configure the Age Off For Quarantined Files.
Download the Host Sensor installer to the host where you want to install the Host Sensor:
- Log In to the TDR Web UI as a user with Operator credentials.
- Select Configuration > Host Sensor.
Download instructions and links appear for each Host Sensor.
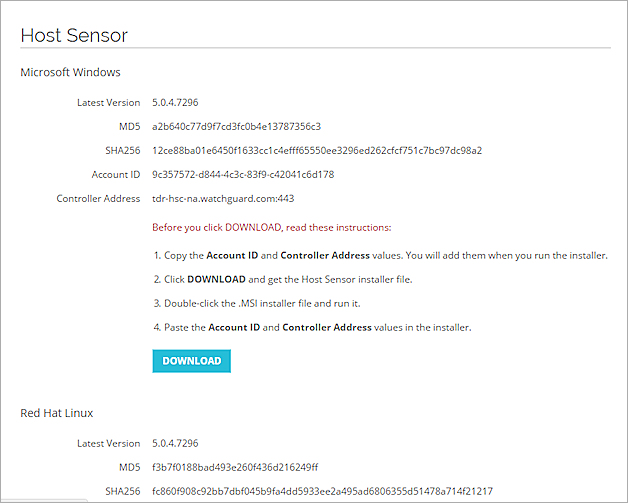
- In the section for the operating system that the host runs, click Download.
The Host Sensor installer downloads. - Click Download.
The Host Sensor installer file is downloaded. - Copy the Account ID and Controller Address from this page.
You must provide this information when you run the installer.
- On the host where you want to install the Host Sensor, log in to the TDR web UI as a user with Operator credentials.
- Select Devices > Hosts.
- Click Download Host Sensor.
The Host Sensor Download dialog box appears.

- From the Operating System drop-down list, select the host operating system:
- Microsoft Windows
- Red Hat Linux
- Mac
- Click Download.
The Host Sensor installer file is downloaded. - Copy the Account ID and Controller Address from this page.
You must provide this information when you run the installer.
Manually Install the Host Sensor
After you download the Host Sensor installer to the host, run the installer.
- Double-click the downloaded MSI installer file.
The Threat Detection and Response Setup dialog box appears.
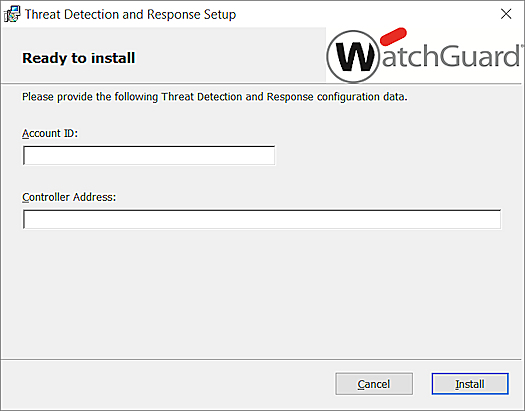
- Copy and paste the Account ID from the TDR Host Sensor page to the Account ID text box in the installer.
- Copy and paste the Controller Address from the TDR Host Sensor page to the Controller Address text box in the installer.
- Click Install.
- Click Finish.
- Log in to the Mac as a user with superuser access.
- Double-click the downloaded .pkg installer file.
The Install Threat Detection and Response Host Sensor Daemon opens. - Click Continue.
The installer shows the amount of disk space required to install the Host Sensor. - Click Install.
- Type your Mac user ID and password to allow installation of the software.
- Click Install Software.
The TDR Host Sensor Setup dialog box appears.
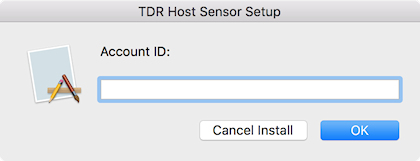
- Copy and paste the Account ID from the TDR Host Sensor page to the Account ID text box in the installer. Click OK.
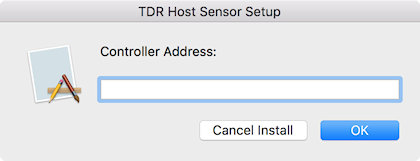
- Copy and paste the Controller Address from the TDR Host Sensor page to the Controller Address text box in the installer. Click OK.
A progress bar appears while the installation is in progress. - After the installation is finished, click Close.
- Select Keep to keep the installer file or Move to Trash to delete it.
To install a new Host Sensor for Red Hat Linux:
- Log in to the Red Hat Linux system as a user with root or root equivalent credentials.
- Copy and paste the commands from the page where you downloaded the Host Sensor. The commands include the controller address and account UUID for your account. In the install command, replace [SENSOR_RPM_PATH] with the name and path of the .RPM file you downloaded.
To update an existing Host Sensor for Red Hat Linux to a new version:
- Log in to the Red Hat Linux system as a user with root or root equivalent credentials.
- Type this command:
yum update [SENSOR_RPM_PATH]
Replace [SENSOR_RPM_PATH] with the name and path of the .RPM file you downloaded.
Verify Host Sensor Status
The first time the Host Sensor sends a heartbeat to your Threat Detection and Response account, the host is added to your TDR account and appears in the Hosts list in the TDR web UI.
To verify the Host Sensor status:
- Select Devices > Hosts.
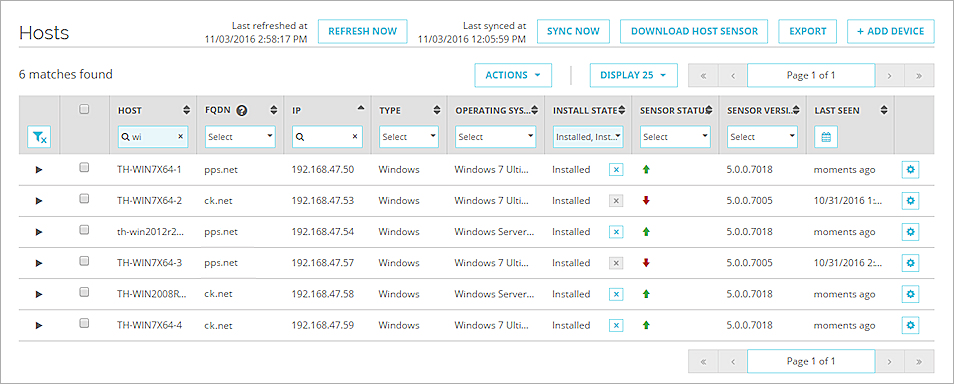
- To verify that the Host Sensor is installed and operational, find the host in the list and review the Sensor Status column.
The icon in the Sensor Status column indicates the status of the Host Sensor on each host.
-
 — Host Sensor is installed and operational
 -
 — Host Sensor is installed but has a problem
 -
 — Host Sensor is not communicating
 -
 — Host Sensor has shut down correctly
For more information about the Hosts page, see Manage TDR Hosts and Host Sensors.