
Related Topics
Manage TDR Hosts and Host Sensors
In the Threat Detection and Response web UI, the Hosts page includes a list of all hosts for your account, and the Host Sensor status for each host. A user with Operator or Analyst credentials can see the Hosts list. Only a user with Operator credentials can remove or install a Host Sensor on a host.
Hosts are added to your Threat Detection and Response account through AD Helper or through manual host sensor installation.
AD Helper
You can use AD Helper to automatically get the a list of Windows hosts in an Active Directory domain on your network, and automatically install or remove Windows Host Sensors. For more information about how to set up AD Helper, see Install and Configure AD Helper.
Manual Host Sensor Installation
You can download a Host Sensor and manually install it on a host. The first time the Host Sensor sends a heartbeat to your Threat Detection and Response account, the host is added to the list of hosts for your TDR account, which you can see in the Hosts list in the TDR web UI.
For more information, see TDR Host Sensor Manual Installation.
You can also uninstall Host Sensors from the TDR Hosts page. For more information, see Uninstall TDR Host Sensors.
Manage Host Sensors
From the Hosts page in the TDR web UI, a user with Operator credentials can complete these actions:
- Download Host Sensor installers
- Install or uninstall Windows and Mac Host Sensors
- Change the Host Group for a Host Sensor
- Edit or remove a host
- Export the hosts list to a file
To see the Hosts page:
- Log In to the TDR Web UI as a user with Operator or Analyst credentials.
- Select Devices > Hosts.
The Hosts page appears.
Host Management Actions
You can complete these actions for hosts:
- Change Host Group — Change the Host Group the host is a member of
- Install Sensor — Use AD Helper to install a Host Sensor on a Windows host
- Remove Sensor — Uninstall a Host Sensor from a host
- Acknowledge Manually Removed — Acknowledge that a Host Sensor has been manually uninstalled from a host
Change the Host Group
A host can be a member of only one Host Group.
To change the Host Group for one or more Hosts:
- Select Devices > Hosts.
- Select the check box adjacent to one or more hosts in the list.
- From the Actions drop-down list, select Change Host Group.
The Change Host Group dialog box appears.
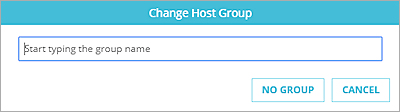
- Start to type the name of the group. This can be an existing group or a new group.
As you type. the names of existing groups and the option to add a new group appear below the text box. - Select the group, or select the option to add the new group with the name you typed.
The selected hosts are added to the group you selected. If you selected the option to add a new group, the Host Group is added.
To remove one or more Host Sensors from a Host Group.
- Select the check box adjacent to one or more hosts in the list.
- From the Actions drop-down list, select Change Host Group.
The Change Host Group dialog box appears. - Select No Group.
Each selected host is removed from the Host Group it was previously a member of.
Install or Remove a Host Sensor
To install or remove a Host Sensor from one or more hosts:
- Select the check box adjacent to one or more hosts in the list.
- Click Actions.
The drop-down list shows the number of selected hosts each available action applies to - To install a Host Sensor, select Install Sensor. To remove a Host Sensor, select Remove Sensor.
The Confirm Action dialog box appears with the list of hosts the action applies to.
- Click Execute Action.
To install or remove a Host Sensor from a single host:
- To remove a host sensor from a host, in the Install State column, click
 .
. - To install a host sensor on a host, in the Install State column, click
 .
. - To manually install a host sensor on a host that is not in the Hosts list, click Download Host Sensor.
For more information, see TDR Host Sensor Manual Installation.
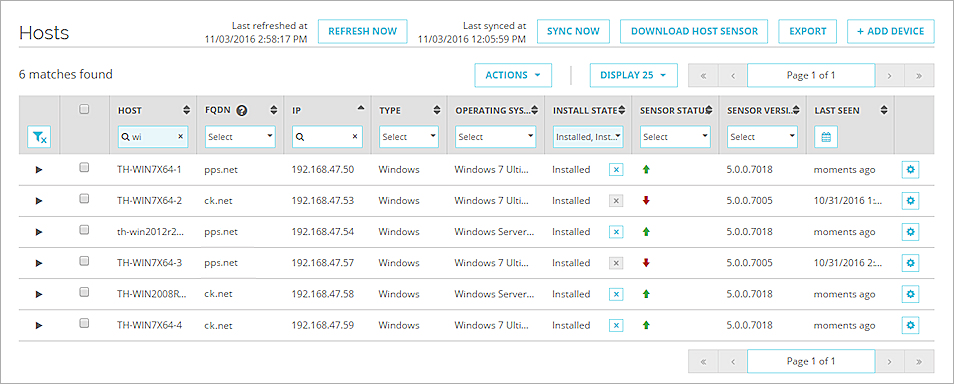
Host and Host Sensor Status
For each host, the Hosts page includes this information:
- Host — The name of the host
- FQDN — The fully qualified domain name for the domain where the host is installed
- IP — The IPv4 address most recently reported by the host
- Type — The type of host (Windows, Linux, or Mac)
- Operating System — The operating system installed on the host
- Install State — The install state of the Host Sensor on the host
- Sensor Status — The Host Sensor Status, described in the next section
- Sensor Version — The version of the installed Host Sensor
- Last Seen — The last time a heartbeat was received from an installed Host Sensor. An installed Host Sensor sends a heartbeat to your TDR account every 30 seconds.
- Host Group — The Host Group a host is a member of
Click Choose Columns to select which columns are visible.
You can filter and sort the Hosts list on any of the columns. To clear column filters, click ![]() .
.
The date and time the Host list was last synchronized appears at the top of the page. To synchronize the Host list with AD Helper, click Sync Now.
Install Status
The Install Status column indicates the installation status of the Host Sensor. It can also indicate that the Host Sensor license is expired.
- Installed — Host Sensor is installed
- Installing — Host Sensor installation is in progress
- Pending Install — The Install Sensor action was requested, but the install has not started
- Uninstalling — Host Sensor uninstall is in progress
- Uninstallation Error — The Remove Sensor action was selected, but the Host Sensor uninstall failed
- Pending Uninstall — The Remove Sensor action was selected, but the uninstall has not started
- Not Installed — The Host Sensor is not installed
- Expired — The Host Sensor license is expired
For more information about Host Sensor licensing and expiration, see TDR Licensing.
Host Sensor Status
The icon in the Sensor Status column indicates the status of the host sensor on each host.
-
 — Host Sensor is installed and operational
 -
 — Host Sensor is installed but has a problem
 -
 — Host Sensor is not communicating
 -
 — Host Sensor has shut down correctly
Host and Sensor Status History
You can expand a host to see a history of the IP addresses and Host Sensor status for a host. From the Sensor history you can also update the sensor status to indicate that a sensor has been manually removed.
To see the host history:
- Log In to the TDR Web UI as a user with Operator credentials.
- In the Hosts list, find the host.
- Adjacent to the host name, click
 .
.
The list of recent IP addresses assigned to this host appears.
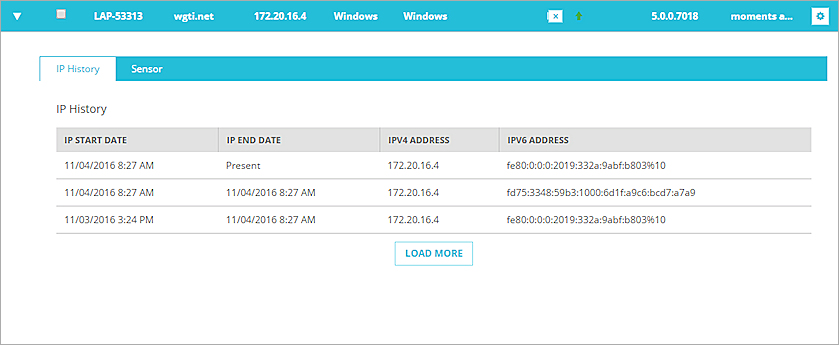
- To see older IP addresses assigned to this host, click Load More.
If there is more history for this host, additional IP addresses appear in the table. - To see the history of the Host Sensor status, select the Sensor tab.
The history of recent changes to the Host Sensor status appears.

- To see older entries in the Sensor History list, click Load More.
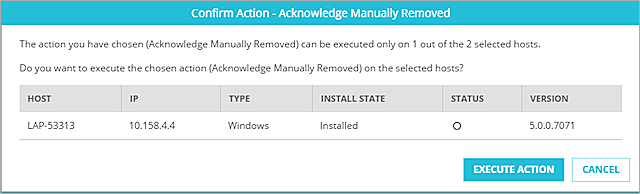
Acknowledge Manual Host Sensor Uninstall
If you manually uninstall a Host Sensor, you can reset the Host Sensor status for that host so that the host does not continue to use a Host Sensor license.
To acknowledge that you manually uninstalled the Host Sensor:
- Adjacent to the host name, click .
The Host Sensor history appears. - Select the Sensor tab.
- Click Acknowledge .
- Click Refresh.
The Host page is refreshed. If the host was added by AD Helper, the Install Status changes to Uninstalled. If the host was not added to the Hosts list by AD Helper, it is removed from the Hosts list.
For information about how to manually uninstall a Host Sensor, see Uninstall TDR Host Sensors.
Edit or Remove a Host
From the Hosts page, you can edit a host. For any host, you can specify that the host is a DNS server or a proxy server on your network. Threat Detection and Response does not take actions based on network events detected for hosts that you identify as a proxy server or DNS server because these hosts might not be the actual origin of the potentially malicious activity. You can also remove a host that was manually installed.
- Adjacent to the host, click
 .
. - Select Edit Device.
The Edit Device dialog box appears.

- If this host is a DNS server on your network, select the DNS check box.
- If this host is a proxy server on your network, select the Proxy check box.
- If the host was not added by AD Helper, you can edit the Device Details, which include the host Name and Domain, and information about the installed operating system.
- Click Save & Close.
- Adjacent to the host, click .
- Select Remove Device.
A confirmation dialog box appears. - Click Yes, Delete.
Export the Hosts List
You can export the hosts list from your TDR account to a text file. In the text file, the column headings and values for each host are enclosed in quotation marks. You can open this file in a text editor or import it into a spreadsheet program, such as Microsoft Excel.
To export the hosts list, at the top of the Hosts page, click Export.