
Related Topics
Configure Server Settings for the Report Server
The Report Server gets data from one or more Log Servers and uses it to create reports about the activity on your network. The Report Server can also store the XML report files you create. From WatchGuard Server Center, on the Server Settings tab, you can specify the Log Servers that your Report Server can connect to,
- In the Servers tree, select Report Server.
- Select the Server Settings tab.
The Server Settings page appears.
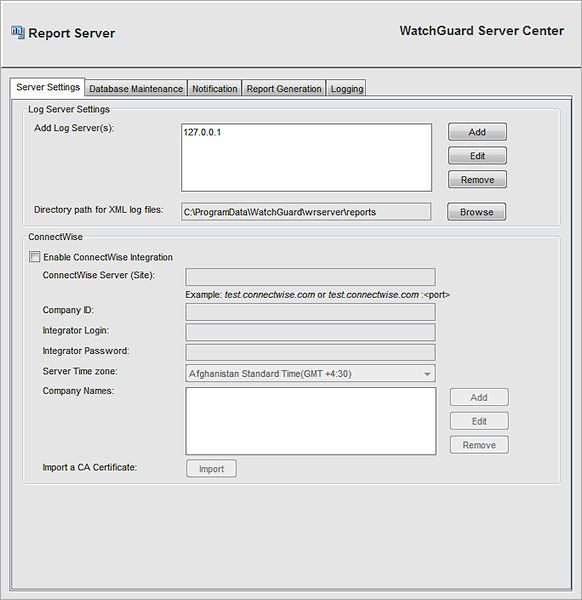
- In the Log Server Settings section, edit the Add Log Server(s) list.
- To add a Log Server to the list, click Add.
- To change information for a Log Server, select a server from the list and click Edit.
- To delete a server from the list, select the server and click Remove.
For more information about how to add or edit Log Servers, see Configure Log Servers for the Report Server.
- To select the Directory Path for XML log files, click Browse.
- To send WatchGuard reports to ConnectWise, select the Enable ConnectWise Integration check box and add the information for your ConnectWise account.
For more information, see the next section. - Click Apply to save your changes.
Configure Your Report Server for ConnectWise Integration
If you have an account with ConnectWise, you can send your relevant WatchGuard reports to ConnectWise to be included in your ConnectWise reports. You can generate daily or weekly reports to send to ConnectWise on a regular schedule. When you send reports to ConnectWise, these WatchGuard reports are converted to the related ConnectWise reports:
| WatchGuard Report | ConnectWise Report |
|---|---|
| Firebox Statistics | Bandwidth |
| Intrusion Prevention Service Summary | Intrusion |
| WebBlocker Summary | Filtered Sites |
| Most Popular Domains | Top Sites |
To send your WatchGuard reports to ConnectWise, you must complete these steps:
- Configure settings for the ConnectWise applications.
- Configure ConnectWise to accept your WatchGuard reports.
For more information about how to configure ConnectWise, see the documentation provided by ConnectWise. - Configure your WatchGuard Report Server to send reports to ConnectWise:
- Enable ConnectWise integration.
- Create a daily report schedule.
To enable ConnectWise integration to send your WatchGuard reports to ConnectWise:
- Select the Enable ConnectWise Integration check box.
The ConnectWise settings are enabled. - In the ConnectWise Server (Site) text box, type the address of your ConnectWise server.
Make sure to type the ConnectWise server address in one of these formats: test.connectwise.com or test.connectwise.com:<port>. - In the Company ID text box, type the ConnectWise identification for your company.
- In the Integrator Login and Integrator Password text boxes, type the user name and password for your ConnectWise Company ID.
- From the Server Time Zone drop-down list, select the time zone where your ConnectWise server is located.
- In the Company Names list, add, edit, or remove the Managed ID and Management Solution information for your company. You can add one or more company names to the list.
- Click Import, to import the CA certificate for your ConnectWise server.
Next, you must configure a report schedule that includes ConnectWise reports. For more information about how to create a schedule, see Configure Report Generation Settings.
For a detailed example of how to complete ConnectWise integration, see the topic Configure ConnectWise Integration for Reports.
See Also
Configure Report Deletion Settings and Database Settings
Configure Notification Settings for the Report Server
Configure Report Generation Settings
See Log Messages & Reports in WebCenter