Applies To: WatchGuard Cloud
A notifications profile is a group of notification rules that enable WatchGuard Cloud to generate alerts and send email notifications for specific events, device alarms, and incidents for multiple notification sources. As a Service Provider, you can use notifications profiles to configure email notifications that apply to multiple Subscriber accounts.
You can change the Default profile or create custom notifications profiles that you can then assign to email notifications lists. For steps to assign a notifications profile to an email notifications list, go to Configure Email Notifications for Service Providers.
View Notifications Profiles
The Notifications Profiles page shows the Default profile and any custom profiles you create.
Your operator role determines what you can view and do in WatchGuard Cloud. Your role must have the Configure Notification Rules permission to configure this feature. For more information, go to Manage WatchGuard Cloud Operators and Roles.
To view notifications profiles:
- From Account Manager, select Overview.
- Select Administration > Email Notifications.
The Email Notifications page opens.
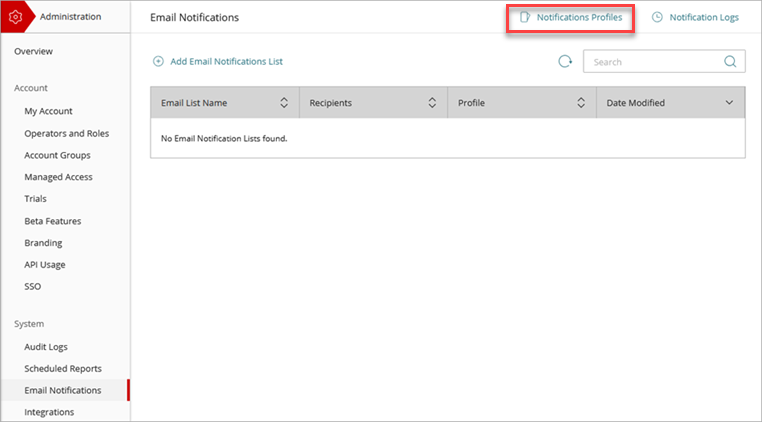
- Click Notifications Profiles.
The Notifications Profiles page opens.

Each profile shows the notification rule categories and the number of rules enabled for each category. To view all the categories, click Show More.
Create a Notifications Profile
You can create up to 50 notifications profiles with different rules and settings as necessary to manage notifications for specific events, device alarms, and incidents for multiple notification sources.
You can create custom notification profiles with rules from these categories:
For general platform events, you can configure these notifications:
Support Access Enabled
Generates an alert when support access is enabled for your account.
Support Access Revoked
Generates an alert when support access is revoked for your account.
Announcements
Generates an alert when there is an announcement from WatchGuard Cloud about updates or changes to WatchGuard Cloud products and features.
For inventory management events, you can configure these notifications:
AuthPoint Users Overallocation (On a Specific Subscriber)
Generates an alert when an AuthPoint account is overallocated and has more users than the account is licensed for.
License Added or Removed
Generates an alert when a license is activated and added to your account or removed from your account.
Inventory Overallocated
Generates an alert when one or more products in the account are overallocated or no longer overallocated. Overallocation occurs when more users or endpoints are allocated than are available in the account licenses.
Inventory Expiration
Generates an alert when inventory expires.
Inventory Expiration Today
Generates an alert on the day inventory expires.
Inventory Allocated
Generates an alert when a device, user, or endpoint is allocated to your account.
Allocation Expired
Generates an alert when a license allocation expires.
For account and operator events, you can configure these notifications:
Delegation Completed
Generates an alert when an account is successfully delegated.
Delegation Revoked
Generates an alert when account delegation is revoked.
Operator Added
Generates an alert when a new operator is added to your account.
Operator Edited
Generates an alert when an operator is edited in your account.
For ThreatSync events, you can configure these notifications:
Malicious IP
Generates an alert when ThreatSync detects an IP address associated with malicious activity.
Malicious Access Point
Generates an alert when ThreatSync detects an unauthorized wireless access point connected to your network or operating in your airspace.
Unknown Program
Generates an alert when a program is blocked because it has not yet been classified by WatchGuard Endpoint Security.
Intrusion Attempt
Generates an alert when ThreatSync detects a security event where an intruder tried to gain unauthorized access to a system.
Credential Access
Generates an alert when ThreatSync detects an AuthPoint incident that indicates an attempt to compromise account credentials.
IOA
Generates an alert when ThreatSync detects Indicators of Attack (IOAs), which are indicators that are highly likely to be an attack.
Advanced Security Policy
Generates an alert when ThreatSync detects unauthorized or unexpected activity on your network, including execution of malicious scripts and unknown programs that use advanced infection techniques, traffic to dangerous websites, unauthorized applications and countries, unauthorized incoming traffic, or unauthorized traffic between internal networks.
Exploit
Generates an alert when ThreatSync detects an attack that tries to inject malicious code to exploit vulnerable processes.
Virus
Generates an alert when ThreatSync detects malicious code.
Malware
Generates an alert when ThreatSync detects malicious software designed to damage, disrupt, and gain unauthorized access to computer systems.
PUP
Generates an alert when ThreatSync detects a Potentially Unwanted Program (PUP) that might install when other software installs on a computer.
Malicious URL
Generates an alert when ThreatSync detects a URL created to distribute malware, such as ransomware.
For access point and Firebox events, you can configure these notifications:
Device Deleted
Generates an alert when a Firebox or access point is removed from your account.
Device Registered
Generates an alert when a Firebox or access point is added to your account.
Device Clock Drift Detected
Generates an alert when clock drift is detected beyond the threshold of +/- 8 hours on a Firebox.
Firebox Certificate Expiring
Generates an alert if any system certificates will expire in 10 or 30 days. This notification type is available with Fireware v12.11.3 and higher.
New Fireware Version Available
Generates an alert when a new version of Fireware is available. This notification type is available with Fireware v12.11.3 and higher.
Data Retention Changed
Generates an alert when the data retention license for a Firebox changes.
For AuthPoint events, you can configure these notifications:
Customer Gateway Connected or Not Connected
Generates an alert when a Gateway installed on the network is available or not available.
AuthPoint Certificate Expiring
Generates an alert when an AuthPoint certificate is about to expire. For more information, go to Certificate Management.
For Endpoint Security events, you can configure these notifications:
Protection Down
Generates an alert when the Endpoint Security protection software is not working correctly on an endpoint.
Installation Error Occurred
Generates an alert when the Endpoint Security protection software is not successfully installed on an endpoint.
Unmanaged Computers Discovered
Generates an alert when endpoints not managed by Endpoint Security are discovered.
For FireCloud events, you can configure these notifications:
FireCloud Exception Applied
Generates an alert when an exception applies to user traffic.
FireCloud Content Filtering Event
Generates an alert when a content filtering action applies to user traffic.
For WatchGuard NDR events, you can configure these notifications:
DHCP Logs Not Received from Source
Generates an alert when no DHCP logs are received from a source for 120 minutes.
NetFlow Logs Not Received
Generates an alert when no NetFlow logs are received by WatchGuard NDR networking devices for 20 minutes.
No NetFlow Logs Received from Source
Generates an alert when no NetFlow logs are received from a source for 20 minutes.
For WatchGuard SaaS DR events, you can configure these notifications:
Collector Heartbeat Detected
Generates an alert when WatchGuard SaaS DR detects a heartbeat from your SaaS integration. SaaS collectors communicate with Microsoft 365 every 30 minutes to confirm that the integration is working properly.
NDR Collector Heartbeat Not Detected
Generates an alert when WatchGuard SaaS DR does not detect a heartbeat from your SaaS integration for 120 minutes.
To create a notifications profile:
- From Account Manager, select Overview.
- Select Administration > Email Notifications.
The Email Notifications page opens. - Click Notifications Profiles.
The Notifications Profiles page opens.
- Click Add Notifications Profile.
The Add Notifications Profile dialog box opens. - In the Profile Name text box, type a unique name.
- Click Add.
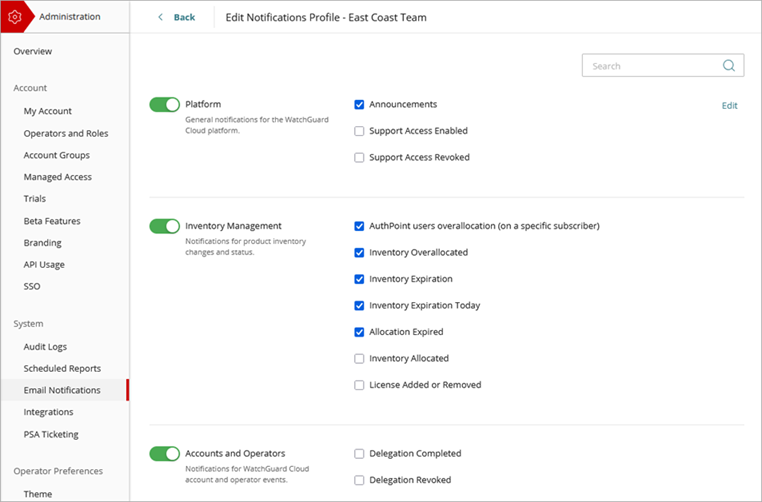
The Edit Notifications Profile page opens. The default categories and rules for your products are enabled.
- To search for a category or rule, in the Search box, type some or all of the category or rule name you want to find.
WatchGuard Cloud automatically filters the list of rules to match the search keyword. - Select the rules you want to include in the profile.
- To add rules, enable the category toggle, and next to each rule you want to enable, select the check box.
- To remove a rule, clear the check box.
- To remove a category of rules, disable the category toggle.
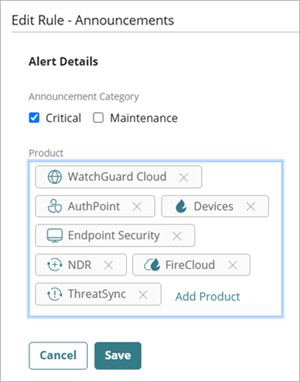
- To change the alert details for a rule, click Edit.
The Edit Rule page opens.- For Announcements notification rules, you must select at least one Announcement Category and at least one Product. For more information about WatchGuard Cloud announcements, go to About Announcements.
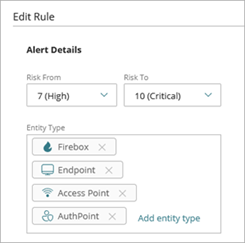
- For ThreatSync Incidents notification rules, select these alert details options:
- From the Risk From and Risk To drop-down lists, select the risk level range for the notifications.
- In the Entity Type section, click Add Entity Type and select the entity types for the notifications.
- To return to the Notifications Profile page, click Back.
Edit a Notifications Profile
When you edit a notifications profile, the notifications are updated for all recipients in email notifications lists that are assigned that notifications profile.
To edit an email notifications profile:
- From Account Manager, select Overview.
- Select Administration > Email Notifications.
- Click Notifications Profiles.
- To search for a notifications profile, type the name in the Search box.
- Next to the list you want to edit, click
 .
. - Select Edit.
The Edit Notifications Profile page opens. - Update the settings.
The changes save automatically and apply to all recipients in the email notifications lists where the profile is assigned.
Copy a Notifications Profile
To copy a notifications profile:
- From Account Manager, select Overview.
- Select Administration > Email Notifications.
- Next to the notifications profile you want to copy, click .
- Select Copy.
The Edit Notifications Profile page opens for the new profile. The new profile has the same name as the source profile with "copy" appended. - Update the settings.
The changes save automatically and apply to all recipients in the email notifications lists where the profile is assigned. - Update the notifications profile name. For more information, go to Change the Name of a Notifications Profile.
Change the Name of a Notifications Profile
To change the name of an email notifications profile:
- From Account Manager, select Overview.
- Select Administration > Email Notifications.
- Next to the notifications profile you want to change the name of, click .
- Select Change Name.
The Change Name dialog box opens. - In the Profile Name text box, type the new name for the notifications profile.
- Click Save.
The updated notifications profile shows in the list.
Delete a Notifications Profile
You can delete a notification profile if it is not linked to an email notification list. To remove a profile linked to a list, you must first remove the profile from the list. For steps to edit an email notification list, go to Configure Email Notifications for Service Providers.
You cannot delete the Default notification profile.
To delete a notifications profile:
- From Account Manager, select Overview.
- Select Administration > Email Notifications.
- Click Notifications Profiles.
- Next to the profile you want to delete, click .
- Select Delete.
- In the confirmation dialog box, click Delete.