Applies To: WatchGuard Cloud
As a Service Provider, you can create email notifications lists and notifications profiles at the Service Provider level to send email alerts for multiple Subscriber accounts.
A notifications profile is a collection of notification rules. When you assign a notifications profile to an email notifications list, WatchGuard Cloud sends email notifications to the configured recipients for the selected Subscriber accounts based on the profile rules. For example, if you have a ThreatSync analyst who reviews incident data across multiple Subscriber accounts, you can create a notifications profile for ThreatSync incidents and assign it to an email notifications list that includes the accounts the analyst reviews.
For detailed instructions about how to create notifications profiles, go to Manage Notifications Profiles for Service Providers.
Email notifications for Service Providers are separate from PSA ticketing notification rules. Email notifications send alerts to the email addresses in an email notifications list. PSA ticketing notification rules open and close tickets in your connected PSA tool. For more information about PSA ticketing notifications, go to Configure Platform PSA Ticketing Notifications.
Your operator role determines what you can view and do in WatchGuard Cloud. Your role must have the Configure Notification Rules permission to configure this feature. For more information, go to Manage WatchGuard Cloud Operators and Roles.
Add an Email Notifications List
You can create up to 100 email notifications lists.
To create an email notifications list:
- From Account Manager, select Overview.
- Select Administration > Email Notifications.
The Email Notifications page opens.
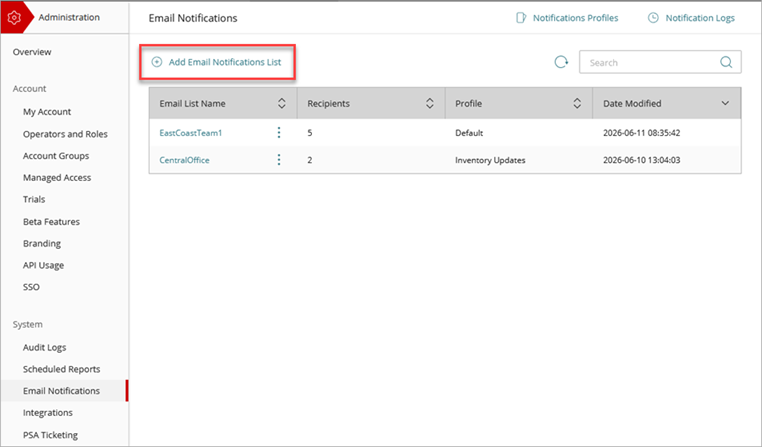
- Click Add Email Notifications List.
The Add Email Notifications List page opens.

- In the Email List Name text box, type a name for the list.
- In the Recipients text box, type one or more recipient email addresses. Press Enter after each email address or separate the email addresses with a space, comma, or semicolon.
- In the Accounts section, click Add Accounts.
The Add Accounts and Account Groups dialog box opens.
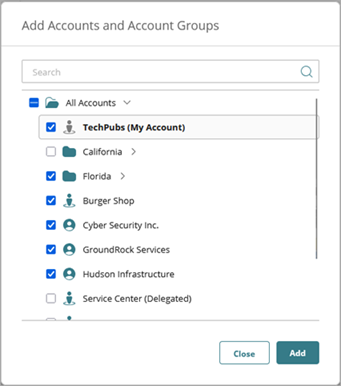
- Select each account or account group you want the email recipients to receive notifications from, then click Add.
- In the Notifications Profile section, click Select Profile.
The Select Notifications Profile dialog box opens and shows a list of available profiles.
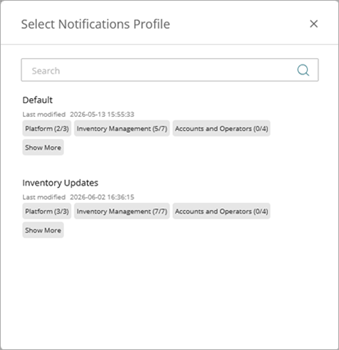
- From the list, select a profile.
- Click Save.
WatchGuard Cloud sends a verification email to each recipient.
Recipients must verify their email addresses within 48 hours, or the verification link expires.
Edit an Email Notifications List
To add or remove recipients, accounts, or a notification profile from an email notifications list, edit the list. From the Edit Email Notifications List page, you can also view recipient verification status and resend the verification email to unverified recipients.
To edit an email notifications list:
- From Account Manager, select Overview.
- Select Administration > Email Notifications.
- Next to the list you want to edit, click
 .
. - Select Edit.
The Edit Email Notifications List page opens.

View Recipient Verification Status
In the Recipients text box, point to an email address to view the status:
- Verified (Green) — This email address is verified and can receive notifications.
- Pending (Blue) — The recipient has not yet verified the email address and must verify the address before they can receive notifications.
- Token Expired (Red) — The verification link has expired, and the email address requires verification.
To send a new verification email to all recipients with an expired token:
Click Save.
When WatchGuard Cloud receives notification that an email address is invalid, it removes the address from the email notifications list.
Change List Settings
To change list settings:
- To change the list name, in the Email List Name text box, type a new name.
- To remove a recipient, click X next to the email address.
- To add recipients, in the Recipients text box, type one or more email addresses.
- To remove an account or account group, click X next to the account.
- To add accounts or account groups, click Add Accounts.
- To change the notifications profile:
- Click X next to the current profile.
- Click Select Profile.
- Select a new notifications profile.
- Click Save.
WatchGuard Cloud sends a verification email to each new recipient you add and to any email addresses with an expired token.
Copy an Email Notifications List
To copy an email notifications list:
- From Account Manager, select Overview.
- Select Administration > Email Notifications.
- Next to the list you want to copy, click .
- Select Copy.
The new email notifications list appears. - To modify the copied list, next to the new list, click .
- Select Edit.
- In the Edit Email Notifications List page, change the list name, recipients, accounts, or notifications profile, then click Save.
Delete an Email Notifications List
To delete an email notifications list:
- From Account Manager, select Overview.
- Select Administration > Email Notifications.
- Next to the list you want to delete, click .
- Select Delete.
- In the confirmation dialog box, click Delete.
Manage Notifications Profiles for Service Providers
View Service Provider Email Notification Log Activity