Applies To: ThreatSync
The Endpoints page provides a list of incidents grouped by endpoint, and enables Incident Responders to review and perform response actions for the incidents associated with an endpoint.
From the Endpoints page, you can:
- Review Endpoint Details in ThreatSync
- Isolate an Endpoint from ThreatSync
- Use the Remote Control Tool in ThreatSync
Your operator role determines what you can view and do in WatchGuard Cloud. Your role must have the ThreatSync Core permission to view or configure this feature. For more information, go to Manage WatchGuard Cloud Operators and Roles.
To open the Endpoints page in ThreatSync:
- Select Monitor > Threats > Endpoints.
The Endpoints page opens.

- To perform an action on an endpoint and its related incidents from the list, click the
 icon to open the options menu, and select an available action from the drop-down list.
 - To view a list of incidents for a specific endpoint, locate the endpoint in the list and click the
 icon.
icon.
The incidents list for that endpoint opens.

- To view more detailed information for a specific incident in the Incident Details page, click the incident. Tip! For more information, go to Review Incident Details in ThreatSync.
You can perform actions directly from the Endpoints page, or from the Incident Details page for a specific incident. For more information, go to Perform Actions in ThreatSync.
Review Endpoint Details in ThreatSync
By default, the Endpoints page lists endpoints according to their risk level in descending order. You can manually sort the list alphabetically, by date, or by risk level. You can filter the list by incident type, action performed, endpoint risk score, or incident risk score.
Endpoints in the endpoint list include the endpoint name, risk score and level, a timeline of incidents related to the endpoint, and an expandable list of incidents that occurred on the endpoint.
The timeline only appears when incidents were detected in the specified time frame. If no incidents were detected in the specified range, the timeline does not appear.
Endpoint Risk Scores and Levels in ThreatSync
Incident Responders can use endpoint risk scores to investigate whether an endpoint poses a threat to the network. Risk scores appear as a numerical value in a square icon next to the endpoint in the endpoints list.

ThreatSync determines the risk score for an endpoint based on the incident risk scores associated with the endpoint in the past 30 days. The endpoint risk score is the same as the value of the highest incident risk score detected on the endpoint in the past 30 days. For example, if an endpoint has two open incidents in a 30-day period, one with an incident risk score of 9 and the another with a risk score of 7, the endpoint risk score is 9.
ThreatSync uses only new and read incidents to determine endpoint risk scores, not closed incidents. When a new incident occurs or an incident is closed, ThreatSync recalculates the endpoint risk score. After the detection of a new incident, recalculated endpoint risk scores can take several seconds to appear in the ThreatSync UI.
ThreatSync determines the risk level for an endpoint based on its risk score. ThreatSync categorizes endpoint risk scores into these risk levels:
| Risk Level | Risk Score | Description |
|---|---|---|
| Critical | 9,10 | Endpoints with critical risk scores require immediate attention and investigation. |
| High | 7, 8 | We strongly recommend you investigate endpoints with high risk scores. |
| Medium | 4, 5, 6 | We recommend you investigate endpoints with medium risk scores. |
| Low | 1, 2, 3 | Investigate endpoints with low risk scores if you have the time and resources available. |
Incident Responders can use endpoint risk scores to investigate whether a device poses a threat to the network. Risk scores appear as a numerical value in a square icon next to the endpoint in the endpoint list.
Endpoint Incident Timeline in ThreatSync
The endpoint timeline shows the sequence of detected incidents for a specified time period.

Color-coded squares on the timeline indicate days in the selected time range when incidents were detected. The color of the square corresponds to the risk level of the highest-risk incident from that day.
- Red — Critical
- Orange — High
- Yellow — Medium
- Gray — Low
To view details of the incidents that occurred on a specific day, hover over a square in the timeline.
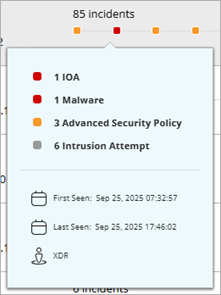
The details for the selected day can include:
- Incident number and types — The number and types of incidents detected
- First Seen — The date and time an incident was first detected
- Last Seen — The date and time an incident was last detected
- Account — The account name associated with the incident
Isolate an Endpoint from ThreatSync
When you isolate an endpoint device, WatchGuard Endpoint Security blocks all communications to and from the device except for those it requires. You can isolate or stop isolation of one or more endpoints from the Endpoints page in ThreatSync.
To isolate an endpoint, from the Endpoints page in ThreatSync:
- Select Monitor > Threats > Endpoints.
The Endpoints page opens. - Select the check box next to one or more endpoints.
The Actions menu appears.
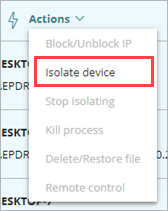
- From the Actions drop-down list, select Isolate Device or, to stop isolation on an endpoint, select Stop Isolating.
The Isolate Device dialog box opens.
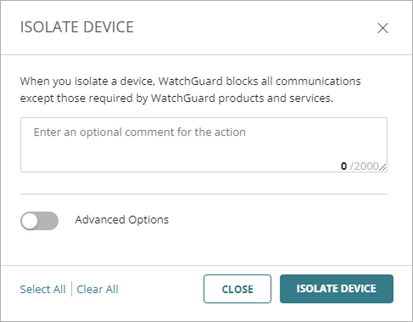
- (Optional) In the text box, enter a comment for the isolate action.
- (Optional) If you want to create exceptions to the isolation and allow communications from specific processes, enable Advanced Options.
The Advanced Options and Show Message on Device sections appear in the Isolate Device dialog box.
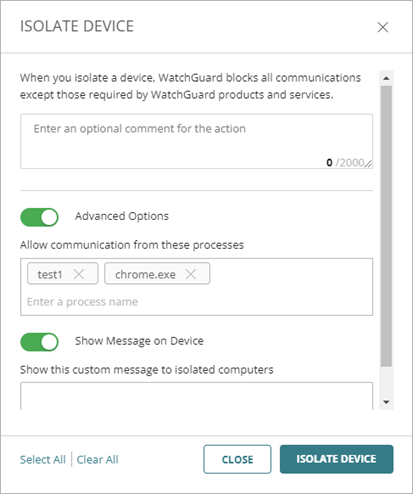
- In the Allow Communication from these Processes text box, enter the names of the processes you want to allow as exceptions to the isolation. For example, enter chrome.exe to allow communications from Google Chrome.
- (Optional) In the Show Message on Device text box, enter the custom message you want to show on isolated computers. If you do not want a message to show on isolated devices, disable Show Message on Device.
- Click Isolate Device.
Use the Remote Control Tool in ThreatSync
With the remote control tool, you can remotely connect to the Windows, Mac, and Linux computers on your network from the Endpoints page to investigate and remediate potential attacks.
To use this feature, your remote computers must have:
- An active Endpoint Security Elite license
- A remote control settings profile assigned in Endpoint Security. For more information, go to Configure Remote Control Settings.
To start a remote control session on an endpoint, from the Endpoints page in ThreatSync:
- Select Monitor > Threats > Endpoints.
The Endpoints page opens. - Select the check box next to an endpoint.
The Actions menu appears.
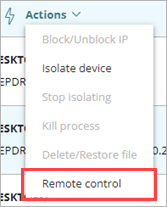
- From the Actions drop-down list, select Remote Control.
The Remote Control window for the computer opens.
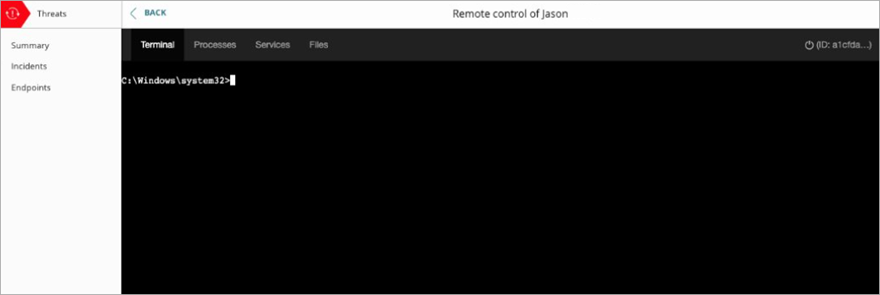
For information on how to use remote control, go to Remote Control Terminal — Commands and Parameters and About the Remote Control Tool.
Incident Types and Triggers in ThreatSync