Applies To: ThreatSync+ NDR
The Firebox page in the ThreatSync+ Integrations UI enables you to configure which Fireboxes you want ThreatSync+ NDR to monitor, where you enable or disable IP address remediation for Fireboxes, and where you can manage WatchGuard NDR for Firebox licenses on Fireboxes in your account.
Available pages and features vary and depend on your license type. If you do not see a page or feature in the ThreatSync+ Integrations UI, it is not supported by your product.
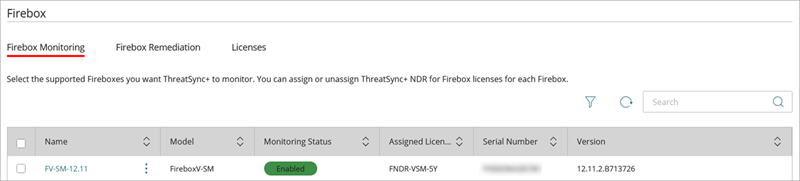
Firebox Monitoring
You can select which Fireboxes you want ThreatSync+ NDR to monitor and which Fireboxes to exclude from monitoring. With a WatchGuard NDR for Firebox license, you can also assign or unassign WatchGuard NDR for Firebox licenses to each compatible Firebox in your account.
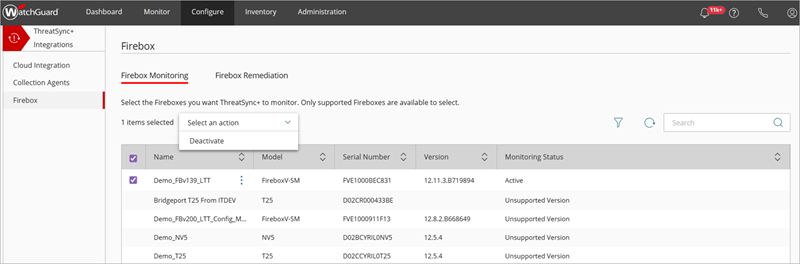
The Firebox Monitoring table shows these details:
- Name — The name of the Firebox or FireCluster.
- Model — The model number of the Firebox. For example, T30 or FireboxV-SM. Monitoring Status — Shows whether the Firebox is monitored by ThreatSync+ NDR. The status can be Enabled, Disabled, or Unsupported Version.
ThreatSync+ NDR requires Fireware v12.10.3 or higher.
- Assigned License — The WatchGuard NDR for Firebox license name assigned to the Firebox. This column is only visible if you have a WatchGuard NDR for Firebox license.
- Serial Number — The serial number of the Firebox.
- Version — The version of Fireware on the Firebox.
To manage which Fireboxes in your network you want ThreatSync+ NDR to monitor:
- Log in to your WatchGuard Cloud Subscriber account.
- Select Configure > ThreatSync+ Integrations > Firebox.
The Firebox page opens with the Firebox Monitoring tab open by default. - Select the Fireboxes you want ThreatSync+ NDR to monitor.
- Next to the Firebox you want to manage, click
 and select one of these options:
- Enable — Enables ThreatSync+ NDR monitoring for the selected Firebox.
- Disable — Disables ThreatSync+ NDR monitoring for the selected Firebox.
- Assign License — Opens the License Assignment page where you select a WatchGuard NDR for Firebox license to assign to your Firebox. When you assign the license, you also enable ThreatSync+ NDR monitoring. For more information, go to Assign a WatchGuard NDR for Firebox License to a Firebox.
- Unassign License — Unassigns the WatchGuard NDR for Firebox license from the Firebox. When you unassign a license, ThreatSync+ NDR monitoring is also disabled.
Available management options depend on the existing status of the Firebox and whether you have a WatchGuard NDR for Firebox license.
If you deactivate monitoring for all Fireboxes in your account, ThreatSync+ NDR does not ingest any Firebox data and a banner shows in the UI.

Filter the Firebox Monitoring Table
To filter the Firebox Monitoring table, click ![]() to open the Filter dialog box.
to open the Filter dialog box.
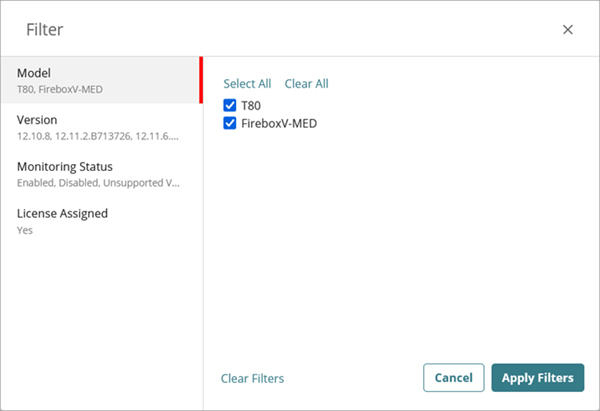
You can filter by Firebox model, Fireware version, monitoring status, or whether a WatchGuard NDR for Firebox license is assigned.
Firebox Remediation
Select the Firebox Remediation tab to manage Firebox remediation for Fireboxes in your account.

IP addresses blocked by ThreatSync+ NDR do not appear on the Firebox Blocked Sites list in Fireware or WatchGuard Cloud.
If ThreatSync is enabled on your account, blocked IP addresses show on the Items Blocked by ThreatSync page. For more information, go to Manage Items Blocked by ThreatSync.
When you enable IP address remediation for Fireboxes in your account, you can perform manual and automatic remediation actions.
To enable IP address remediation:
- Log in to your WatchGuard Cloud Subscriber account.
- Select Configure > ThreatSync+ Integrations > Firebox.
The Firebox page opens. - Select the Firebox Remediation tab.
- Select Firebox Remediation.
After remediation is enabled for your Fireboxes, you can perform manual actions on specific external IP addresses on the All IP Addresses page.

The All IP Addresses page shows a list of IP addresses and whether they are blocked by Fireboxes in the account. For more information, go to All IP Addresses.
To configure a ThreatSync+ NDR policy to automatically block external IP addresses that violate a policy, select the If this policy is violated, automatically block involved external IPs check box in the Remediation section of a ThreatSync+ NDR policy.

IP address remediation blocks external IP addresses in ThreatSync+ NDR only. If you have ThreatSync enabled on your account, all remediation of incidents must be performed in the ThreatSync management UI. For more information, go to Perform Actions in ThreatSync.
For more information, go to Configure ThreatSync+ Policies.
To view IP address remediation history, go to ThreatSync+ Audit Logs.
Licenses
The Licenses tab on the Firebox page is where you can assign and unassign WatchGuard NDR for Firebox licenses to Fireboxes and FireClusters in your account for ThreatSync+ NDR monitoring.
This tab is only available with a WatchGuard NDR for Firebox license.
The WatchGuard NDR for Firebox license is licensed based on Firebox model. Before you can view the Licenses tab, you must activate and allocate a WatchGuard NDR for Firebox license to a Subscriber account that has a compatible Firebox model. For more information, go to About WatchGuard NDR for Firebox Licenses and Allocate WatchGuard NDR for Firebox Licenses.
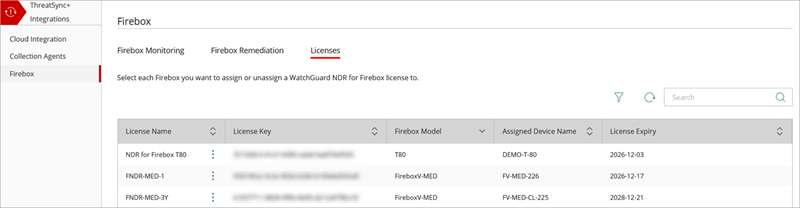
The Licenses tab shows these columns:
- License Name — The name of the WatchGuard NDR for Firebox license.
- License Key — The license key for the Firebox.
- Firebox Model — The name of the Firebox model. For example, T80.
- Assigned Device Name — The name of the assigned Firebox.
- License Expiry — The expiry date of the license.
Assign a WatchGuard NDR for Firebox License to a Firebox
To enable ThreatSync+ NDR monitoring of a Firebox, you must first assign a WatchGuard NDR for Firebox license to the Firebox.
You can assign a WatchGuard NDR for Firebox license from the Firebox Monitoring tab or the Licenses tab. This enables ThreatSync+ NDR monitoring of the selected Firebox.
To assign a WatchGuard NDR for Firebox license to a Firebox:
- On the Firebox Monitoring tab, next to the Firebox you want to assign the license to, click and select Assign License.
The License Assignment page opens.
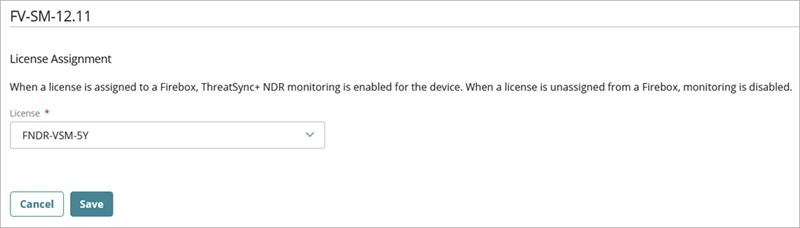
- From the License drop-down list, select the license you want to assign the Firebox to.
- Click Save.
The Firebox Monitoring tab shows ThreatSync+ NDR monitoring is enabled for the assigned Firebox and the name shows in the Assigned License column.
To assign a WatchGuard NDR for Firebox license to a Firebox:
- On the Licenses tab, next to the Firebox you want to assign the license to, click and select Assign.
The Assign License dialog box opens.
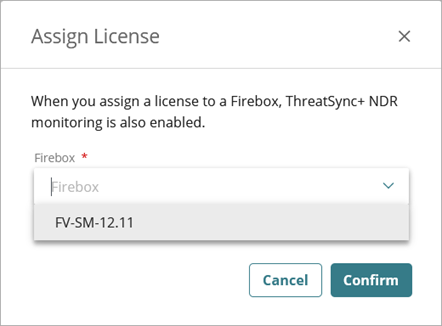
- From the Firebox drop-down list, select the Firebox you want to assign the license to.
- Click Confirm.
The Firebox Monitoring tab shows ThreatSync+ NDR monitoring is enabled for the assigned Firebox and the name shows in the Assigned License column.
You can unassign a WatchGuard NDR for Firebox license on a Firebox on the Licenses tab. This disables ThreatSync+ NDR monitoring of the selected Firebox.
To unassign a WatchGuard NDR for Firebox license on a Firebox:
- On the Firebox Monitoring or Licenses tab, next to the Firebox you want to unassign, click and select Unassign or Unassign License.
The Unassign License dialog box opens.
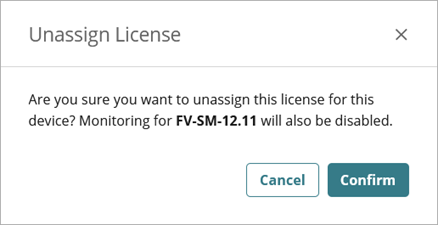
- Click Confirm.
The Firebox Monitoring tab shows that ThreatSync+ NDR monitoring is disabled for the Firebox and the name no longer shows in the Assigned License column.

Assign a WatchGuard NDR for Firebox License to a FireCluster
For an Active/Active cluster, you must assign two WatchGuard NDR for Firebox licenses to both Fireboxes because both cluster members share the traffic that passes through the cluster. For Active/Passive clusters, only one license is assigned to the active Firebox. For more information about FireCluster, go to About FireCluster in the Fireware documentation.
To assign a WatchGuard NDR for Firebox License to a Active/Active FireCluster:
- On the Firebox Monitoring tab, next to the Firebox you want to assign the license to, click and select Assign License.
The License Assignment page opens.

- From the FireCluster Member 1 License drop-down list, select the license you want to assign the FireCluster to.
- From the FireCluster Member 2 License drop-down list, select the license you want to assign the FireCluster to.
- Click Save.
The Firebox Monitoring tab shows ThreatSync+ NDR monitoring is enabled for the assigned FireCluster and the names show in the Assigned License column.
