Applies To: Cloud-managed Fireboxes, Locally-managed Fireboxes

This document applies to Fireboxes you manage in WatchGuard Cloud. For information that applies to Fireboxes managed in Fireware Web UI or WatchGuard System Manager, go to:
- Configure FireCluster (Locally-managed FireCluster)
Overview
You can add and manage an active/passive FireCluster in WatchGuard Cloud. For more information about FireCluster, go to About FireCluster in WatchGuard Cloud.
To add a cloud-managed FireCluster, use one of these methods:
- Add a New Cloud-Managed FireCluster — Add two Fireboxes with factory-default settings as a cloud-managed FireCluster.
- Change a Locally-Managed FireCluster to Cloud Management — Change an existing locally-managed active/passive FireCluster to cloud management. After you change the FireCluster to cloud management, you can only manage the FireCluster in WatchGuard Cloud.
- Change a Cloud-Managed Firebox to a Cloud-Managed FireCluster Member — You cannot change a cloud-managed Firebox to a cloud-managed FireCluster member directly. To convert a cloud-managed Firebox to a cloud-managed FireCluster member, you must first configure it as a locally managed FireCluster, then add the cluster to WatchGuard Cloud and change it to cloud management.
Before You Begin
Before you add a cloud-managed FireCluster, learn about requirements and plan your configuration. For information about FireCluster requirements, go to Before You Configure a Cloud-Managed FireCluster in WatchGuard Cloud.
Your operator role determines what you can view and do in WatchGuard Cloud. Your role must have the Devices permissions to view or configure this feature. For more information, go to Manage WatchGuard Cloud Operators and Roles.
Add a New Cloud-Managed FireCluster
If you have two Fireboxes that you have not yet configured as a FireCluster, use the method described in this section. Both Fireboxes must have factory-default settings.
When you add a cloud-managed FireCluster, you can:
- Create a new configuration manually for the FireCluster.
- Import many supported settings from a Firebox .XML configuration file to help build the cloud-managed configuration. You can do this when you add the FireCluster through the Add Device Wizard, or you can use the Import Configuration wizard after you add the FireCluster. This topic describes how to use the Add Device Wizard. For information about Import Configuration wizard workflow, go to Import Configuration Settings from a Firebox Configuration File.
- Reset both Fireboxes to factory-default settings. For more information, go to Reset a Firebox.
- Log in to your WatchGuard Cloud Subscriber account.
- Select Configure > Devices.
- Click Add Device.
A list of activated devices appears. If the list does not include your devices, review the requirements in Before You Configure a Cloud-Managed FireCluster in WatchGuard Cloud.
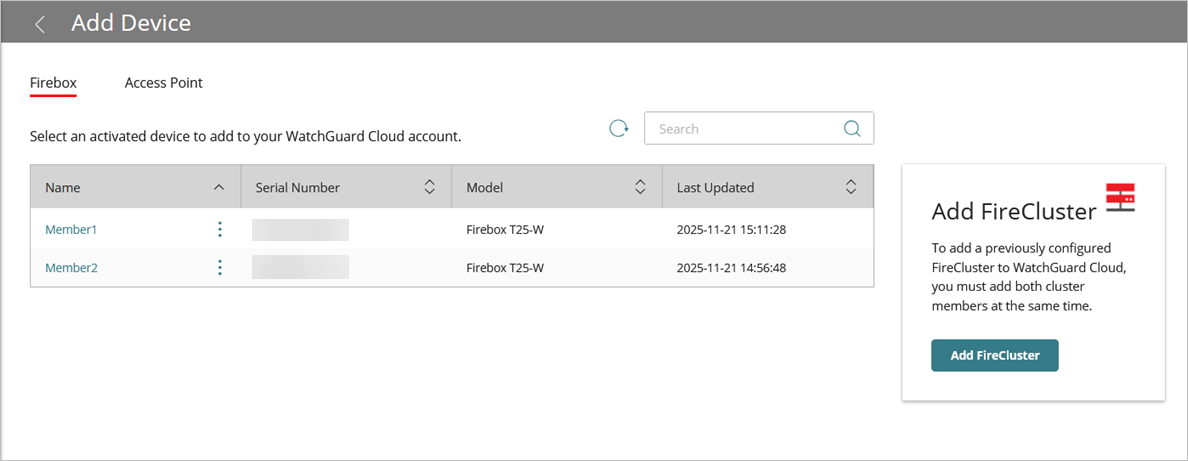
- Click Add FireCluster.
The selection page for the first FireCluster member opens.
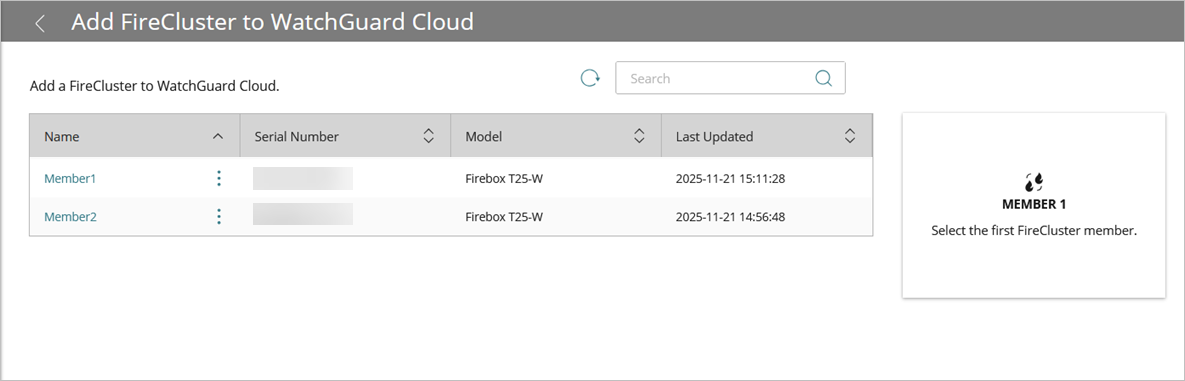
- To add the first FireCluster member, select a Firebox name.
The selection page for the second FireCluster member opens.

- To add the second FireCluster member, do one of the following:
- From the list of devices, select a Firebox name.
Selected FireCluster members appear next to the device list. - Enter the serial number of the second FireCluster member and click Add.
- From the list of devices, select a Firebox name.
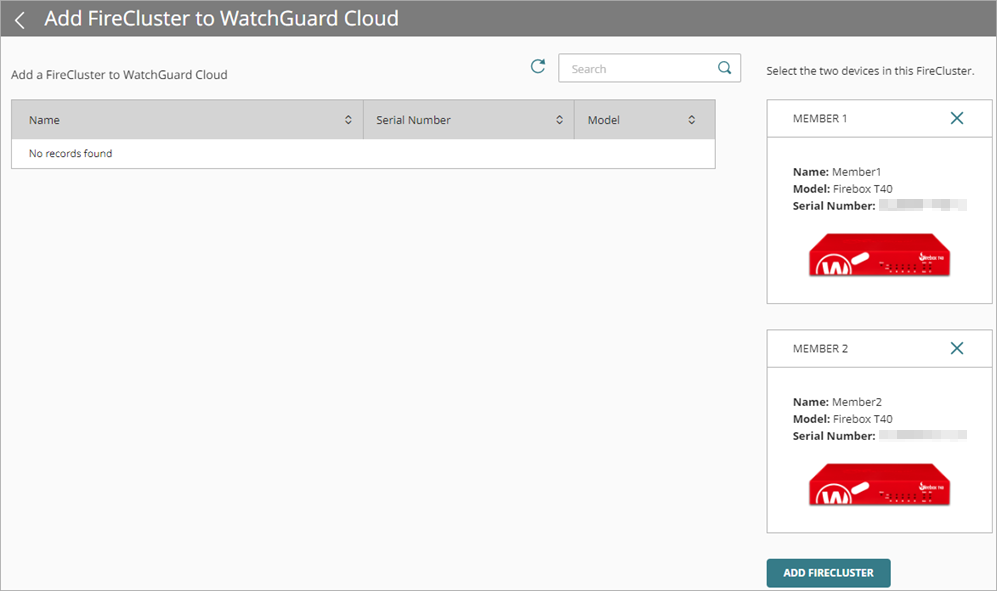
- Click Add FireCluster.
A confirmation page opens.
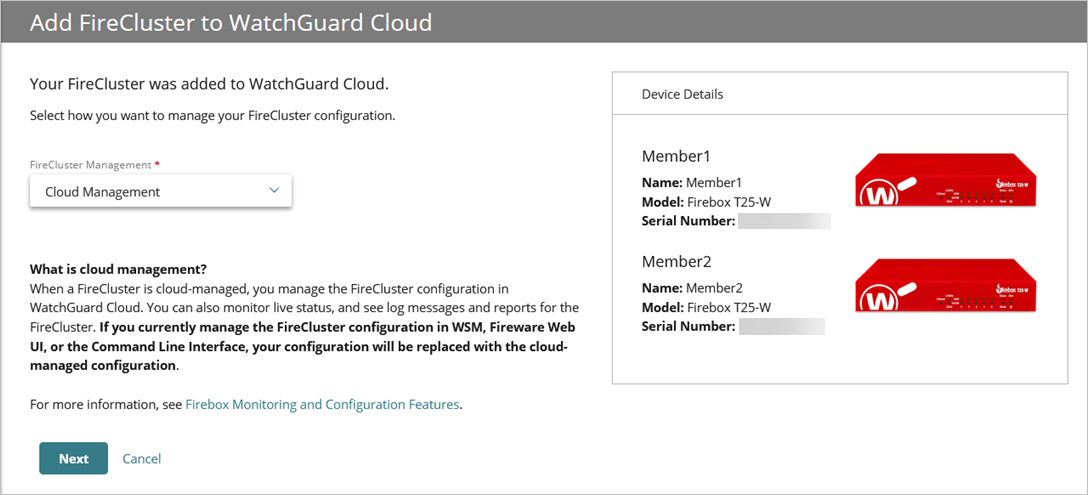
- From the FireCluster Management drop-down list, select Cloud-Managed.
- Click Next.
The Configuration Type page opens. - From the Configuration Type drop-down list, select Create a New Configuration.
- Click Next.
The Begin Setting up Your FireCluster page opens.
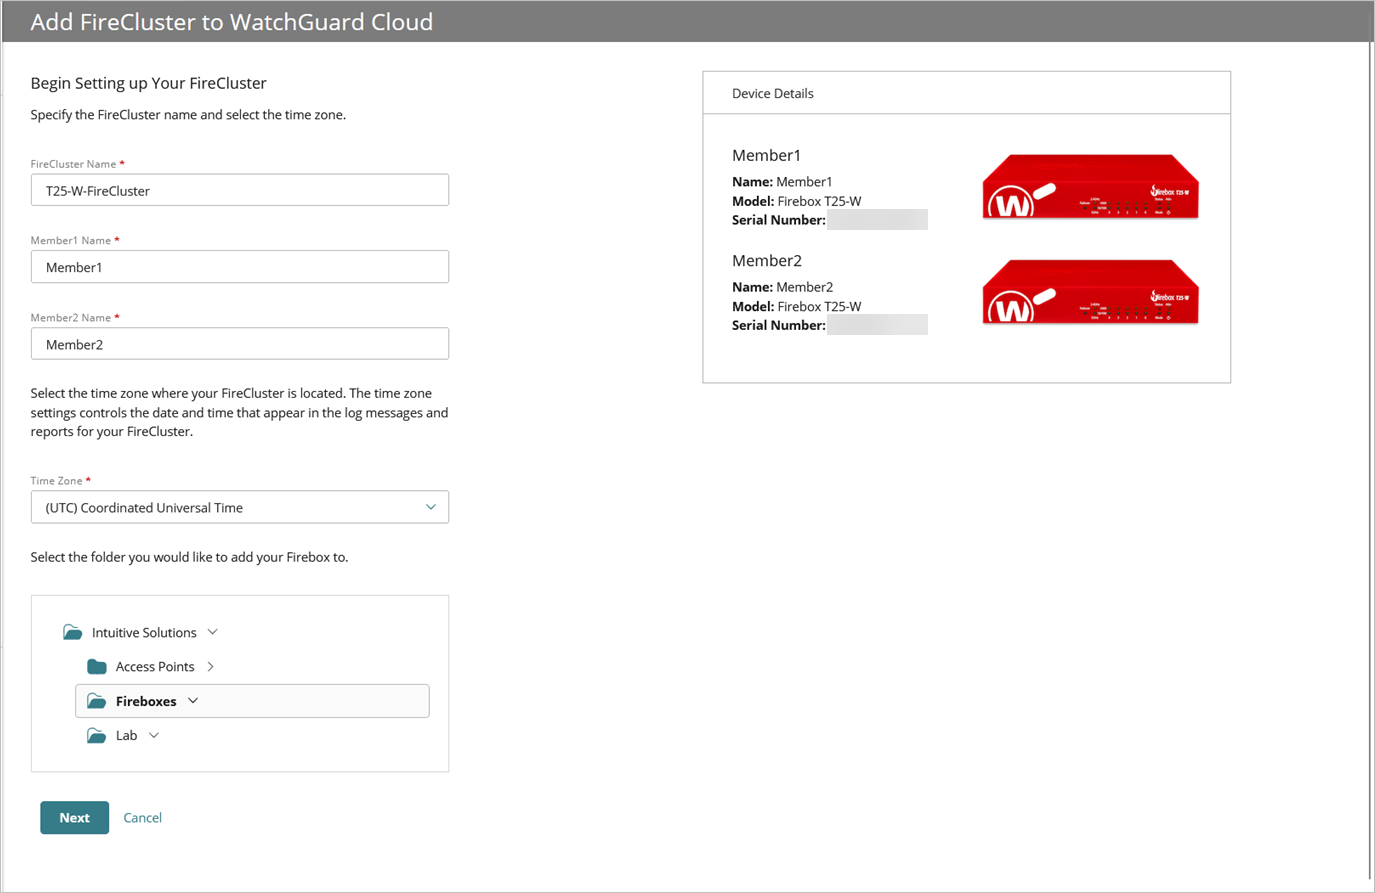
- Enter the FireCluster Name.
- Enter the Member1 Name.
- Enter the Member2 Name.
- Select a Time Zone. The time zone settings control the date and time that appear in the log messages and reports for your FireCluster.
- Select the device folder for your Firebox. Device Folders help you view status and summary data for groups of devices.
If you have only one root folder, the folder list does not appear.
- Click Next.
- From the Cluster Interface drop-down list, select an interface.
Cluster members use this dedicated interface to exchange heartbeat packets and to synchronize connection and session information.
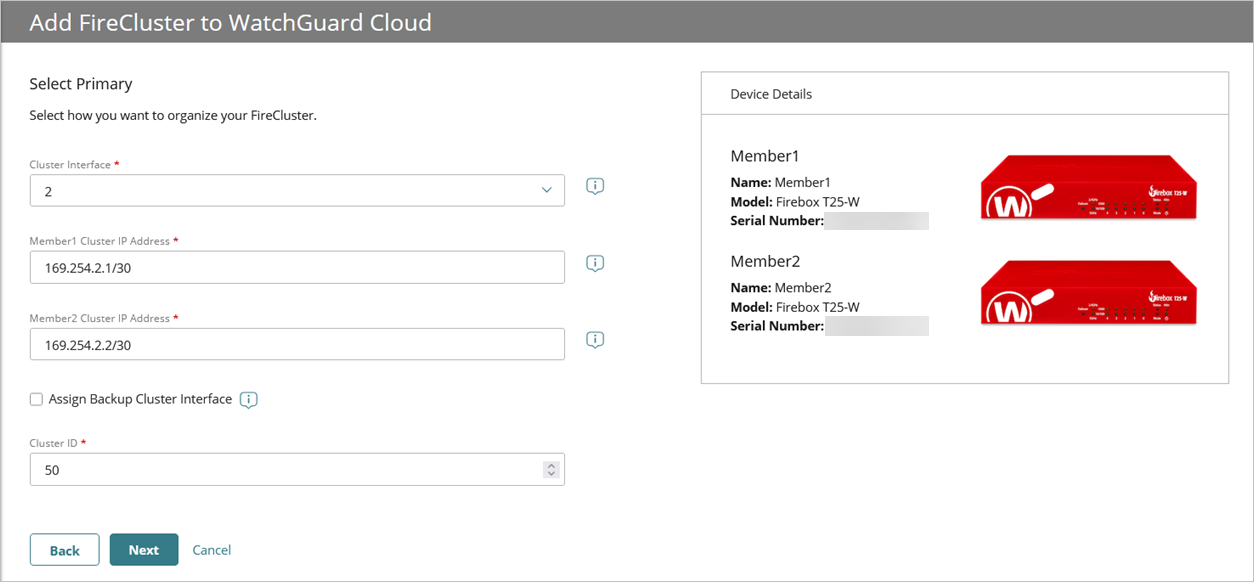
- In the Member1 Cluster IP Address and Member2 Cluster IP Address text boxes, enter an IP address that is not in use on your network.
To avoid conflicts with routable IP addresses, we recommend APIPA addresses or IP addresses from a dedicated private subnet. - In the Cluster ID text box, enter a number from 1 through 255. The default cluster ID is 50.
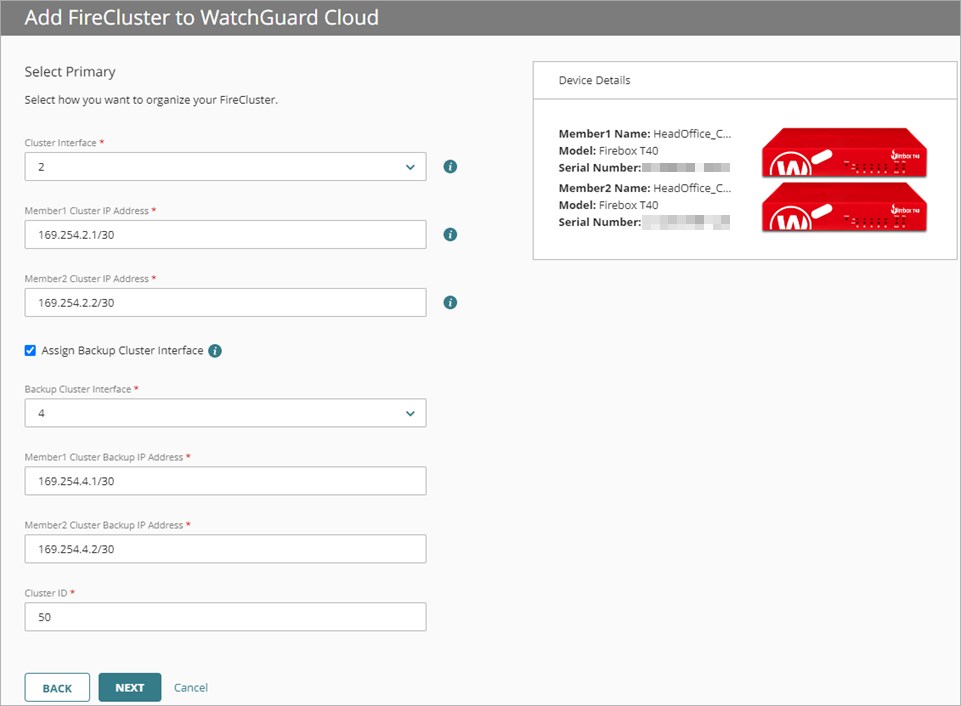
The Cluster ID determines the virtual MAC (VMAC) addresses that cluster member interfaces use. If you add a second FireCluster to the same subnet, enter a Cluster ID that is different enough from the Cluster ID of the first FireCluster to avoid a virtual MAC address conflict. For information about how the VMAC address is calculated, go to Active/Passive Cluster ID and the Virtual MAC Address. - (Optional) To add redundancy, select Assign Backup Cluster Interface. The FireCluster uses the backup cluster interface if the primary cluster interface fails. We recommend this option for FireCluster members separated by a switch without a direct cable connection between cluster members. For more information about this setting, go to Before You Configure a Cloud-Managed FireCluster in WatchGuard Cloud.
- From the Backup Cluster Interface drop-down list, select an interface.
- In the Member1 Cluster Backup IP Address and Member2 Cluster Backup IP Address text boxes, enter an IP address that is not in use on your network. To avoid conflicts with routable IP addresses, we recommend APIPA addresses or IP addresses from a dedicated private subnet.
If you use both primary and backup cluster interfaces, the interfaces must be on different subnets. We recommend that you do not use a switch between each member for the cluster interfaces. If you do use a switch between cluster members, the cluster interfaces must be logically separated from each other on different VLANs. We recommend that you configure a backup cluster interface if you separate the cluster interfaces with a switch.
- Click Next.
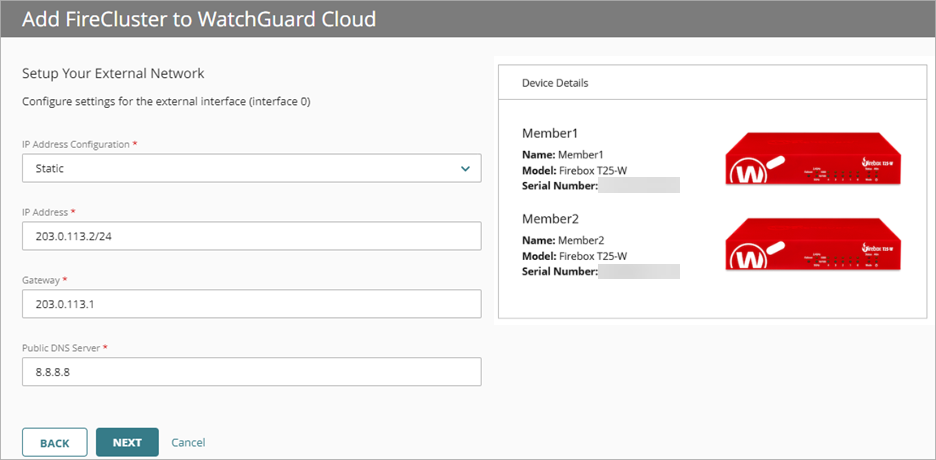
- From the IP Address Configuration drop-down list, select Static, DHCP, or PPPoE.
- If you selected Static:
- In the IP Address text box, enter an IP address for the external interface.
- In the Gateway text box, enter an IP address for the gateway.
- In the Public DNS Server text box, enter the IP address of a public DNS server for name resolution.
- If you selected DHCP or PPPoE:
- Select Obtain an IP Address Automatically or Use This IP Address.
- Enter the Client Name.
- Enter the Host Name.
- If you selected Use This IP Address, enter an IP address.
- Click Next.
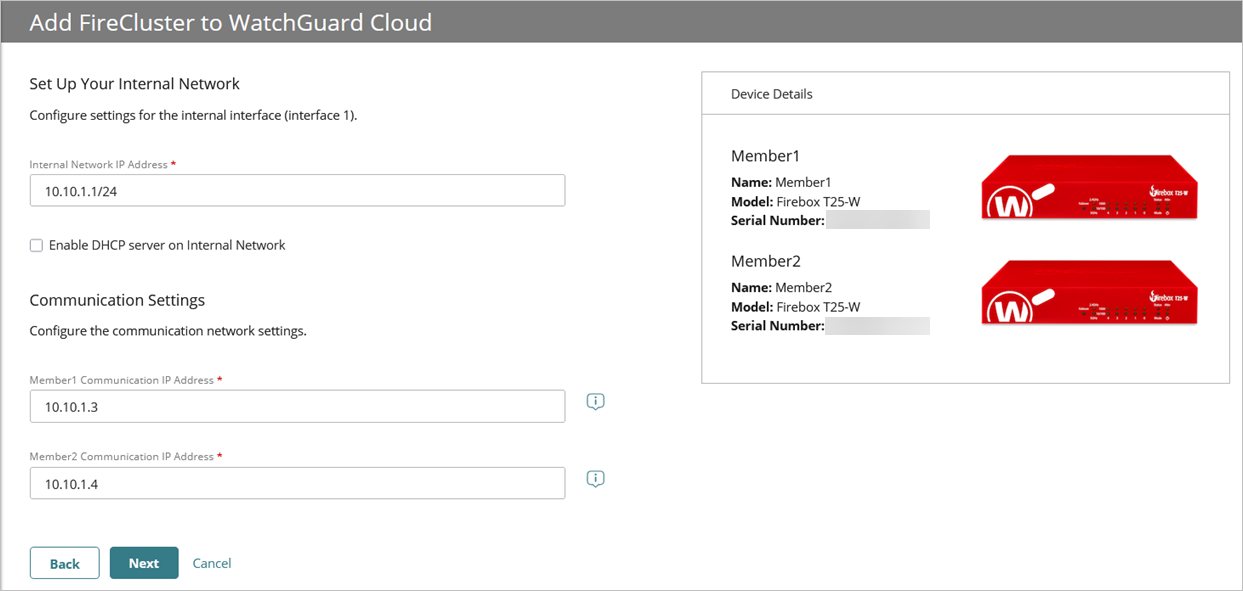
- Enter the Internal Network IP Address.
- (Optional) Select Enable DHCP Server on Internal Network.
- Enter a Starting IP Address.
- Enter an Ending IP Address.
- In the Member1 Communication IP Address text box, type an IP address that is on the same subnet as your internal network. Your Dimension or syslog server must also be on this network.
- In the Member2 Communication IP Address text box, type an IP address that is on the same subnet as your internal network. Your Dimension or syslog server must also be on this network.
- Click Next.
- (Optional) If your Firebox is a wireless model, on the Configure Wireless Settings page, you can enable these options:
- Enable Wireless — If you enable this option, enter the SSID and Passphrase for your internal wireless network.
- Enable Guest Wireless — If you enable this option, enter the SSID and Passphrase for your guest wireless network.

Click Next.
- Set the Status and Admin user device passwords for connections to Fireware Web UI on the Firebox. Device passwords must be 8–32 characters long, and must contain uppercase and lowercase letters, at least one number, and at least one symbol. The Status and Admin passwords cannot be the same.

- To complete the FireCluster configuration, click Next.
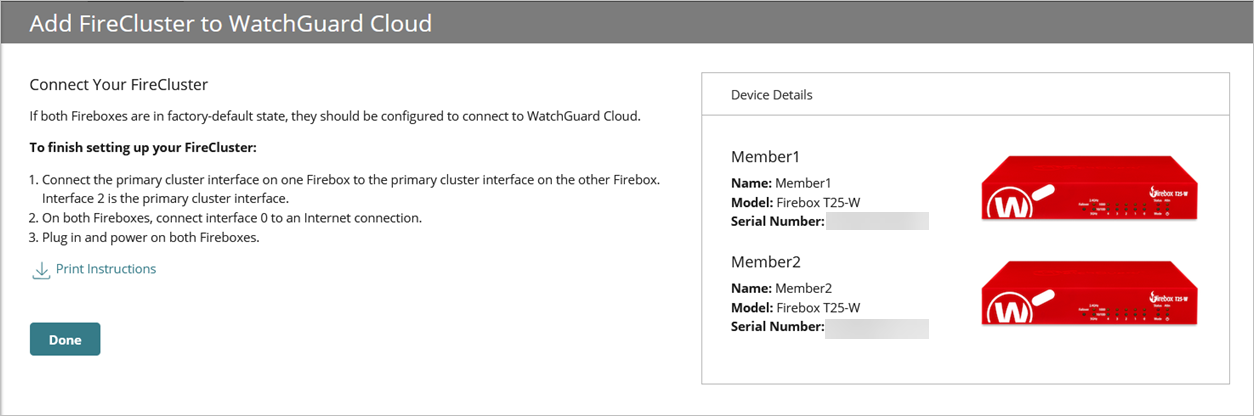
- Follow the instructions on the Connect Your FireCluster page.
- Connect the primary cluster interface on one Firebox to the primary cluster interface on the other Firebox.
- On both Fireboxes, connect interface 0 to an Internet connection.
- Plug in and power on both Fireboxes.
For information about cabling and network topology, go to Connect the Hardware for a Cloud-Managed FireCluster.
- Click Done.
- Follow the instructions on the Connect Your FireCluster page.
- To use a USB drive, you must click Download the Connection Settings File on the Connect Your FireCluster page now. You cannot return to this page later.
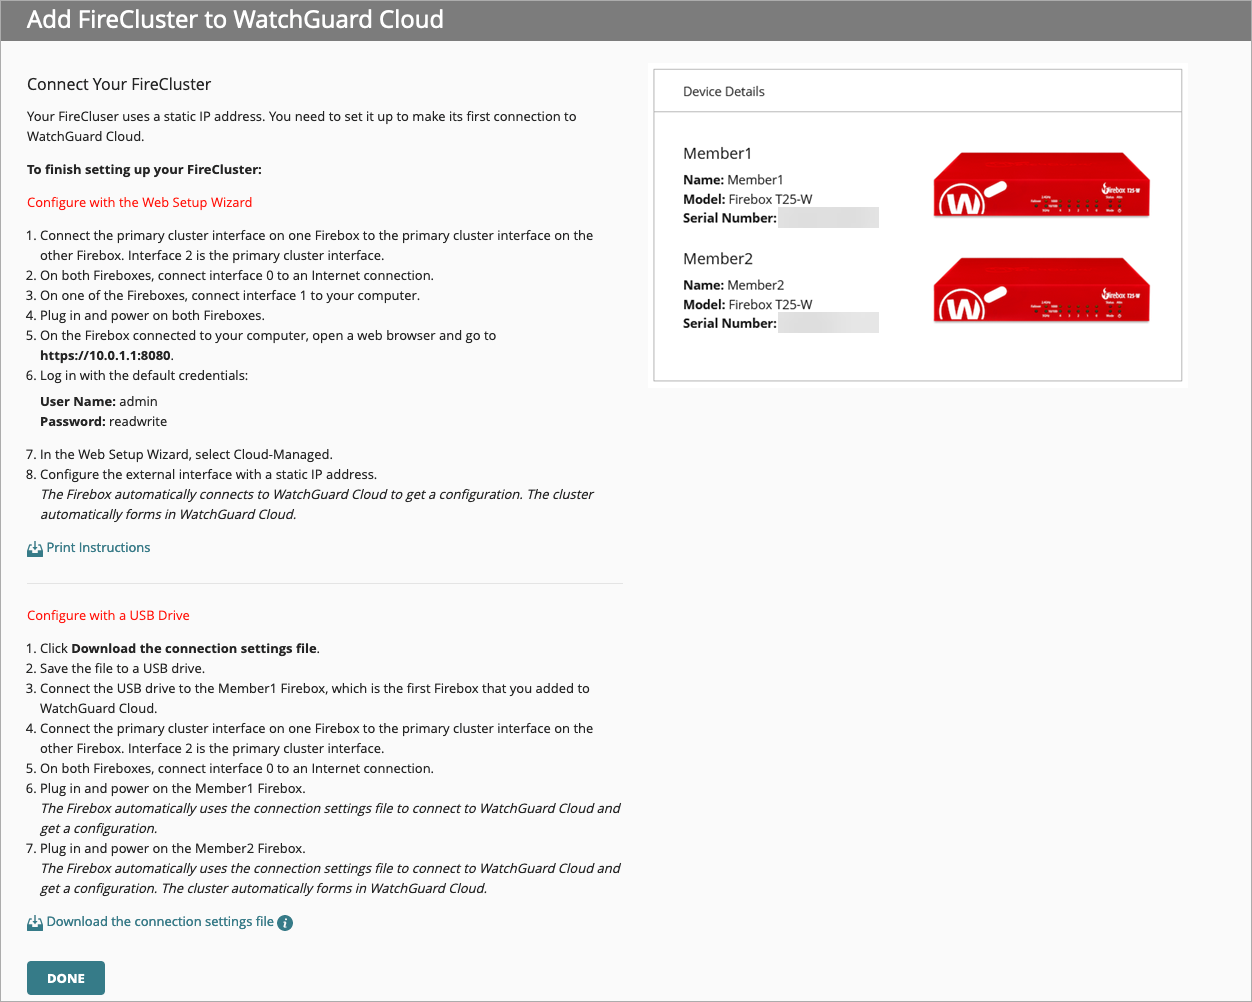
You must connect locally to one of the Fireboxes to configure a connection between the Firebox and WatchGuard Cloud. Use one of these methods:
- Web Setup Wizard — Manually specify the connection settings in the Web Setup Wizard, which is part of the local operating system on the Firebox.
- USB drive — Download and save a preconfigured connection settings file to a USB drive. The Firebox uses the file to automatically configure the connection settings. The USB drive must be formatted with the FAT or FAT32 file system. If the USB drive has more than one partition, Fireware uses only the first partition.
After you add the FireCluster, complete the cable configuration:
- Remove the interface 1 cable from your computer.
- Connect the interface 1 cable to your network equipment. For information about cabling and network topology, go to Connect the Hardware for a Cloud-Managed FireCluster.
When you import a configuration from a Firebox, you can import some configuration settings from an existing Firebox configuration file to a cloud-managed FireCluster configuration. Some configuration settings are not importable. For more information about how to import configuration settings, go to Import Configuration Settings from a Firebox Configuration File.
If the file contains settings that conflict with Firebox default objects such as a default alias, the Add Device wizard uses the default objects. For more information about duplicate settings, go to Import Configuration Settings from a Firebox Configuration File.
Before you import an .XML configuration file to add a cloud-managed FireCluster, make sure that you have exported a valid .XML configuration file from a Firebox. For more information, go to Configuration File Requirements.
You configure the Cluster Interface and Cluster ID in the Add Device wizard. The wizard does not import cluster interface settings from the .XML file.
- Reset both Fireboxes to factory-default settings. For more information, go to Reset a Firebox.
- Log in to your WatchGuard Cloud Subscriber account.
- Select Configure > Devices.
- Click Add Device.
A list of activated devices appears. If the list does not include your devices, review the requirements in Before You Configure a Cloud-Managed FireCluster in WatchGuard Cloud.
- Click Add FireCluster.
The selection page for the first FireCluster member opens.
- To add the first FireCluster member, select a Firebox name.
The selection page for the second FireCluster member opens.
- To add the second FireCluster member, select a Firebox name or enter the serial number of the second FireCluster member and click Add.
- Click Add FireCluster.
A confirmation page opens.
- From the FireCluster Management drop-down list, select Cloud-Managed.
- Click Next.
The Configuration Type page opens. - From the Configuration Type drop-down list, select Import an XML Configuration File.

- Click Next.
The Begin Setting Up Your FireCluster page opens. - Configure these FireCluster system settings:
- Enter the FireCluster Name.
- Enter the Member1 Name.
- Enter the Member2 Name.
- From the Time Zone drop-down list, select the time zone of the location where the FireCluster is installed.
- Select the device folder for your FireCluster. Device Folders help you view status and summary data for groups of devices.
If you have only one root folder, the folder list does not appear.
- Click Next.
- From the Cluster Interface drop-down list, select an interface.
Cluster members use this dedicated interface to exchange heartbeat packets and to synchronize connection and session information. Networks in the .XML file that use this interface are not importable.
- In the Member1 Cluster IP Address and Member2 Cluster IP Address text boxes, enter an IP address that is not in use on your network.
To avoid conflicts with routable IP addresses, we recommend APIPA addresses or IP addresses from a dedicated private subnet. - In the Cluster ID text box, enter a number from 1 through 255. The default cluster ID is 50.
The Cluster ID determines the virtual MAC (VMAC) addresses that cluster member interfaces use. If you add a second FireCluster to the same subnet, enter a Cluster ID that is different enough from the Cluster ID of the first FireCluster to avoid a virtual MAC address conflict. For information about how the VMAC address is calculated, go to Active/Passive Cluster ID and the Virtual MAC Address. - (Optional) To add redundancy, select Assign Backup Cluster Interface. The FireCluster uses the backup cluster interface if the primary cluster interface fails. We recommend this option for FireCluster members separated by a switch without a direct cable connection between cluster members. For more information about this setting, go to Before You Configure a Cloud-Managed FireCluster in WatchGuard Cloud.
- From the Backup Cluster Interface drop-down list, select an interface.
- In the Member1 Cluster Backup IP Address and Member2 Cluster Backup IP Address text boxes, enter an IP address that is not in use on your network. To avoid conflicts with routable IP addresses, we recommend APIPA addresses or IP addresses from a dedicated private subnet.
If you use both primary and backup cluster interfaces, the interfaces must be on different subnets. We recommend that you do not use a switch between each member for the cluster interfaces. If you do use a switch between cluster members, the cluster interfaces must be logically separated from each other on different VLANs. We recommend that you configure a backup cluster interface if you separate the cluster interfaces with a switch.
- Click Next.
- Set the Status and Admin user device passwords for connections to Fireware Web UI on the Firebox. Device passwords must be 8–32 characters long, and must contain uppercase and lowercase letters, at least one number, and at least one symbol. The Status and Admin passwords cannot be the same.
Caution: To keep your device secure, make sure you do not use the default passwords for the admin account (readwrite) and status account (readonly). We recommend that you specify unique passwords for each Firebox you manage and change them frequently.
- Click Next.
The Import Configuration page opens. - Drag the .XML configuration file to the import box, or click the import box, and click Browse to select the file.

- Click Next.
The Aliases page opens.
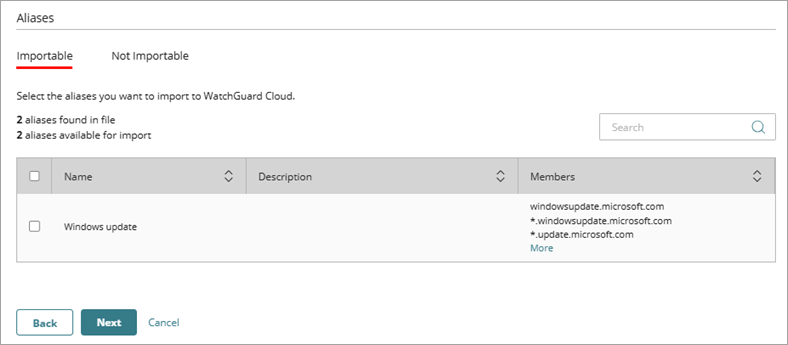
- To import an alias, select the check box next to each alias. The page shows the number of aliases available for import and the number of aliases found in the configuration file.
- Click Next.
The Exceptions page opens. - Select the check box next to each exception to import. The page shows the number of exceptions available for import and the number of exceptions found in the configuration file.
- Click Next.
The Routes page opens. - Select the check box next to each route to import. The page shows the number of routes available for import and the routing distance found in the configuration file.
- Click Next.
The Blocked Ports page opens. - Select the check box next to each blocked port to import. The page shows the number of blocked ports available for import in the configuration file.
- Click Next.
The Blocked Sites page opens. - Select the check box next to each blocked site to import. The page shows the number of blocked sites available for import and their description in the configuration file.
- Click Next.
The Dimension Servers page opens and shows the Dimension servers on the cloud-managed FireCluster. - (Optional) To change the list of Dimension servers, click Select Server.
A dialog box opens and shows the list of available Dimension servers.- Select the check box next to the Dimension servers that you want to use with WatchGuard Cloud. You can select up to two Dimension servers from the list.
- Click OK.
- To prioritize Dimension servers, click the move handle for a server and drag it to a new position in the list.
- Click Next.
The Syslog Servers page opens. The list of servers includes syslog servers from both the import file and the cloud-managed configuration. - Select the check box next to each syslog server that you want to use with WatchGuard Cloud. You can select up to three syslog servers.
- Click Next.
The Technology Integrations page opens. - Select the check box next to each technology integration to import.
When you import a technology integration, it replaces an existing technology integration of the same type. For more information, go to About Firebox Technology Integrations.
- Click Next.
The Networks page opens. The page shows the number of networks available for import and the number of networks found in the configuration file.
When you import a network, WatchGuard Cloud imports the network and the associated interface and network settings from the configuration file. Depending on the configuration, this can include:
- Physical, VLAN, bridge, and link aggregation (LAG) interfaces
- Internal, external, and wireless networks
- IP address and secondary network settings
- DHCP client or server settings, including DHCP reservations
- DNS and WINS settings
- MAC address control lists
- Other cloud-supported interface properties, such as MTU and link speed
You must import an entire network and its settings. Partial network configurations, such as DHCP reservations or secondary networks only, are not supported. Unsupported or non-imported settings can appear as not importable in the Import Configuration wizard. For more information, go to Not Importable Settings.
For a FireCluster, the primary and backup cluster interfaces that you selected for the FireCluster are already in use. Networks that include those interfaces are not importable.

- Select the check box next to each network you want to import.
- (Optional) If you want to manually configure an external network or create a default internal network:
- To configure an external network later in the wizard, select Manually Configure.
- To create a default internal network, select Default Internal.
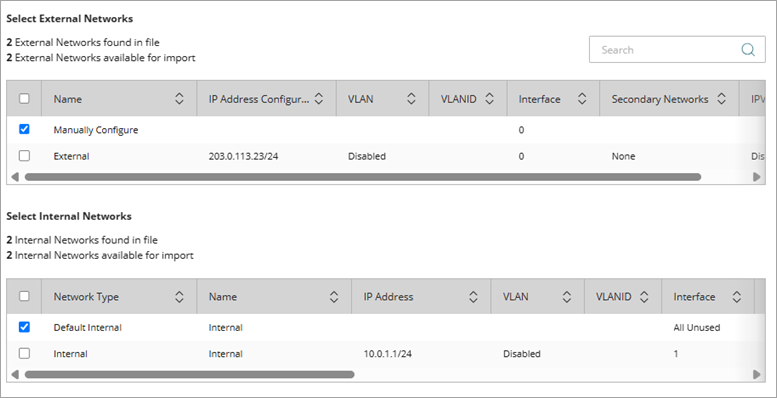
- If you import an Optional or Custom network from a locally-managed Firebox configuration, the Import Configuration wizard prompts you to select a different network type.
WatchGuard Cloud does not support Optional or Custom network types. If the configuration file includes an Optional or Custom network, select Internal or Guest as the network type for the cloud-managed configuration.
To select a different network type, from the Optional or Custom drop-down list, select Internal or Guest.

- Click Next.
If you imported networks, the Finish page opens. If you did not import networks, a network configuration page opens.

- If you did not import an external network, configure an external network manually. From the IP Address Configuration drop-down list, select Static, DHCP, or PPPoE, then complete the settings.
- Click Next.
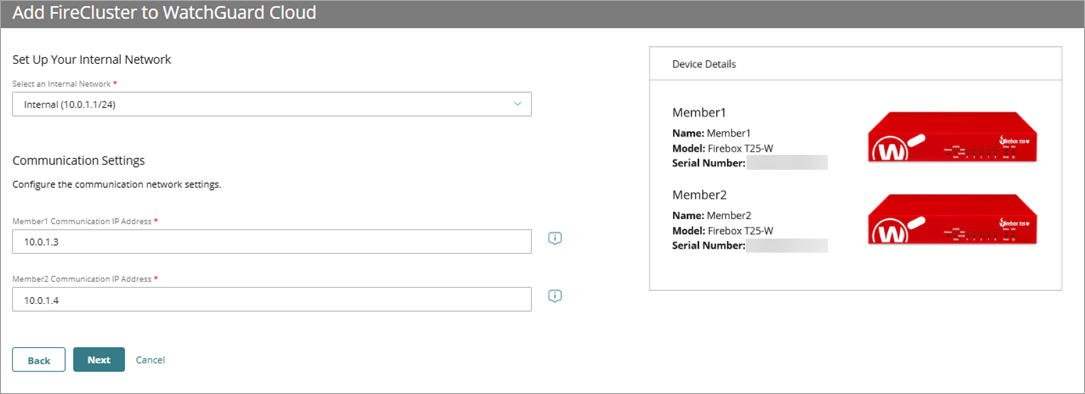
The page to configure FireCluster member communication IP addresses opens. - From the Select an Internal Network drop-down list, select an internal network for the member communication IP addresses.
- In the Member1 Communication IP Address text box, type an IP address that is on the same subnet as the selected internal network. Your Dimension or syslog server must also be on this network.
- In the Member2 Communication IP Address text box, type an IP address that is on the same subnet as the selected internal network. Your Dimension or syslog server must also be on this network.
- Click Next.
The Connect Your FireCluster page opens. - Follow the instructions on the Connect Your FireCluster page.
- Connect the primary cluster interface on one Firebox to the primary cluster interface on the other Firebox.
- On both Fireboxes, connect interface 0 to an Internet connection.
- Plug in and power on both Fireboxes.
For information about cabling and network topology, go to Connect the Hardware for a Cloud-Managed FireCluster.

- Click Done to stage your changes, or click Deploy Now to deploy the changes immediately.
Verify the FireCluster Connection to WatchGuard Cloud
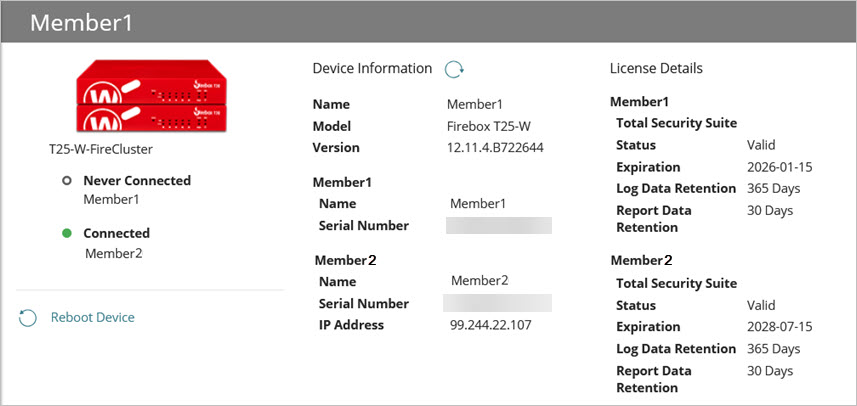
In WatchGuard Cloud, select Monitor > Devices and view the Device Summary of the FireCluster to verify the connection to WatchGuard Cloud.
Only the cluster master connects to WatchGuard Cloud.
- The status of the cluster master is Connected.
- The status of the backup master is Never Connected or Not Connected because the backup master connects only if the current cluster master is unavailable.
Change a Locally-Managed FireCluster to Cloud Management
If you previously added a locally-managed FireCluster to WatchGuard Cloud for visibility, you can change the FireCluster to cloud management.
After you change the management type and deploy the change, the cloud-managed configuration replaces the locally-managed configuration on the Firebox. You can no longer locally manage the FireCluster in WatchGuard System Manager or Fireware Web UI.
- Log in to your WatchGuard Cloud Subscriber account.
For Service Provider operators, from Account Manager, select My Account. - Select Configure > Devices.
- Select the FireCluster.
The Device Settings page opens. - In the Cloud Management section, click Change to Cloud Management.
The Add Device wizard opens. - (Optional) Edit the FireCluster Name.
- (Optional) Edit the Member1 Name.
- (Optional) Edit the Member2 Name.
- (Optional) Edit the Time Zone.
- Click Next.
- From the Cluster Interface drop-down list, select an interface.
Cluster members use this dedicated interface to exchange heartbeat packets and to synchronize connection and session information. - In the Member1 Cluster IP Address and Member2 Cluster IP Address text boxes, enter an IP address that is not in use on your network.
To avoid conflicts with routable IP addresses, we recommend APIPA addresses or IP addresses from a dedicated private subnet. - In the Cluster ID text box, enter a number from 1 through 255.
The Cluster ID determines the virtual MAC (VMAC) addresses used by the interfaces of the clustered devices. If you add a second FireCluster to the same subnet, set the Cluster ID to a number that is different enough from the Cluster ID of the first FireCluster to avoid a virtual MAC address conflict. For information on how the VMAC address is calculated, go to Active/Passive Cluster ID and the Virtual MAC Address.
- (Optional) To add redundancy, select Assign Backup Cluster Interface. The FireCluster uses the backup cluster interface if the primary cluster interface fails. We recommend this option for FireCluster configurations without a direct cable connection between cluster members. For more information about this setting, go to Before You Configure a Cloud-Managed FireCluster in WatchGuard Cloud.
- From the Backup Cluster Interface drop-down list, select an interface.
- In the Member1 Cluster Backup IP Address and Member2 Cluster Backup IP Address text boxes, enter an IP address that is not in use on your network. To avoid conflicts with routable IP addresses, we recommend APIPA addresses or IP addresses from a dedicated private subnet.
If you use both primary and backup cluster interfaces, the interfaces must be on different subnets. We recommend that you do not use a switch between each member for the cluster interfaces. If you do use a switch between cluster members, the cluster interfaces must be logically separated from each other on different VLANs. We recommend that you configure a backup cluster interface if you separate the cluster interfaces with a switch.
- Click Next.
- (Optional) Edit the IP Address Configuration. From the drop-down list, select Static, DHCP, or PPPoE.
- In the IP Address text box, enter an IP address for the external interface.
- In the Gateway text box, enter an IP address for the gateway.
- In the Public DNS Server text box, enter the IP address of a public DNS server for name resolution.
- Click Next.
- (Optional) Edit the Internal Network IP Address.
- (Optional) Select Enable DHCP Server on Internal Network.
- Enter a Starting IP Address.
- Enter an Ending IP Address.
- In the Member1 Communication IP Address text box, type an IP address that is on the same subnet as your internal network. Your Dimension or syslog server must also be on this network.
- In the Member2 Communication IP Address text box, type an IP address that is on the same subnet as your internal network. Your Dimension or syslog server must also be on this network.
- Click Next.
- (Optional) If your Firebox is a wireless model, on the Configure Wireless Settings page, you can enable these options:
- Enable Wireless — If you enable this option, enter the SSID and Passphrase for your internal wireless network.
- Enable Guest Wireless — If you enable this option, enter the SSID and Passphrase for your guest wireless network.
- Enter the passwords for the built-in Status and Admin user accounts. The passwords must be different.
- To complete the configuration and change to cloud management, click OK.
The confirmation page opens.
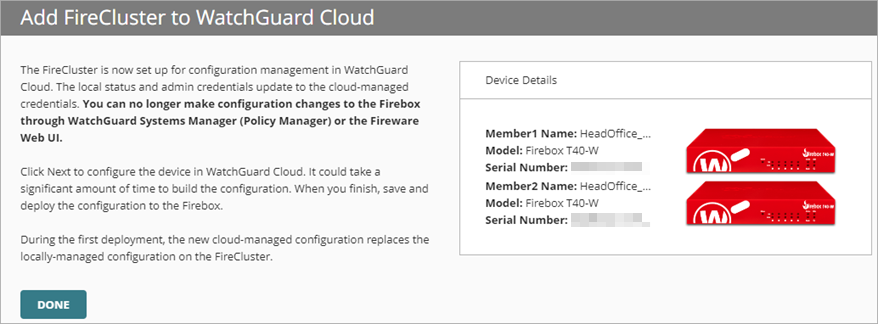
- Click Done.
After you deploy the configuration change, the cloud-managed configuration replaces the locally-managed configuration on the Firebox. You can no longer locally manage the FireCluster in WatchGuard System Manager, Fireware Web UI, or CLI.
- Schedule a deployment.
For more information, go to Manage Device Configuration Deployment. - In WatchGuard Cloud, select Monitor > Devices and view the Device Summary of the FireCluster to verify the connection to WatchGuard Cloud.
- The status of the cluster master is Connected.
- The status of the backup master is Never Connected or Not Connected because the backup master connects only if the current cluster master is unavailable.
Only the cluster master connects to WatchGuard Cloud.
Change a Cloud-Managed Firebox to a Cloud-Managed FireCluster Member
To change a single cloud-managed Firebox to a cloud-managed FireCluster member, you must:
- Remove the device from cloud management so that it is locally managed. For more information, go to Change the FireCluster Management Type.
- Configure a locally-managed cluster. For more information, go to Configure FireCluster with the Setup Wizard.
- Add the FireCluster in WatchGuard Cloud as a locally-managed cluster with visibility, and then change the FireCluster to cloud management. For more information, go to Change the FireCluster Management Type.
Caution: The deployment history of a cloud-managed Firebox is no longer available after you add the device to a cloud-managed FireCluster. This means that when you complete the configuration of a cloud-managed FireCluster, you cannot revert to earlier deployment versions of the cloud-managed Firebox.
Manage the FireCluster
After you add a cloud-managed FireCluster, you can:
- Edit the FireCluster Settings
- Upgrade the firmware
- Reboot cluster members
- Fail over a FireCluster
- Monitor FireClusters
- Troubleshoot a FireCluster
- Manage FireCluster Logging in WatchGuard Cloud
About FireCluster in WatchGuard Cloud
Change the FireCluster Management Type
Remove a FireCluster from WatchGuard Cloud
Configure an RMA Replacement for a Cloud-Managed FireCluster Member
Copy Configuration Settings from a Cloud-Managed Firebox
Import Configuration Settings from a Firebox Configuration File