Applies To: WatchGuard Core MDR, WatchGuard Core MDR for Microsoft, WatchGuard Total MDR, WatchGuard Open MDR
With WatchGuard MDR Vulnerability Scanner, you can configure vulnerability scanning for endpoints that run the WatchGuard Agent and schedule internal and external scans from the Managed Services portal. After scans complete, findings show on the Vulnerabilities pages so you can review them and manage risk.
Before You Begin
Before you configure vulnerability scanning, make sure that you:
- Purchase and allocate WatchGuard Vulnerability Scanner licenses to the Subscriber account. For more information, go to About WatchGuard MDR Licenses.
- Review System Requirements
To install and configure vulnerability scanning, you must be a Service Provider (Owner), a tier-n Subscriber (Admin) with Service Access enabled, or a tier-1 Subscriber (Admin). For more information about permissions in the Managed Services portal, go to Permissions for the Managed Services Portal.
Your account must have an active WatchGuard Vulnerability Scanner license. If the license is not active, you cannot schedule scans. Any previously scheduled scans change to on-demand so they do not run automatically.
Review System Requirements
The computers on which you install the WatchGuard Agent and Vulnerability Scanner must meet these requirements.
Hardware and Software Requirements
- Operating System — Linux-based system. For supported Linux distributions and architectures, go to Supported Linux Distributions.
- CPU — 4 2-GHz cores
- Memory — Minimum 4 GB (8 GB RAM recommended)
- Available Disk Space — Minimum 30 GB, not including space used by the host operating system
Network and Firewall Rules
The Linux computer that runs the WatchGuard Agent and Vulnerability Scanner must allow outgoing traffic on HTTP 443.
For external scans, you must add a location-specific IP range to an allowlist on your firewall. To find the correct IP range for your region, go to Cloud Sensors in the Tenable documentation.
Supported Linux Distributions
The computers on which you install the WatchGuard Agent and Vulnerability Scanner must run one of these supported Linux distributions:
| Linux Distribution | Supported Versions |
|---|---|
| AlmaLinux 8.10 and 9.5 |
x86_64 AArch64 |
|
Amazon Linux 2023, Amazon Linux 2 |
x86_64 AArch64 |
| CentOS Stream 9 and 10 | x86_64 |
| Debian 11, 12, and 13 | x86_64 |
| Kali Linux 2020 | x86_64 |
| Fedora 41 and 42 | x86_64 |
| Oracle Linux (including Unbreakable Enterprise Kernel) 7, 8, and 9 |
x86_64 AArch64 |
| Raspberry Pi OS | ARMHF |
| Red Hat EL 7.9 | x86_64 |
| Red Hat EL 8.4, 8.6, 8.8, 8.10, 9.0, 9.2, 9.4 and later, and 10 |
x86_64 AArch64 |
| Rocky Linux 8.10 and 9.5 |
x86_64 AArch64 |
| SUSE 12 SP5, SUSE Enterprise 15 SP3 and later | x86_64 |
| TencentOS 3.x | x86_64 |
| Ubuntu 16.04 | x86 |
| Ubuntu 16.04, 18.04, 20.04, 22.04, and 24.04 | x86_64 |
| Ubuntu 18.04, 20.04, 22.04, and 24.04 | AArch64 |
Install the WatchGuard Agent
The WatchGuard Agent is an application that you install on endpoints in your network so that WatchGuard Cloud can communicate with them and deploy software. Install the WatchGuard Agent on each Linux computer you want to add a WatchGuard Agent MDR service to.
If the WatchGuard Agent is already installed on the endpoint, it shows in the Endpoints with WatchGuard Agent list on Monitor > Managed Services > Onboarding > WatchGuard Agent.
To install the WatchGuard Agent:
- Log in to your WatchGuard Cloud account.
- Select Monitor > Managed Services.
The Managed Services portal opens in a new browser tab. - If you are a Service Provider, select an account from the drop-down list.
- In the upper-right corner of the Managed Services portal, click
 .
. - From the drop-down list, select Onboarding.
- From the navigation menu, select WatchGuard Agent.
The WatchGuard Agent page opens.
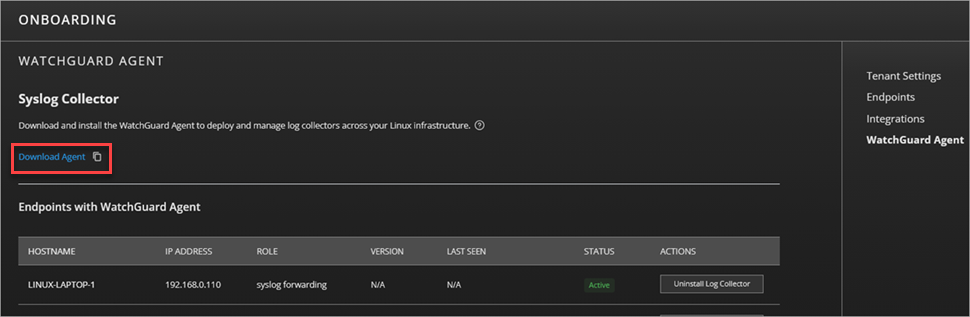
- Click Download Agent.
The WatchGuard Agent.RUN file downloads. - Copy the .RUN file to the Linux computer you want to install a WatchGuard Agent MDR service on.
- To install the WatchGuard Agent, from the Linux computer, run this command:
sudo bash "WatchGuard Agent.run" - To verify that the WatchGuard Agent installed successfully, make sure that the endpoint shows in the Endpoints with WatchGuard Agent list in the Managed Services portal.

Install Vulnerability Scanner
After you install the WatchGuard Agent, you can install the Vulnerability Scanner service on that endpoint. An endpoint can have more than one service role, such as Log Forwarder and Vulnerability Scanner.
To install Vulnerability Scanner:
- Log in to your WatchGuard Cloud account.
- Select Monitor > Managed Services.
The Managed Services portal opens in a new browser tab. - If you are a Service Provider, select an account from the drop-down list.
- In the upper-right corner of the Managed Services portal, click .
- From the drop-down list, select Onboarding.
- From the navigation menu, select WatchGuard Agent.
The WatchGuard Agent page opens and shows the Endpoints with WatchGuard Agent list. - In the Actions column for the endpoint, click Install.
After the installation completes, the Status column shows Active for Vulnerability Scanner.
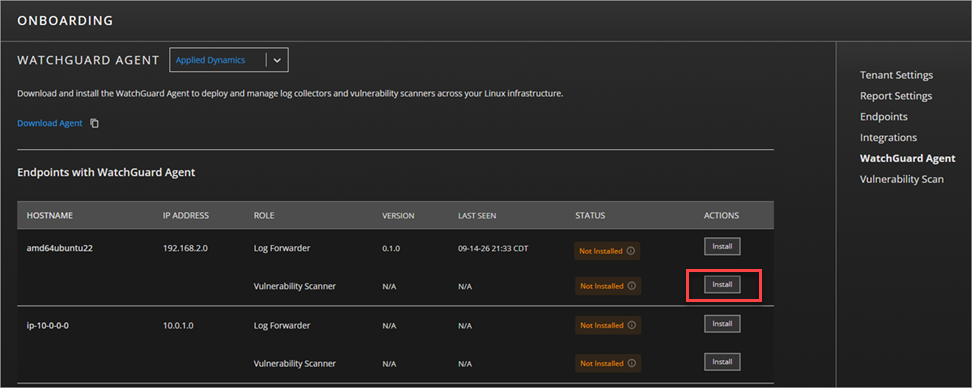
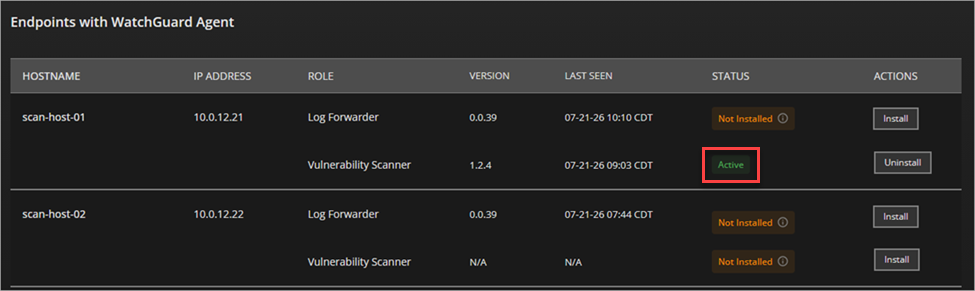
The Status column can show:
- Active — Vulnerability Scanning is installed and runs on the endpoint.
- Not Installed — The WatchGuard Agent is installed, but Vulnerability Scanning is not installed.
- Deactivated — Vulnerability Scanning was installed previously and is no longer active.
Configure Vulnerability Scan Settings
After you install Vulnerability Scanner, schedule internal and external scans on the Vulnerability Scan page. For each scan type, you specify the IP address range, the day of the month to run the scan, and the time of day to start the scan.
You cannot submit a scan schedule if a scan for the account completed and returned results within the last seven days. The IP addresses in your scan ranges cannot exceed the number of IP addresses included in your Vulnerability Scanner license.
To configure vulnerability scan settings:
- Log in to your WatchGuard Cloud account.
- Select Monitor > Managed Services.
The Managed Services portal opens in a new browser tab. - If you are a Service Provider, select an account from the drop-down list.
- In the upper-right corner of the Managed Services portal, click .
- From the drop-down list, select Onboarding.
- From the navigation menu, select Vulnerability Scan.
The Vulnerability Scan page opens. - To configure an external scan, select the External IPs tab, then specify these settings:
- External IP Address Range — Type one or more public IP addresses, CIDR ranges, or Fully Qualified Domain Names (FQDN) to scan. For example, 203.0.113.0/24 or www.example.com.
- Scan Day — Select the day of the month to run the scan (1–28).
- Scan Time — Select the time of day to start the scan.
- To configure an internal scan, select the Internal IPs tab, then specify these settings:
- Internal IP Address Range — Type one or more private IP addresses, CIDR ranges, or FQDNs to scan. For example, 10.0.1.0/24.
- Scan Day — Select the day of the month to run the scan (1–28).
- Scan Time — Select the time of day to start the scan.
- Click Submit Request.
If the schedule is accepted, a notification confirms that the request is successful. If the request fails, the notification includes information to help you adjust the settings.
After you submit a schedule, you can review these read-only details for each configured scan:
- Scan Name — A system-generated name, such as hostname-External-1 or hostname-Internal-1.
- IP Range — The configured IP address range.
- Scan Day — The configured day of the month for the scan.
For more information about how to review scan findings after scans complete, go to Review Vulnerability Scan Results.
Verify the Service Status
To verify service status for vulnerability scanning, view the Vulnerability Scanning section on the Service Status page in the Managed Services portal in WatchGuard Cloud.
To verify the status:
- In WatchGuard Cloud, select Monitor > Managed Services.
The Managed Services portal opens in a new browser tab. - If you are a Service Provider, select your Subscriber account from the drop-down list.
- Select Connections > Service Status.
The Service Status page opens.

For more information, go to Review MDR Connection Service Status.
Uninstall Vulnerability Scanner
To stop an endpoint from running vulnerability scans, you can uninstall the Vulnerability Scanner from the WatchGuard Agent page. If you uninstall Vulnerability Scanner, the WatchGuard Agent and other services remain on the endpoint.
To uninstall Vulnerability Scanner from an endpoint:
- Log in to your WatchGuard Cloud account.
- Select Monitor > Managed Services.
The Managed Services portal opens in a new browser tab. - If you are a Service Provider, select an account from the drop-down list.
- In the upper-right corner of the Managed Services portal, click .
- From the drop-down list, select Onboarding.
- From the navigation menu, select WatchGuard Agent.
The WatchGuard Agent page opens and shows the Endpoints with WatchGuard Agent list. - In the Actions column for the endpoint with Vulnerability Scanner, click Uninstall.
The WatchGuard Agent uninstalls the Vulnerability Scanner from the endpoint.
Troubleshoot the WatchGuard MDR Vulnerability Scanner
Use the information in this section to help you diagnose and resolve issues with the WatchGuard MDR Vulnerability Scanner.
To troubleshoot the WatchGuard MDR Vulnerability Scanner:
- Make sure that the computer running the WatchGuard Agent and Vulnerability Scanner meets the requirements described in the Review System Requirements section.
- Make sure that the vulnerability scanner is installed as a systemd service and that it is running without errors.
- To verify the service status, run this command:
- sudo systemctl status nessusd
- If the service is not active, investigate the reported errors or try to restart it.
- To verify the service status, run this command:
Review Vulnerability Scan Results