Applies To: Locally-managed Fireboxes
When you configure the global authentication settings for your Firebox, you can configure the global values for firewall authentication, which include timeout values, user login session limits, and authentication page redirect settings. You can also enable Single Sign-On (SSO), and configure settings for Terminal Services. For more information about SSO and Terminal Services, go to Enable Active Directory SSO on the Firebox and Configure Terminal Services Settings.
If you configure user login session limits for individual users or groups, the limits set for a group and for a user take precedence over the global setting.
You can also configure global settings that apply to Device Management user accounts.
Specify Firewall Authentication Settings
To configure Firewall Authentication settings, from Fireware Web UI:
- Connect to Fireware Web UI.
- Select Authentication > Settings.
The Settings page appears. - Configure authentication settings as described in the next sections.
- Click Save.
To configure Firewall Authentication settings, from Policy Manager:
- Open Policy Manager.
- Select Setup > Authentication > Authentication Settings.
The Authentication Settings dialog box appears with the Firewall Authentication tab selected by default. - Configure authentication settings as described in the next sections.
- Click OK.
Set Global Authentication Timeouts
You can set the time period that users remain authenticated after they close their last authenticated connection. For users authenticated by external servers, the timeouts set on those servers also override the global authentication timeouts.
The Firebox considers all authentication servers other than Firebox-DB as external authentication servers. To set the authentication timeout values when you use an external server for authentication, you must configure the settings in the external server portal. For more information on how to configure the timeout values for an external server, go to the documentation of the external server that you use.
Global authentication timeout values for Firewall Authentication do not override the individual user authentication timeout settings for Mobile VPN with L2TP or Mobile VPN with IKEv2 users.
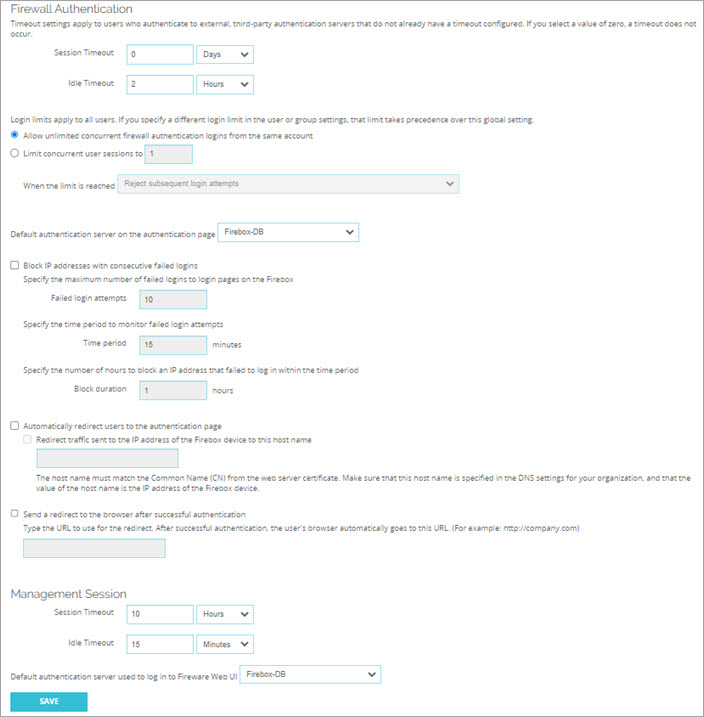
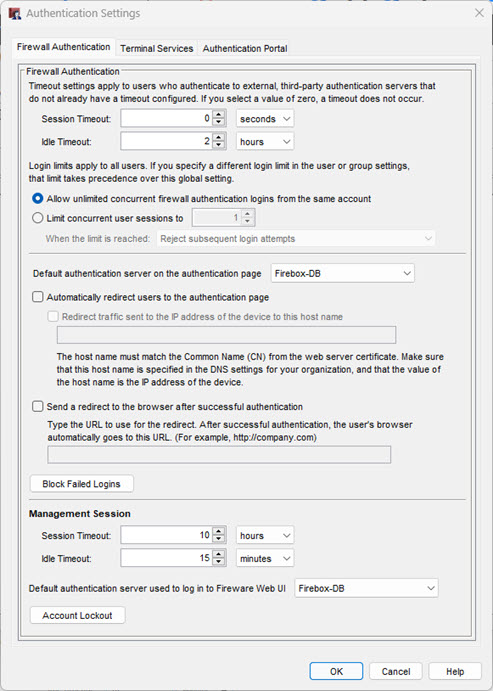
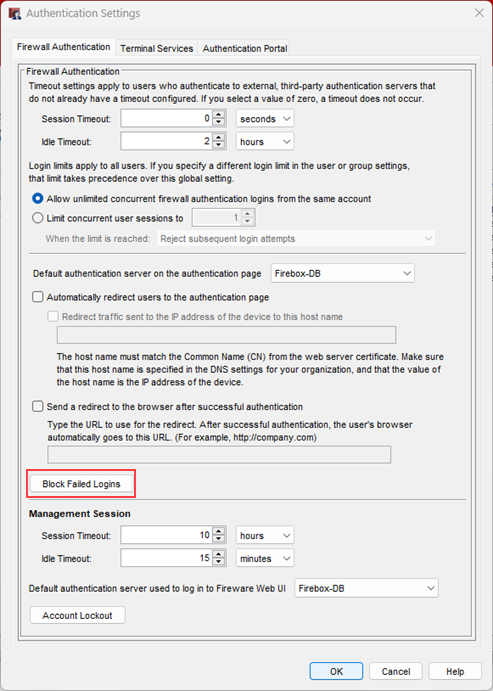
Session Timeout
The maximum length of time the user can send traffic to the external network. If you set this value to zero (0) seconds, minutes, hours, or days, the session does not expire and the user can stay connected for any length of time.
Idle Timeout
The maximum length of time the user can stay authenticated when idle (not passing any traffic to the external network). If you set this value to zero (0) seconds, minutes, hours, or days, the session does not time out when idle and the user can stay idle for any length of time.
If you have a page open that actively retrieves data from the Firebox, such as the Front Panel or Traffic Monitor, the connection is not considered idle.
If you set the Session Timeout or Idle Timeout to 0, authenticated users can remain authenticated until the Firebox is rebooted. If your network uses DHCP, the IP address for an authenticated user could be reassigned to a completely different user. If this happens, the new user can connect to your network without authentication.
For more information about user authentication settings, go to Define a New User for Firebox Authentication.
Allow Unlimited Concurrent Login Sessions
By default, the Allow Unlimited Concurrent Firewall Authentication Logins from the Same Account option is selected. This option allows users to authenticate to the authentication server more than once at the same time. This is useful for guest accounts or in laboratory environments.
Global authentication settings for concurrent user sessions do not apply to mobile VPN sessions.
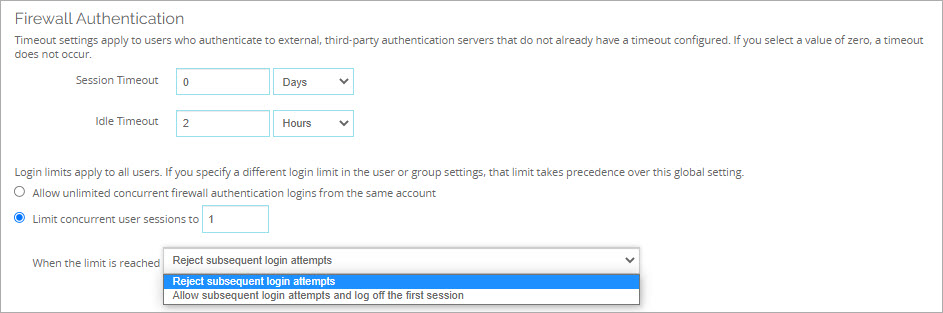
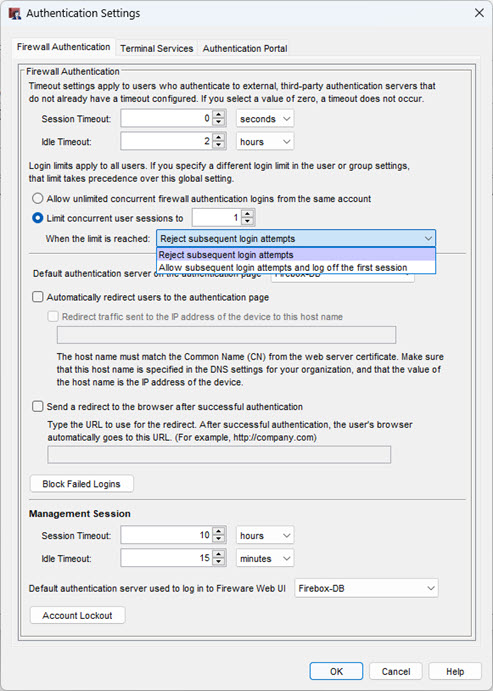
Limit Login Sessions
To restrict your users to a specific number of authenticated sessions, select Limit Concurrent User Sessions To. If you select this option, you can specify the number of times your users can use the same credentials to log in to one authentication server from different IP addresses. When a user is authenticated and tries to authenticate again, you can select whether the first user session is terminated when an additional session is authenticated, or if the additional sessions are rejected.
You can configure login session limits at the global, group, and user level.
- User settings take precedence over the group and global settings.
- If user's login session limits are not configured, group settings take precedence, if configured.
- If a user belongs to more than one group, the settings for the first group in the user's group list takes precedence.
- If user or group login session limits are not configured, the global settings are used.
- Select Authentication > Settings.
The Authentication Settings page appears. - Select Limit Concurrent User Sessions To.
- In the text box, type or select the number of allowed concurrent user sessions.
- From the drop-down list, select an option:
- Reject Subsequent Login Attempts
- Allow Subsequent Login Attempts and Logoff the First Session.
Firewall Authentication settings in Fireware Web UI
Firewall Authentication settings in Policy Manager
Specify the Default Authentication Server in the Authentication Portal
When your users log in to the Authentication Portal or Fireware Web UI, they must select which authentication server to use for authentication. Users can select from any of the authentication servers you have enabled. By default, the first server in the list is Firebox-DB. You can change this setting so another enabled authentication server is first in the list of authentication servers. This is helpful if you want your users to authenticate with a server other than Firebox-DB.
To select the default authentication server for the Authentication Portal:
From the Default Authentication Server on the Authentication Page drop-down list, select an authentication server.
For example, if you want your users to authenticate to your Home AD Active Directory server, from the drop-down list, select Home AD.
To select the default authentication server for Fireware Web UI:
From the Default Authentication Server Used to Log In to Fireware Web UI drop-down list, select an authentication server.
For example, if you want your users to authenticate with AuthPoint MFA, from the drop-down list, select the AuthPoint authentication server.
Automatically Redirect Users to the Authentication Portal
If you require your users to authenticate before they can get access to the Internet, you can choose to automatically send users who are not already authenticated to the authentication portal, or have them manually navigate to the portal. This applies only to HTTP and HTTPS connections.
Automatically redirect users to the authentication page
When you select this check box, all users who have not yet authenticated are automatically redirected to the authentication portal when they try to get access to the Internet. If you do not select this check box, unauthenticated users must manually navigate to the authentication portal to log in.
If this option is selected, users are only redirected if the device configuration does not include a policy that allows HTTP or HTTPS traffic from the users IP addresses. To make sure that your users are automatically redirected to the authentication page, you can remove any allow HTTP or HTTPS policies other than those that include your authorized users or groups.
For more information about user authentication, go to User Authentication Steps.
Redirect traffic sent to the IP address of the Firebox to this host name
Select this check box to specify a host name for the page where your users are redirected, when you choose to automatically redirect users to the authentication portal. Type the host name in the text box.
Make sure that the host name matches the Common Name (CN) from the web server certificate. This host name must be specified in the DNS settings for your organization and the value of the host name must be the IP address of your Firebox.
If you have users who must manually authenticate to the authentication portal, and you use SSO, you can add an SSO exception for those users to reduce the amount of time it takes for them to authenticate. For more information about SSO exceptions, go to Enable Active Directory SSO on the Firebox.
Users are only redirected to the Authentication Portal if the HTTP or HTTPS request does not match the policies on your Firebox. To make sure users are redirected to the Authentication Portal, you must make sure that your device configuration does not include an HTTP or HTTPS policy that allows user connections, which does not include the user name or user group in the From list. Because the default Outgoing policy includes all TCP and UDP ports, you must either disable the Outgoing policy, or edit the Outgoing policy to include user names or user groups in the From list.
After you have made any necessary configuration changes, to make sure that your users can reach the Authentication Portal, verify that users can connect to a local or external DNS server. Before an HTTP or HTTPS request can be completed for a user, the user must be able to resolve the DNS name of a website external to your network.
If authentication redirection is enabled and a user browses to an HTTPS website, a certificate warning message appears in the browser. This occurs because the redirected page request does not match the address in the browser address bar.
Use a Custom Default Start Page
When you select the Automatically Redirect Users to Authentication Page check box to require your users to authenticate before they can get access to the Internet, the authentication portal automatically appears when a user opens a web browser. If you want the browser to go to a different page after your users successfully log in, you can define a redirect.
To specify a redirect:
- Select the Send a Redirect to the Browser after Successful Authentication check box.
- In the text box, type the URL of the website where users are redirected.
Set Management Session Timeouts
Use these options to set the time period that a user who is logged in with read/write privileges remains authenticated before the Firebox terminates the session.
Session Timeout
The maximum length of time the user can send traffic to the external network. If you select zero (0) seconds, minutes, hours, or days, the session does not expire and the user can stay connected for any length of time.
Idle Timeout
The maximum length of time the user can stay authenticated when idle (not passing any traffic to the external network). If you select zero (0) seconds, minutes, hours, or days, the session does not expire when the user is idle, and the user can stay idle for any length of time.
Configure Device Management Account Lockout Settings
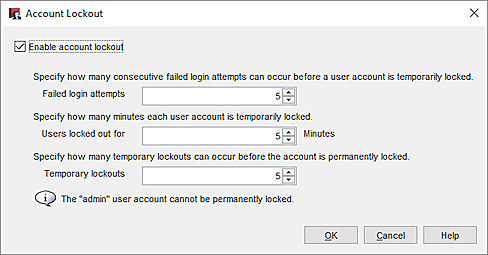
To prevent brute force attempts to guess passwords for Device Management user accounts, you can enable the Account Lockout feature. When Account Lockout is enabled, the Firebox temporarily locks a user account after a specified number of consecutive, unsuccessful login attempts, and permanently locks a user account after a specified number of temporary account lockouts. Only a user with Device Administrator credentials can unlock a permanently locked user account.
The Account Lockout settings on this page apply only to Device Management user accounts configured with Firebox-DB authentication. To enforce account lockout for Device Management user accounts configured with other authentication types, you must configure the account lockout settings on those authentication servers.
The default admin user account can be temporarily locked but cannot be permanently locked.
- Select System > Users and Roles.
The Users and Roles page opens. - Select the Account Lockout tab.
- Select the Enable Account Lockout check box.

- In the Failed Login Attempts text box, type the number of consecutive failed login attempts that can occur before a user account is temporarily locked.
- In the Users Locked Out For text box, type the number of minutes that a temporarily locked account remains locked.
- In the Temporary Lockouts text box, type the number of temporary lockouts that can occur before an account is permanently locked. Tip!
- Click Save.
- Select Setup > Authentication > Authentication Settings.
- In the Management Session section, click Account Lockout.
The Account Lockout dialog box opens.
- Select the Enable Account Lockout check box.
- In the Failed Login Attempts text box, type the number of consecutive failed login attempts that can occur before a user account is temporarily locked.
- In the Users Locked Out For text box, type the number of minutes that a temporarily locked account remains locked.
- In the Temporary Lockouts text box, type the number of temporary lockouts that can occur before an account is permanently locked. Tip!
- Click OK.
For information about how to unlock a locked Device Management user account, go to Manage Users and Roles on Your Locally-Managed Firebox.
Configure Block Failed Logins Settings
To help prevent brute force attacks against the login pages of a locally-managed Firebox, you can enable the Block IP Addresses with Consecutive Failed Logins feature. This feature blocks an IP address that makes consecutive failed login attempts to these login pages on the locally-managed Firebox:
- Fireware Web UI
- Mobile VPN with SSL client
- Mobile VPN with SSL client download page
- Access Portal
- Authentication Portal
In Fireware v12.11 and higher, the Mobile VPN with SSL client download page is removed from the Firebox.
In Fireware v12.11 and higher, this feature is enabled by default in new and upgraded configurations, unless you previously saved changes to authentication settings in Fireware v12.10.4.
We recommend that you enable this feature if appropriate in your environment.
When you enable Block IP Addresses with Consecutive Failed Logins, the Firebox temporarily blocks an IP address after a specified number of consecutive failed authentication attempts within a specified time period. The Firebox automatically adds the blocked IP address to the Blocked Sites list with a Reason of block failed logins. For more information, go to About Blocked Sites.
The number of consecutive failed authentication attempts you enter is used for the total number of failed attempts to all login pages on the Firebox. For example, if you allow 5 failed authentication attempts and there are 2 failed authentication attempts to the Web UI and 3 failed authentication attempts to the Access Portal from the same IP address, the Firebox blocks the IP address.
This feature does not block failed login attempts for the Fireware Web UI login page when the account user name is not admin or status.
In Fireware v12.11 and higher, this feature blocks failed login attempts for AuthPoint users. In Fireware v12.10.4, this feature does not block failed AuthPoint authentications.
- Select Authentication > Settings.
The Settings page opens. - Select the Block IP Addresses with Consecutive Failed Logins check box.

- In the Failed Login Attempts text box, enter the maximum number of failed login attempts that can occur before the Firebox temporarily blocks the source IP address.
The value that you enter is the total number of failed login attempts to all login pages on the Firebox.
- In the Time Period text box, enter the number of minutes that the consecutive failed login attempts must occur in for the Firebox to block the IP address.
- In the Block Duration text box, enter the number of hours to block the IP address.
- Click Save.
For information about how to change the expiration of the block duration for a temporarily blocked IP address, go to Blocked Sites. You can add a Blocked Site exception to allow an IP address that is currently blocked. For information about how to add an exception, go to Create Blocked Sites Exceptions.
When the feature blocks a source IP address, Traffic Monitor shows the IP address as blocked with reason = block failed logins.
- Select Setup > Authentication > Authentication Settings.
The Authentication Settings dialog box opens. - Click Block Failed Logins.
The settings page opens.
- Select the Block IP Addresses with Consecutive Failed Logins check box.

- In the Failed Login Attempts text box, enter the number of consecutive failed login attempts that must occur before the Firebox temporarily blocks the source IP address.
The value that you enter is the total number of all failed login attempts to all login pages on the Firebox.
- In the Time Period text box, enter the number of minutes that the consecutive failed login attempts must occur in for the Firebox to temporarily block the IP address.
- In the Block Duration text box, enter the number of hours to block an IP address.
- Click OK.
For information about how to change the expiration of the block duration for a temporarily blocked IP address, go to Blocked Sites. You can also add a Blocked Site exception to allow an IP address that is currently blocked. For information about how to add an exception, go to Create Blocked Sites Exceptions.
When the feature blocks a source IP address, Traffic Monitor shows the IP address as blocked with reason = block failed logins.
Configure Your Firebox as an Authentication Server
How Active Directory SSO Works
Install the WatchGuard Single Sign-On (SSO) Agent and Event Log Monitor