Applies To: Cloud-managed Fireboxes
You can configure a policy-based Branch Office VPN (BOVPN) between a cloud-managed Firebox and a locally-managed Firebox or third-party VPN endpoint that supports IKEv2 VPN. A policy-based BOVPN is established when you define a set of local-remote pairs that specify the source and destination of the traffic that utilizes the tunnel. At each endpoint, you define the network resources accessible through the tunnel route. This creates a mesh of possible local-remote pairs. You can enable or disable specific local-remote pairs from the Tunnel Routes page.
You might use a policy-based BOVPN when you have no authority over the remote endpoint and you cannot configure the endpoint settings to support the more common route-based BOVPN. We recommend that you use a policy-based BOVPN when the remote endpoint cannot support a route-based BOVPN.
Policy-based BOVPNs do not support IKEv1 VPN endpoints.
When you configure a policy-based BOVPN, WatchGuard Cloud creates an IPSec tunnel between the cloud-managed Firebox and the remote endpoint. Use this option to manage a BOVPN tunnel in WatchGuard Cloud between a cloud-managed Firebox and a remote endpoint that you cannot easily configure with a route-based BOVPN. You cannot configure a policy-based BOVPN between two cloud-managed Fireboxes.
In Fireware Help, a policy-based BOVPN is referred to as a Manual BOVPN.
When you configure a policy-based BOVPN, WatchGuard Cloud deploys the configuration to the cloud-managed Firebox. From the cloud-managed Firebox, you configure:
- VPN Gateways — The external networks the two devices use to connect.
- Credential Method — Select one of two options:
- Pre-Shared Key — A shared secret used to encrypt and decrypt data that goes through the tunnel. Use a key length of 20 or more characters.
- Certificate — An IPSec Firebox certificate used for tunnel authentication. For more information, go to Certificates for Branch Office VPN (BOVPN) Tunnel Authentication in Fireware Help.
- NAT — (Optional) When you create a Branch Office VPN (BOVPN) tunnel between two networks that use the same private IP address range, an IP address conflict occurs. To create a tunnel without this conflict, you can add NAT to the VPN.
Select one of two options:- 1-to-1 NAT — Creates a map from one or more IP addresses in one range to a second IP address range of the same size. Each IP address in the first range corresponds to an IP address in the second range. For more information, go to Configure 1-to-1 NAT Through a Branch Office VPN Tunnel in Fireware Help.
- Dynamic NAT — Most frequently used type of NAT. Dynamic NAT changes the source IP address of an outgoing connection to any IP address or network that you specify. For more information, go to About Dynamic NAT in Fireware Help.
- Network Resources — The networks that can send and receive traffic through the tunnel.
- Attempt to Resolve Domain — The Firebox automatically performs a DNS query to identify the IP address associated with the domain name of the other endpoint, even when that IP address changes. Connections do not proceed until the domain name can be resolved.
Select this option if your configuration relies on a dynamic DNS server to maintain a mapping between a dynamic IP address and a domain name. - Security Settings — Authentication and encryption settings for VPN negotiation.
- Dead Peer Detection (DPD) — Firebox detects when a tunnel disconnects and automatically starts a new Phase 1 negotiation. Always enabled and can be Traffic-Based or Timer-Based.
Traffic-Based DPD — The Firebox sends a DPD message to the remote gateway only if the Firebox receives no traffic from the remote gateway for a specified length of time and a packet is waiting to be sent to the remote gateway.
Timer-Based DPD — The Firebox initiates a DPD exchange with the remote gateway at a specified message interval, regardless of any other traffic received from the remote gateway.
- NAT Traversal Keep-Alive Interval — Controls how often the Firebox sends traffic through the tunnel to keep the tunnel active when no other tunnel traffic exists. The default value is 20 seconds.
- Enable Don't Fragment (DF) Bit Settings — (Optional) Specifies whether the Firebox uses the original DF bit setting in the header of a packet.
- Start Phase 1 Tunnel When Firebox Starts — Specifies whether the remote endpoint initiates the tunnel.
- Dead Peer Detection (DPD) — Firebox detects when a tunnel disconnects and automatically starts a new Phase 1 negotiation. Always enabled and can be Traffic-Based or Timer-Based.
You cannot configure VPN failover for policy-based BOVPN third-party endpoints.
Policy-Based BOVPNs and Routing
In the BOVPN configuration, you specify the network resources that are accessible through the BOVPN tunnel. By default, the Firebox uses system policies to specify how traffic must use the tunnel.
You can create your own policy to have more control over policy-based BOVPN traffic than the BOVPN-Allow-Any-in and BOVPN-Allow-Any-out system policies provide.
If you want to specify network resources for both endpoints in the same subnet, you must use NAT. If you do not use NAT, you cannot route traffic through a BOVPN tunnel between private networks that use the same IP address range.
For a policy-based BOVPN between a cloud-managed Firebox and a locally-managed Firebox or third-party VPN endpoint:
- The network resources you specify for the remote endpoint specify what traffic the Firebox routes through the tunnel.
- The network resources you specify for the Firebox are the resources that you want the remote endpoint to route through the VPN tunnel to the Firebox. For the Firebox to receive VPN traffic to these resources, the remote endpoint must be configured to route traffic to these IP addresses through the tunnel.
- Network traffic that leaves the Firebox must originate from a network resource that you specify for the Firebox and have a destination of a network resource on the remote endpoint.
- Network traffic that leaves the remote endpoint must originate from a network resource that you specify at the remote endpoint and have a destination of a network resource on the Firebox.
- Policy-based BOVPNs do not create system routes. The Firebox controls what goes through the BOVPN tunnel based on the source and destination of the traffic that matches the network resources that you provide at each endpoint.
BOVPNs and Automatic Deployment
When you add, edit, or remove a policy-based BOVPN, the BOVPN configuration is automatically deployed for the cloud-managed Firebox to download. To make sure that the automatic deployment contains only BOVPN configuration changes, you cannot save BOVPN changes if the Firebox has other undeployed configuration changes.
Add a BOVPN Between a Cloud-Managed Firebox and a Locally-Managed Firebox or Third-Party VPN Endpoint
You can add a policy-based BOVPN from the BOVPN page of a specific Firebox, or you can add the BOVPN from the WatchGuard Cloud VPNs page, which is a shared configuration page. For more information, go to Manage BOVPNs for Cloud-Managed Fireboxes.
To add a policy-based BOVPN to a cloud-managed Firebox, from WatchGuard Cloud:
- To open the BOVPN page, use one of these methods:
- To manage BOVPNs for all Fireboxes in the currently selected account, select Configure > VPNs.
- To manage BOVPNs for a specific Firebox, on the Device Configuration page, click the Branch Office VPN tile.
The BOVPN page shows currently configured BOVPNs.
- To manage BOVPNs for all Fireboxes in the currently selected account, select Configure > VPNs.

- Click Add BOVPN.
The Add BOVPN page opens. - In the Name text box, type a name for the BOVPN.
- From the VPN Connection Type drop-down list, select Policy-Based IPSec to Locally-Managed Firebox / Third-Party.
- From the Address Family drop-down list, select IPv4 Addresses or IPv6 Addresses.
If you select IPv6 Addresses, the other BOVPN endpoint must be configured to support IPv6.
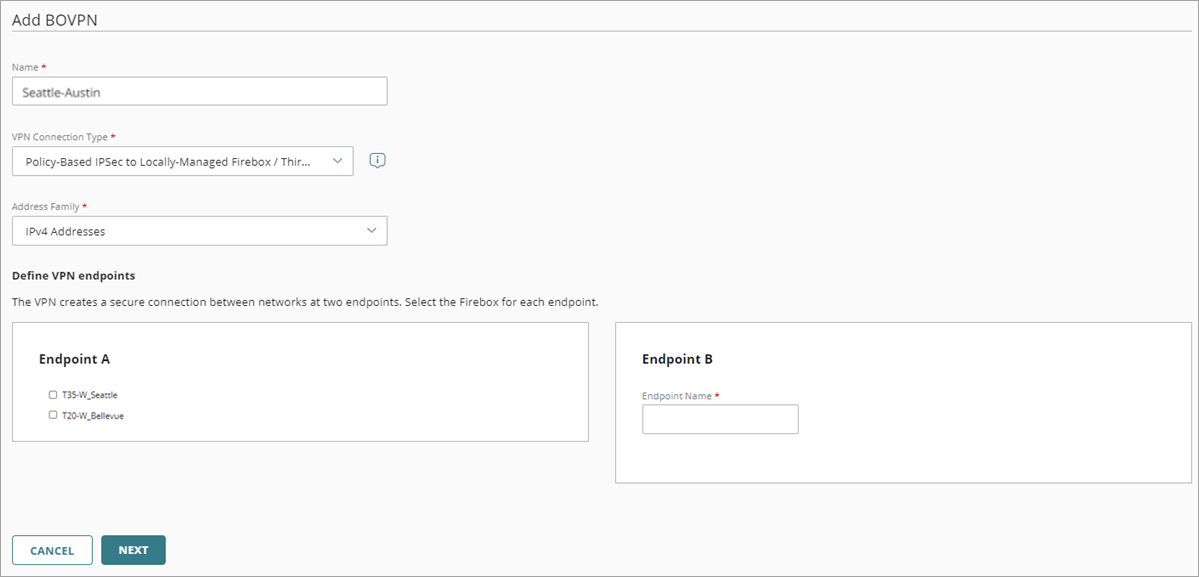
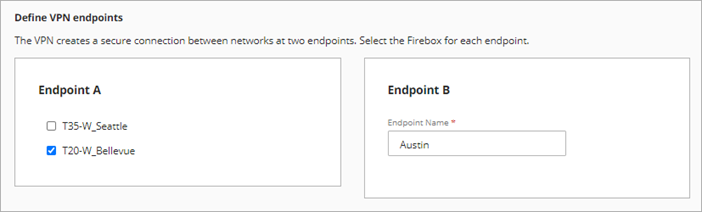
- In the Endpoint A section, select a cloud-managed Firebox from your account. You can only select one Firebox.
If you add the BOVPN from a Device Configuration page, the Endpoint A list contains only one Firebox. - In the Endpoint B section, in the Endpoint Name text box, type a name to identify the remote VPN endpoint.
The BOVPN configuration uses this name to refer to Endpoint B.
- Click Next.
The VPN Gateways settings page opens.

-
(Optional) BOVPN failover enables a BOVPN tunnel to automatically switch to an alternate gateway when the primary VPN path becomes unavailable. When you configure failover, VPN tunnels automatically fail over to a backup external interface if a failure occurs. You can add multiple local and remote endpoints (gateway endpoint pairs) to support failover.

To add multiple remote endpoints:
- Click the plus (+) button.
- In the IP or Domain Name or User on Domain text box, enter a domain name, user on domain, or IP address that resolves to the IP address of the remote endpoint.
- For a domain or a user on domain, to automatically perform a DNS query to identify the IP address associated with the domain name of the remote endpoint, select the Attempt to Resolve Domain check box.
- (Optional) To change the order in which the Firebox attempts connections, you can drag the endpoint to a new position in the Order list.
BOVPN virtual interface failover is supported only for specific third‑party VPN endpoint configurations. For more information about supported third-party integrations, go to BOVPN Virtual Interface Examples in Fireware Help.
- To use an IPSec Firebox certificate for this VPN connection, select Use IPSec Firebox Certificate. To use a pre-shared key instead, go to Step 11.
A certificate list opens.

- Select a certificate. For more information, go to About Device Certificates or Configure Certificate-Based Authentication for a Cloud-Managed BOVPN Tunnel.
- For the cloud-managed Firebox, select one external network.
- For the external network, specify the IP address in the IP Address drop-down list. Select the x500 name, domain name, or IP address. Available options depend on the certificate configuration.
For networks with an IP address configuration of DHCP or PPPoE, the default IP address is Any (Dynamic). - For the remote endpoint:
- In the IP Address drop-down list, select or enter an IP address.
- In the Endpoint ID text box, enter an x500 name, domain name, user on domain, or IP address that resolves to the IP address of the remote endpoint.
- To automatically perform a DNS query to identify the IP address associated with the domain name of the other endpoint, select the Attempt to Resolve Domain check box.
Select the Attempt to Resolve Domain check box only if you can publicly resolve the endpoint domain name. The Attempt to Resolve Domain check box is not available when you select an IP address.
- Click Next.
The Traffic page opens. - To use a pre-shared key for this VPN connection, for the cloud-managed Firebox, select an external network.
- In the IP or Domain Name or User on Domain text box, select an IP address, domain name, or user on domain that resolves to the Firebox external network IP address.
- For the remote endpoint, in the IP or Domain Name or User on Domain text box, type an IP address, domain name, or user on domain that resolves to the IP address of the remote endpoint. For example, a user on domain might be [email protected].
- To automatically perform a DNS query to identify the IP address associated with the domain name of the other endpoint, select the Attempt to Resolve Domain check box.
- In the Pre-Shared Key text box, type a pre-shared key to secure the VPN tunnel.
- Click Next.
The Traffic page opens.

Select the Attempt to Resolve Domain check box only if you can publicly resolve the endpoint domain name. The Attempt to Resolve Domain check box is not available when you select an IP address.
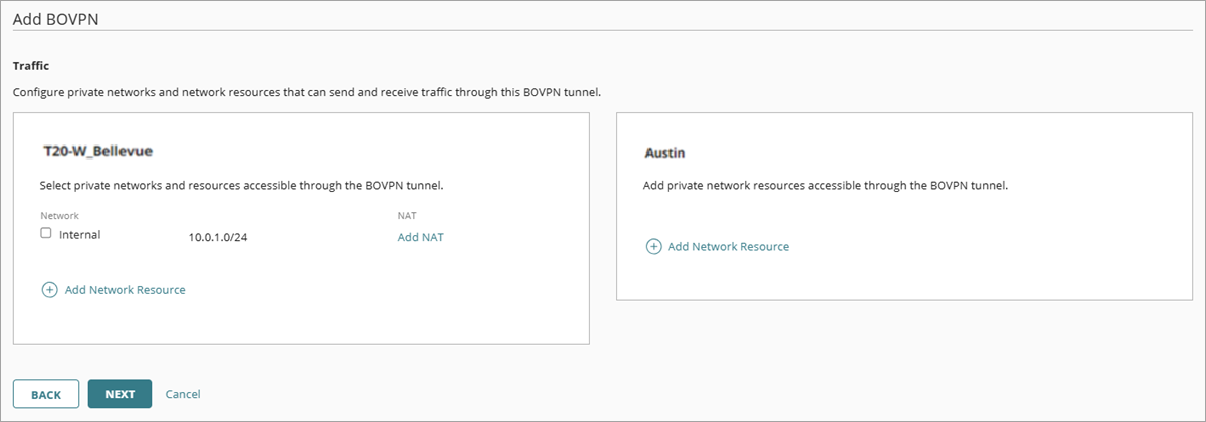
- Select the Firebox network that you want to be accessible through the VPN tunnel.
- (Optional) To avoid conflicts when both networks use the same private IP address range, add NAT to an endpoint.
You cannot set the traffic direction through the tunnel when you enable dynamic NAT. The default direction is outbound.
- Next to the cloud-managed endpoint you want to add NAT to, click Add NAT.
The Add NAT dialog box opens. - Select 1-to-1 Nat or Dynamic NAT.
- In the NAT Address text box, type an IP address and netmask for 1-to-1 NAT, or in the Source IP Address text box, type an IP address for dynamic NAT.


- Click Add.
The NAT information shows next to the network endpoint entry. - To add a network resource other than internal or guest networks:
- In the section for the Firebox resources, click Add Network Resource.
The Add Network Resource dialog box opens.
- In the Network Resource text box, type the network IP address and netmask.Tip!
- (Optional) To add NAT to a network resource, click Add NAT.
- In the section for the Firebox resources, click Add Network Resource.
- Add a network resource for the remote endpoint:
- In the section for the second endpoint, click Add Network Resource.
- In the Network Resource text box, type the network IP address and netmask.
- Click Add.
The network resource is added to the traffic settings for the endpoint.
- Repeat the previous step to add other network resources.
- Click Next.
The Tunnel Routes page opens.
To remove a NAT IP address, clear the NAT text box and click Save.

- From the Traffic Direction drop-down list, select the direction of traffic for the BOVPN route.
The default for traffic direction is Bidirectional. You can set the traffic direction to travel from Endpoint A to Endpoint B, Endpoint B to Endpoint A, or Bidirectional between the endpoints.
- (Optional) You can use the toggles to enable or disable tunnel routes from the Tunnel Routes page. When you disable a tunnel route, the Firebox does not try to establish that specific tunnel route between the two endpoints.

- Click Next.
The Security settings page opens.

- Accept the default security settings, or edit them to be the same as the settings supported by the remote VPN endpoint. For more information, go to Configure BOVPN Security Settings. For information about BOVPN throughput, go to Optimize BOVPN Throughput.
- Click Add.
The BOVPN deployment is added, and the BOVPN Guide page opens.
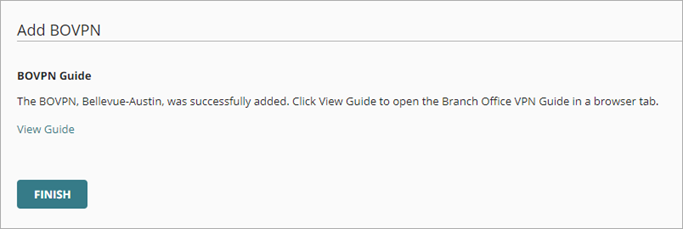
- (Optional) To open the BOVPN Guide in a new browser tab, click View Guide.
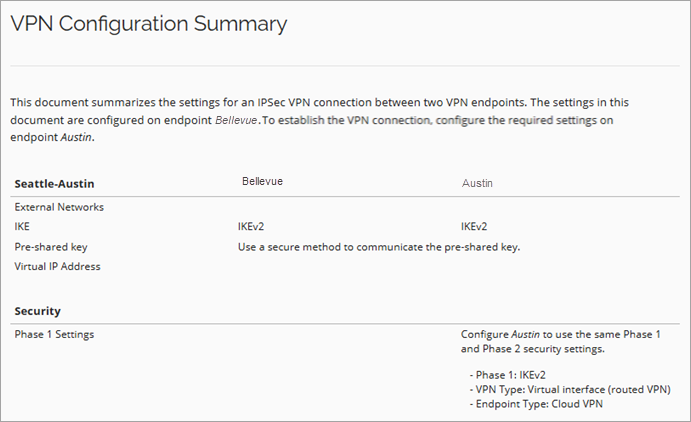
The VPN Configuration Summary opens in a new browser tab.
- To return to the BOVPN list, click Finish.
You can edit or delete a BOVPN from the BOVPN page. For information, go to Manage BOVPNs for Cloud-Managed Fireboxes.
View the BOVPN Guide
For each BOVPN, WatchGuard Cloud generates a VPN Guide that summarizes the VPN configuration settings required on the remote VPN endpoint. You can view the BOVPN Guide from the Edit BOVPN page. For more information, go to View the BOVPN Guide.
Manage Device Configuration Deployment