Applies To: Locally-managed Fireboxes
You can use the WebBlocker Global Settings to configure WebBlocker to use an HTTP proxy server, add on-premises WebBlocker Servers, configure the WebBlocker cache, and add global WebBlocker exceptions.
- Select Subscription Services > WebBlocker.
- On the WebBlocker Actions page, click Settings.
The WebBlocker Global Settings page opens.

- Select Subscription Services > WebBlocker > Configure.
- In the WebBlocker Actions dialog box, click Global Settings.
The WebBlocker Global Settings dialog box opens.

Use an HTTP Proxy Server for WebBlocker
If WebBlocker must use a proxy server to connect to the WebBlocker Cloud through the Internet, you must configure the proxy server settings in the WebBlocker Global Settings.
To configure proxy server settings:
- Open the WebBlocker Global Settings.
- In the HTTP Proxy Server section, select the Connect to the WebBlocker cloud with an HTTP proxy server check box.
- In the Server Address text box, type the IP address or host name of the proxy server.
- In the Server Port text box, type the number of the port the Firebox must use to contact the proxy server.
- From the Server Authentication drop-down list, select the authentication method to use for proxy server connections.
- If you selected Basic or NTLM as the authentication method, type the User name, Domain (Web UI) or User Domain (Policy Manager), and Password for connections to the proxy server.
- Click Save or OK.
Add On-Premises WebBlocker Servers
If you want to configure WebBlocker to use an on-premises WebBlocker Server, you can add the server details in the WebBlocker Global Settings.
When an on-premises WebBlocker Server is set up, you can configure WebBlocker actions to use the server to look up website categories. For more information, go to Configure WebBlocker Servers.
You can configure WebBlocker to use an on-premises WebBlocker Server in Fireware v12.2 and higher.
To add an on-premises WebBlocker Server:
- Open the WebBlocker Global Settings.
- In the On-Premises WebBlocker Servers section, click Add.
The Add On-Premises Server dialog box opens.
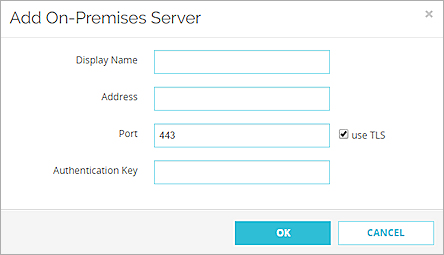
Add On-Premises Server dialog box in Fireware Web UI
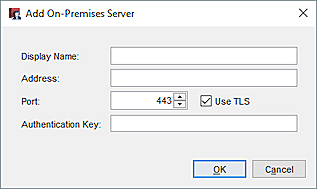
Add On-Premises Server dialog box in Policy Manager
- In the Display Name text box, type a name for your on-premises WebBlocker Server.
- In the Address text box, type the IP address or domain name of your on-premises WebBlocker Server.
- In the Port text box, type or select the port number your on-premises WebBlocker Server uses. The default port number is 443.
- To use Transport Layer Security (TLS) to connect securely to the on-premises WebBlocker Server, select the Use TLS check box.
- In the Authentication Key text box, type the authentication key used to establish a secure connection between the on-premises WebBlocker Server and your Firebox.
- Click OK.
Configure the WebBlocker Cache
To improve performance, WebBlocker stores recent URL lookups in a local cache on your Firebox. WebBlocker stores up to three levels of the URL path in the cache. For example, if WebBlocker looks up the URL www.example.com/path1/path2/path3/path4/webpage.html, it stores only www.example.com/path1/path2/path3 in the cache.
You can use the WebBlocker Global Settings to configure the cache size and the length of time cache entries are stored.
The maximum number of entries that can be stored in the WebBlocker cache varies by device and is not configurable.
| WebBlocker Cache Entries | Device Model |
|---|---|
| 32,000 | Firebox T15 |
| 64,000 | Firebox T20, T35, T55, T70 |
| 256,000 | All other Firebox models |
To configure the WebBlocker cache:
- Open the WebBlocker Global Settings.
- Select the Cache tab.
In Fireware 12.2.1 and lower, in Fireware Web UI, cache settings are on the Global Settings page instead of a separate tab.

WebBlocker cache settings in Fireware Web UI

WebBlocker cache settings in Policy Manager
- Select the Enable cache check box.
- Type the number of entries to cache in the Cache size text box. The maximum number you can enter depends on your Firebox model.
- To specify when cache entries expire, type a number in the Cache entries expire after text box and select hours or days from the drop-down list.
- Click Save or OK.
If you encounter problems with WebBlocker scanning and categorization of sites, you can clear the WebBlocker cache.
To clear the WebBlocker cache, from Fireware Web UI:
- Connect to Fireware Web UI for your Firebox device.
- Select Dashboard > Subscription Services.
The Subscription Services status page opens. - In the WebBlocker section, click Clear cache.
To clear the WebBlocker cache, from Firebox System Manager:
- Start Firebox System Manager for your Firebox device.
- Select the Subscription Services tab.
The status of the installed subscription services opens. - Select Tools > Clear WebBlocker Cache.
Configure Global WebBlocker Exceptions
If you want WebBlocker to always allow or always deny access to a website, regardless of the content category, you can add a global WebBlocker exception for that site. Global exceptions can be used by multiple WebBlocker actions and eliminate the need to add the same exceptions to multiple actions. The global exceptions list includes a predefined exception to allow connections to WatchGuard servers.
In each WebBlocker action, you specify whether the action checks the global exception list. WebBlocker always checks exceptions defined in the WebBlocker action first. If Check global exceptions is selected, and a URL does not match the exceptions defined in the WebBlocker action, WebBlocker then checks the URL against the global exceptions list. If the URL matches a global exception rule, WebBlocker takes the action specified in the rule. For more information, go to Check Global Exceptions and Remove Duplicates.
In the WebBlocker Actions list, the Global Exceptions column shows whether each action uses the global exceptions list.
You can configure global WebBlocker exceptions in Fireware v12.3 and higher.
To configure global WebBlocker exceptions:
- Open the WebBlocker Global Settings.
- Select the Exceptions tab.
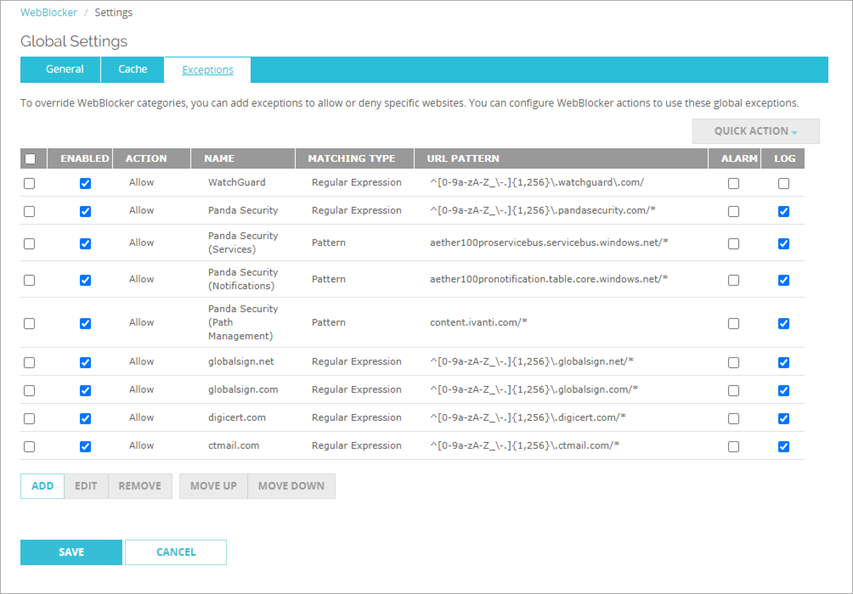
WebBlocker global exceptions list in Fireware Web UI
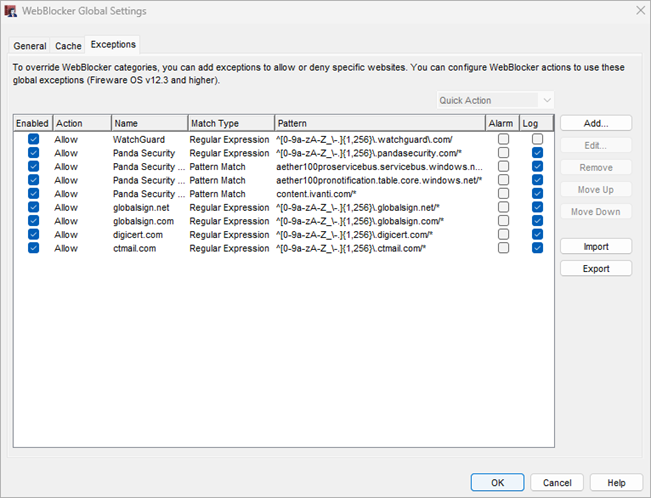
WebBlocker global exceptions list in Policy Manager
The steps to configure global exceptions are the same as those to configure exceptions in a WebBlocker action:
- To add a new global exception, click Add. For more information, go to Configure WebBlocker Exceptions.
- To change the order in which the Firebox compares site addresses to the global exceptions, select the exception rule you want to move. Click Move Up or Move Down. For more information, go to Change the Order of WebBlocker Exceptions.
- In Policy Manager, to import or export exceptions to or from a text file, click Import or Export. For more information, go to Import or Export WebBlocker Exceptions.
- To delete a global exception, select it in the list and click Remove. In the confirmation message that appears, click OK (Fireware Web UI) or Yes (Policy Manager).