Applies To: Locally-managed Fireboxes
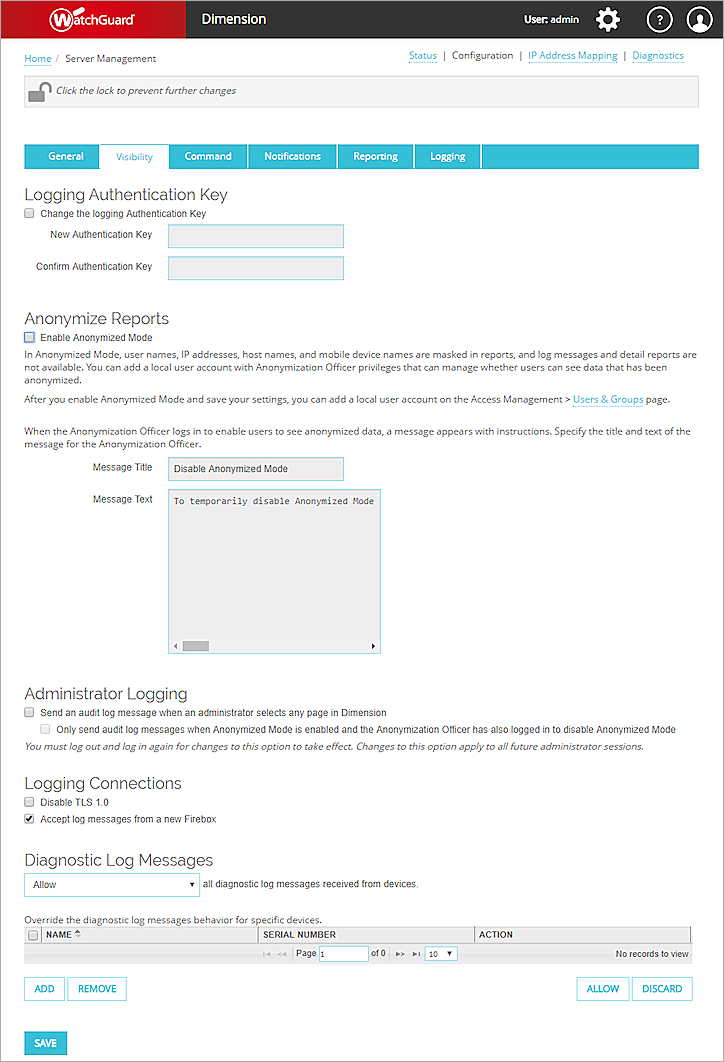
On the Visibility tab of the Dimension Server Management Configuration pages, you can change the logging Authentication Key for Dimension, enable Anonymized Mode, configure logging settings for administrator connections, configure the settings for logging connections to Dimension, and see the diagnostic log messages generated by the Fireboxes connected to Dimension.
To configure the Visibility settings:
- Select

 > Administration > Administration > Server Management.
The Server Management pages open with the Status tab selected. - Select the Configuration tab.
The Configuration pages open with the General tab selected. - Select the Visibility tab.
- To unlock the configuration so you can make changes, click
 .
.
For more information about how to unlock and lock the Dimension configuration, go to Lock and Unlock the Dimension Configuration. - Configure the settings as described in these sections:
Change the Logging Authentication Key
If you change the Authentication Key for Dimension, you must also update the logging Authentication Key in the configurations of the Fireboxes and WatchGuard servers that send log messages to Dimension.
The allowed range for the logging Authentication Key is 8–32 characters. You can use all characters except spaces and slashes (/ or \).
To change the logging Authentication Key:
- Select the Change the logging Authentication Key check box.
- In the New Authentication Key and Confirm Authentication Key text boxes, type a new encryption key for Dimension. Tip
Enable Anonymized Mode
To replace user names, IP addresses, host names, and mobile device names that appear in reports and dashboards with anonymized placeholder text, you can enable Anonymized Mode. When users log in to Dimension while Anonymized Mode is enabled, log messages and detail reports are not available. Instead, users only see a restricted view of the pages that their assigned user roles allow them to see.
When Anonymized Mode is enabled, a user with the Anonymization Officer role can log in to Dimension as a secondary user for a current user session, and temporarily disable Anonymized Mode for only that session. When Anonymized Mode is temporarily disabled, the current user can see the data that was anonymized. When the current user logs out and logs in again, Anonymized Mode is enabled again.
When you enable and configure the settings for Anonymized Mode, you can optionally specify the title and text of the message the Anonymization Officer sees in the login dialog box. Dimension already includes explanatory text for the login dialog box, but you can replace this text with a different message, or add instructions to the current text to provide more information to your Anonymization Officer or to meet the requirements of your company.
To enable Anonymized Mode, from the Anonymize Reports section:
- Select the Enable Anonymized Mode check box.
The Message Title and Message Text text boxes are enabled. - (Optional) In the Message Title text box, type a new title for the login dialog box.
- (Optional) In the Message Text text box, type the new message text to include in the login dialog box.
You can keep the current text and add your own text to it, or you can replace the text with your own message.
After you enable Anonymized Mode, when you log out and log in again, your user session is in Anonymized Mode and ![]() appears in the Dimension top navigation bar. Anonymized Mode is enabled for all future user sessions.
appears in the Dimension top navigation bar. Anonymized Mode is enabled for all future user sessions.
After you enable Anonymized Mode, you can add the Anonymization Officer user account.
For more information about Anonymized Mode and instructions to add an Anonymization Officer user account, go to Anonymize Reports in Dimension.
Configure Logging Settings for Administrator Connections
You can configure Dimension to generate an audit log message when a user with administrator credentials selects any page in Dimension. You can also select to send log messages only when Anonymized Mode is enabled in the Dimension configuration, but temporarily disabled by an Anonymization Officer. This can help you monitor administrator activity and the changes made to your Dimension configuration. When Anonymized Mode is enabled, the audit log messages indicate which pages were selected when data is no longer anonymized. You can review the audit log messages in the Audit Report.
For information about how to view the Audit Report, go to Use the Audit Report.
To specify the logging settings for administrator connections to Dimension, from the Administrator Logging section:
- To generate a log message when a user with administrator credentials selects a page in Dimension, select the Send an audit log message when an administrator selects any page in Dimension check box.
- To only generate an audit log message when Anonymized Mode is temporarily disabled, select the Only send audit log messages when Anonymized Mode is enabled and the Anonymization Officer has also logged in to disable Anonymized Mode check box.
- Save your changes.
- To enable the options you selected, log out and log in again.
Configure Logging Settings for Connections to Dimension
You can also enable Dimension to accept log messages from a new Firebox that has not been added to Dimension. If you do not enable Dimension to accept log messages from new Fireboxes, when a Firebox that has not already been added to Dimension sends a log message to Dimension, the log message is discarded and not added to the log message database.
From the Logging Connections section:
- To make sure your Dimension server does not use TLS v1.0 for connections from your Fireboxes, select the Disable TLS 1.0 check box.
- To enable Dimension to accept log messages from Fireboxes that have not been added to Dimension, select the Accept log messages from a new Firebox check box.
- Click Save.
Configure Settings for Diagnostic Log Messages from Your Fireboxes
From the Diagnostic Log Messages section, you can configure Dimension to accept or deny the diagnostic log messages that your Fireboxes send to Dimension. You can specify a global setting for all Fireboxes and add individual Firebox exceptions to the global setting.
Specify the Global Diagnostic Log Messages Setting
From the drop-down list at the top of the Diagnostic Log Messages section, select an option to apply to the diagnostic log messages that Dimension receives from you Fireboxes:
Allow
(The default setting.)
Dimension accepts all diagnostic log messages from your Fireboxes and adds them to the log message database.
Discard
Dimension automatically purges all diagnostic log messages from your Fireboxes, unless the Firebox is included in the exceptions list.
Add a Firebox to the Exceptions List
When you add a Firebox to the exceptions list, by default, the action selected for the Firebox is the opposite of the global setting you specified. If you remove a Firebox from the Home > Devices page, it is also removed from the exception list.
To add an exception for a Firebox:
- Click Add.
The Add Device dialog box opens.
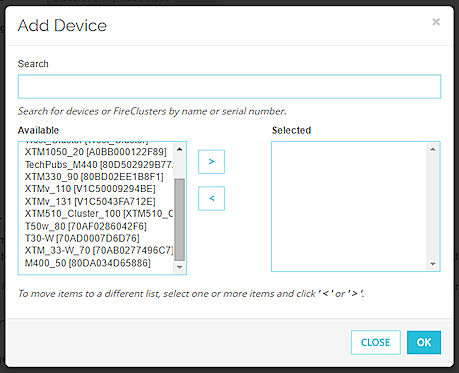
- To find a specific Firebox in the Available list, in the Search text box, type any characters included in the device name of the Firebox.
The available list is updated to only include those Fireboxes with names that include the characters you specified. - From the Available list, select one or more Fireboxes. Click
 .
.
The Fireboxes appear in the Selected list. - To remove one or more Fireboxes from the Selected list, click
 .
. - Click OK.
Each Firebox you selected appears on a separate line in the exceptions list, with the action that is the opposite of the global action. - To change the Action for a Firebox, from the exceptions list, select the check box for that Firebox and click the button for the new action: Allow or Discard.
To remove a Firebox from the exceptions list:
- Select the check box for one or more Fireboxes.
- Click Remove.
A confirmation message appears. - Click Yes.