Configure the Authorized WiFi Policy
WIPS identifies and continually monitors Authorized APs to make sure they conform to the access parameters you specify in your security policy.
There are two ways you can define your policy for authorized Wi-Fi access points:
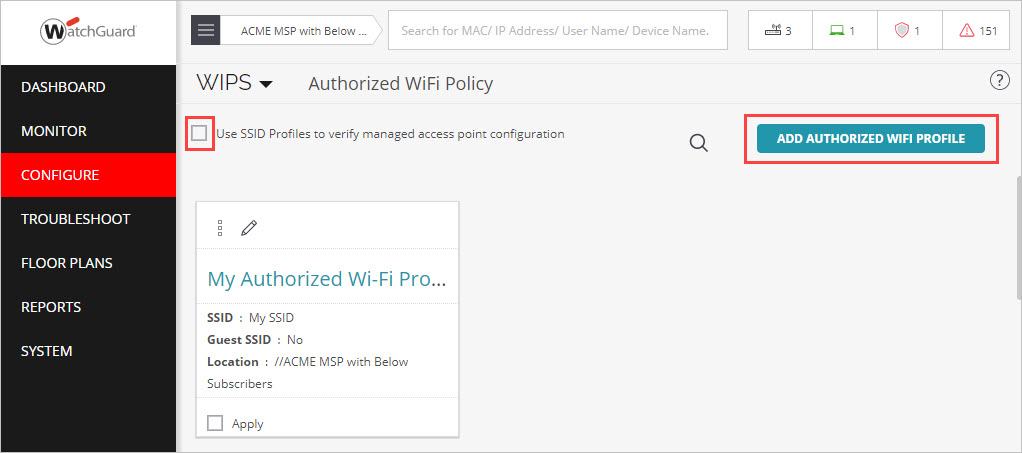
- Use SSID Profiles — In the default configuration, the Use SSID Profiles to verify managed access point configuration option is selected. This option uses the settings of your SSID Profiles to validate the configuration of your APs. We recommend you use this option to simplify the security settings of your Wi-Fi deployment if you are protecting a WatchGuard AP network.

- Use Authorized WiFi Policy — If you want to provide specific policy settings such allowed AP vendors or allowed networks, you can also create an Authorized WiFi Policy for each SSID you use. You must disable the Use SSID Profiles to verify managed access point configuration option to apply a new policy. We recommend you use Authorized WiFi Policies when you deploy WatchGuard APs as dedicated WIPS sensors in a third-party AP network.
Customize an Authorized WiFi Policy
To create a custom Authorized WiFi Policy for an SSID:
- Open Discover.
- From the Navigator, select the location where the Authorized WiFi Policy will be applied. Make sure that you select the correct top-level location. Settings are inherited by subfolders automatically. If you select a subfolder that has inherited a policy, you can enable editing to customize the policy for the specific subfolder location.
- Select Configure > WIPS > Authorized WiFi Policy.
- Clear the Use SSID Profile to verify managed access point configuration option if you want to create custom Authorized WiFi policies for your deployment.
- Click Add Authorized WiFi Profile, or select an existing profile to edit.
- Configure these settings in the Authorized WiFi Policy:
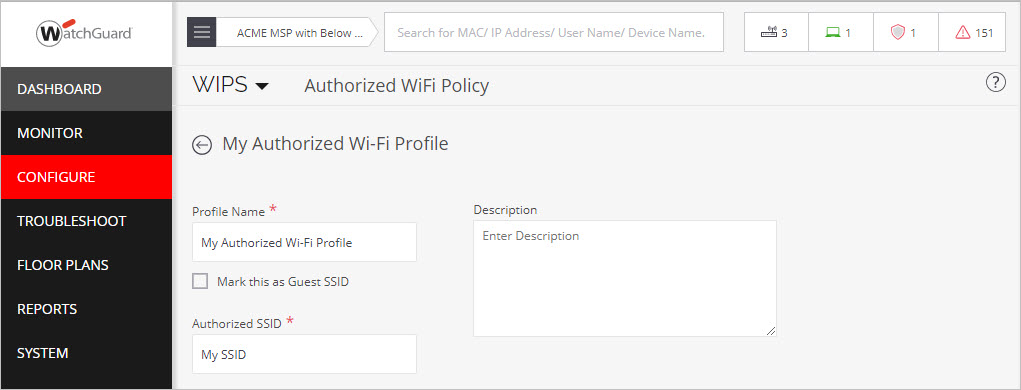
- Type a descriptive Profile Name.
- (Optional) Type a description to describe the policy.
- (Optional) Select the Mark this as Guest SSID check box if you intend this SSID to be used by guest users. Clear this check box for private SSIDs.
- Select the Authorized SSID for this policy. The list displays any SSIDs you have already deployed. You can also type the SSID name (case-sensitive). This SSID can be an SSID Profile you created in Wi-Fi Cloud to be broadcast by WatchGuard APs, or it can be an SSID broadcast by third-party APs.
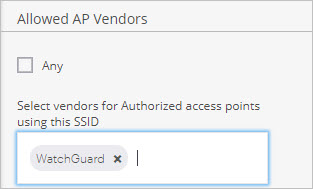
- In the Allowed AP Vendors section, clear the Any check box, then select “WatchGuard” from the drop-down list if you plan to use only WatchGuard APs to broadcast this SSID. If you want to protect third-party APs, select the AP vendor that you use in your deployment.
- You can leave the other policy settings at their default values unless you have specific security policies to customize for your deployment.
- Click Save to save the policy or click Save & Apply to save the policy and apply it to the current location.
Repeat these steps for each SSID that you want to protect.