Client Connectivity Test
Applies To: Wi-Fi Cloud-managed Access Points (AP120, AP125, AP225W, AP320, AP322, AP325, AP327X, AP420)
From the third-radio of a nearby AP, you can perform a client connectivity test to troubleshoot an AP that experiences client connectivity issues.
The third radio of the AP acts as a client and you can view these test results for later analysis:
- Association
- Authentication
- DHCP
- DNS
- WAN
- Throughput tests for the Internet or Wi-Fi network
- Application tests
- Ping Test
- VoIP Test (computes a Mean Opinion Score (MOS) based on latency, packet loss, and jitter)
Client connectivity tests include these tasks:
- Create a Test Profile
- Run the Client Connectivity Test
- Add Client Connectivity Test Schedule
- View Client Connectivity Test Schedules
- View Client Connectivity Test Results
- Delete Client Connectivity Test Results
Create a Test Profile
You must create a test profile to run the client connectivity test. Note these requirements when you create a test profile:
- The SSID broadcast by the target AP and the SSID selected in the profile must be the same.
- You can retrieve the SSID used by the target AP from Manage, and then select that SSID when you create the profile.
- You can add a maximum of 100 test profiles.
When you create client connectivity test profiles, they are used for testing in your current Wi-Fi network configuration. If you change your network configuration, such as the security mode of an SSID, the client connectivity tests will no longer be valid. You must change the appropriate configuration in your client connectivity test profiles or they will fail.
To create a test profile:
- Select Troubleshoot > Client Connectivity Test.
- Click Add New Test Profile.
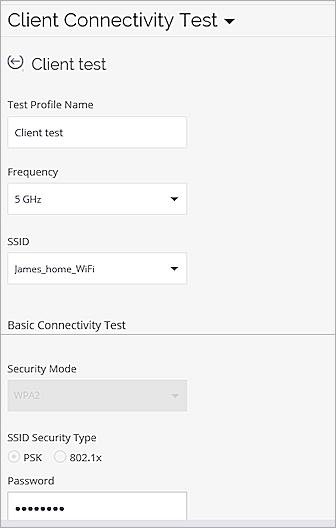
- In the Test Profile Name text box, type a descriptive name for the profile.
- From the Frequency drop-down list, select the frequency band for the test. (2.4 GHz or 5 GHz).
- From the SSID drop-down list, select an SSID.
- Select the Security Mode and SSID Security Type.
- Type a Password for the selected SSID Security Type.
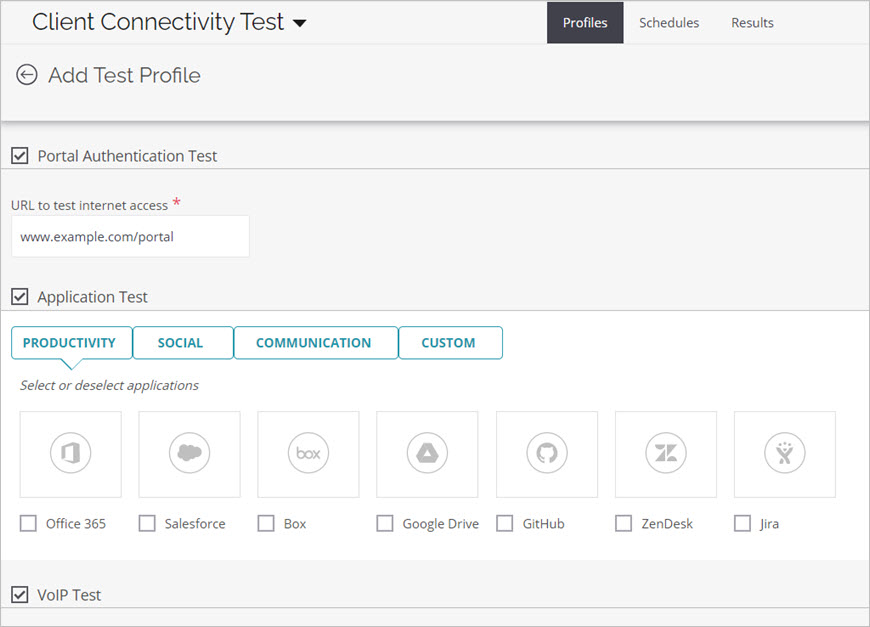
- Select the Portal Authentication Test check box to connect to the Internet through the specified portal URL and bypass any captive portal authentication on an SSID. This enables the test to run correctly.
- In the Application Test section, select the applications to perform as part of the client connectivity test.
- To test VoIP (Voice over IP) connectivity, select the VoIP Test check box.
In the VoIP Call Duration text box, type the duration of the test in minutes. The VoIP call duration can be between 3 and 10 minutes. The default value is 3 minutes.
- In the Throughput Test section, select the Internet and Wi-Fi check boxes to test throughput for Internet and Wi-Fi communications.
- Click Save.
Run the Client Connectivity Test
After you create a test profile, you can run the client connectivity test.
To run the client connectivity test requires:
- At least one active AP with a third radio on the network.
- The target AP must broadcast the same SSID that is configured in the test profile.
- The target AP that is being tested and the AP that acts as a client should be active when you run the connectivity test.
- The AP that acts as a client should be in the range of the target AP.
- If the AP that acts as a client is performing another task, such as spectrum analysis, you cannot use that AP to run the client connectivity test. You can run the client connectivity test on the target AP even though it is engaged in another task, such as spectrum analysis.
To run a client connectivity test:
- Select Monitor > WiFi > Access Points, right-click the AP to test, then select Run Client Connectivity Test.
You can also run the test from Troubleshoot > Client Connectivity Test. - If you have not already created a test profile, add a test profile.
If you have already created a test profile, the SSID of the target AP is displayed on the Run Client Connectivity Test page. Click Next.
If you have created more than one test profile, then the most recently created test profile is selected by default.
- On the Select AP as a Client page, select the AP with a third radio that will act as a client.
- Click Start.
- The Ongoing Activity message box displays this data:
- A status message "Client connectivity test in progress" or "Client connectivity test completed"
- The name of the target AP
- The name of the AP with the third radio acting as client
- Time stamp
- A link to the test results appears when the test is complete
Add Client Connectivity Test Schedule
You can create a schedule for client connectivity tests in a test profile. You can configure a recurring schedule to run tests every few days or every few weeks. When you configure a schedule for client connectivity tests for a location, the schedule automatically applies to all child locations. Scheduled times are always based on the local time of the client.
To configure a schedule for a client connectivity test:
- Select Troubleshoot > Client Connectivity Test.
- Click the menu icon of the test profile for which you want to schedule the tests and select Schedules from the drop-down list.
- Click Add A Schedule.
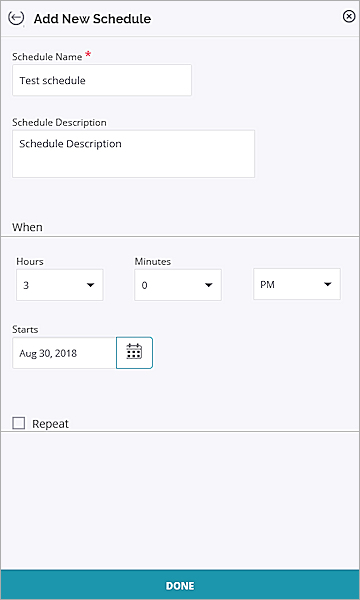
- In the Schedule Name text box, type a name for the schedule.
- In the Schedule Description text box, type a description for the schedule.
- Set the schedule time in hours and minutes.
- Select the start and end date.
- To set up a recurring schedule, select Repeat.
- Select Daily or Weekly. You can also select a day of the week at the bottom of the window.
If you selected Daily, select the number of days between two successive tests. For example, select 2 for the tests to run every 2 days.
If you selected Weekly, select the number of weeks between two successive tests and the days of the week when you want the test to run. For example, for the test to run on alternate Thursdays, select 2 (for the tests to run every 2 weeks), and select Thursday.
- In the Repeat Every field, select how often you want the test to run.
- A summary of the schedule appears. Click Done.
The schedule appears in the list in the Schedules window. - Click Save.
View Client Connectivity Test Schedules
You can use the calendar to view client connectivity test schedules, edit schedules, and see test results.
To view the calendar:
- Select Troubleshoot > Client Connectivity Test > Schedules.
- Select a schedule.
A window appears that displays the details of the schedule. You can Edit or Delete the schedule, or See Results of the test.
View Client Connectivity Test Results
After you run a client connectivity test, the results for the last 50 client connectivity tests are saved on the Results page.
To view the results:
- Select Troubleshoot > Client Connectivity Test.
- Click the Results tab. The following information is provided:
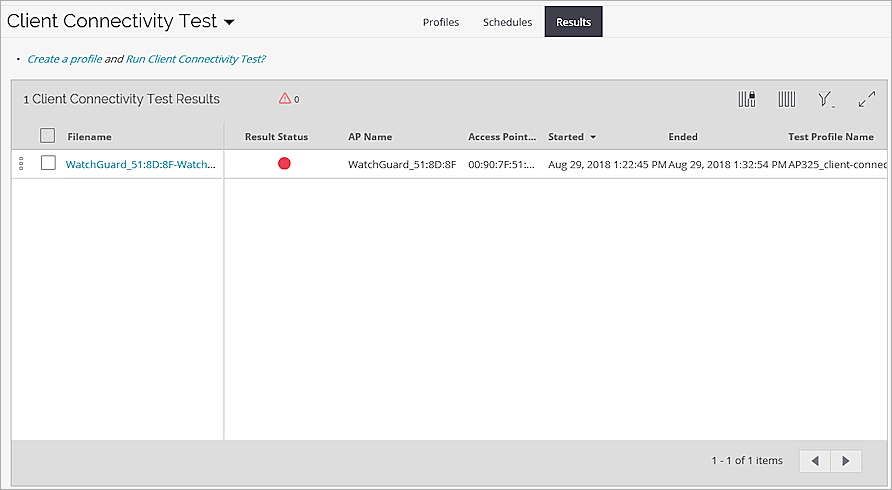
- Filename — The name of the result file. The name is automatically generated and consists of the target name, client AP name, and the time stamp.
- Result Status — The status of the result: Green (Successful) or Red (Failed).
- AP Name — The name of the target AP.
- AP MAC Address — The BSSID on which the test was performed.
- Started — Time stamp when the test started
- Ended — Time stamp when the test completed
- Profile name — The profile used to test the target AP. The profile name appears as "Deleted" if the profile used to the run the connectivity test has been deleted.
- SSID — The SSID selected in the profile.
- Frequency — The frequency selected in the profile.
- Right-click the file name and select Open Results to view the test results.
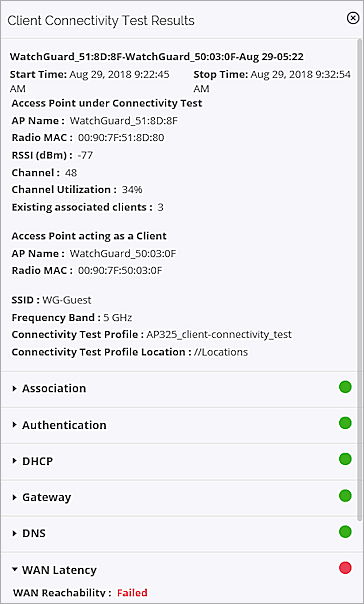
This table describes the client connectivity test results details:
| Option | Description |
|---|---|
| General Information |
General information about the result is displayed:
|
| Access Point under Connectivity Test |
Details of the target AP on which test runs:
|
| AP turned into client |
Details of the AP with a third radio used to run the test:
|
| Association |
Displays the association status. The values are:
|
| Authentication |
The authentication status. The values are:
|
| DHCP |
|
| Gateway |
The status of the gateway.
|
| DNS |
The status of the DNS server.
When any one of the DNS servers has a failed status, the overall status of the DNS server will be "Partial". If the overall status of the DNS server is "Partial", the Client Connectivity test result will be considered as "Failed". |
| WAN Latency |
|
| Ping test |
The status of the ping test.
|
| VoIP test |
The quality of the VoIP call.
Hover over the MOS score to see values for:
|
| Throughput Test |
The Internet throughput and Wi-Fi throughput. A green dot appears if the test is successful.
|
Delete Client Connectivity Test Results
You can delete a test result from the Results page.
To delete a test result:
- Select Troubleshoot > Client Connectivity Test.
- Click Results.
- Right-click on the file name, then click Delete.