Google Integration in Discover
Applies To: Wi-Fi Cloud-managed Access Points (AP125, AP225W, AP325, AP327X, AP420)
For more information about Google services, and how to set up a Google account and obtain a JSON file, see How Google Integration Works.
Configure Google Integration in Discover
To configure Google Integration in Discover:
- Select System > Third-party Servers > Google Integration.
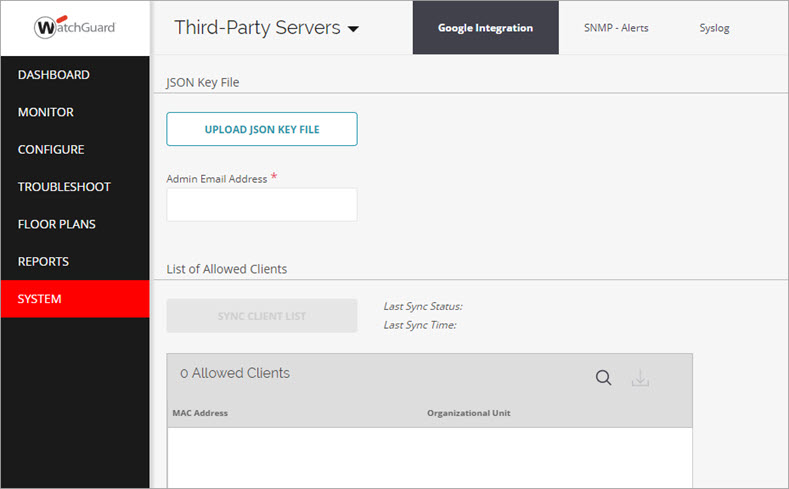
- Click Upload JSON Key File to upload the JSON key file you downloaded from your Google account.
- In the Admin Email Address text box, type the administrator email address that you used to access the Google Apps Admin Console.
- In the Synchronization section, click Sync Client List to manually synchronize the device list from Google.
Wi-Fi Cloud automatically synchronizes the device list from Google once every 24 hours at 00:00 UTC.
The synchronization of devices can fail in these scenarios:
- JSON key file is missing: Make sure the JSON key file is created and downloaded correctly.
- JSON key file is invalid: Make sure that the correct JSON key file is associated with the profile. This can occur if all the required scopes are not mentioned in the JSON file.
- Admin Email ID is missing or is invalid: You must specify the correct Admin email ID that was used to create the service account JSON key.
- Internal error: Wait a few minutes then perform a manual synchronization if this error occurs.
The MAC address and the OU of the synchronized devices is displayed. You can click Export Client List to download this list as a CSV file.
How Google Integration Works
The core functionality provided by Google is User and Device Management and Organizational Units.
Network administrators can create an organizational structure and control which settings and policies must be applied to users and devices.
- User directory offers single sign-on for all Google services
- Device management enables administrators to authorize devices that can access the network and additionally restrict access based on the user role. When a user logs in with their Google credentials, the device's MAC address is tracked and the administrator can then authorize or block the device from connecting to the network. For more information, see Google Device Authorization.
If any Google OU rules are defined in the Role Based Control section of the SSID Profile, then the OU of the authorized device is matched against the role names defined in the rule and the appropriate role is applied to the client device. For more information, see About Role Based Control.
Wireless Authentication and Client Device Authorization
The two widely-used user authentication methods in wireless deployments are PSK and 802.1x. Both these methods have their own challenges in terms of controlling the devices that connect to the wireless network. In the case of PSK, a single key is shared among all users. In this scenario, you have no control over which devices can connect to the network as users can use the same PSK to connect any device to the network.
In the case of 802.1x, each user has unique credentials, but you cannot easily prevent users from using these credentials on their personal devices. In addition, organizations need to maintain a local Active Directory server that replicates the Google User directory, and also an on-premise RADIUS server to terminate the 802.1x.
You can integrate a Google service account with Wi-Fi Cloud to simplify the user authentication and device authorization process and make sure only registered or authorized devices are allowed to access the wireless network.
- When Google Integration is configured in Wi-Fi Cloud, a list of authorized devices is retrieved from Google.
- The list of devices is pushed to all access points on your wireless network.
- When a client authenticates to the wireless network, the device details are compared against the authorized device list and wireless access is allowed or blocked.
If Google OU rules are defined in the SSID Profile, then the OU of the device is matched against the rules and the configured wireless access is allowed.
Wi-Fi Cloud fetches the authorized device list from Google Apps through API calls. To utilize this API, in your Google account you must create a Google API console project and a service account. From this service account you can create a JSON key to upload to your Wi-Fi Cloud configuration.
To configure Google Integration, you must perform these steps:
- Create a Google service account and download a JSON key
- Define API Scopes for the service account
- Upload the JSON key file to Wi-Fi Cloud
Create a Google Service Account and Download a JSON Key
To create a Google service account and download a JSON key:
- Go to the Google Developers Console and log in to your Google account at https://console.developers.google.com/
- Click Create to create a new project.
- Type a project name. For example, watchguard-integration, then Click Create.
- Select Library from the left menu, then search for and select Admin SDK.
- Click Enable to enable the Admin SDK library.
- Click the top left menu icon for Google APIs and select IAM & admin > Service Accounts.
- Click Create Service Account.
- Type the Service account name and Service account description, then click Create.
- (Optional) Select a role to grant the service account access permissions to complete specific actions on the resources in your project. Many roles do not have the required permissions for the integration to work correctly.
- (Optional) Grant access to users or groups that need to perform actions as this service account.
- Click Create Key.
- Select JSON as the key type, then click Create.
The service account JSON key is created and downloaded to your computer. You will upload this JSON key to the Google Integration configuration in Wi-Fi Cloud Manage in a later step.
- Click Done to save the service account details.
- For the newly created service account, click the actions icon on the right, then click Edit.
- Click the Show Domain-wide Delegation link, then select Enable G-Suite Domain-wide Delegation.
- Type a Product name for the consent screen.
- Click Save.
- To be able to define API scopes, you need the client ID for the service account. Click the View Client ID link for the service account and copy the Client ID.
Define API Scopes for the Service Account
After you have created a service account, you must specify the API scopes for the service account in the admin console of your Google account.
- Log in to your Google Apps domain control panel (admin.google.com) with an administrator account.
- Click on the Security icon.
If you do not see Security listed, then select More controls from the toolbar and select Security from the list of controls. Make sure you are signed in as an administrator for the domain.
- Select Advanced settings > Authentication > Manage API Client Access.
- Type the service account Client ID in the Client Name field.
The Client ID is found on the Service Accounts details page. - In the One or More API Scopes field, type the list of comma separated scopes required for access.
- https://www.googleapis.com/auth/admin.directory.device.chromeos
- https://www.googleapis.com/auth/admin.directory.device.chromeos.readonly
- https://www.googleapis.com/auth/admin.directory.device.mobile
- https://www.googleapis.com/auth/admin.directory.device.mobile.readonly
- https://www.googleapis.com/auth/admin.directory.device.mobile.action
- https://www.googleapis.com/auth/admin.directory.user.readonly
- https://www.googleapis.com/auth/admin.directory.user
- Click Authorize.