Applies To: Wi-Fi Cloud-managed Access Points (AP120, AP125, AP225W, AP320, AP322, AP325, AP327X, AP420)
You can use the SAML authentication plug-in to authenticate your Captive Portal users with an identity provider (IdP). To use the SAML plug-in, you must select the Cloud Hosted portal mode in your SSID captive portal settings.
To configure the SAML plug-in:
- Open Discover.
- Open the Navigator, and select a location where to apply the SSID settings.
- Select Configure > WiFi.
- Select the SSID tab.
- Select an existing SSID or add a new SSID.
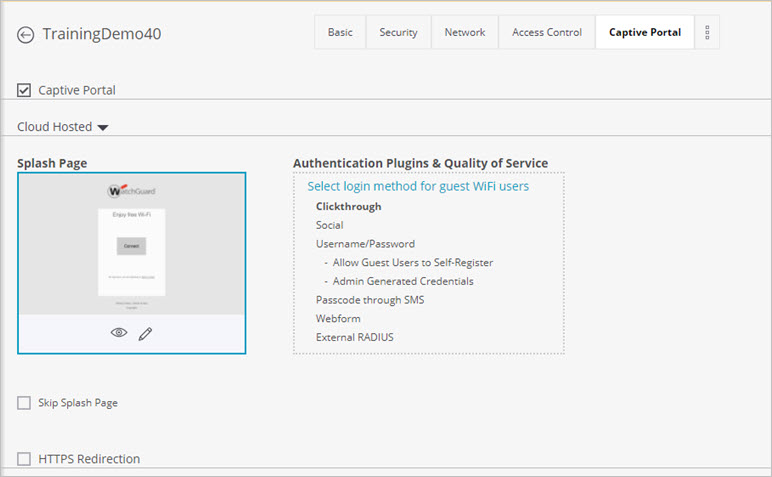
- Select the Captive Portal tab.
- Select the Captive Portal check box.
- Select Cloud Hosted as the portal mode.
- In the Authentication Plugins & Quality of Service section, click Select login method for guest WiFi users.
- Select the Custom check box in the list of plug-ins, then select SAML.
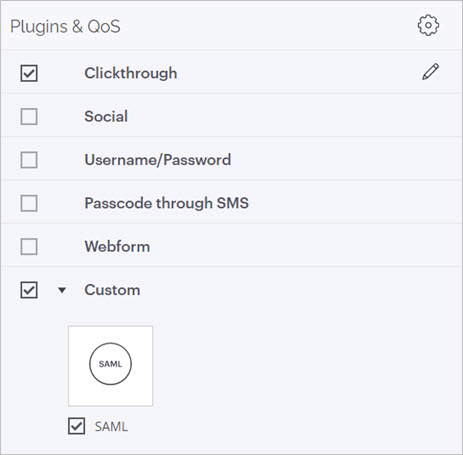
- Click the SAML icon to edit the plug-in settings.
- In the Display Name text box, type the name that users will see on the splash page.
The maximum is 15 characters. - (Optional) Upload a logo for the SAML icon that appears in the plug-in configuration page.
- Click Download SP Metadata XML and share this downloaded metadata file with your identity provider.
- Provide the metadata information received from your identity provider. You can manually add the metadata or upload an XML file.
To manually add metadata, provide this information:
- Entity ID — The ID of the SAML SSO identity provider (IdP).
- Login URL — The URL of the IdP application.
- Hash Algorithm — Select SHA256 or SHA512. The default is SHA256.
- Upload Certificate — Select and upload the certificate file used by the IdP to sign or encrypt the data.
- Click Upload XML to upload the XML metadata file from your local computer.
- Provide a mapping between the SAML attribute and the target attribute. The SAML attributes are predefined attributes that users see on the splash page. The Target attributes are attributes defined by the identity provider.
- You can configure these additional Quality of Service (QoS) options:
- Login Timeout — Select the time, in minutes, for which a wireless user can access the guest network after they log in to the portal page. After the timeout is reached, access to the guest network is stopped and the portal page is displayed again. The user must log in to the portal page to regain access to the guest network. If the user disconnects and reconnects to the guest network before their session times out, the user does not have to enter their credentials on the splash page again.
- Blackout Time — This is the time for which a guest user is not allowed to login after a previous session timed out.
- Limit the maximum download bandwidth to — The maximum download bandwidth in Kbps or Mbps for the guest user.
- Limit the maximum upload bandwidth to — The maximum upload bandwidth in Kbps or Mbps for the guest user.
- Redirect URL — The URL of the page to which a guest user must be redirected after successful authentication.
- Click Save to save the plug-in settings.
- Click Save to the SSID settings.