Wireless Network Best Practices
AP Transmit Power Reduction
When you reduce AP transmit power, it helps to decrease the cell size. Smaller cells enable network designs to maximize channel reuse that can increase aggregate throughput and capacity for a wireless network.
Classroom:
- 5 GHz: 8–16 dBm
- 2.4 GHz: 4–10 dBm
Auditorium or Lecture Hall:
- 5 GHz: 5–12 dBm
- 2.4 GHz: 3–10 dBm
We recommend that you set AP transmit power levels for 2.4 GHz lower than those for 5 GHz. This is to compensate for better propagation of 2.4 GHZ signals as compared to 5 GHz.
To configure the Transmit Power:
- Open Discover.
- Select Configure >WiFi > Radio Settings.
- Expand the Radio Advanced Settings section.
- Configure the Transmit Power for the radio, or select Automatic to automatically adjust power settings based on the RF environment.

Fast Roaming
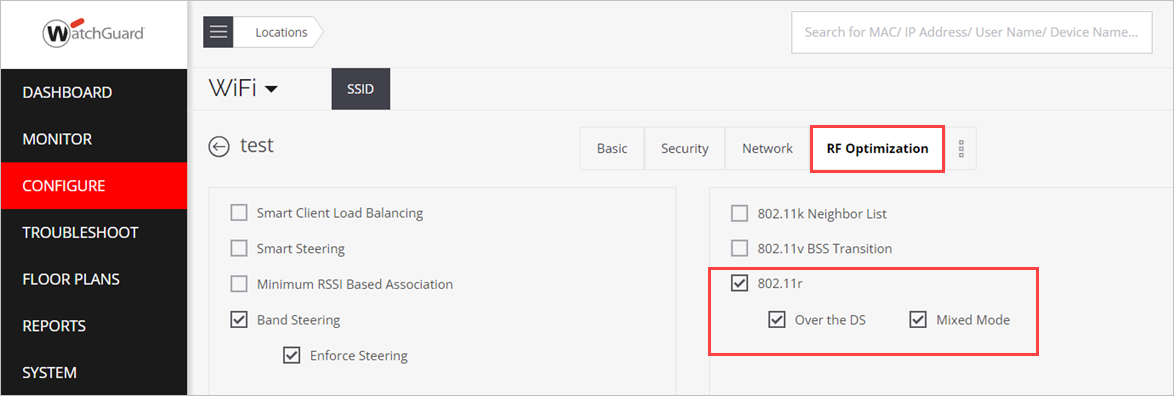
WatchGuard APs support 802.11r fast roaming. The 802.11r standard significantly improves roaming times and can significantly improve streaming quality while roaming. The 802.11r feature is enabled per SSID. We recommend you enable 802.11r with mixed-mode support so that SSIDs support both 802.11r and non-802.11r clients.
To configure 802.11r fast roaming settings
- Open Discover.
- Select Configure > WiFi.
- Select an SSID Profile.
- Select the RF Optimization tab.
- Select the 802.11r check box.
- Select the Over the DS and Mixed Mode settings as required.
- Save the SSID settings.
802.11k and 802.11v
The wireless network infrastructure can influence client roaming decisions with features such as load balancing, however, the final roaming decision is decided by client devices. The IEEE amendments 802.11k and 802.11v define enhanced information exchange that enables clients to make more informed roaming decisions.
Radio Resource Measurement (802.11k) and Wireless Network Management (802.11v) help measure, report and manage resources on a wireless network. With 802.11k, APs and clients share RF environment information. With 802.11k enabled, clients can make more informed roaming decisions with respect to the RF environment, such as channel load, link measurement, noise histogram, and neighbor reports. With 802.11v enabled, some RF information is exchanged, such as channel usage, but many other types of information are also shared, such as BSS transition management, Flexible Multicast Service (FMS), QoS traffic capability, and location services capabilities.
We recommend you enable both 802.11k and 802.11v, and with backwards compatibility mode enabled, so that devices that do not yet support these newer specifications can still join the wireless network.
To configure 801.11k and 802.11v options:
- Open Discover.
- Select Configure > WiFi.
- Select an SSID Profile.
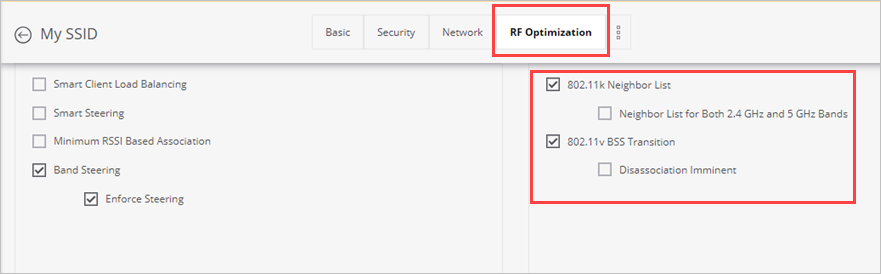
- Select the RF Optimization tab.
- Select the 11k Neighbour List and 11v BSS Transition check boxes.
- Save the SSID settings.
SSID Bridge vs. NAT Mode
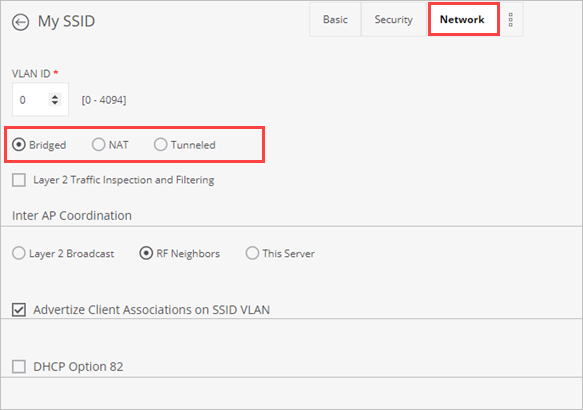
WatchGuard APs can operate in Bridged mode, NAT (Network Address Translation) mode, or Tunneled mode.
For most use cases other than small remote sites we recommend you use bridged mode. With bridged mode, traffic is bridged between the wireless interface and the wired interface. When you use NAT mode, the AP supplies clients with IP addresses from the built-in DHCP service on the access point and performs NAT for traffic between the wireless interface and the wired interface.
Tunneled mode is useful when you want to route network traffic on the SSID to and from a single end point, and apply policies at this end point. In the tunneled mode, APs on the SSID route all traffic via the tunnel to a remote endpoint configured on the Tunnel Interface that you select.
To configure bridge or NAT mode:
- Open Discover.
- Select Configure > WiFi.
- Select an SSID Profile.
- Select the Network tab.
- Select NAT or Bridged mode.
- Configure the options for the selected mode as required.
- Save the SSID settings.
Smart Client Load Balancing and Steering
In high-density environments, such as auditoriums, lecture halls, and libraries, APs are usually deployed close to each other to support a large number of devices in a small space. Because they are close in proximity, a client device at any given location can often detect multiple APs with good signal strength. Unless the client and the AP both support 802.11k (very few clients support 802.11k), the client typically picks the AP that it detects with the strongest signal strength. This can cause some APs in the network to be over-used while the other APs have capacity to spare. You can use Smart Load Balancing to distribute the clients across APs and across bands within an AP. This can increase per-client throughput, improve application performance, and increase the overall capacity of the wireless network.
Load balancing is also useful in moderately dense environments common to classrooms where clients require high bandwidth to support applications such as HD video streaming.
Smart Steering
Clients that prefer to remain connected to distant APs rather than roam to closer APs are a common wireless network issue. These clients not only experience poor performance, but because they operate at low data rates, they lower the capacity of the AP.
Smart Steering is a client-to-AP association optimization that enables the wireless network infrastructure to control client connectivity and roaming. Smart Steering monitors clients and automatically steers them to the optimal AP. This improves the performance for the steered client, and improves the performance for the AP from which the client disconnects. Smart Steering works with all types of clients and client operating systems.
You can configure advanced Smart Steering options in the Radio Advanced Settings section for an AP's radio settings. We recommend you use the default settings.
Band Steering
While most devices tend to associate to 5 GHz radios, there are some clients that must be directed towards the 5 GHz band. Band steering enables you to steer clients towards the 5 GHz band, and distributes the clients across both bands so that the channel capacity in the 2.4 GHz band can be used.
Advanced parameters are configured in the Radio Advanced Settings section for an AP's radio settings. We recommend you use the default settings.
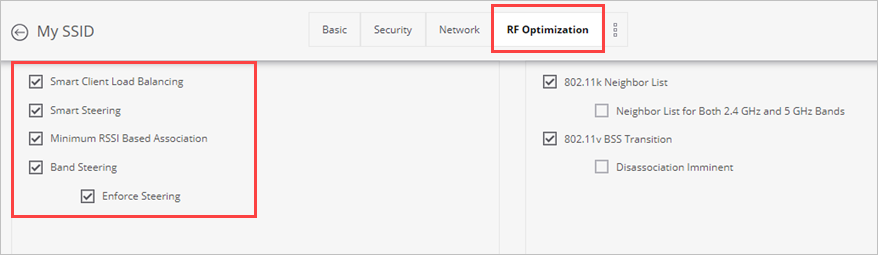
You can enable load balancing and steering options in the RF Optimization settings of an SSID Profile.
- Open Discover.
- Select Configure > WiFi.
- Select an SSID Profile.
- Select the RF Optimization tab.
- Select the Smart Client Load Balancing check box and other steering options as required.
- Save the SSID settings.
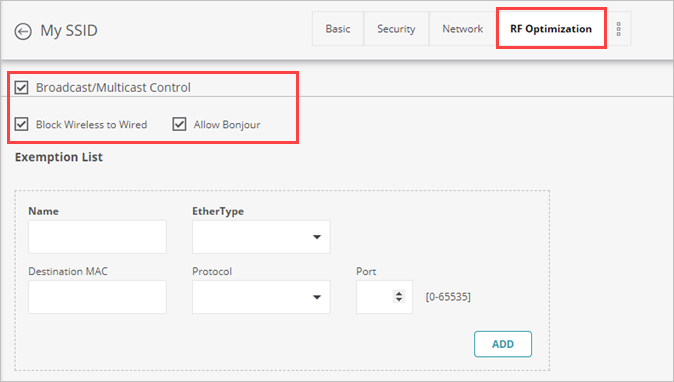
Broadcast/Multicast Control
A large VLAN creates a large broadcast domain. Unnecessary broadcast and multicast traffic can consume valuable airtime. To prevent this, we recommend you configure broadcast/multicast control. You can block broadcast/multicast packets on your wireless network and create exemptions for specific applications.
To configure Broadcast/Multicast Control:
- Open Discover.
- Select Configure > WiFi.
- Select an SSID Profile.
- Select the RF Optimization tab.
- Select the Broadcast/Multicast control check box.
- (Optional) Enable Block Wireless to Wired to block broadcast and multicast traffic from the wireless side to the wired side.
- (Optional) Enable Allow Bonjour to allow the Apple Bonjour protocol. In many educational environments, multicast-based services such as Apple Bonjour are common. To enable Bonjour service advertisements, which use non-routable multicast addresses, to be transmitted across VLANs, a Bonjour gateway is required. WatchGuard APs have built in Bonjour Gateways that enable access to Bonjour services, such as Apple TVs and printers, across VLANs.
- Configure the Exemption list for specific applications if required.
- Save the SSID settings.
Alternatively, you can restrict VLAN sizes. WatchGuard Wi-Fi Cloud’s controller-less architecture does not require tunneling all traffic back to a wireless controller located in the core of the network. This enables you to bring the VLANs out to the access switches. With VLANs at the edge of the network, the size of each VLAN can be controlled per building or per floor. VLAN size limiting helps you control broadcast and multicast bandwidth consumption.
Reliable Multicast Delivery and IGMP Snooping
Streaming multicast video over wireless is inherently challenging, as multicast traffic over wireless is not acknowledged by the receiving client. With no acknowledgments for multicast packets, multicast over wireless is essentially unreliable. Unicast packets must be acknowledged by the receiving client. If unicast packets are not acknowledged by the receiver, the sender resends the original packet.
For reliable delivery of multicast video, WatchGuard APs can convert multicast video traffic to unicast traffic at the 802.11 layer. Traffic is sent to the multicast address at the IP layer. If these unicast packets are not acknowledged by the receiver (for example, a client that has joined the multicast group) the AP resends the packet. This feature enables unicast traffic to be more reliable than multicast traffic. In addition to the reliable delivery feature of unicast packets, there is the additional benefit of the packets being sent at unicast data rates, which are typically much higher than multicast data rates, even when multicast rate optimization is enabled.
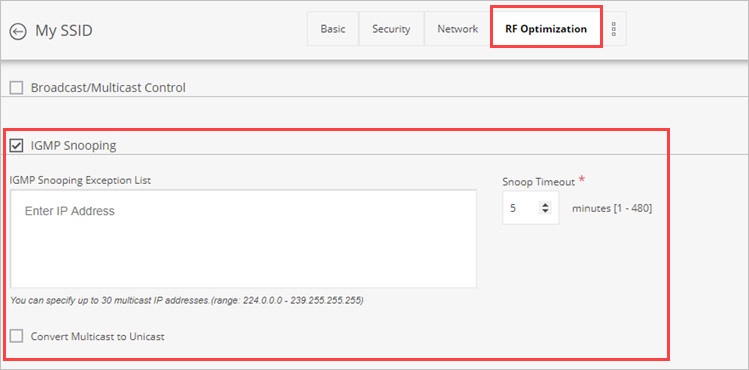
Multicast to unicast conversion is only part of the solution. You must enable IGMP snooping for optimal multicast video delivery. IGMP (Internet Group Management Protocol) enables WatchGuard APs to listen for multicast group join messages sent by wireless clients. The IGMP feature builds multicast group forwarding tables on the APs so that multicast traffic (now converted to unicast traffic) is transmitted to only those clients that have joined multicast groups.
To enable IGMP Snooping and create exceptions for specific IP addresses:
- Open Discover.
- Select Configure > WiFi.
- Select an SSID Profile.
- Select the RF Optimization tab.
- Select the IGMP Snooping check box.
- (Optional) Add IP addresses to the IGMP Snooping Exception list. The packets with multicast IP addresses that are mentioned in the exception list are not dropped even if no client joins the multicast group. They are not converted to Unicast even if Convert Multicast to Unicast is enabled.
- Save the SSID settings.
Set a Minimum Unicast Rate
The default minimum unicast rate for 802.11n 2.4 GHz and 802.11ac 5 GHz is most suitable for networks designed to optimize coverage, as opposed to client capacity. We recommend that you design enterprise wireless networks for capacity with the goal to improve the throughput and client capacity of each cell and reduce cell sizes so that channels can be reused more frequently. This results in an increase in the overall capacity of the network, given a fixed amount of frequency spectrum to use.
One technique that can help reduce cell size is to increase the minimum data rate at which clients can associate to a wireless network. We recommend that you set the minimum unicast data rate to 24 Mbps.
To configure the minimum unicast data rate:
- Open Discover.
- Select Configure > WiFi.
- Select an SSID Profile.
- Select the Traffic Shaping & QoS tab.
- Edit the minimum unicast date rate.
- Save the SSID settings.

Multicast, Broadcast and Management Rate Optimization
This optimization feature enables you to configure the rate at which broadcast, multicast, and management packets are transmitted by the AP. You can increase the data rate for multicast, broadcast, and management traffic to improve wireless network performance. This feature can reduce the channel utilization consumed by these types of packets. This feature can also help reduce the effective network cell that enables greater channel reuse.
In addition to configuring management rate optimization, you can also restrict the number of SSIDs to significantly reduce the total airtime consumed by management traffic.
To configure the unicast and multicast data rates:
- Open Discover.
- Select Configure > WiFi.
- Select an SSID Profile.
- Select the Traffic Shaping & QoS tab.
- In this example, the minimum unicast data rate has been set to 24 Mbps. Configure the data rate for multicast, broadcast, and management traffic to be equal to or greater than the minimum unicast data rate.
- Save the SSID settings.

Traffic Shaping
Most wireless networks offer guest access to clients. The Guest SSID may be available in limited areas of the deployment or it may be available across the entire network. If you offer guest wireless access, you must prevent guest traffic from adversely affecting your internal wireless network. To prevent guest users from disrupting wireless performance for non-guest users, you can configure rate limiting at the SSID level and client level .
To configure rate limits:
- Open Discover.
- Select Configure > WiFi.
- Select an SSID Profile.
- Select the Traffic Shaping & QoS tab.
- Select the Limit the maximum upload bandwidth on the SSID to and the Limit the maximum download bandwidth on the SSID to check boxes.
- Type a data rate from 0 to 1024 Kbps or Mbps.
- Save the SSID settings.
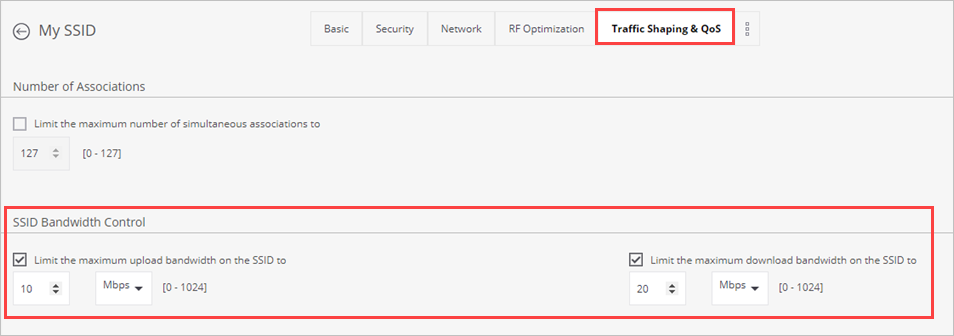
In this example, the throughput rate for the Guest SSID has been limited to 10 Mbps upstream and 20 Mbps downstream.
Wi-Fi Multimedia and Quality of Service
Wireless networks are a shared medium, and you must make sure that critical latency-sensitive applications, such as voice traffic or video streaming, have priority over other applications.
Quality of service (QoS) prioritizes different classes of traffic throughout the wireless network. Wi-Fi Multimedia (WMM) admission control tags different types of traffic and maps them to different queues with custom WMM parameters. The WMM Access Categories, together with their corresponding identifying values, are described in this table.
|
WMM Access Categories |
|||
|---|---|---|---|
|
Binary |
802.1p Priority |
WMM Access Category |
Traffic Type |
|
001 |
1 |
AC_BK |
Background |
|
010 |
2 |
AC_BK |
Background |
|
000 |
0 |
AC_BE |
Best Effort |
|
011 |
3 |
AC_BE |
Best Effort |
|
100 |
4 |
AC_VI |
Video |
|
101 |
5 |
AC_VI |
Video |
|
110 |
6 |
AC_VO |
Voice |
|
111 |
7 |
AC_VO |
Voice |
While some applications and devices can correctly tag packets for prioritization as they travel through the network, most traffic is transmitted as best effort (AC_BE). With a large amount of available capacity, this does not create an issue. But in enterprise wireless networks there are many use cases where channels operate at high levels of utilization, and you must correctly prioritize traffic for latency-sensitive applications such as voice and real-time video for solid application performance and a high quality user experience.
Inbound traffic from the Internet is transmitted as best effort, even if it originally was tagged as voice (AC_VO) before traversing the Internet, and network components, such as switches, routers and APs, must be able to identify, tag, and prioritize traffic.
End-to-End QoS
For optimal QoS, you must implement it end-to-end throughout the entire network. All components along the path must apply packet tagging.
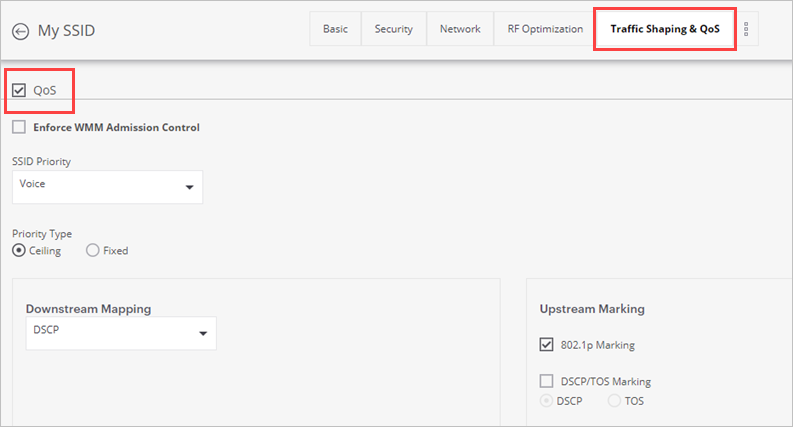
WatchGuard APs use WMM on the wireless side, and DSCP (DiffServ Code Point) and 802.1p tagging for traffic destined for upstream networks on the wired side. DSCP/802.1p tagging guarantees appropriate delivery on the wired side of the network. We recommend that you enable QoS if you support voice or real-time video applications on your network.
To configure QoS settings:
- Open Discover.
- Select Configure > WiFi.
- Select an SSID Profile.
- Select the Traffic Shaping & QoS tab.
- Select the QoS check box.
- Configure your QoS settings as required. For more information on QoS configuration, see the WatchGuard Wi-Fi Cloud Help.
- Save the SSID settings.
Application Visibility and Control
Application Visibility provides real-time, Layer 7 application classification and meta data extraction for network traffic. Application Visibility uses a combination of application classification and inspection techniques to deliver industry leading scope and accuracy. Application Visibility automatically classifies thousands of popular applications.
Application Visibility enables you to see the applications used by each client and provides a global view of what applications are used on the network. You can block, rate limit, or prioritize (tag) individual applications.
You can enable Application Visibility in an SSID Profile (802.11ac Wave 2 APs only).
If you do not already have a firewall or network appliance that has application control features, we recommend you enable Application Visibility on all SSIDs that could be used for voice or video traffic. This can improve application performance and can enhance the quality of experience for end users.
To enable Application Visibility on an SSID:
- Open Discover.
- Select Configure > WiFi.
- Select an SSID Profile.
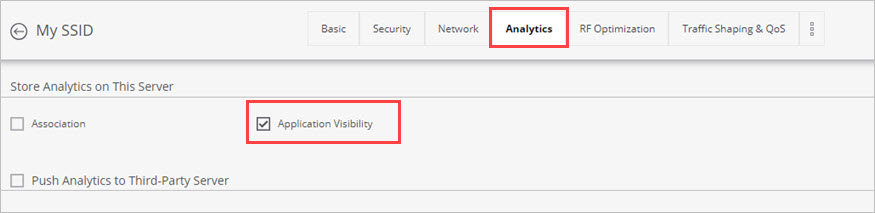
- Select the Analytics tab.
- Select the Application Visibility check box.
- Save the SSID settings.
Application Firewall
When Application Visibility is enabled, you can use the Application Firewall to create rules and control application use on an SSID.
The default application firewall rule is to block all applications.
To enable the Application Firewall:
- Open Discover.
- Select Configure > WiFi.
- Select an SSID profile.
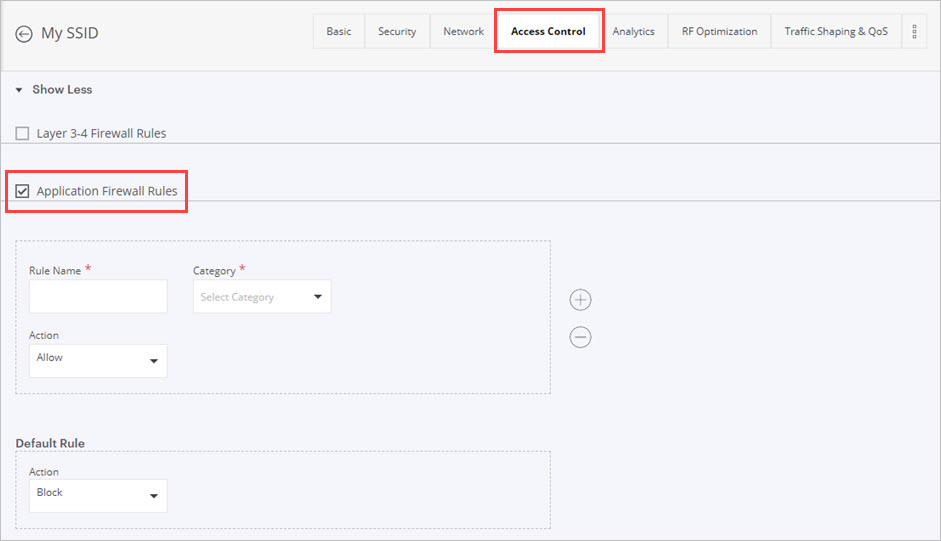
Make sure that Application Visibility is enabled on the SSID Profile. - Select the Access Control tab.
- Select the Application Firewall Rules check box.
- Configure your rules.
- Save the SSID settings.
WIPS (Wireless Intrusion Prevention System)
WatchGuard APs can run in these modes:
- Wi-Fi Access point only
- Wi-Fi Access point with background scanning and wireless security features enabled
- Dedicated WIPS sensor
You can deploy APs in Wi-Fi access point mode with background scanning. This option provides robust protection for many Wi-Fi threats.
Video streaming and voice application performance are another important consideration. APs that have background scanning enabled must periodically scan all channels. This means that the AP must temporarily leave the channel where the AP is servicing clients. For typical data traffic, such as web browsing or email, the latency that results from channel scanning does not create issues. However, for real-time applications, this latency is not acceptable.
On 802.11ac Wave 2 APs you can enable VoIP-aware scanning to perform the functions of background scanning but optimize the scanning for high-priority real-time traffic. If you enable VoIP-aware scanning, make sure that SSIDs added to this radio have the Application Visibility option enabled for traffic detection.
For comprehensive protection against Wi-Fi threats, we recommend you use dedicated WIPS sensors. For example, if you need to prevent your wireless clients from connecting to an unauthorized personal hotspot, your deployment must include a WIPS sensor.
You can configure dual-radio APs as dedicated WIPS sensors that dedicate both radios to WIPS scanning and do not broadcast Wi-Fi. Tri-radio devices such as the AP225W, AP325, and AP420 have a dedicated WIPS sensor on the third radio.
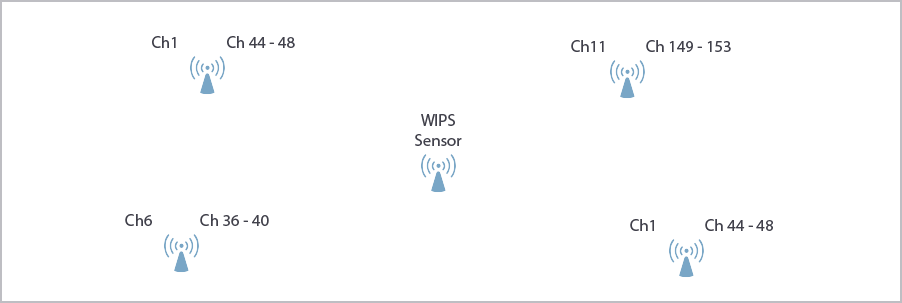
We recommend you deploy a dedicated WIPS sensor for every three to five Wi-Fi access points.
- Place your WIPS sensors to provide full coverage over your Wi-Fi airspace, but do not install them too close to your existing APs to avoid interference.
- Make sure there is some overlap in the coverage area so that at least two sensors are active in the same area in the event of multiple threats.
Some AP models must use full PoE+ power or be connected to a power adapter for the third WIPS scanning radio to be fully effective. Lower PoE power results in reduced performance and effectiveness of WIPS scanning and intrusion prevention functions. For more information, see the "AP Power Requirements" section in Wired Network Best Practices.
For detailed information on how to configure Wi-Fi Cloud WIPS to meet the requirements of a Trusted Wireless Environment, go to Create a Trusted Wireless Environment with WIPS.
You can test your own wireless network security measures to see if they are able to detect and prevent the six known threats identified by the Trusted Wireless Environment. For more information, see the Trusted Wireless Environment Test Guide.
Summary of Wireless Network Recommendations
This table provides a summary of the recommendations for a wireless network deployment.
|
Feature |
Default |
Recommended |
Notes |
|---|---|---|---|
| SSID Profile Options | |||
|
SSIDs |
0 |
Limit number of SSIDs to 6 per AP |
WatchGuard APs support up to 8 SSIDs per radio, or 16 SSIDs per AP. |
|
SSID Network Mode |
Bridge |
Bridge |
Consider NAT only for small remote site deployments. |
|
Application Visibility |
Disabled |
Enabled |
You must also enable QoS in your end-to-end switching infrastructure. |
|
Bonjour Gateway |
Disabled |
Enabled |
|
|
Min Unicast Data Rate |
2.4 GHz - 1 Mbps 5 GHz - 6 Mbps |
24 Mbps |
Removing supported data rates can cause client interoperability issues. |
|
Min Multicast, Broadcast, and Management Rate |
2.4 GHz - 1 Mbps 5 GHz - 6 Mbps |
24 Mbps |
This rate should be equal to or greater than Min Unicast (Association) Data Rate. |
|
Traffic Shaping |
Disabled |
Enable for Guest wireless network |
|
|
Smart Client Load Balancing |
Disabled |
Enabled |
|
|
Smart Steering |
Disabled |
Enabled with default settings
|
Consider leaving Smart Steering disabled in environments that support voice traffic. |
|
Minimum Association RSSI |
-65 dBm |
-65 dBm |
Wireless network should be designed for -62 dBm or greater throughout the entire deployment. |
|
802.11k and 802.11v |
Disabled |
Enabled |
|
|
Proxy ARP |
Disabled |
Enabled |
|
|
Broadcast and Multicast Suppression |
Disabled |
Enabled |
A function of the WatchGuard AP layer 2 Firewall. |
|
Reliable Multicast Delivery |
Disabled |
Enabled |
AP converts multicast to unicast and uses IGMP Snooping to build multicast group forwarding tables at the AP. |
| Device and Radio Settings | |||
|
Channel Width |
20/40/80 MHz |
20/40/80 MHz for 802.11ac |
Use 20/40 MHz if DFS channels are not available. |
|
AP Mode |
Wi-Fi only |
Wi-Fi only or WIPS Sensor |
Deploy one full-time WIPS sensor for every 3 to 5 Wi-Fi only APs for maximum AP performance and WIPS effectiveness. |
|
Auto Channel Selection / Dynamic Channel Selection |
Enabled |
Enabled or Disabled with a Static Channel Plan |
Depends on the environment and preference of your network deployment engineers. |
|
AP Power |
Auto Power |
Auto Power or Static Power Plan
Classroom: 5 GHz: 8 - 16 dBm 2.4 GHz: 4 - 10 dBm
Auditorium/Lecture Hall: 5 GHz: 5 - 12 dBm 2.4 GHz: 3 - 10 dBm |
Depends on the environment and preference of network deployment engineers.
|