Applies To: ThreatSync
Some of the features described in this topic are only available to participants in the ThreatSync Beta program. If a feature described in this topic is not available in your version of WatchGuard Cloud, it is a beta-only feature.
This quick start topic outlines the general steps to set up and configure ThreatSync in WatchGuard Cloud:
- Before You Begin
- Enable ThreatSync in Your Account
- Configure Device Settings
- Monitor Threats
- Perform Actions in ThreatSync
- Add Automation Policies
ThreatSync+ NDR extends the existing ThreatSync functionality in WatchGuard Cloud and offers enhanced network detection and response, network device identification, and advanced reporting for Fireboxes, third-party firewalls, and LAN infrastructure. To learn more, go to About ThreatSync+ NDR.
ThreatSync+ SaaS enables you to monitor, detect, and report on activity from third-party SaaS and cloud environments, such as Microsoft 365. To learn more, go to About ThreatSync+ Cloud Integration — Microsoft 365.
Before You Begin
You do not have to purchase a new license to enable and use ThreatSync.
Before you begin, make sure that you meet the requirements for each product you want to use with ThreatSync. For more information, go to ThreatSync Requirements.
The more WatchGuard products you have, the more information ThreatSync has to correlate events.
We recommend you wait a few minutes after license activation before you enable ThreatSync.
Enable ThreatSync in Your Account
To enable ThreatSync for your account, in WatchGuard Cloud:
- From Account Manager, select your account.
- Select Monitor > Threats or Configure > ThreatSync.
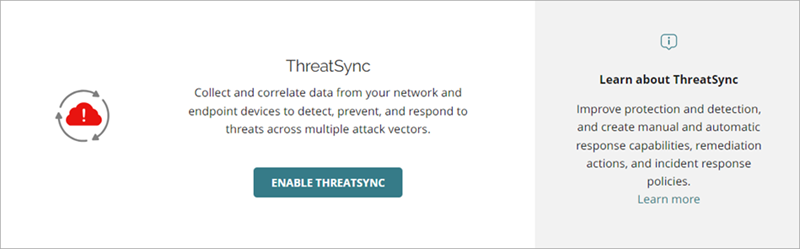
- In the ThreatSync tile, click Enable ThreatSync.
The Enable ThreatSync dialog box opens. ThreatSync is automatically enabled on any devices in your account.

- Click Close.
The Device Settings page opens.
Configure Device Settings
When you enable ThreatSync, it is automatically enabled on your Fireboxes, access points, and endpoint devices allocated to your account. You can configure whether endpoint devices or specific Firebox or access point devices send data to ThreatSync on the Device Settings page.
To configure which products and devices send data to ThreatSync:
Your operator role determines what you can view and do in WatchGuard Cloud. Your role must have the ThreatSync Core permission to view or configure this feature. For more information, go to Manage WatchGuard Cloud Operators and Roles.
- Select Configure > ThreatSync > Device Settings.
The Device Settings page opens. - To specify whether to send incident data from ThreatSync+ to ThreatSync, enable or disable the ThreatSync+ toggle.
- To specify whether to send incident data from AuthPoint to ThreatSync, enable or disable the AuthPoint toggle.
- To specify whether to send incident data from all endpoint devices to ThreatSync, enable or disable the Endpoints toggle.
- To automatically enable ThreatSync for any new devices you allocate to the account in WatchGuard Cloud, select the corresponding check box for Fireboxes and Access Points.
- To specify which specific Fireboxes and access points send data to and receive actions from ThreatSync, clear or select check boxes next to the Firebox and access point names.

- Click Save.
Monitor Threats
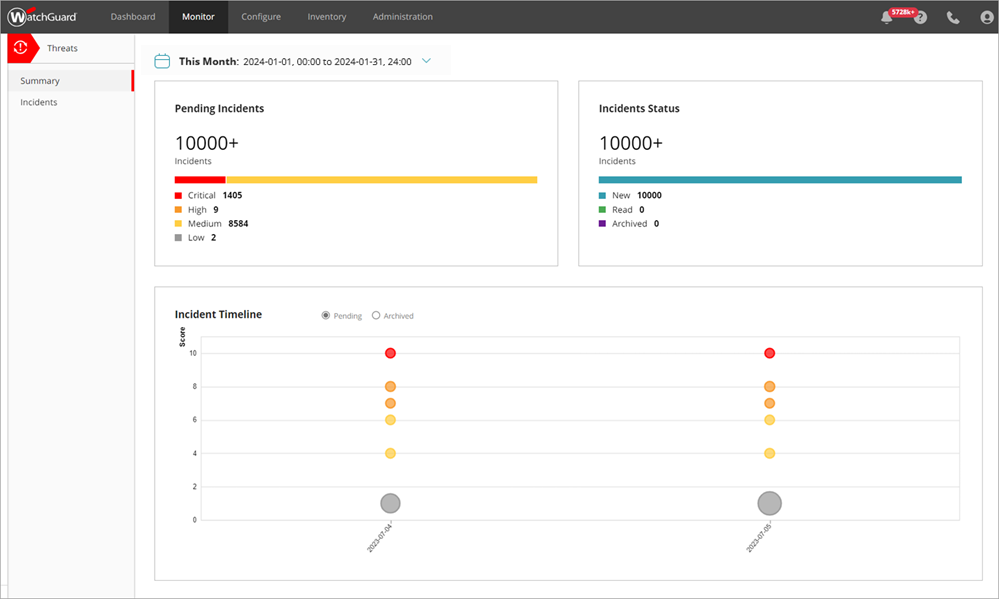
The Monitormenu in the ThreatSync management UI shows an overview of correlated incident activity for a specific time period.
To monitor ThreatSync, select Monitor > Threats. The Summary page opens by default for both Service Providers and Subscribers.
Use these pages to monitor ThreatSync in WatchGuard Cloud:
- Summary — The Summary page provides a snapshot of incident activity for your account. For more information, go to ThreatSync Incident Summary.
- Incidents — The Incidents page shows a list of incidents for a specified time period and enables you to perform actions to remediate incidents. For more information, go to Monitor Incidents in ThreatSync.
- Endpoints — The Endpoints page provides an endpoint-based view of incident activity for a specified time period and enables you to perform actions to remediate incidents on an endpoint. For more information, go to Monitor Endpoints in ThreatSync.
- Users — The Users page provides a user-based view of incident activity for a specified time period and enables you to perform actions to remediate incidents for the user. For more information, go to Monitor Users in ThreatSync.
Perform Actions in ThreatSync
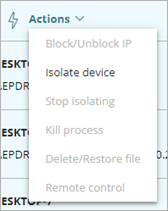
As you monitor threats detected by ThreatSync and review incident details, you can decide to take one of these response actions to the incident:
- Block/Unblock IP — Blocks or unblocks the external IP address associated with the incident. When you select this action, all Fireboxes in the WatchGuard Cloud account block or unblock connections to and from the IP address.
IP addresses blocked by ThreatSync do not appear on the Firebox Blocked Sites list in Fireware or WatchGuard Cloud. For more information, go to Manage Items Blocked by ThreatSync.
- Block/Unblock Domain — Blocks or unblocks the domain associated with the incident. When you select this action, all Fireboxes in the WatchGuard Cloud account block or unblock connections to and from the domain.
- Isolate/Stop Isolating Device — Isolates the computer from the network to prevent the spread of the threat, and to block the exfiltration of confidential data, or stops isolating a previously isolated computer.
- Kill Process — Terminates a process that exhibited malicious behavior associated with the incident.
- Delete/Restore File — Deletes the flagged file associated with the incident, or restores a previously deleted file.
- Block/Unblock Connections to Access Point
— Blocks wireless client connections to malicious access points.
The WatchGuard access point that detects the malicious device must have a dedicated scanning radio and run firmware v2.7 or higher to perform over-the-air response actions and block wireless client connections to a malicious access point.
- Disable/Enable User in Microsoft 365 — Disables or enables the user associated with a ThreatSync+ SaaS incident in Microsoft 365.
- Block/Unblock User in AuthPoint — Blocks or unblocks the user associated with a Credential Access incident in AuthPoint. For more information on how to block users or activate blocked users in AuthPoint, go to Block a User or Token.
- Remote Control — Remotely connects to the selected Windows computer on your network to enable you to investigate and remediate a potential attack. The remote control tool requires Advanced EPDR and can only be used for a single device at a time. For more information, go to About the Remote Control Tool.
Not all actions apply to all incident types.
- Select Monitor > Threats > Incidents.
The Incidents page opens. - Select the check box next to one or more incidents.
The Change Status and Actions menus appear. - From the Actions drop-down list, select the action to perform.

Recommendations for an incident on the Incident Details page determine what actions are available in the Actions drop-down list on the Incidents page. For example, if the recommended action for an incident is to isolate a device, the Isolate/Stop isolating device option is enabled in the Actions drop-down list.
- Select Monitor > Threats > Incidents.
The Incidents page opens. - Click an incident in the incident list.
The Incident Details page opens. - To perform an action:
- In the Recommended Actions section, click an action.
- In Entities of Interest section, click the
 icon for an entity to open the drop-down list, then select an action from the list.

- Select Monitor > Threats > Endpoints.
The Endpoints page opens. - Select the check box for one or more endpoints.
The Actions menu appears at the top of the page. - From the Actions drop-down list, select the action to perform.
- Select Monitor > Threats > Users.
The Users page opens. - Select the check box for one or more users.
The Actions menu appears at the top of the page. - From the Actions drop-down list, select one of the available actions.

For more information on response actions, go to Perform Actions in ThreatSync.
You can also close or change the status of incidents after you review them. For more information, go to Close or Change the Status of Incidents.
Add Automation Policies
You can configure automation policies to automatically perform ThreatSync actions for you.
We recommend that you do not add automation policies other than the default automation policies in ThreatSync Best Practices until you are familiar with the different types of incidents that can occur in your environment and the response actions you can perform.
To add an automation policy (Subscriber accounts):
- Select Configure > ThreatSync.
The Automation Policies page opens.
- Click Add Automation Policy.
The Add Policy page opens.
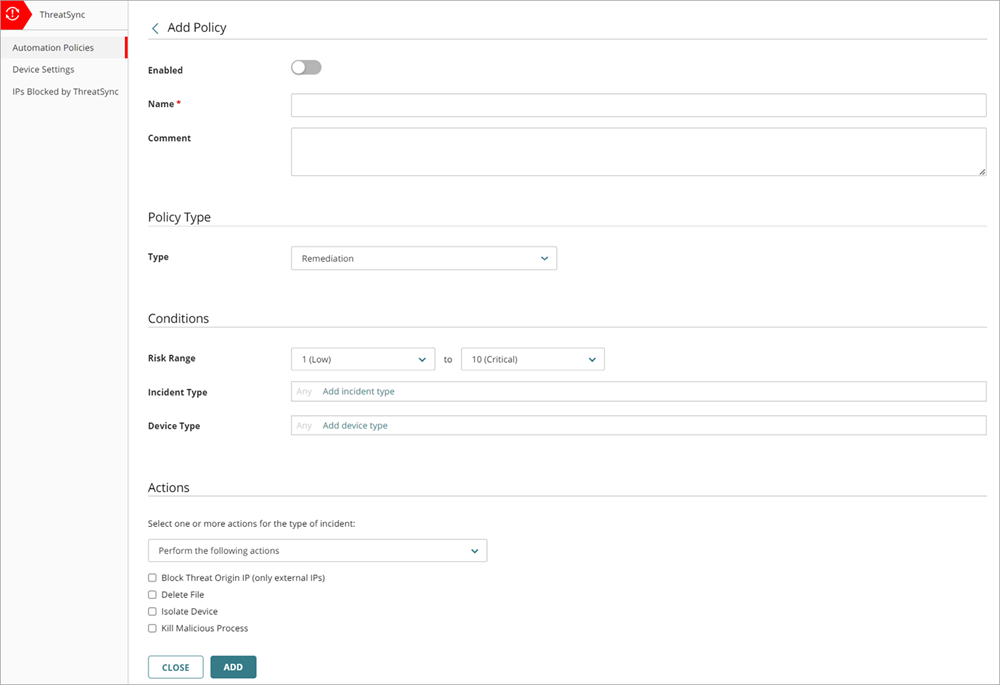
- To enable the new policy, click the Enabled toggle.
- Enter a Name for your policy and any comments.
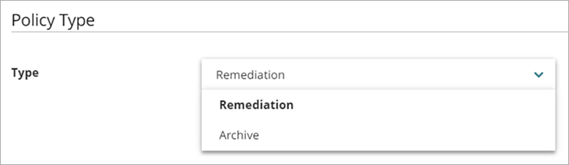
- In the Policy Type section, from the Type drop-down list, select the type of policy you want to create:
- Remediation — The automation policy performs the specified remediation actions for incidents that meet the conditions.
- Close — The automation policy changes the status of incidents that meet the conditions to Closed.
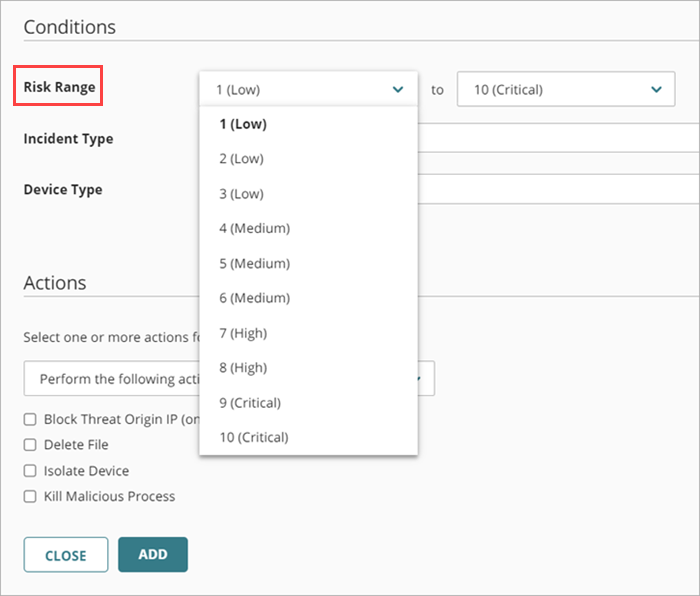
- In the Conditions section, specify the conditions that an incident must meet for this automation policy to apply:
- Risk Range — Specify a range of incident risk levels. For more information, go to About ThreatSync.
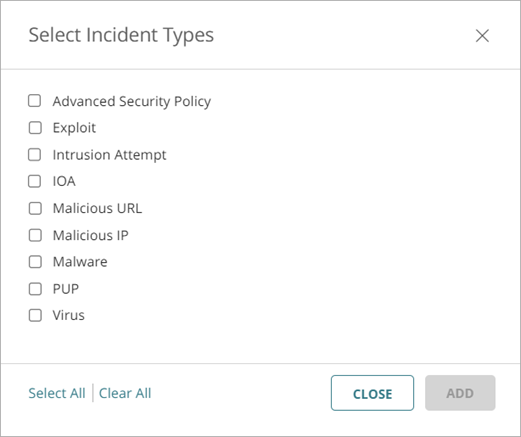
- Incident Type — Select one or more of these incident types:
- Advanced Security Policy — Unauthorized or unexpected activity on your network, including execution of malicious scripts and unknown programs that use advanced infection techniques, traffic to dangerous websites, unauthorized applications and countries, unauthorized incoming traffic, or unauthorized traffic between internal networks.
- Exploit — Attacks that try to inject malicious code to exploit vulnerable processes.
- Intrusion Attempt — A security event where an intruder tries to gain unauthorized access to a system.
- IOA — Indicators of Attack (IOAs) are indicators that are highly likely to be an attack.
- Malicious URL — A URL created to distribute malware, such as ransomware.
- Malicious IP — An IP address associated with malicious activity.
- Malware — Malicious software designed to damage, disrupt, and gain unauthorized access to computer systems.
- PUP — Potentially Unwanted Programs (PUPs) that might install when other software installs on a computer.
- Virus — Malicious code that enters computer systems.
- Unknown Program — Program blocked because it has not yet been classified by WatchGuard Endpoint Security. For more information on what happens when Endpoint Security reclassifies an Unknown Program, go to Unknown Programs and Incident Reclassification.
- Malicious Access Point — An unauthorized wireless access point connected to your network or operating in your airspace.
- Credential Access — AuthPoint incident that indicates an attempt to compromise account credentials.
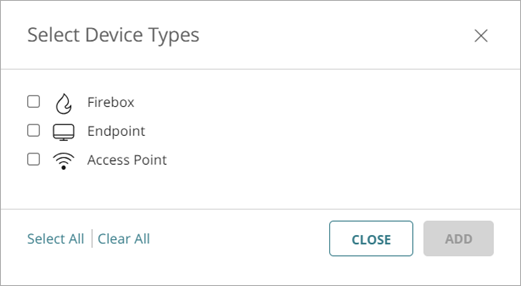
- Signal Source — Select one or more of these signal sources:
- Firebox
- Endpoint
- AuthPoint
- Access Point
- ThreatSync+

- Entity Type — Select one or more of these entity types:
- Firebox
- Endpoint
- AuthPoint
- Access Point
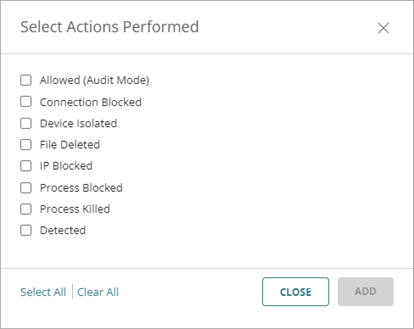
- Actions Performed — Select one or more of these actions performed on an incident (Close policy type only).
- Allowed (Audit Mode) — Incident detected, but because the device is in Audit mode, no action was taken.
- Connection Blocked — Connection blocked.
- Device Isolated — Communication with device is blocked.
- File Deleted — File was classified as malware and deleted.
- IP Blocked — Network connections to and from this IP address are blocked.
- Connections to Access Point Blocked — Wireless client connections to this malicious access point are blocked.
- Process Blocked — Process blocked by an endpoint device.
- Process Killed — Process ended by an endpoint device.
- User Disabled in Microsoft 365 — Advanced Security Policy incident in which the user was disabled in Microsoft 365.
- User Blocked in AuthPoint — Credential Access incident in which the user was blocked in AuthPoint.
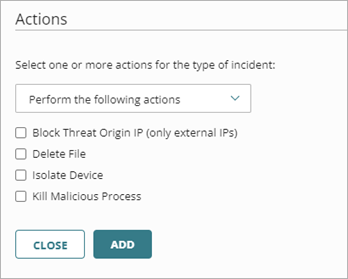
- In the Actions section, from the drop-down list, select whether you want to perform or prevent specified actions.
- Perform — ThreatSync performs the specified actions for new incidents that meet the policy conditions.
- Prevent — ThreatSync prevents the specified actions. To create an exception to a broader Perform policy, you can add a policy with the Prevent action and rank it higher than the other policy in the policy list. A policy with the Prevent action does not prevent the manual execution of an action by an operator.
- Select one or more of these actions to perform or prevent:
- Block Threat Origin IP (only external IPs) — Blocks the external IP address associated with the incident. When you select this action, all Fireboxes with ThreatSync enabled in the WatchGuard Cloud account block connections to and from the IP address.
- Delete File — Deletes the flagged file associated with the incident.
- Isolate Device — Isolates the computer from the network to prevent the spread of the threat, and to block the exfiltration of confidential data.
- Block Connections to Access Point — Blocks wireless client connections to malicious access points.
- Kill Malicious Process — Terminates a process that exhibited malicious behavior associated with the incident.
- Close the Incident — Changes the incident status to Closed (Closed policy type only).
If the policy type is Close, the Close the Incident action is selected automatically and you cannot select a different action.
- Click Add.
The new policy is added to the policy list.
Service Providers can create automation policy templates that include multiple automation policies and then assign them to their managed accounts. For more information, go to Manage ThreatSync Automation Policy Templates (Service Providers).