Applies To: ThreatSync+ NDR
This quick start topic outlines the general steps to set up and configure ThreatSync+ NDR in WatchGuard Cloud:
- Before You Begin
- Activate the License and Allocate ThreatSync+ NDR Users
- Verify Firebox Network Traffic
- Download and Install the Agents to Collect Network Traffic
- Configure Notifications and Alerts
- Respond to Smart Alerts
- Review Policy Alerts
- Review Reports for Compliance
Before You Begin
Before you can use ThreatSync+ NDR, make sure that:
- You have a cloud-managed Firebox or a locally-managed Firebox added to WatchGuard Cloud for cloud reporting.
- Your Firebox runs Fireware v12.10.3 or higher.
- You enable the Send a log message for reports or Send a log message check box in each policy on your locally-managed Firebox that is configured to send log data to WatchGuard Cloud.
- Send a log message for reports — For a packet filter policy that allows connections, this check box appears in the Logging settings. For proxy policies, this setting is in the proxy action, and is called Enable logging for reports.
- Send a log message — For a packet filter or proxy policy, this check box appears in the Logging settings.
For more information, go to Set Logging and Notification Preferences in Fireware Help.
Activate the License and Allocate ThreatSync+ NDR Users
To use ThreatSync+ NDR, you must purchase a ThreatSync+ NDR license or the Total NDR license. ThreatSync+ NDR is licensed for each user. You can have up to two unique networked devices (workstations, mobile phones, IP phones, servers, cameras, or other IOT devices) for each licensed ThreatSync+ NDR user. For example, if a license is for 250 users, then ThreatSync+ NDR monitors traffic for up to 500 active network devices. For more information, go to About ThreatSync+ NDR Licenses.
A Total NDR license includes:
- ThreatSync+ NDR
- ThreatSync+ SaaS
- Compliance Reporting
For more information, go to:
- About WatchGuard Compliance Reporting Licenses
- About ThreatSync+ SaaS Licenses
- About Total NDR Licenses
After you purchase a ThreatSync+ NDR or Total NDR license, you must activate the license at www.watchguard.com. For more information, go to Activate a ThreatSync+ NDR License and Activate a Total NDR License.
A separate license is required for WatchGuard Compliance Reporting, unless you have a Total NDR license. For information on how to activate a Compliance Reporting license, go to Activate a WatchGuard Compliance Reporting License.
A separate license is required for ThreatSync+ SaaS, unless you have a Total NDR license. For more information on how to activate a ThreatSync+ SaaS license, go to Activate a ThreatSync+ SaaS License.
You manage user allocation for your account and all accounts you manage in WatchGuard Cloud. Each user allocation includes up to two active network devices.
For more information, go to:
- Allocate ThreatSync+ NDR Users
- Allocate WatchGuard Compliance Reporting Users
- Allocate Total NDR Users
For more information about ThreatSync+ NDR licensing and enforcement, go to this Knowledge Base article: FAQ on ThreatSync+ NDR Licensing ![]()
For information about ThreatSync+ NDR and Compliance Reporting trial licenses, go to About Trials in WatchGuard Cloud.
Verify Firebox Network Traffic
After you enable ThreatSync+ NDR, the service automatically starts to monitor and analyze Firebox traffic logs from all Fireboxes associated with the account that are managed in WatchGuard Cloud or are configured to send log and report data to WatchGuard Cloud for visibility.
ThreatSync+ NDR analyzes traffic log messages in 30 minute blocks, and uses machine learning and other advanced analytics to identify threats. You can expect to see data in the ThreatSync+ user interface (from the Monitor menu) approximately one hour after you start your trial.
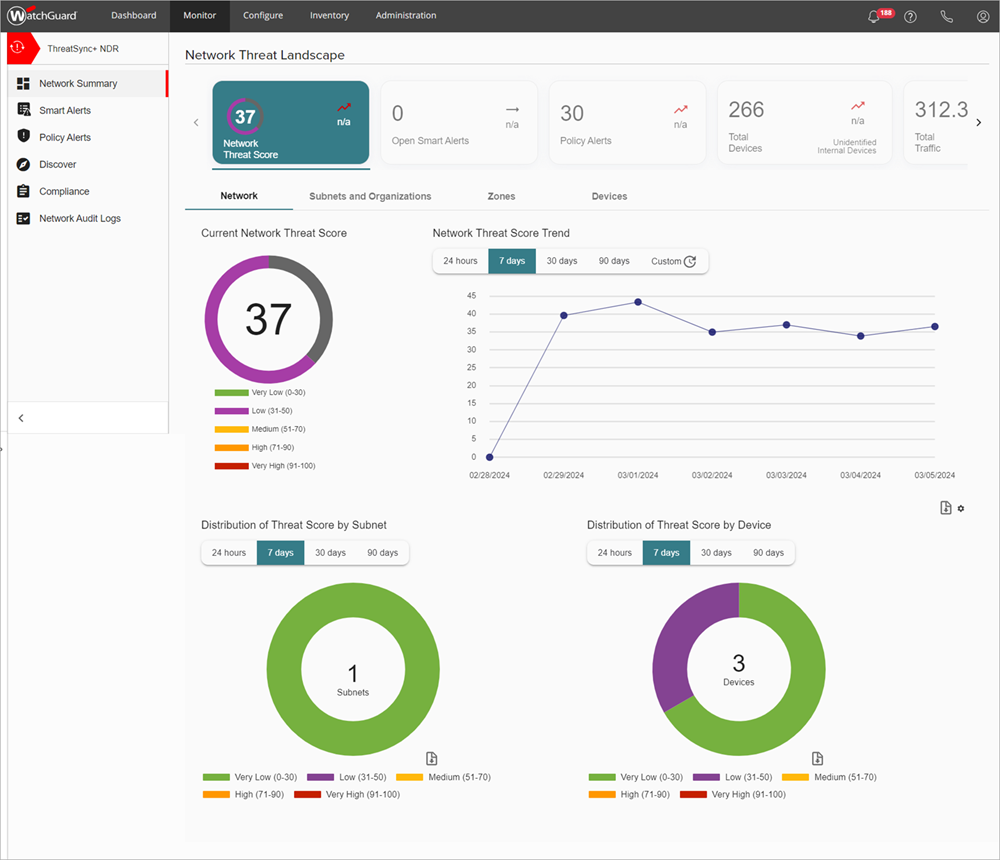
On the Network Summary page, make sure the Total Devices and Total Traffic widgets show non-zero values.
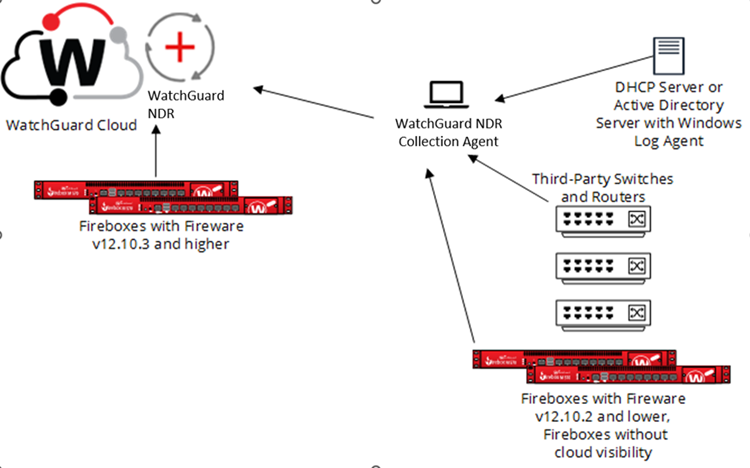
Download and Install the Agents to Collect Network Traffic
In addition to data collected by the Firebox, you can also install collection agents to collect data from third-party switches and firewalls. These collection agents relay NetFlow, sFlow and logs from Active Directory and DHCP servers to WatchGuard Cloud through a secure IPSec tunnel.
To add and configure a collection agent, you must first download the WatchGuard Agent installer and run the installation wizard on the Windows or Linux computers or servers you want to configure as collection agents.
When you install the WatchGuard Agent, it installs the ThreatSync+ NDR Collection Agent.
- The ThreatSync+ NDR Collection Agent receives log data from switches and routers in your network, DHCP data from the Windows Log Agent, and data from locally-managed Fireboxes and sends the data to WatchGuard Cloud.
- The Windows Log Agent is a collection agent that reads Windows DHCP server logs and then forwards them to the ThreatSync+ NDR Collection Agent. The ThreatSync+ NDR Collection Agent then forwards the DHCP logs to WatchGuard Cloud.
System Requirements for Windows
Before you download the WatchGuard Agent, make sure that you have Administrator permissions and are logged in to the Windows computer that you want to install the WatchGuard Agent on.
Make sure that virtualization is enabled in the BIOS and make sure that Virtualization-Based Security (VBS) is enabled for virtual environment hosts.
For more information, go to:
- Enable Virtualization on Windows PCs
- Virtualization-Based Security (VBS)
- Enable or Disable VBS For an Existing VM in the VMware Host Client
If you run the collection agent on Hyper-V, Nested Virtualization must be enabled. For more information, go to Nested Virtualization and Run Hyper-V in a Virtual Machine with Nested Virtualization.
To avoid Nested Virtualization, we recommend that you run the collection agent on a dedicated physical device instead of a virtual device.
The ThreatSync+ NDR Collection Agent for Windows must meet these requirements:
- Windows 10, Windows 11, or Windows 2022 installed with:
- Minimum CPU cores: 2
- Minimum of 8 GB RAM and 150 GB of disk space
For networks with a NetFlow rate greater than 500,000 per minute, more CPUs, RAM, and disk space are required.
For more information, go to Configure Collection Agents for ThreatSync+ NDR (Windows Computers).
System Requirements for Linux
Before you download the WatchGuard Agent, make sure that you have root permissions for the Linux computer where you want to install the WatchGuard Agent. You must have sudo access.
The ThreatSync+ NDR Collection Agent for Linux must meet these requirements:
- Ubuntu 22.04 Server LTS or 24.04 Server LTS installed with:
- Minimum CPU cores: 2
- Minimum of 8 GB RAM and 128 GB of disk space
Only the full Ubuntu server installation is supported. The default (previously called minimal) installation is not supported.
Only the English Ubuntu installation is supported.
We recommend Ubuntu 22.04 Server LTS. If you install Ubuntu 24.04 Server LTS on the same server as WatchGuard Endpoint Security 360, make sure you upgrade your Linux protection to 3.0.5.00.0001 or higher.
For networks with a NetFlow rate greater than 500,000 per minute, more CPUs, RAM, and disk space are required.
- x86-64 architecture — To verify the architecture of your computer, run this command:
user@ndr-ubuntu24:~$ uname -m
x86_64
For more information, go to Configure Collection Agents for ThreatSync+ NDR (Linux Computers).
System Requirements for the Windows Log Agent
You can install the Windows Log Agent on these operating systems:
- Windows Server 2019
- Windows Server 2022
The Windows installer is compatible with computers with an x86 or ARM processor.
For more information about supported operating systems and virtualization environments, go to Operating System Compatibility for ThreatSync+ NDR Components in the ThreatSync+ NDR Release Notes.
The ThreatSync+ NDR Collection Agent listens on:
- Port 2055 for NetFlow log data from endpoints.
- Port 6343 for sFlow log data from endpoints.
- Port 514 for DHCP log data from the Windows Log Agent.
Download and Install the WatchGuard Agent
Download and install the WatchGuard Agent on each Windows or Linux computer that you want to configure as a collection agent. You can configure more than one ThreatSync+ NDR Collection Agent in your account. Typically, only one ThreatSync+ NDR Collection Agent is required for each physical location in your network. We recommend that you add and configure the Windows Log Agent on all DHCP servers.
To install the WatchGuard Agent for Windows:
- Log in to your WatchGuard Cloud account.
- For Service Provider accounts, from Account Manager, select My Account.
- Select Configure > ThreatSync+ Integrations > Collection Agents.
- On the ThreatSync+ NDR Collection Agents tab, click Add Collection Agent.
- In the Download and Install the WatchGuard Agent section, click Download the WatchGuard Agent.
The Download WatchGuard Agent Installer dialog box opens. - In the Download WatchGuard Agent Installer dialog box, select Windows.

- (Optional) Click Copy Download URL to save the download URL.
- Click Download.
The Windows WatchGuard_Agent.msi file downloads. - Copy the .MSI file to the Windows computer or server you want to receive logs from.
- Double-click the WatchGuard_Agent.msi file and complete the steps in the wizard.
A progress bar shows during the installation process. The agent opens an Ubuntu console window during installation. You should not close this window. The Windows computer or server will restart to complete installation.
To install the WatchGuard Agent for Linux:
- Log in to your WatchGuard Cloud account.
- For Service Provider accounts, from Account Manager, select My Account.
- Select Configure > ThreatSync+ Integrations > Collection Agents.
- On the ThreatSync+ NDR Collection Agents tab, click Add Collection Agent.
- In the Download and Install the WatchGuard Agent section, click Download the WatchGuard Agent.
The Download WatchGuard Agent Installer dialog box opens. - In the Download WatchGuard Agent Installer dialog box, select Linux.

- (Optional) Click Copy Download URL to save the download URL.
- Click Download.
The WatchGuard Agent.run file downloads. - Copy the .RUN file to the Linux computer or server you want to receive logs from.
- Log in to the Linux computer and verify the operating system version is supported. The Description and Release fields show the version.Example output:

ndr@ndr-ubuntu:~$ lsb_release -a
No LSB modules are available.
Distributor ID: Ubuntu
Description: Ubuntu 24.04.1 LTS
Release: 24.04
Codename: noble
ndr@ndr-ubuntu:~$
- Verify that you are in the directory where you copied the WatchGuard Agent.run file. Run the command ls -l to list the names of the files in the current directory and verify that WatchGuard Agent.run shows in the list.Example output:
ndr@ndr-ubuntu:~$ ls -1
total 2072
-rw-rw-r-- 1 ndr ndr 2121583 Oct 2 08:06 'WatchGuard Agent.run'
ndr@ndr-ubuntu:~$ - To install the WatchGuard Agent, run this command:
sudo bash "WatchGuard Agent.run"Example output:ndr@ndr-ubuntu24:~$ sudo bash 'WatchGuard Agent.run'
[sudo] password for ndr:
Verifying archive integrity... 100% All good.
Uncompressing WatchGuard Agent Installer 100%
Desktop server detected
Installing debian repository
Removing debian repository
Repository installed
Hit:1 https://repository.pandasecurity.com/aether/qa-us1/installers/agent/linux/1.15.00.0000/default/deb/common stable InRelease
Hit:2 http://security.ubuntu.com/ubuntu noble-security InRelease
Hit:3 http://in.archive.ubuntu.com/ubuntu noble InRelease
Hit:4 http://in.archive.ubuntu.com/ubuntu noble-updates InRelease
Hit:5 http://in.archive.ubuntu.com/ubuntu noble-backports InRelease
Reading package lists... Done
Reading package lists... Done
Building dependency tree... Done
Reading state information... Done
apt-transport-https is already the newest version (2.7.14build2).
0 upgraded, 0 newly installed, 0 to remove and 21 not upgraded.
Reading package lists... Done
Building dependency tree... Done
Reading state information... Done
The following NEW packages will be installed: management-agent
0 upgraded, 1 newly installed, 0 to remove and 21 not upgraded.
Need to get 0 B/15.3 MB of archives.
After this operation, 130 MB of additional disk space will be used.
Selecting previously unselected package management-agent.
(Reading database ... 150921 files and directories currently installed.)
Preparing to unpack .../management-agent_1.15.00.0000-1.10.00-2000-g8ff98e0_amd64.deb ...
Running preinst script with params: install 1.15.00.0000-1.10.00-2000-g8ff98e0 1.15.00.0000-1.10.00-2000-g8ff98e0
Unpacking management-agent (1.15.00.0000-1.10.00-2000-g8ff98e0) ...
Setting up management-agent (1.15.00.0000-1.10.00-2000-g8ff98e0) ...
Running postinst script with params: configure 1.15.00.0000-1.10.00-2000-g8ff98e0
Created symlink /etc/systemd/system/multi-user.target.wants/management-agent.service → /usr/lib systemd/system/management-agent.service.
starting service
Management Agent installation successfully completed!
Succeeded
ndr@ndr-ubuntu24:~$
If you see output with this information, this means you already have the WatchGuard Agent installed:
Reading state information... Done
management-agent is already the newest version (1.15.00.0000-1.10.00-1988-gcffa169).
0 upgraded, 0 newly installed, 0 to remove and 15 not upgraded.
Succeeded
Add a ThreatSync+ NDR Collection Agent
The ThreatSync+ NDR Collection Agent receives log message data from endpoints in your network and sends the data to WatchGuard Cloud. This can include DHCP log messages from Windows Log Agents that the ThreatSync+ NDR Collection Agent then forwards to WatchGuard Cloud.
Typically, you only have to install the ThreatSync+ NDR Collection Agent on one endpoint for each physical location in your network. If you want to collect DHCP data log messages from a DHCP server, make sure to install the ThreatSync+ NDR Collection Agent on a computer that has a static IP address.
To add a ThreatSync+ NDR Collection Agent for Windows:
- Log in to your WatchGuard Cloud account.
- For Service Provider accounts, from Account Manager, select My Account.
- Select Configure > ThreatSync+ Integrations > Collection Agents.
- On the ThreatSync+ NDR Collection Agents tab, click Add Collection Agent.
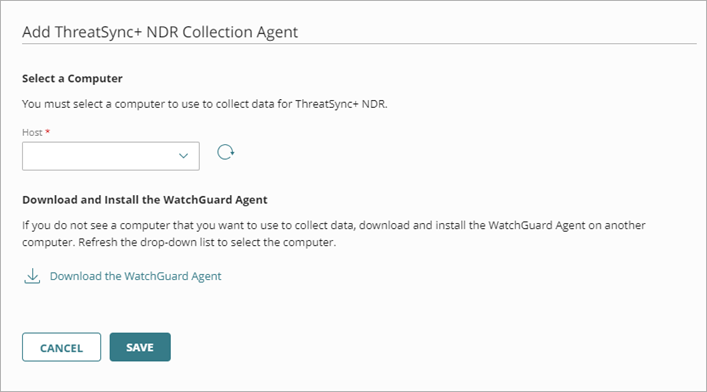
- From the Host drop-down list, select the Windows computer that you want to use as a ThreatSync+ NDR Collection Agent.
This list includes all Windows computers with the WatchGuard Agent installed. To refresh the list of available computers and servers, click .
. - Click Save.
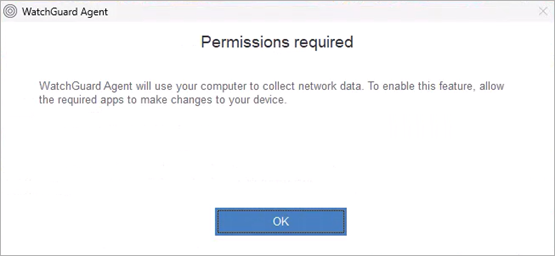
The collection agent starts to report data to ThreatSync+ NDR. You can view reported traffic information on the Network Summary page. - On your host computer, click OK when the Permissions Required dialog box opens.
It might take some time for the Permissions Required dialog box to appear on the host computer.
Record the IP address of the ThreatSync+ NDR Collection Agent. You must enter the IP address to configure the Windows Log Agent.
To add a ThreatSync+ NDR Collection Agent:
- Log in to your WatchGuard Cloud account.
- For Service Provider accounts, from Account Manager, select My Account.
- Select Configure > ThreatSync+ Integrations > Collection Agents.
- On the ThreatSync+ NDR Collection Agents tab, click Add Collection Agent.
- From the Host drop-down list, select the Linux computer that you want to use as a ThreatSync+ NDR Collection Agent.
This list includes all computers with the WatchGuard Agent installed. To refresh the list of available computers and servers, click. - Click Save.
The collection agent starts to report data to ThreatSync+ NDR. You can view reported traffic information on the Network Summary page.
Record the IP address of the ThreatSync+ NDR Collection Agent. You must enter the IP address to configure the Windows Log Agent.
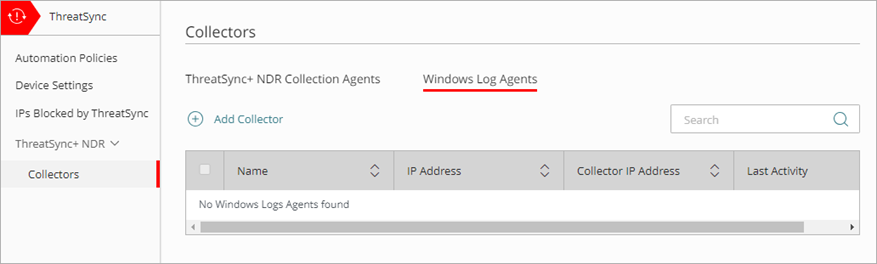
Add a Windows Log Agent
To collect Active Directory DHCP logs, you must add and configure both types of collection agents in your network — first the ThreatSync+ NDR Collection Agent, and then the Windows Log Agent. Before you add a Windows Log Agent, make sure that:
- You have installed the WatchGuard Agent on a server that runs Windows Server 2019 or 2022.
- You have added a ThreatSync+ NDR Collection Agent on a computer that has a static IP address.
Add and configure the Windows Log Agent on all DHCP servers in your network.
To add a Windows Log Agent:
- Log in to your WatchGuard Cloud account.
- For Service Provider accounts, from Account Manager, select My Account.
- Select Configure > ThreatSync+ Integrations > Collection Agents.
- On the Windows Log Agent tab, click Add Collection Agent.
The Add Windows Log Agent page opens.

- From the Host drop-down list, select the computer that you want to use as a Windows Log Agent.
This list includes all servers with the WatchGuard Agent installed. To refresh the list of available computers and servers, click - In the ThreatSync+ NDR Collection Agent IP Address text box, enter the IP address of the computer you configured the ThreatSync+ NDR Collection Agent for.
You can view the IP address on the ThreatSync+ NDR Collection Agents tab. - Click Save.
The log agent begins to report data to ThreatSync+ NDR. You can view reported traffic information on the Network Summary page. For more information, go to About the ThreatSync+ Summary Page. - (Optional) To add a new ThreatSync+ NDR Collection Agent, click Add ThreatSync+ NDR Collection Agent. For more information, go to Add a ThreatSync+ NDR Collection Agent for Windows or Add a ThreatSync+ NDR Collection Agent for Linux.
After you add a device as a Windows Log Agent collection agent, make sure to configure your managed switches to send NetFlow log data to the Windows Log Agent. For information on how to do this, refer to the firewall or switch product documentation.
For more information, go to Configure the Windows Log Agent.
Configure Notifications and Alerts
You can configure WatchGuard Cloud to send email notifications when ThreatSync+ detects a threat or vulnerability. To set up email notifications, you specify which collection agents, remediation alerts, policy alerts, and Smart Alerts generate a notification when they are created or updated.
Configure Policy and Smart Alerts
On the Alerts page, you can specify which remediation alerts, collection agents, policies, and Smart Alert types are included in the notification rules you configure to generate alerts and send email notifications from WatchGuard Cloud.
The SaaS Collectors section is only available with a ThreatSync+ SaaS or Total NDR license. For more information, go to About ThreatSync+ SaaS Licenses and About Total NDR Licenses.
To configure ThreatSync+ Alerts, from WatchGuard Cloud:
- Select Configure > ThreatSync+ > Alerts.
The Alerts page opens.

- In the Collectors section, select the collector options that you want to include in your alerts.
- In the SaaS Collectors section, select the Azure Flow Logs Heartbeat or Microsoft 365 Heartbeat options that you want to include in your alerts.
- In the Remediation section, select the check boxes next to the block actions you want to include in your alerts.
- In the Policies section, select the check boxes next to the policies that you want to generate policy alerts.
- In the Smart Alerts section, for each Smart Alert type that you want to generate alerts for, select one or both of the Created and Updated check boxes.
Configure Notification Rules
In WatchGuard Cloud, you can configure notification rules to generate alerts and send email notifications for ThreatSync+ activity. Notification rules make it easier for you to respond to emerging threats on your network.
Delivery Methods
For each notification rule, you can select one of these delivery methods:
- None — The rule generates an alert that appears on the Alerts page in WatchGuard Cloud.
- Email — The rule generates an alert that appears on the Alerts page in WatchGuard Cloud and also sends a notification email to the specified recipients.
Add a ThreatSync+ NDR Notification Rule
To add a new ThreatSync+ NDR notification rule:
- Select Administration > Notifications.
- Select the Rules tab.
- Click Add Rule.
The Add Rule page opens.
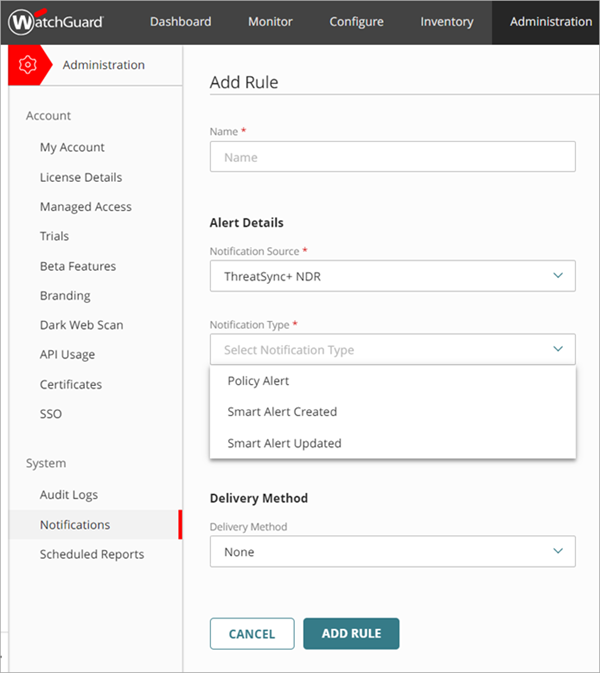
- On the Add Rule page, in the Name text box, enter a name for your rule.
- From the Notification Source drop-down list, select ThreatSync+ NDR.
- From the Notification Type drop-down list, select one of these ThreatSync+ NDR notification types:
- Policy Alert — Generates an alert when a new policy alert is generated for your account.
- Smart Alert Created — Generates an alert when a Smart Alert is created.
- Smart Alert Updated — Generates an alert when a Smart Alert is updated.
- No DHCP Logs Received from a Source — Generates an alert when no DHCP logs are received from a source for 120 minutes.
- DHCP Logs Received from a Source — Generates an alert when DHCP logs are received from a source.
- No NDR Collector Heartbeat Detected — Generates an alert when no heartbeat message is received from a ThreatSync+ NDR collector for 20 minutes.
- NDR Collector Heartbeat Detected — Generates an alert when a heartbeat message is received from a ThreatSync+ NDR collector after a collector failure.
- No NetFlow Logs Received — Generates an alert when no NetFlow logs are received by ThreatSync+ NDR networking devices for 20 minutes.
- NetFlow Logs Received — Generates an alert when NetFlow logs are received.
- No NetFlow Logs Received from a Source — Generates an alert when no NetFlow logs are received from a source for 20 minutes.
- NetFlow Logs Received from a Source — Generates an alert when NetFlow logs are received from a source.
- IP Addresses are Automatically Blocked — Generates an alert when IP addresses are automatically blocked by a ThreatSync+ NDR policy.
- IP Addresses are Manually Blocked — Generates an alert when IP addresses are manually blocked.
- IP Addresses are Manually Unblocked — Generates an alert when IP addresses are manually unblocked.
- Azure Flow Logs Collection Agent Heartbeat Failure — Generates an alert when no heartbeat message is received from an Azure Flow Logs collection agent.
- Azure Flow Logs Collection Agent Heartbeat Success — Generates an alert when a heartbeat message is received from an Azure Flow Logs collection agent after a failure.
- No AWS VPC Logs Collector Heartbeat Detected — Generates an alert when no heartbeat message is received from an AWS VPC logs collector for 120 minutes.
- AWS VPC Logs Collector Heartbeat Detected — Generates an alert when a heartbeat message is received from an AWS VPC logs collector after a collector failure.
- IONOS Flow Logs Collector Heartbeat Detected — Generates an alert when a heartbeat message is received from an IONOS logs collector after a collector failure.
- No IONOS Flow Logs Collector Heartbeat Detected — Generates an alert when no heartbeat message is received from an IONOS logs collector for 120 minutes.
- Account in Limitation Phase — Generates an alert when the account is in the Limitation Phase and data collection and network monitoring have stopped.
- Account Out of Limitation Phase — Generates an alert when the account is out of the Limitation Phase and data collection and network monitoring have resumed.
- (Optional) Type a Description for your rule.
- To send an email message when the rule generates an alert:
- From the Delivery Method drop-down list, select Email.
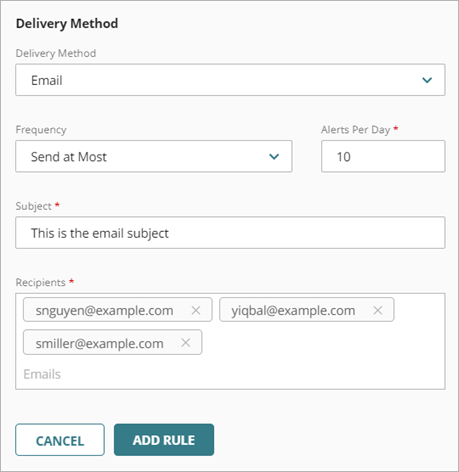
- From the Frequency drop-down list, configure how many emails the rule can send each day:
- To send an email message for each alert the rule generates, select Send All Alerts.
- To restrict how many email messages the rule sends each day, select Send At Most. In the Alerts Per Day text box, enter the maximum number of email messages this rule can send each day. You can specify a value up to 20,000 alerts per day.
- In the Subject text box, enter the subject line for the email message this rule sends when it generates an alert.
- In the Recipients section, enter one or more email addresses. Press Enter after each email address, or separate the email addresses with a space, comma, or semicolon.
- From the Delivery Method drop-down list, select Email.
- Click Add Rule.
Configure Scheduled Reports
You can schedule different ThreatSync+ reports to run in WatchGuard Cloud. Each scheduled report can contain multiple reports. WatchGuard Cloud sends scheduled reports as a zipped .PDF email attachment to the recipients you specify. Recently generated reports are also available for download in WatchGuard Cloud.
Add a Scheduled Report
You can schedule reports to run daily, weekly, monthly, or immediately. For daily, weekly, and monthly reports, the report frequency also determines the date range for data included in the report. For example, a weekly report includes data collected from 00:00 UTC to 23:59 UTC for the specified time period.
To add a scheduled report:
- Click Add Scheduled Report.
The Create Schedule wizard opens with the Report Description step selected.
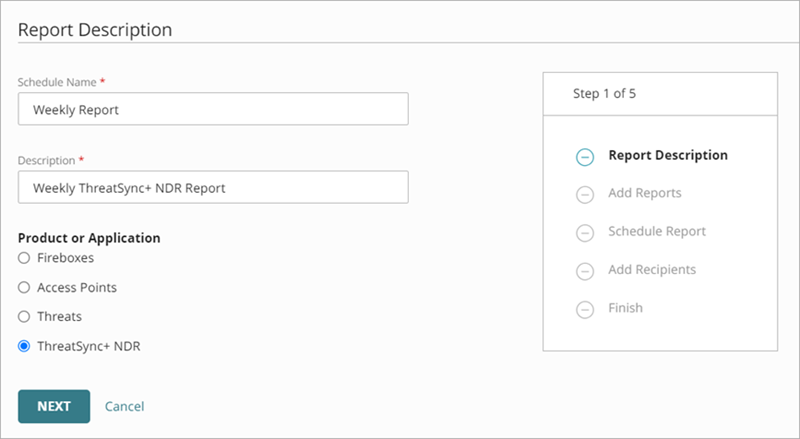
- In the Schedule Name text box, type a name for the report.
- In the Description text box, type a description for the report.
- In the Product or Application section, select ThreatSync+.
- Click Next.
The Add Reports page opens.
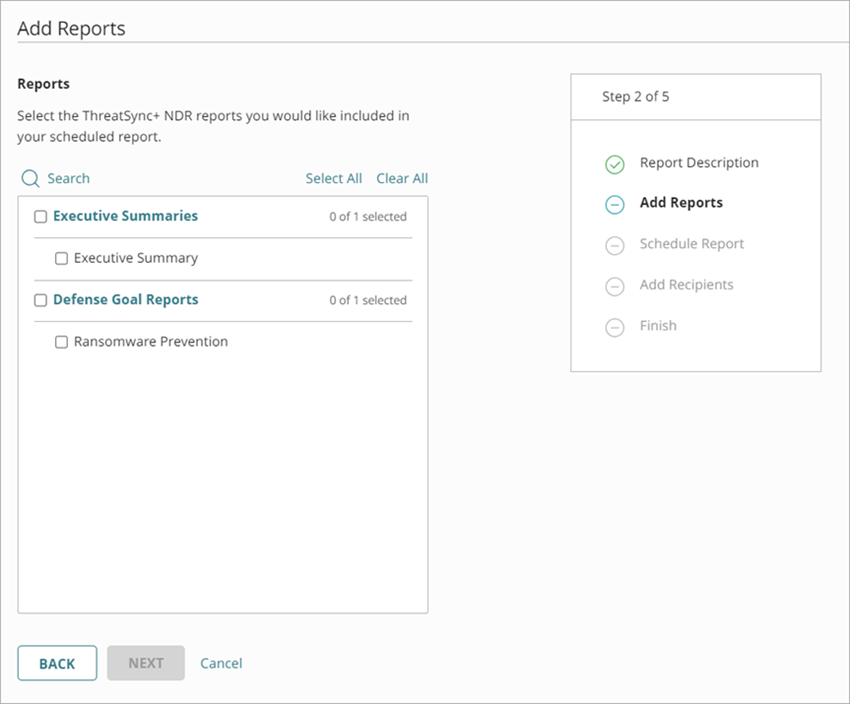
Available ThreatSync+ reports depend on your license type. The Executive Summary and Ransomware Prevention reports are included by default with ThreatSync+ NDR or Total NDR. To add more reports, and the ability to generate custom reports, we recommend you add a WatchGuard Compliance Reporting or Total NDR license. For more information, go to About WatchGuard Compliance Reporting and About Total NDR.
- In the Reports section, select the check box for each report to include in your scheduled report. To include all available reports, click Select All .
- Click Next.
The Schedule Report step opens.
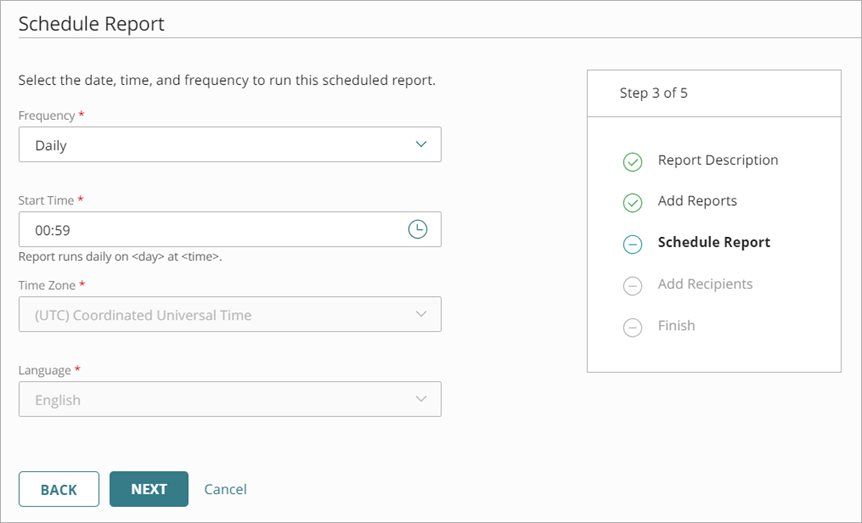
- From the Frequency drop-down list, select one of these options to specify how often to run the report:
- Daily — Runs daily and contains data for the past 24 hours (includes 00:00 until 23:59, adjusted to the timezone)
- Weekly — Runs weekly and contains data for the past week (includes Sunday 00:00 to Saturday 23:59)
- Monthly — Runs monthly and contains data for the past month (includes the first day 00:00 to the last day 23:59)
- Run Once — Queues the report to run for the date range you specify
The time required to generate and send the report depends on the types of selected reports, and position of the request in the processing queue.
- To select the time the report starts to run, in the Start Time text box, click
 .
.
Or, in the Start Time text box, type the hour and minute of the day to start the report, in 24-hour format HH:MM. - For a Weekly report, specify the day of the week to run the report.
- For a Monthly report, specify the day of the month to run the report.
- Specify the Time Zone for the scheduled report.
- Select the Language for the report.
- Click Next.
The Add Recipients step opens.

- In the Report Recipients text box, type the email address for each report recipient. To separate multiple addresses, use a space, comma, or semicolon. Press Enter to add the specified addresses to the recipient list.
Reports must be smaller than 10 MB to be emailed. - To add yourself as a recipient, click Add me as a recipient.
The email address associated with your WatchGuard Cloud account shows in the list. - Click Next.
The Finish page opens, with a summary of the scheduled report settings. - Click Save Report.
The report is added to the list of scheduled reports.
Respond to Smart Alerts
ThreatSync+ NDR uses artificial intelligence (AI) to consolidate data related to a large volume of network traffic into Smart Alerts. A Smart Alert indicates that a potential attack is in progress on your network and guides you to focus on emerging threats that pose the greatest risk and organizational impact.
To view Smart Alerts for your account, from WatchGuard Cloud:
- Select Monitor > ThreatSync+ > Smart Alerts.
The Smart Alerts page opens and shows a list of open Smart Alerts.
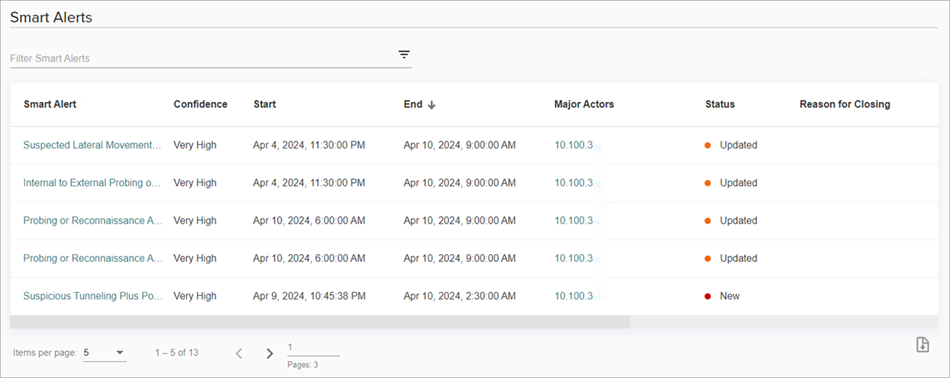
- Click the Smart Alert you want to review.
The Smart Alert Details page opens. - Review the What to Look For section for remediation recommendations.
- When you are ready, click Close this Smart Alert and select a reason. This provides feedback that helps the ThreatSync+ AI better understand your network and generate future Smart Alerts.
Review Policy Alerts
Policy alerts notify you of activity on your network that is unauthorized or unexpected. When you configure ThreatSync+ policies to reflect the network access policies of your organization, each policy alert you receive indicates a policy violation that might be a threat to your organization.
When you first set up ThreatSync+ NDR, a subset of policies are activated by default. These are identified by the Level 1 tag and they automatically generate policy alerts. About 30 of the more than 75 available policies are included in Level 1. These default policy alerts reflect the threats and vulnerabilities that are most common and easiest to remediate. For more information, go to ThreatSync+ NDR Level 1 Policies.
We recommend you wait at least two days after ThreatSync+ NDR is enabled to review your policy alerts.
To review policy alerts:
- Select Monitor > ThreatSync+ > Policy Alerts.
- To view only alerts from active policies, from the Status Types drop-down list, clear the Not Active check box.
- To view detailed information about each policy alert, click a policy name to go to the Policy Alert Details page.
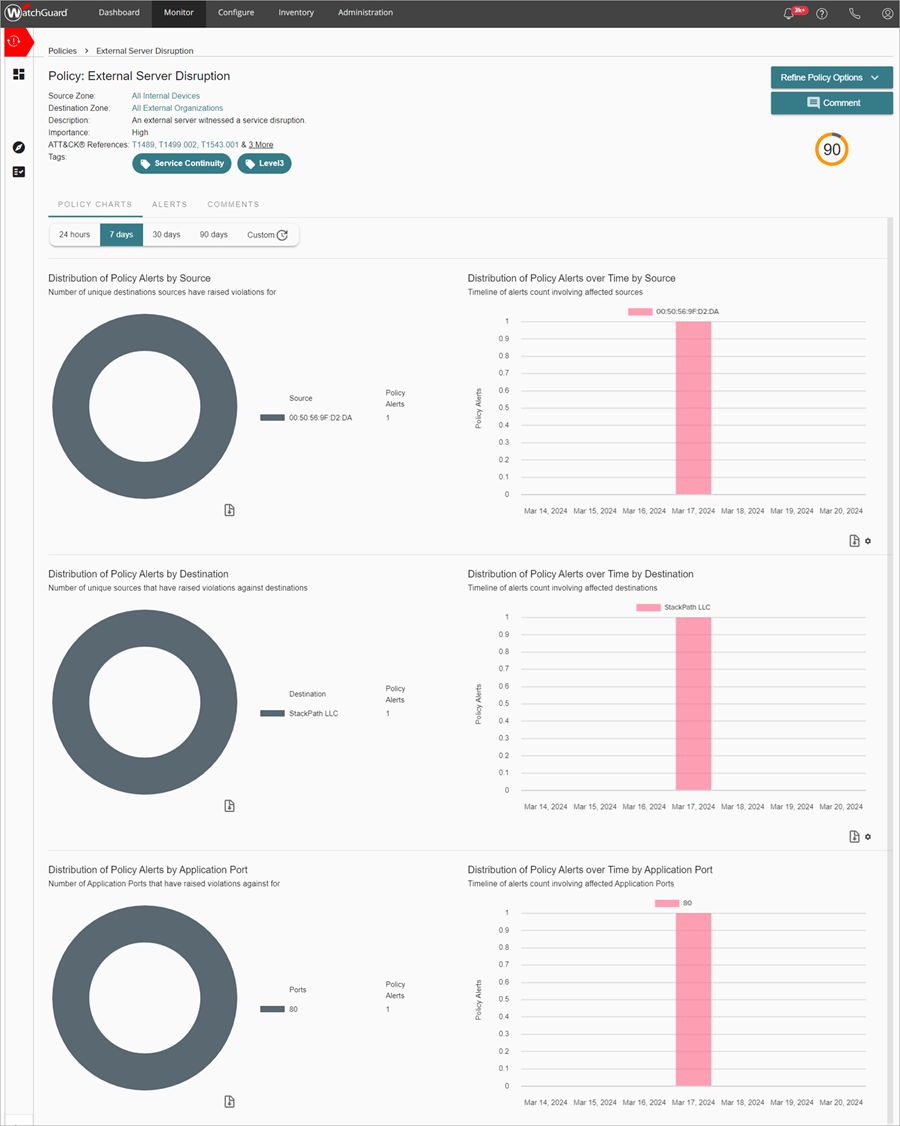
The Policy Alert Details page shows a summary of zone information, importance, the threat score, and tags associated with the policy.
You can modify policy configuration details from the Refine Policy Options drop-down list:
- Refine Activity Triggers
- Refine Source Zones
- Refine Destination Zones
For more information, go to Configure ThreatSync+ Policies.
Review Reports for Compliance
The Executive Summary Report and the Ransomware Prevention Defense Goal Report are both included with ThreatSync+ NDR by default. To view additional reports for compliance reporting, and to generate custom reports, you can add a Compliance Reporting or Total NDR license. For more information, go to About WatchGuard Compliance Reporting and About Total NDR.
Review the Executive Summary Report
After ThreatSync+ NDR collects data for several days, you can generate the Executive Summary Report to get a high-level overview of the threats and vulnerabilities that ThreatSync+ NDR detected. The report includes an overall network threat score and shows you changes in the trend of the threat score over time. Lower scores indicate that your network might not be fully protected.
The metrics included in the report reflect the range of detection and response capabilities provided by ThreatSync+ NDR. The overall threat score weighs these metrics evenly across three key areas of protection:
Threat Detection
Threat Detection metrics encourage you to review and respond to ThreatSync+ NDR Smart Alerts. The metrics track how many Smart Alerts are open, how promptly you address them, and how much time ThreatSync+ NDR saves by monitoring potential threats so you do not have to.
Network Visibility
Network Visibility metrics help you to keep up with the identification of the important subnets and devices in your network. When you tell ThreatSync+ NDR which assets and subnets are most important to you, ThreatSync+ NDR can provide more effective threat information. When you label the assets and specify their roles, ThreatSync+ NDR can automatically detect policy violations for those types of systems. ThreatSync+ NDR also uses subnet labels to more effectively identify rogue devices and unknown threats.
Policy Assurance
The Policy Violation metric tracks how many violations ThreatSync+ NDR detects in your network. The policies that you enable help to identify traffic that represents unauthorized activity. Enable policies that help you to identify errors and misconfiguration in your other security tools, such as firewalls, VPNs, EDR, and asset management systems. This helps you to quickly identify when these tools do not block unauthorized traffic.

To customize the Executive Summary report, you can configure these report settings:
Set Threat Score Calculation Weights
To control how ThreatSync+ NDR calculates the overall threat score, you can specify weighting factors for each key area of protection. You can also completely exclude an area if you do not want to measure your progress in that area.
Select Metrics to Include
To control which metrics show in the report, you can exclude specific metrics from any of the three areas of protection. Metrics you exclude do not appear in the report and are not included in the overall threat score.
Set Threat Score Calculation Weights
To set the threat score calculation weights, from WatchGuard Cloud:
- Select Configure > ThreatSync+ > Executive Summary Report Settings.
The Executive Summary Report Settings page opens.

- In the Set Threat Score Calculation Weights section, enter your preferred values for Threat Detection, Network Visibility, and Policy Assurance weights.
- Click Save.
Select Metrics to Include
Some metrics might not be important or applicable to your network security policies. You can customize which metrics to include in your Executive Summary report and your overall threat score calculation.
To select metrics to include, from WatchGuard Cloud:
- Select Configure > ThreatSync+ > Executive Summary Report Settings.
The Executive Summary Report Settings page opens. - In the Select Metrics to Include section, select or clear the check box next to each metric to include or exclude.
- Click Save
Follow the recommendations in the report to protect your network and improve your threat score. For more information, go to ThreatSync+ NDR Executive Summary Report.
To generate an Executive Summary report, go to Configure Scheduled Reports.
Review the Ransomware Prevention Defense Goal Report
The Ransomware Prevention Defense Goal Report monitors your network for vulnerabilities that can make you more susceptible to ransomware. This report presents a summary of the controls ThreatSync+ NDR monitors to help you prevent the spread of ransomware. Each control included in the report is based on a ThreatSync+ NDR policy.
The Ransomware Prevention Defense Goal Report provides you with a network defense overview and shows whether you are in compliance with the objectives and controls for a specified time period. This report, in addition to continuous monitoring of your policy alerts and closing your Smart Alerts, can prove compliance for audit or cyber insurance purposes.
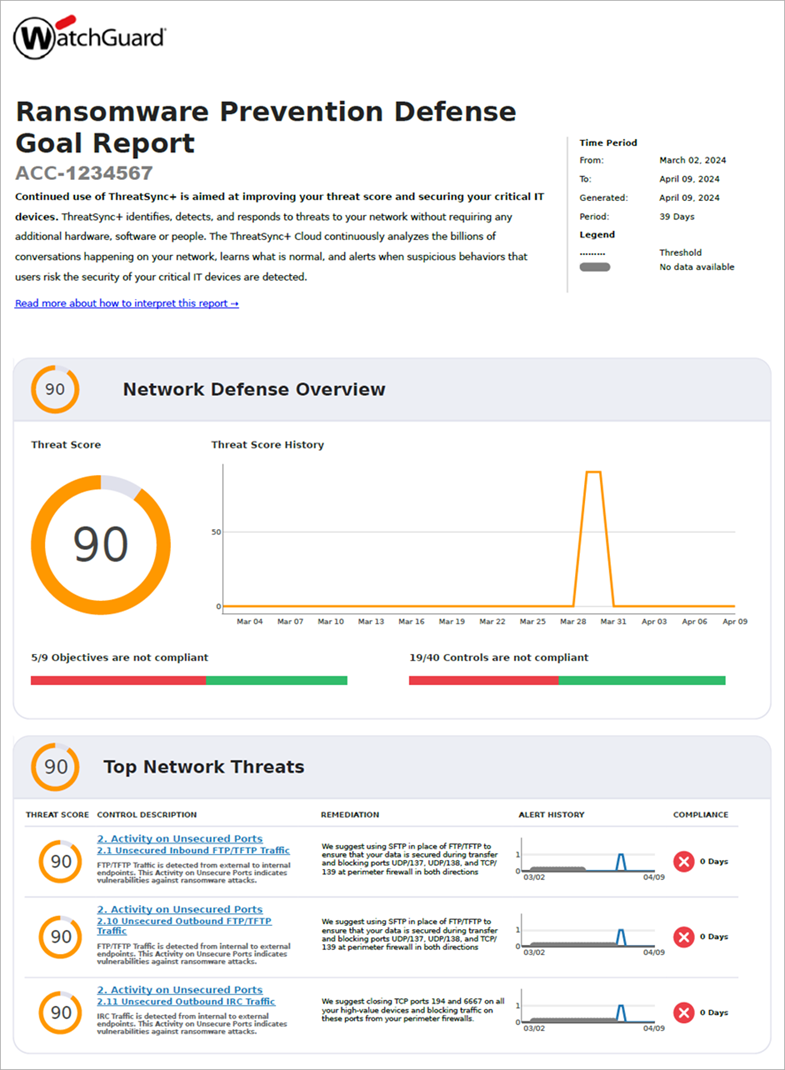
To generate a Ransomware Prevention Defense Goal report, go to Configure Scheduled Reports.
For more information, go to Ransomware Prevention Defense Goal Report.
About ThreatSync+ Policies and Zones