Network Discovery Scan
- Network scan
- DHCP detection
- Exchange monitoring
- Finger detection
- HTTP detection
- SSL VPN and IKE detection for mobile devices
- Mobile Security configuration
Network Discovery Scan Limitations
The Network Discovery Scan feature has these limitations:
- Device discovery is limited to Firebox internal interface networks and networks routed through the internal interfaces
- A network scan has these subnet limits:
- /24 for reachable routed networks
- /16 for neighbor networks
- /8 networks are not scanned
- Discovery for devices connected to the Firebox through SSL VPN or IKE are limited to iOS and Android mobile devices
- Network Discovery does not perform scans on BOVPN and BOVPN virtual interfaces
- Intermediary firewalls or other NAT devices can affect accuracy of scan path; hosts cannot be discovered behind NAT devices
- Some less common OS types and services might not be recognized
- The OS versions on most Fireboxes can be detected, but not specific hardware models
- The host name or device type cannot always be correctly determined
To run or schedule a Network Scan, you must log in to your Firebox with Device Administrator credentials .
Network Scan Stages
To find all the details for each device connected to your network, the Network Discovery Scan process completes the scan in these three stages:
- Quick Host Discovery
- TCP and OS
- UDP and Service Version (this stage takes the most time to complete)
Manual Scans and Scheduled Scans
You can run a manual scan of your network at any time, or you can configure your Firebox to run the Network Scan on a schedule.
When you run a manual scan, the Firebox completes all three scan stages in sequence. The first stage, Quick Host Discovery, takes the shortest amount of time to complete, which enables you to quickly see all the devices in the network map. The second and third scan stages for port scanning and OS services take longer to complete and can take many hours; the amount of time the scans take to complete depend on the size of your network.
For a scheduled scan, to reduce duplicated network traffic, the Firebox runs the discovery, port scanning, and OS service scan stages at the same time. The Network Map is updated when all the scans are completed for each network. Updates to the Network Map for a specific network might not appear in the map until that network is completely scanned.
Because the amount of time it takes to complete a Network Scan depends on the size of your network and the number of devices in your network, it can take a long time for the scan to complete. For example, a full scan of a x.x.x.x/24 network with 100 active hosts can take several hours.
Enable Network Discovery
Before you can run a Network Scan, you must enable the Network Discovery feature in your Firebox configuration.
To enable Network Discovery, from Fireware Web UI:
- Select Subscription Services > Network Discovery.
The Network Discovery page appears. - Select the Enable Network Discovery check box.
A confirmation message appears. - Click Yes.
- Click Save.
When you enable the Network Discovery feature on your Firebox, the process load increases and consumes additional memory. This could noticeably affect the performance of your Firebox, particularly if you have a large network. Make sure to only enable the Network Discovery feature if you plan to use it. To help minimize the performance impact on your Firebox, we recommend that you configure the Network Discovery Scan settings to only scan the networks that you must monitor.
Configure Network Discovery Scan
When you configure the settings for the Network Discovery Scan, you can select which network interfaces to scan and create a scan schedule. You can also run a manual scan. When you run a manual scan, you can choose to only scan specific interfaces and networks, or use the same configuration as your scheduled scan.
Select the Network Interfaces to Scan & Run a Manual Scan
Before you run a manual scan or a scheduled scan, you must select which network interfaces to scan.
- Select Subscription Services > Network Discovery.
The Network Discovery page appears.
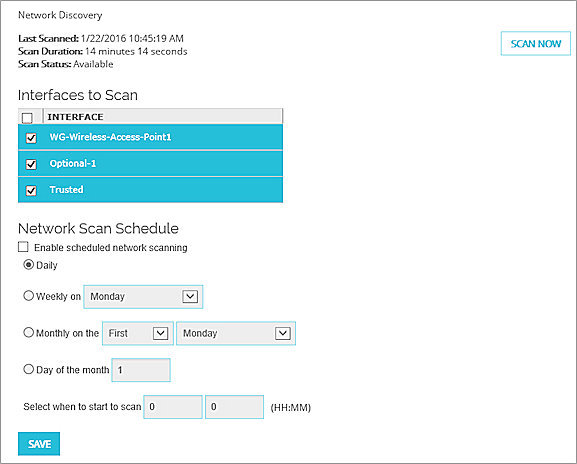
- In the Interfaces to Scan list, select the check box for each Firebox interface to scan.
- To run a manual scan, click Scan Now.
The Scan Now dialog box appears. - From the Scan Now drop-down list, select an option and specify any additional information for that option:
- Scan as configured for scheduled scan — Scans the interfaces you selected in the Interfaces to Scan list
- Scan the following interfaces — Select the check box for the interfaces to scan
- Scan the following networks — Type the network address to scan
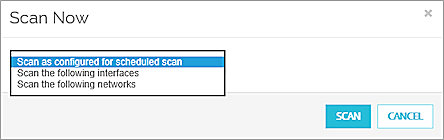
- Click Scan.
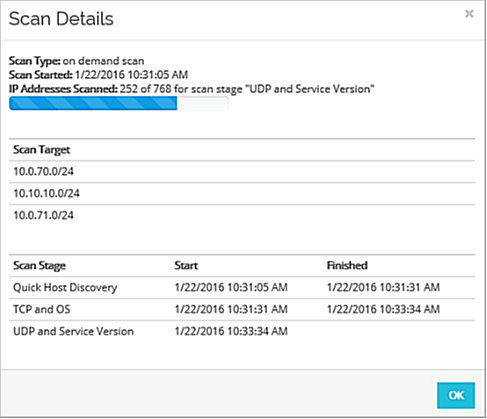
The network scan starts and the show details link appears at the top of the Network Discovery page. - To see information about the scan, click Show Details.
The Scan Details dialog box appears.
Configure Scheduled Scans
You can also configure Network Discovery to run a network scan at a date and time you schedule. You can configure the scan to run only once, or to recur at an interval you specify.
You can specify these options in a schedule:
- Daily (default)
- Weekly
- Monthly
- Day of the month
- Scan time
Because clients must be online to be scanned by the Firebox, when you configure the settings for a scheduled scan, make sure to specify a day and time when the most client devices will be online and accessible by the scan.
To create a network scan schedule:
- In the Network Scan Schedule section, select the Enable schedule network scanning check box.
- Select an option to specify how often to run the scheduled scan:
- Daily
- Weekly — From the drop-down list, select the day of the week to run the scan.
- Monthly — From the drop-down lists, select the day of the month to run the scan. Select First or Last and a day of the week.
- Day of the month — In the text box, type or select a day of the month.
- In the Select when to start to scan text boxes, type or select the hour and minute of the day for the scan to start.
- Click Save.
See Scan Results
After you run a manual scan or a scheduled scan runs, you can see the results of the scan in the Network Map, which shows a tree map view of all the devices on your network that are connected to the interfaces on your Firebox.
To view the Network Discovery > Network Map page, click Dashboard > Network Discovery.
For more information about the Network Map and the Network Discovery Dashboard page, go to Network Discovery.