NAT Loopback and 1-to-1 NAT
Applies To: Locally-managed Fireboxes
NAT loopback enables a user on the trusted or optional networks to connect to a public server with the public IP address or domain name of the server, if the server is on the same physical Firebox interface. To help you understand how to configure NAT loopback when you use 1-to-1 NAT, we give this example:
Company ABC has an HTTP server on the Firebox trusted interface. The company uses a 1-to-1 NAT rule to map the public IP address to the internal server. The company wants to allow users on the trusted interface to use the public IP address or domain name to access this public server.
For this example, we assume an existing 1-to-1 NAT configuration:
- The trusted interface is configured with a primary network, 10.0.1.0/24
- The HTTP server is physically connected to the network on the trusted interface, and it has the IP address of 10.0.1.5.
- The trusted interface is also configured with a secondary network, 192.168.2.0/24.
- A server with public IP address 203.0.113.5 is mapped with a 1-to-1 NAT rule to a host on the internal network.
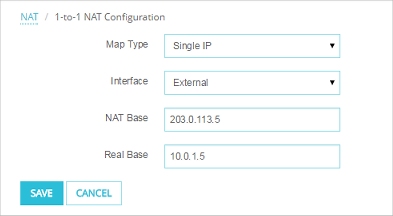
The example 1-to-1 NAT configuration has these settings:
Interface — External. NAT Base — 203.0.113.5, Real Base — 10.0.1.5
 s
s
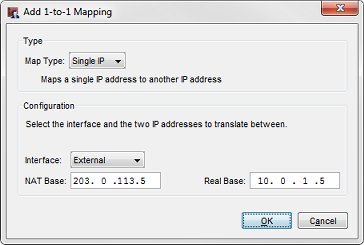
The existing 1-to-1 configuration in Policy Manager
To enable NAT loopback for all users connected to the trusted interface, you must:
- Make sure that there is a 1-to-1 NAT entry for each interface that traffic uses when internal computers get access to the public IP address 203.0.113.5 with a NAT loopback connection.
For this example, you must add one more 1-to-1 NAT mapping to apply to traffic that starts from the trusted interface. The new 1-to-1 mapping is the same as the previous one, except that the Interface is set to Trusted instead of External.
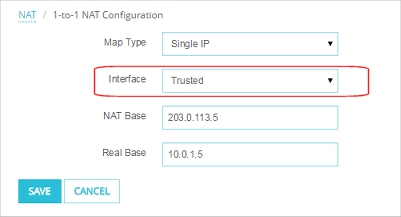
The 1-to-1 NAT mapping in Fireware Web UI
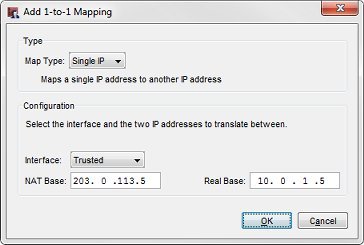
The 1-to-1 NAT mapping in Policy Manager
After you add the second 1-to-1 NAT entry, the Firebox has two 1-to-1 NAT mappings; one for External and one for Trusted.
Interface — External, NAT Base — 203.0.113.5, Real Base — 10.0.1.5
Interface — Trusted, NAT Base — 203.0.113.5, Real Base — 10.0.1.5
- Add a Dynamic NAT entry for every network on the interface that the server is connected to.
- The From field for the Dynamic NAT entry is the network IP address of the network from which computers get access to the 1-to-1 NAT IP address with NAT loopback.
- The To field for the Dynamic NAT entry is the NAT base address in the 1-to-1 NAT mapping.
For this example, the trusted interface has two networks defined, and we want to allow users on both networks to get access to the HTTP server with the public IP address or host name of the server. We must add two Dynamic NAT entries.
In the Dynamic NAT tab of the NAT configuration, add two dynamic NAT rules:
10.0.1.0/24 – 203.0.113.5
192.168.2.0/24 – 203.0.113.5
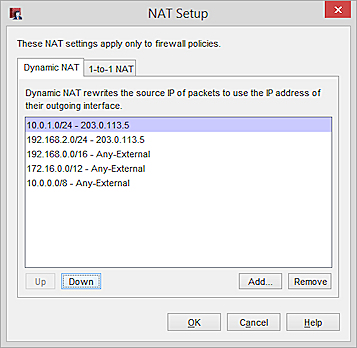
The Dynamic NAT configuration in Policy Manager
If you plan to use NAT loopback with a large number of IP addresses, you can specify an IP address range or subnet in the To field of the Dynamic NAT rule.
- Add a policy to allow users on your trusted network to use the public IP address or domain name to get access to the public server on the trusted network. For this example:
From
Any-Trusted
To
203.0.113.5
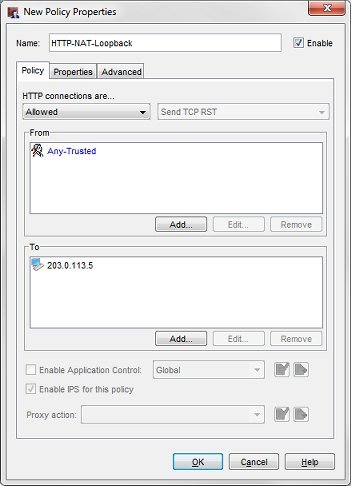
The NAT loopback policy in Policy Manager
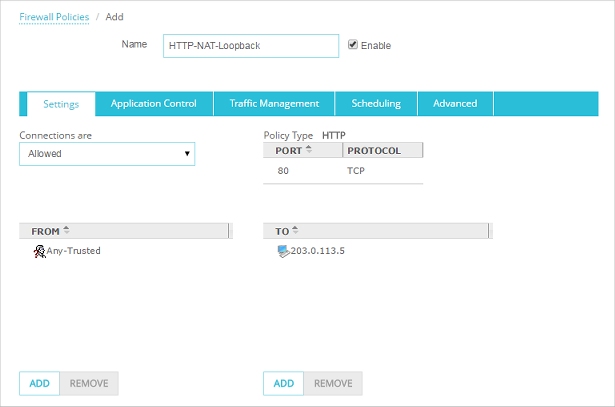
The NAT loopback policy in Fireware Web UI
The public IP address that users want to connect to is 203.0.113.5.