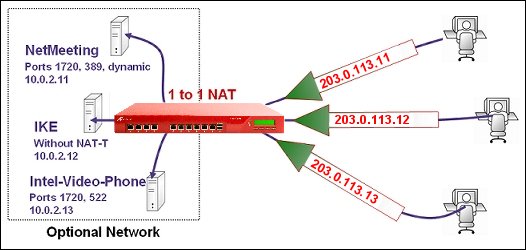
1-to-1 NAT Example
When you enable 1-to-1 NAT, the Firebox changes and routes all incoming and outgoing packets sent from one range of addresses to a different range of addresses.
Consider a situation in which you have a group of internal servers with private IP addresses that must each show a different public IP address to the outside world. You can use 1-to-1 NAT to map public IP addresses to the internal servers, and you do not have to change the IP addresses of your internal servers. To understand how to configure 1-to-1 NAT, consider this example:
A company has a group of three privately addressed servers behind an optional interface of their Firebox. The addresses of these servers are:
10.0.2.11
10.0.2.12
10.0.2.13
The administrator selects three public IP addresses from the same network address as the external interface of their Firebox, and creates DNS records for the servers to resolve to. These addresses are:
203.0.113.11
203.0.113.12
203.0.113.13
Now the administrator configures a 1-to-1 NAT rule for the servers. The 1-to-1 NAT rule builds a static, bidirectional relationship between the corresponding pairs of IP addresses. The relationship looks like this:
10.0.2.11 <--> 203.0.113.11
10.0.2.12 <--> 203.0.113.12
10.0.2.13 <--> 203.0.113.13
When the 1-to-1 NAT rule is applied, the Firebox creates the bidirectional routing and NAT relationship between the pool of private IP addresses and the pool of public addresses.
In the 1-to-1 NAT mapping for this example:
- The Map Type is IP Range
- The Interface is External
- The NAT Base defines the first external IP addresses in the range, 203.0.113.11
- The Real Base defines the first internal IP addresses in the range, 10.0.2.11
- The Number of Hosts to NAT defines the size of the address pool, 3
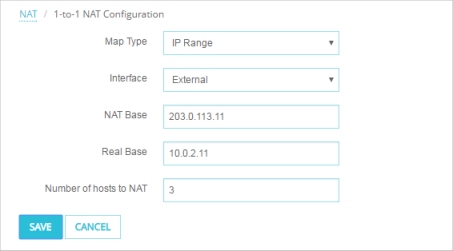
In Policy Manager, the 1-to-1 NAT configuration for this example looks like this:

After you configure the NAT mapping, make sure that you have policies to allow incoming traffic to the real IP addresses of the servers.
For complete steps to define a 1-to-1 NAT rule, and an example of a policy, go to Configure Firewall 1-to-1 NAT.