Applies To: Locally-managed Fireboxes
The objective of this configuration example is to show how an organization with two mail servers with private IP addresses on the optional network of a Firebox can make sure that the two servers can exchange email with servers outside the local network, even though they have private IP addresses.
This example includes two configuration options to demonstrate how you can use NAT to map public IP addresses to servers behind your Firebox.
This configuration example is provided as a guide. Additional configuration settings could be necessary, or more appropriate, for your network environment.
Solution Overview
This example demonstrates two different types of NAT configuration that can be used to translate the public IP addresses of the email servers to the corresponding private IP addresses for inbound and outbound traffic
- Option 1 — Use Static NAT for inbound traffic and Dynamic NAT for outbound traffic
- Option 2 — Use 1-to-1 NAT for both inbound and outbound traffic
For this configuration example, we created configuration files for each option.
Requirements
Mail servers
Two SMTP servers configured as public mail servers, each with a private IP address.
We recommend that you do not connect publicly accessible servers, such as a web server, FTP server, or mail server, to the same network that connects to internal users or other non-public network resources. Because these servers are publicly accessible, they represent a potential vulnerability to your internal network. Instead, connect these publicly accessible servers to a separate network from your other internal network resources and users. In this example, the mail servers are part of a network connected to a Firebox configured as Optional.
Public IP addresses to use for mail servers
You must have a publicly routable IP address to map to each server. In this example, we use two IP addresses for the two mail servers. It can make configuration easier to use adjacent IP addresses if you have more than one server.
DNS MX Record
For some types of servers, such as the mail servers in this example, you need to create DNS records to resolve to the public IP addresses of the servers. For the mail servers, you need an MX record for each server.
Network Topology
In this example, the two SMTP email servers have private IP addresses and are located behind the Firebox on the optional network.
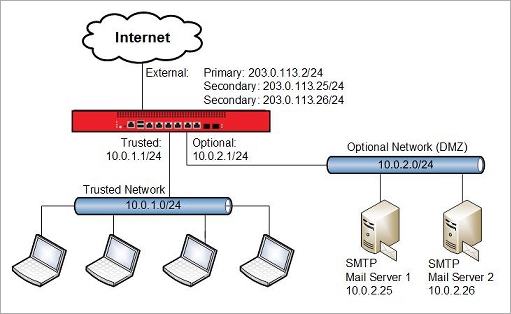
In our example, the Firebox and the email servers use these IP addresses:
| Interface or Device | IP Address |
|---|---|
|
Firebox External interface: Primary (required for option 1 only) Secondary (required for option 1 only) Secondary |
203.0.113.2/24 203.0.113.25/24 203.0.113.26/24 |
| Firebox Trusted interface | 10.0.1.1/24 |
| Firebox Optional interface | 10.0.2.1/24 |
| Mail Server 1 connected to the optional network | 10.0.2.25 |
| Mail Server 2 connected to the optional network | 10.0.2.26 |
The goal in this example is to enable traffic to flow between the email servers behind the Firebox and the public Internet. The IP addresses we use to translate for each mail server are:
| Mail Server | Public IP Address | Private (Real) IP Address |
|---|---|---|
|
Mail Server 1 |
203.0.113.25 |
10.0.2.25 |
| Mail Server 2 | 203.0.113.26 | 10.0.2.26 |
Configuration
NAT refers to several types of IP address and port translation. All types of NAT enable the Firebox to automatically change one IP address to another IP address in the source or destination of a packet handled by a policy. In these configuration examples we use three different types of NAT to translate a public IP address to the private IP address of each server for both inbound and outbound traffic.
- Dynamic NAT — handles address translation for traffic that leaves a Firebox interface
- Static NAT — handles address translation for traffic that enters an external interface
- 1-to-1 NAT — handles address translation for traffic that enters or leaves an interface
This example demonstrates how you can configure NAT in two different ways to achieve the same result.
- In option 1, we use dynamic NAT and static NAT together to handle inbound and outbound traffic to the mail servers.
- In option 2, we use 1-to-1 NAT alone to achieve the same result with fewer steps.
All NAT is policy based. The policies in the device configuration determine whether each type of NAT applies to traffic handled by each policy.
- For 1-to-1 NAT and dynamic NAT — the NAT settings in the Advanced tab of a policy determine whether the settings configured in Network > NAT apply to traffic handled by that policy. For dynamic NAT, you can configure the policy to use the network NAT settings, or you can specify a source IP address to use for dynamic NAT.
- For static NAT — a policy uses static NAT for outbound traffic if the To: section of a policy contains a static NAT action.
Option 1 — Use Static NAT and Dynamic NAT
This configuration demonstrates how to use static NAT and dynamic NAT to translate the mail server IP addresses for inbound and outbound traffic.
External Interface Configuration
The external interface is configured with two secondary IP addresses, one for each mail server. You need to add these secondary external IP addresses first, so that you can select them when you configure the static NAT action.
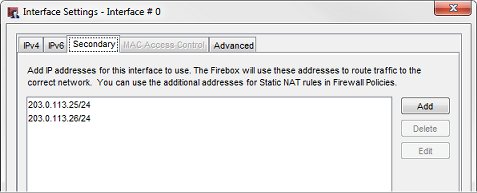
These IP addresses are the public IP addresses in the DNS MX records for the two mail servers, and are used in the static and dynamic NAT configuration.
Static NAT Configuration
SMTP traffic is not allowed inbound by default. The example configuration includes a SMTP-proxy policy to allow the inbound SMTP traffic to the two mail servers. The SMTP-proxy policy that handles incoming SMTP traffic contains a static NAT (SNAT) action to perform NAT on incoming traffic to the two mail servers from any external interfaces.
To see the static NAT action in the policy:
- Open a configuration file with Policy Manager.
- Create an SMTP-proxy policy similar to ours.
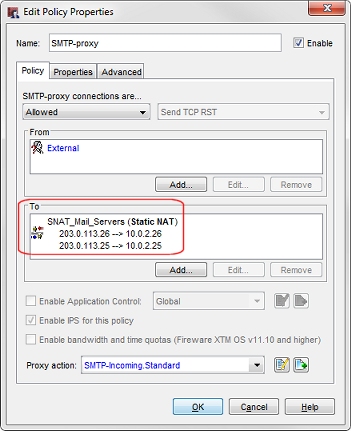
The SNAT rule in this policy changes the destination IP addresses for inbound traffic from the public IP address of each server to the private IP address of each server. The effect of this SNAT action in the SMTP-Proxy policy is:
- For inbound SMTP traffic to Mail Server 1, change the destination IP address from 203.0.113.25 to 10.0.2.25.
- For inbound SMTP traffic to Mail Server 2, change the destination IP address from 203.0.113.26 to 10.0.2.26.
The SNAT action handles NAT for traffic that comes in to these servers. But since the SNAT action applies only to inbound traffic, we need to use dynamic NAT to translate the source IP address for traffic sent by the mail servers out the external interface. To do this, we use dynamic NAT in the policies that handle outbound SMTP traffic.
Dynamic NAT Configuration
The default dynamic NAT configuration automatically applies dynamic NAT to all traffic from one of the three private IP address ranges to any external interface. By default, dynamic NAT is enabled for traffic that starts in any RFC 1918-defined private IP address range and leaves any external interface.
To see the default dynamic NAT configuration, select Network > NAT.

Each of these dynamic NAT actions translates traffic from a source to a destination. If traffic matches the source and destination in a dynamic NAT action, dynamic NAT changes the source IP address to the primary IP address of the destination interface.
The effect of the third default dynamic NAT action 10.0.0.0/8 - Any-External on traffic from our mail servers is:
- For outbound traffic from Mail Server 1, change the source IP address from 10.0.1.25 to 203.0.113.2
- For outbound traffic from Mail Server 2, change the source IP address from 10.0.1.26 to 203.0.113.2
But this default behavior is not what we want. We want to change the source IP address for each mail server to match the public IP address for that server. What we want to do is this:
- For outbound traffic from Mail Server 1, change the source IP address from 10.0.1.25 to 203.0.113.25
- For outbound traffic from Mail Server 2, change the source IP address from 10.0.1.26 to 203.0.113.26
To override the source IP address used by the default dynamic NAT action, we create policies to handle outgoing SMTP traffic from each of these servers. In each policy, we specify the source IP address to use for dynamic NAT. In the example, these policies are SMTP-out-MS_1 for traffic from Mail Server 1, and SMTP-out-MS_2 for traffic from Mail Server 2.
To see the policy configuration outbound traffic from Mail Server 1:
- Open the SMTP-out-MS_1 policy.
- Click the Advanced tab.
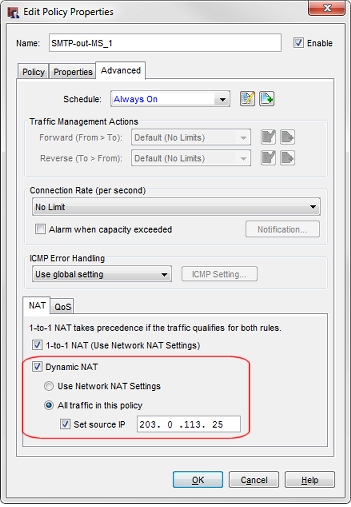
The dynamic NAT All Traffic in This Policy and Set Source IP options are selected. The source IP address is set to the public IP address of Mail Server 1, 203.0.113.25. For traffic handled by this policy, dynamic NAT changes the source IP address to the source IP address set in the policy rather than the primary IP address of the external interface.
For dynamic NAT to correctly use the source IP address in this policy, the policy must meet two requirements:
- The policy must allow traffic out through only one interface.
- The dynamic NAT Set Source IP address must be on the same subnet as the IP address of the interface in the To section of the policy.
- To verify that this policy meets these requirements, click the Policy tab.
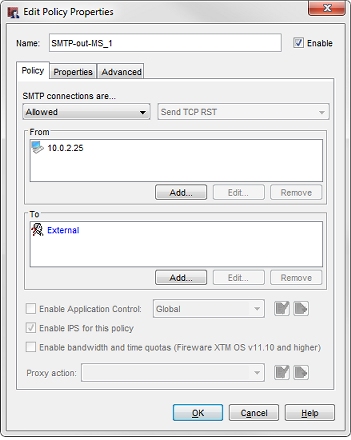
This policy allows traffic:
From 10.0.2.25, the private IP address of Mail Server 1.
To External, the name of a specific external interface. This meets the first requirement.
The source IP address in this policy (203.0.113.25), is on the same subnet as the External interface IP address (203.0.113.2). This meets the second requirement.
The example configuration also includes a policy configured to handle dynamic NAT for outbound traffic for Mail Server 2. To see the policy configuration outbound traffic from Mail Server 2:
- Open the SMTP-out-MS_2 policy.
- Click the Advanced tab to see the Dynamic NAT source IP address configuration.
- Click the Policy tab to see the source and destination of traffic handled by the policy.
The source IP address set in these two policies have this effect:
- For outbound traffic from Mail Server 1, change the source IP address from 10.0.2.25 to 203.0.113.25
- For outbound traffic from Mail Server 2, change the source IP address from 10.0.2.26 to 203.0.113.26
How It Works
The static and dynamic NAT actions and policies in this configuration work together to handle address translation in the IP packet headers for inbound and outbound traffic to both mail servers.
The combined static NAT (SNAT) and dynamic NAT (DNAT) configuration settings have this effect:
| Traffic direction | Source IP Address | Destination IP Address | NAT Action |
|---|---|---|---|
| Inbound to External | 203.0.113.25 | SNAT changes destination to 10.0.2.25 | |
| Outbound from External | 10.0.2.25 | DNAT changes source to 203.0.113.25 | |
| Inbound to External | 203.0.113.26 | SNAT changes destination to 10.0.2.26 | |
| Outbound from External | 10.0.2.26 | DNAT changes source to 203.0.113.26 |
Option 2 — Use 1-to-1 NAT
Another method to set up NAT for these mail servers is to use 1-to-1 NAT instead of static and dynamic NAT. Since 1-to-1 NAT handles both incoming and outgoing traffic, it requires fewer steps to configure 1-to-1 NAT than it does to configure dynamic and static NAT to the same servers.
External Interface Configuration
The external interface configuration does not include two secondary IP addresses. This is different than the external interface configuration for Option 1. You do not need to add secondary external interface IP addresses in order to configure them in the 1-to-1 NAT settings.
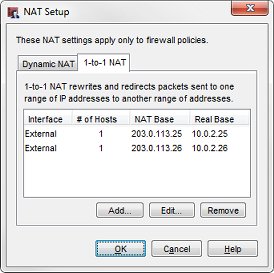
Network 1-to-1 NAT Configuration
Network 1-to-1 NAT settings apply to traffic handled by all policies in the configuration that have the 1-to-1 NAT check box selected. The example configuration has a single 1-to-1 NAT rule that handles inbound and outbound NAT for both mail servers.
To see the 1-to-1 NAT settings:
- Open a configuration file in Policy Manager.
- Select Network > NAT.
- Click the 1-to-1 NAT tab.
Here is how you read each column of this configuration:
Interface
This 1-to-1 NAT action applies to incoming and outgoing traffic on the External interface.
# of Hosts
This specifies the number of IP addresses this 1-to-1 NAT action applies to. In this case, it applies to 2 hosts.
NAT Base
The NAT Base is the lowest IP address in the range of addresses to translate. The NAT Base range is a series of consecutive IP addresses, up to the # of Hosts, with the specified NAT Base IP address as the lowest address in the range. In this example, the # of Hosts is 2, so the NAT Base address range consists of these addresses:
203.0.113.25 — the public IP address of Mail Server 1
203.0.113.26 — the public IP address of Mail Server 2
Real Base
The Real Base is the lowest IP address is the range of source addresses to translate. The Real Base range is a series of consecutive IP addresses, up to the # of Hosts, with the specified IP address as the lowest address in the range. In this example, the # of Hosts is 2, so the Real Base address range consists of these addresses:
10.0.2.25 — the private IP address of Mail Server 1
10.0.2.26 — the private IP address of Mail Server 2
In this example, we can configure 1-to-1 NAT mapping with an IP address range because the public IP addresses, and private IP addresses of the two mail servers are consecutive. When we define the 1-to-1 NAT mapping as a range, the Real Base and NAT Base for Mail Server 2 are the second addresses in the range.
If the public or private IP addresses of the servers were not consecutive (for example, if the private IP address of the Mail Server 2 in this example was 10.0.2.50), you could add a single 1-to-1 NAT mapping to handle the NAT mapping for each server.
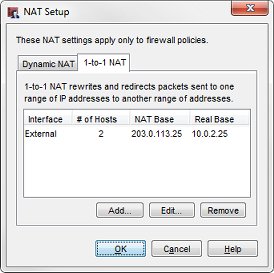
Even if your servers have consecutive IP addresses, you might want to configure the 1-to-1 NAT mapping as two separate mappings, for clarity. For comparison, you can look at the 1-to-1 NAT configuration in our configuration file (on the left) side-by-side with the equivalent configuration with separate NAT mappings for each host (on the right).
Whether you configure one 1-to-1 NAT rule to apply to a range of IP addresses, or you configure separate 1-to-1 NAT rules for each server, 1-to-1 NAT operates the same way. In this example, the effect of the 1-to-1 NAT configuration is:
1-to-1 NAT for Mail Server 1:
- For traffic inbound to the External interface, if the destination IP address is 203.0.113.25, change it to 10.0.1.25.
- For traffic outbound from the External interface, if the source IP address is 10.0.1.25, change it to 203.0.113.25.
1-to-1 NAT for Mail Server 2:
- For traffic inbound to the External interface, if the destination IP address is 203.0.113.26, change it to 10.0.1.26.
- For outbound traffic from the External interface, if the source IP address is 10.0.1.26, change, it to 203.0.113.26.
Policy Configuration
SMTP traffic is not allowed inbound by default. The example configuration includes a SMTP-proxy policy to allow the inbound SMTP traffic to the two mail servers. The default NAT settings in the SMTP-proxy policy enable 1-to-1 NAT, so no changes to the default NAT settings in the policy are required. By default, both 1-to-1 NAT and Dynamic NAT are enabled in all policies. 1-to-1 NAT takes precedence over Dynamic NAT, if both apply to traffic in a policy.
To see the SMTP-proxy policy
- Open the SMTP-proxy policy.
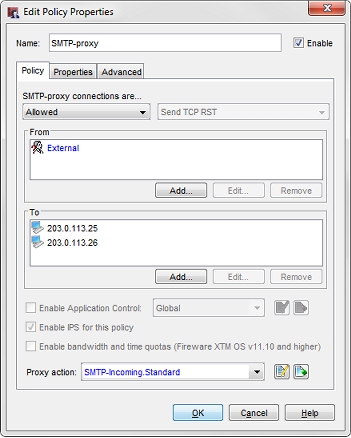
This policy sends traffic directly to the public IP addresses of the mail servers. These are the IP addresses in the NAT Base of the 1-to-1 NAT configuration. Unlike the policy in the first example configuration, this policy does not need an SNAT action, because 1-to-1 NAT takes care of the address translation.
You could also specify the Real Base instead of the NAT Base.
- Click the Advanced tab to see the default policy NAT settings.

You can see that 1-to-1 NAT (Use Network NAT Settings) is enabled. This is the default.
The example configuration also has an SMTP policy to handle SMTP traffic from Any-Optional to External. This policy is optional, since the default Outgoing policy also allows this traffic. Both the SMTP policy and the Outgoing policy have 1-to-1 NAT enabled by default, so no changes to the NAT settings in the policy are required.
Other Considerations
The 1-to-1 NAT settings you configure are enabled in all policies by default. If your mail server is also used for other types of outbound traffic, and you do not want that other traffic to be subject to the 1-to-1 NAT mapping, make sure that you disable 1-to-1 NAT in the Advanced tab of the policy that handles that traffic. For example, if your mail server is also used occasionally to do FTP downloads from an external server, and you do not want that FTP traffic to appear to come from your mail server, clear the 1-to-1 NAT settings in the Advanced tab of the FTP policy.
How It Works
The 1-to-1 NAT configuration provides a way to configure bi-directional NAT in a single location, and requires no changes to the default NAT settings in the policies, unless you want to disable 1-to-1 NAT for a specific type of traffic.
- For incoming traffic addressed to a destination IP address in the NAT Base, 1-to-1 NAT changes the destination IP address to the corresponding IP address in the Real Base.
- For outgoing traffic from a source IP address in the Real Base 1-to-1 NAT changes the source IP address to the corresponding IP address in the NAT Base.
The 1-to-1 NAT configuration in this example has this effect:
| Traffic direction | Source IP Address | Destination IP Address | NAT Action |
|---|---|---|---|
| Inbound to External | 203.0.113.25 | 1-to-1 NAT changes destination to 10.0.1.25 | |
| Outbound from External | 10.0.1.25 | 1-to-1 NAT changes source to 203.0.113.25 | |
| Inbound to External | 203.0.113.26 | 1-to-1 NAT changes destination to 10.0.1.26 | |
| Outbound from External | 10.0.1.26 | 1-to-1 NAT changes source to 203.0.113.26 |
Conclusion
In this configuration example, traffic from an external mail server or user is addressed to the public IP address of one of the internal email servers. The NAT actions in the configuration automatically change the destination to the internal IP address of the server. For mail sent from the mail servers through the external interface, the NAT actions in the configuration automatically change the source IP address to the public IP address of each server.
These configuration examples showed two methods to configure this, and in the process demonstrated these capabilities of static NAT, dynamic NAT, and 1-to-1 NAT:
- Static NAT handles inbound NAT, and dynamic NAT handles outbound NAT. Used together they can handle NAT in both directions.
- 1-to-1 NAT handles both inbound and outbound network address translation.
You can use either of these options to implement NAT to servers in your own network.
BOVPN on a Firebox Behind a Device That Does NAT
Configure a BOVPN Virtual Interface
BOVPN Virtual Interface with Dynamic Routing
BOVPN Virtual Interface Examples