Define a Tunnel
Applies To: Locally-managed Fireboxes
After you configure a branch office VPN gateway, you can add, edit, and delete branch office VPN tunnels.
Add a Tunnel
- Select VPN > Branch Office VPN.
The Branch Office VPN page appears.
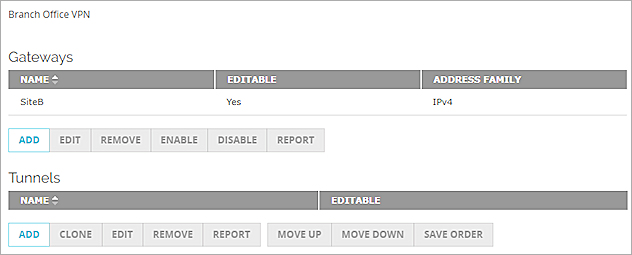
- In the Tunnels section, click Add.
The New Tunnel dialog box appears.
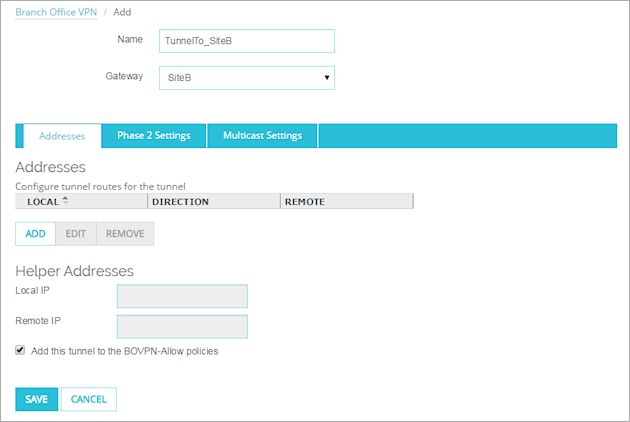
- In the Name text box, type a name for the tunnel.
Make sure the name is unique among tunnel names, Mobile VPN group names, and interface names. - From the Gateway drop-down list, select the gateway for this tunnel to use.
- To add the tunnel to the BOVPN-Allow.in and BOVPN-Allow.out policies, select the Add this tunnel to the BOVPN-Allow policies check box. These policies allow all traffic that matches the routes for this tunnel.
To restrict traffic through the tunnel, clear this check box and create custom policies for types of traffic that you want to allow through the tunnel. - Add at least one tunnel route to define what traffic is allowed through the tunnel. For more information, go to Add Routes for a Tunnel
- Select VPN > Branch Office Tunnels.
The Branch Office IPSec Tunnels dialog box appears.
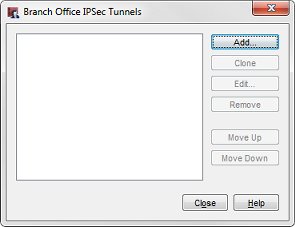
- Click Add.
The New Tunnel dialog box appears.
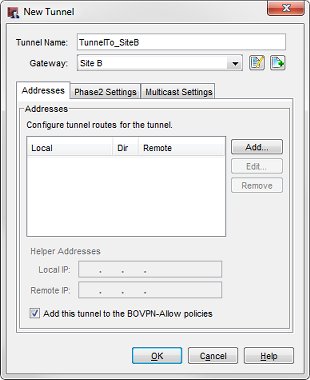
- In the Tunnel Name text box, type a name for the tunnel.
Make sure the name is unique among tunnel names, Mobile VPN group names, and interface names. - From the Gateway drop-down list, select the gateway for this tunnel to use.
To edit a gateway that already exists, select the name and click . Follow the procedures described in Configure Manual BOVPN Gateways.
To add a new gateway, click . Follow the procedures described in Configure Manual BOVPN Gateways.
- To add the tunnel to the BOVPN-Allow.in and BOVPN-Allow.out policies, select the Add this tunnel to the BOVPN-Allow policies check box. These policies allow all traffic that matches the routes for this tunnel.
To restrict traffic through the tunnel, clear this check box and use the BOVPN Policy wizard as described in Define Custom Tunnel Policies to create custom policies for types of traffic that you want to allow through the tunnel. - Add at least one tunnel route to define what traffic is allowed through the tunnel. For more information, go to Add Routes for a Tunnel
In the tunnel configuration you can also Configure Phase 2 Settings, or Enable Multicast Routing Through a Branch Office VPN Tunnel.
Edit or Delete a Tunnel
To edit or delete a tunnel, from Fireware Web UI:
- Select VPN > Branch Office VPN.
- Select the tunnel and click Edit.
The Tunnel page appears. - Make the changes and click Save.
- To delete a tunnel, select the tunnel and click Remove.
To edit or delete a tunnel, from Policy Manager:
- Select VPN > Branch Office Tunnels.
- Select the tunnel and click Edit.
The Edit Tunnel dialog box appears. - Make the changes and click OK.
- To delete a tunnel, select the tunnel and click Remove.
Clone a Tunnel
You can use the clone feature to make a new tunnel that is a copy of an existing tunnel. This can help you to define similar tunnels quickly.
To clone a tunnel, from Fireware Web UI:
- Select VPN > Branch Office VPN.
- Select the tunnel to clone.
- Click Clone.
- Edit the tunnel name and other tunnel properties
- Click Save to save the new tunnel.
To clone a tunnel, from Policy Manager:
- Select VPN > Branch Office Tunnels.
- Select the tunnel to clone.
- Click Clone.
- Edit the tunnel name and other tunnel properties.
- Click OK to save the new tunnel.
Run the BOVPN Tunnel Configuration Report
After you add a tunnel, you can run a report to see a summary of all tunnel settings. This report can be useful if you need to troubleshoot the VPN. It can also make it easier to compare the configured settings with the settings of the remote VPN endpoint device.
To generate the report, click Report in the tunnel list.
For more information about this report, go to Use the BOVPN Configuration Reports.