BOVPN Virtual Interface for Static Routing to Amazon Web Services (AWS)
Applies To: Locally-managed Fireboxes
For VPN connections to AWS, we recommend that you configure a BOVPN virtual interface on the Firebox instead of a BOVPN. You can use static or dynamic routing.
In this example, we show a VPN configuration with:
- Static routing
- One Firebox external physical interface
- One Firebox BOVPN virtual interface with two gateway endpoints
- One AWS gateway with two IP addresses for failover
AWS Configuration
An AWS VPN configuration includes one virtual private gateway with two external IP addresses for redundancy. AWS automatically determines which IP address is the primary IP address.
Failover between the external IP addresses is enabled by default. If the primary AWS external IP address is unavailable, VPN traffic automatically fails over to the other AWS external IP address.
For detailed instructions about how to configure the AWS VPN settings, go to the Amazon Virtual Private Cloud User Guide.
Before You Configure the Firebox
Before you configure the Firebox, download the configuration file from your AWS account:
- Log in to the AWS Management Console at https://aws.amazon.com/console.
- Click to expand All Services.
- In the Networking & Content Delivery section, click VPC.
- From the navigation menu, in the Virtual Private Network section, click Site-to-Site VPN Connections.
- Click the connection name.
- Click Download Configuration.
- From the Vendor drop-down list, select WatchGuard, Inc.
- From the Software drop-down list, select Fireware OS 11.12.2 +.
- Click Download.
A .txt file downloads to your desktop. - Open the .txt file in a text editor.
The .txt configuration file contains the pre-shared keys, gateway IP addresses for AWS Tunnel 1 and Tunnel 2, and routes to the trusted (private) network of your AWS VPC.
You can also find the IP addresses in your AWS configuration:
- For the gateway IP addresses, select Virtual Private Network > Site-to-Site VPN Connections > [name].
- For the routes, select Virtual Private Cloud > Subnets or Virtual Private Cloud > Route Tables.
For this example, the AWS configuration uses these IP addresses:
- Customer Gateway Address — 203.0.113.2 (external interface on the Firebox )
- VPN Connections:
- Tunnel 1 — 198.51.100.2 (first IP address of the AWS virtual private gateway)
- Tunnel 2 — 192.0.2.2 (second IP address of the AWS virtual private gateway)
- Static Route — 10.0.1.0/24 (trusted network of the Firebox)
Configure the Firebox
For this example, the Firebox has one external interface and one trusted network:
| Interface | Type | Name | IP Address |
|---|---|---|---|
| 0 | External | External | 203.0.113.2/24 |
| 1 | Trusted | Trusted | 10.0.1.1/24 |
Add a BOVPN Virtual Interface
To configure a redundant gateway that uses both AWS external IP addresses, you must configure one BOVPN virtual interface that includes two gateway endpoints. Make sure to specify different pre-shared keys for each gateway endpoint on your Firebox.
- Select VPN > BOVPN Virtual Interfaces.
- Click Add.
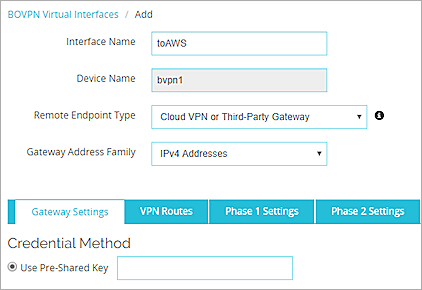
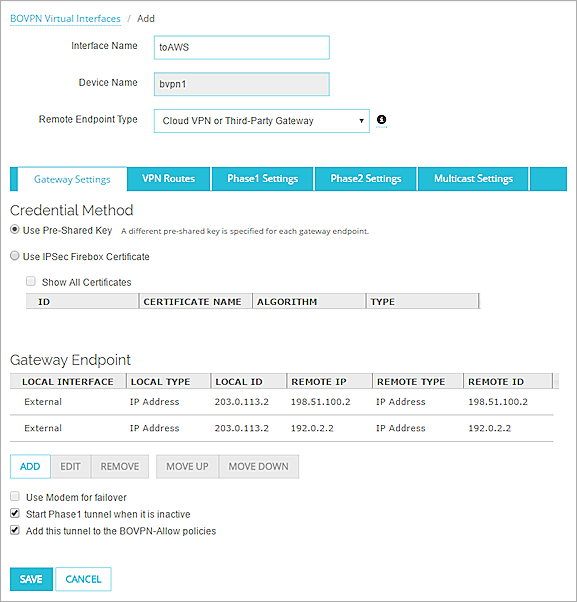
- In the Interface Name text box, type a name that describes the virtual interface. In our example, we use toAWS.
- From the Remote Endpoint Type drop-down list, select Cloud VPN or Third-Party Gateway.
- From the Gateway Address Family drop-down list, select IPv4 Addresses. AWS does not support IPv6 for VPN tunnels.
- For the credential method, select Use Pre-Shared Key. Keep the pre-shared key text box clear for now. Later in the configuration, you specify a different pre-shared key for each gateway.
Add the Gateway Endpoints
To add the first gateway endpoint:
- In the Gateway Endpoint section, click Add.
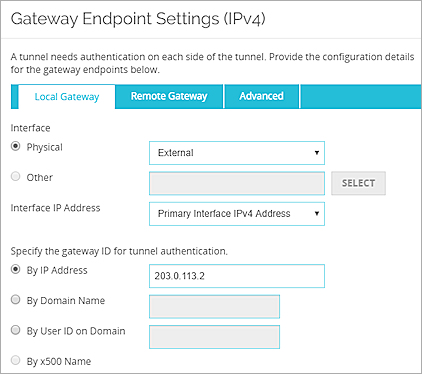
The Gateway Endpoint Settings dialog box appears. - From the Physical drop-down list, select External.
- From the Interface IP Address drop-down list, select Primary IPv4 Interface Address.
- Select By IP Address.
- In the adjacent text box, type the IP address for the Firebox external interface. In our example, we use 203.0.113.2.
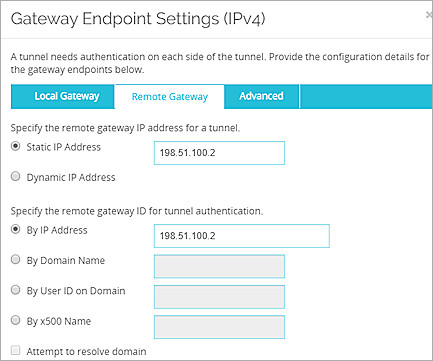
- Select the Remote Gateway tab.
- Select Static IP Address.
- In the adjacent text box, type the first IP address of the AWS virtual private gateway. In our example, we use 198.51.100.2.
- Select By IP Address.
- In the adjacent text box, type the first IP address of the AWS virtual private gateway. In our example, we use 198.51.100.2.
- On the Advanced tab, select Specify a different pre-shared key for each gateway endpoint.
- Paste the key from the AWS .txt configuration file. This file includes two pre-shared keys, one for each gateway endpoint.
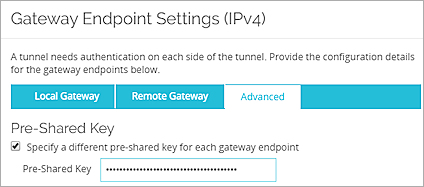
- Click OK.
- In the Gateway Endpoint section, click Add.
The Gateway Endpoint Settings dialog box appears. - From the Physical drop-down list, select External.
- From the Interface IP Address drop-down list, select Primary IPv4 Interface Address.
- Select By IP Address.
- In the adjacent text box, type the IP address for the Firebox external interface. In our example, we use 203.0.113.2.
- Select the Remote Gateway tab.
- Select Static IP Address.
- In the adjacent text box, type the first IP address of the AWS virtual private gateway. In our example, we use 192.0.2.2 .
- Select By IP Address.
- In the adjacent text box, type the first IP address of the AWS virtual private gateway. In our example, we use192.0.2.2 .
- On the Advanced tab, select Specify a different pre-shared key for each gateway endpoint.
- Paste the other key from the AWS .txt configuration file.
- Click OK.
Configure the VPN Routes
Next, add a route to the trusted (private) network of your AWS VPC.
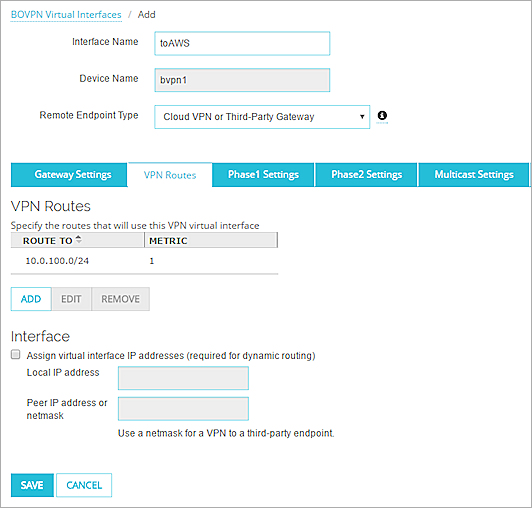
- On the VPN Routes tab, click Add.
The VPN Route Settings dialog box appears. - From the Choose Type drop-down list, select Network IPv4.
- In the Route To field, type 10.0.100.0/24. Tip!
- Click OK.
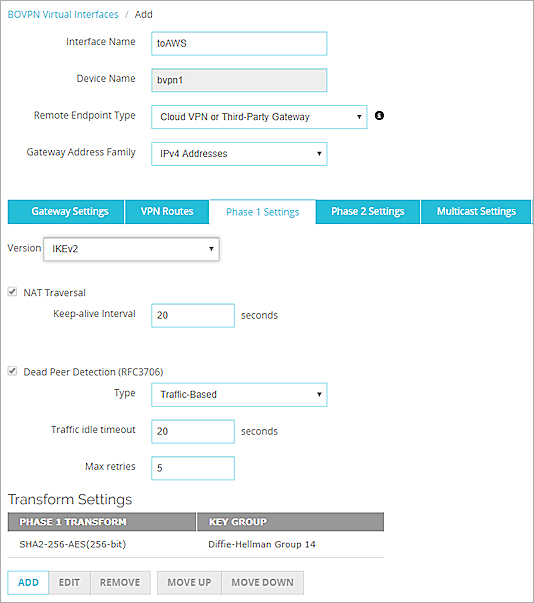
Configure the Phase 1 and Phase 2 Settings
Finally, you must configure the Phase 1 and Phase 2 settings.
During VPN negotiations, AWS identifies the authentication and encryption algorithm settings from the Firebox. If AWS supports the settings, AWS automatically uses the same settings. AWS supports specific proposals. You cannot edit the AWS configuration to specify different proposals.
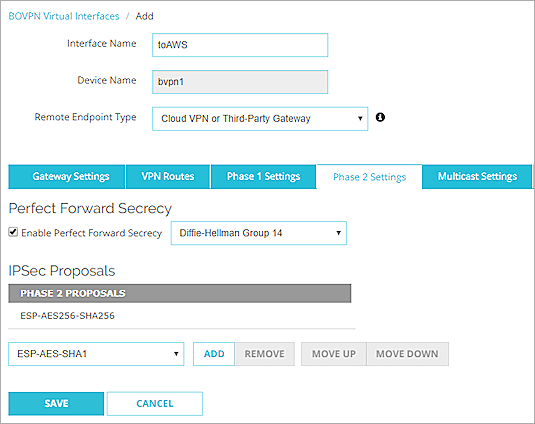
- Select Enable Perfect Forward Secrecy.
- From the drop-down list, select Diffie-Helman Group 14.
Groups 1, 2, 5, 15, 19, and 20 are also supported. - From the IPSec Proposals drop-down list, select ESP-AES256-SHA256.
SHA1 and AES128 are also supported.
BOVPN Virtual Interface for Dynamic Routing to Amazon Web Services (AWS)