Microsoft Azure Cloud Security Posture Management (CSPM) with WatchGuard MDR
Deployment Overview
You can use WatchGuard MDR with Microsoft Azure Cloud Security Posture Management (CSPM) to combine threat detection and cloud security optimization for your environment.
This document describes the steps to integrate WatchGuard MDR with Microsoft Azure CSPM.
Contents
Before You Begin
Before you complete the procedures in this document, make sure that:
- You have a Microsoft Azure user with a Global Administrator role or sufficient permissions to register an application in Microsoft Entra ID, create a client secret, and assign the required Microsoft Graph API permissions and Azure role-based access control (RBAC) roles to the application and subscription.
- You have a WatchGuard Total or WatchGuard Open MDR license allocated in WatchGuard Cloud.
Configure Microsoft Azure
To integrate WatchGuard MDR with Microsoft Azure CSPM, you must prepare the Azure subscription for CSPM scanning. You can use a script to automatically configure the Azure subscription or you can manually configure the Azure subscription.
To download and run the appregistration.ps1 script, go to Use a PowerShell script to prepare Microsoft Azure CSPM for integration with WatchGuard MDR in the WatchGuard Knowledge Base and run the script in your Microsoft Azure environment.
To manually configure Microsoft Azure, follow these steps:
- Create an App Registration and Client Secret
- Add API Permissions and Consent
- Add Role Assignments
- Encrypt Credentials with Keybase
Create an App Registration and Client Secret
To create the app registration and client secret:
- Log in to the Microsoft Azure portal with the user identified in the prerequisites.
- From the navigation menu, select All Services > Identity.
- In the Identity Management section, select App Registrations.
The App Registrations page opens.
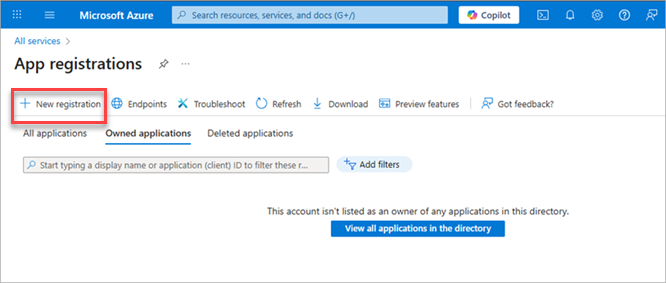
- Click New Registration.
The Register an Application page opens.
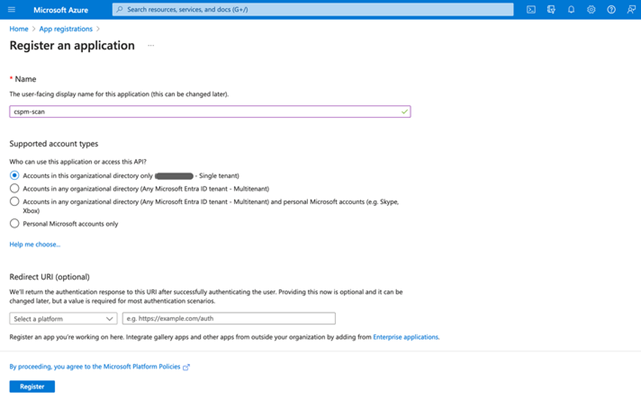
- In the Name text box, type a name for the application. For example, type cspm-scan.
- In the Supported Account Types section, select Accounts in This Organizational Directory Only.
- For Redirect URI, keep the default setting.
- Click Register.
The app is registered.
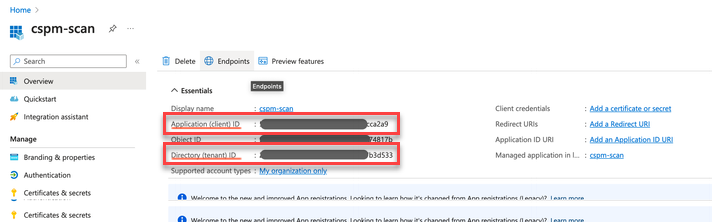
- Copy the Application (Client) ID and Directory (Tenant) ID values and save them to add to the onboarding form later.
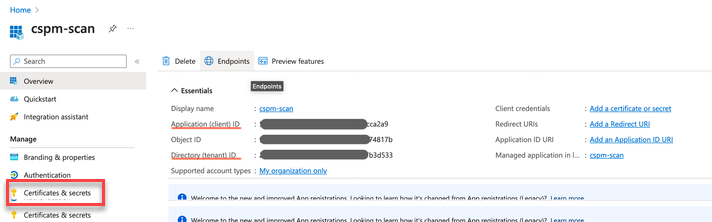
- From the left navigation menu, select Certificates and Secrets.
The Certificates and Secrets page opens. - Click New Client Secret.
The Add a Client Secret page opens.

- In the Description text box, type the client secret. For example, type cspm-scan-secret.
- From the Expires drop-down list, select 730 Days (24 Months).
- Click Add.
- From the new client secret, copy the contents of the Value column and save them to add to the onboarding form later.
Add API Permissions and Consent
You must add Microsoft Graph API permissions to the app registration with admin consent.
To add API permissions in Microsoft Azure:
- From the navigation menu, select Manage > API Permissions.
- Click Add a Permission.
The Select an API page opens.
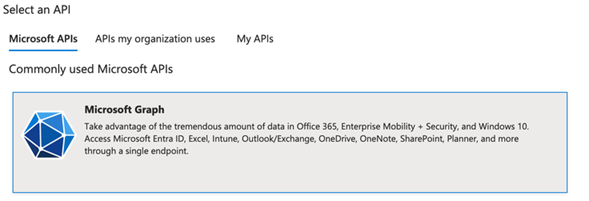
- On the Microsoft APIs page, click Microsoft Graph.
The Request API Permissions page opens.
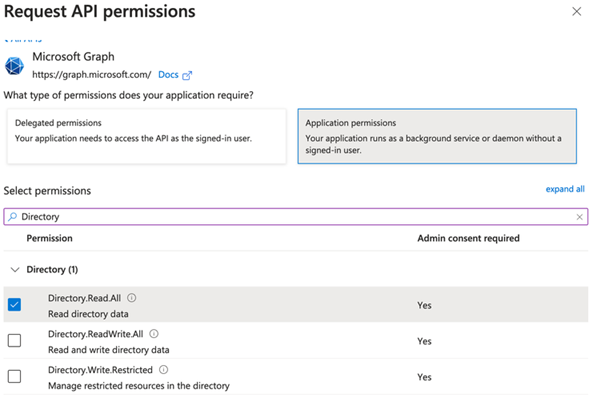
- Click Application Permissions.
- In the search box, search for and select Directory.Read.All.
- In the search box, search for and select Policy.Read.All.
- Click Add Permissions.
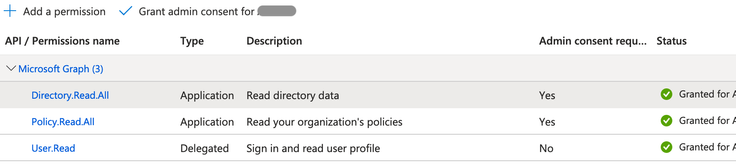
The Configured Permissions page opens.
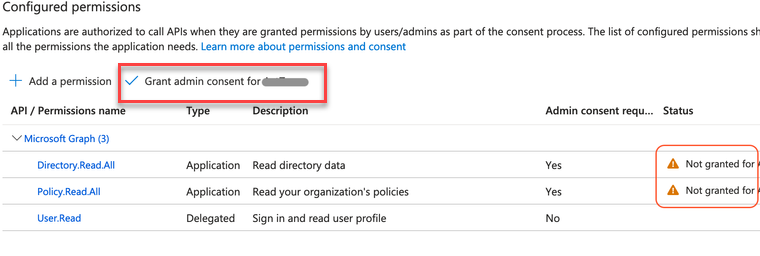
- Click Grant Admin Consent for Directory Name.
A confirmation dialog box opens. - Click Yes.
A green checkmark shows in the Status column.
Add Role Assignments
You must add Security Reader and Reader role-ased aAccess control (RBAC) roles in the Azure subscription.
To add the required RBAC roles in Microsoft Azure:
- In the Microsoft Azure search box, search for and select Subscriptions.
The Subscriptions page opens. - Select your subscription.
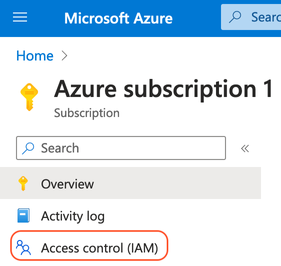
- From the navigation menu, select Access Control (IAM).
- To add the Security Reader role, complete these steps:
- Select Add > Add Role Assignment.
The Add Role Assignment page opens.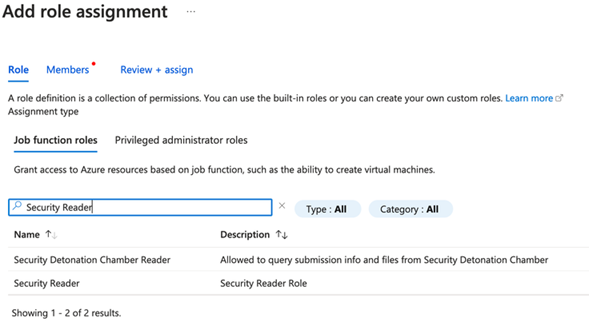
- In the search box, search for and select Security Reader. Click Next.
The Members tab opens.
- Select User, Group or Service Principal.
- Click Select Members.
The Select Members page opens.
- In the search box, search for and select the registered application name you used in Create an App Registration and Client Secret. For example, cspm-scan.
- Click Select.
The registered application shows in the Members list. - Click Next.
- Review the changes and click Review + Assign.
- Select Add > Add Role Assignment.
- To add the Reader role, complete these steps:
- Select Add > Add Role Assignment.
The Add Role Assignment page opens.
- In the search box, search for and select Reader. Click Next.
The Members tab opens.
- Select User, Group or Service Principal.
- Click Select Members.
The Select Members page opens. - In the search box, find and select the registered application name you used in Create an App Registration and Client Secret. For example, cspm-scan.
- Click Select.
The registered application shows in the Members list. - Click Next.
- Review the changes and click Review + Assign.
- Select Add > Add Role Assignment.
Encrypt Credentials with Keybase
To securely share the required Microsoft Azure credentials with WatchGuard in the CSPM Onboarding Form, encrypt the Application (Client) ID, Directory (Tenant) ID, and client secret values with Keybase.
To encrypt the values:
- Go to https://keybase.io/encrypt.
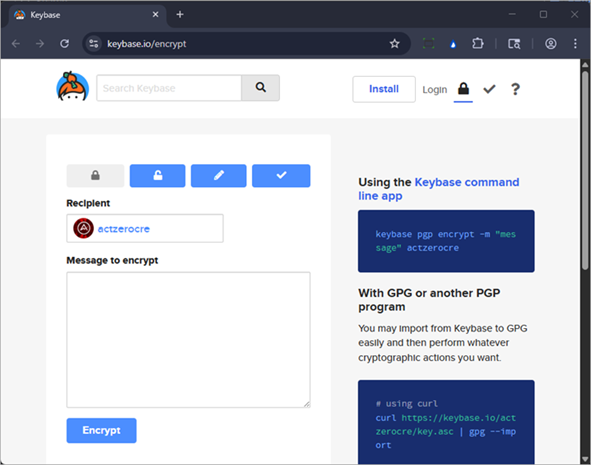
- In the Recipient text box, enter actzerocre.
- In the Message to Encrypt text box, paste the values copied from the previous steps.
- Click Encrypt.
- From the The Secret Message text box, copy the encrypted contents of the message and save them to add to the onboarding form.
Make sure to erase the copies of the sensitive information in your local environment after you add them to the onboarding form.
Complete the Onboarding Form
After you configure your Microsoft Azure environment, to finish the integration with WatchGuard MDR, complete the CSPM Onboarding Form (external link). To complete the form, you must have the encrypted Azure credentials.
You also need this information:
- Customer Company Name — The company name of the customer account for this connector.
- Partner Company Name — The company name of the Partner.
- WatchGuard Partner ID — The Partner ID format is: ACC-XXXXXXX.
- Partner Contact Email Address — The Partner contact email address the deployment team can use if they have questions.
- Customer/Subscriber WatchGuard Account ID — The Account ID format is: ACC-XXXXXXX or WGC-X-XXXXXXXXXXXXXXXXXXXX.