Eduroam® is a cloud-based RADIUS proxy solution used by education institutions to provide a single SSID that can be deployed across many different institutions. Eduroam enables students to move between different campus locations and authenticate with the security of RADIUS and the same SSID.
Programs and Software
- WatchGuard Firebox
- Windows Server 2012 with ADDS, ADCS, and NPS services
- Eduroam Global Wi-Fi Roaming for Academia
For assistance with setup of Windows Server 2012 NPS services, see these references in the MSDN Library:
Access Point Configuration in WatchGuard Gateway Wireless Controller
Configure RADIUS Single Sign-On
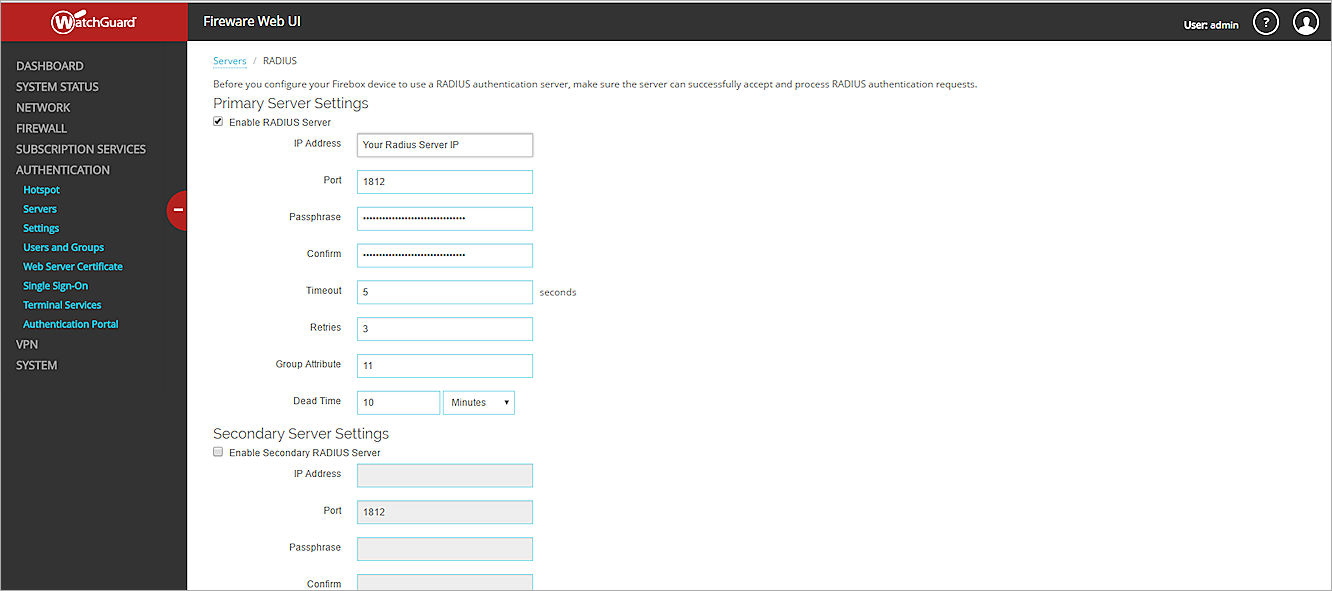
- Log in to Fireware Web UI for your Firebox at https://<IP address of your Firebox>:8080.
- Select Authentication > Servers.
- From the Server list, select RADIUS.

- In the Primary Server Settings section, select the Enable RADIUS Server check box.
- In the IP Address text box, type the IP address of your RADIUS server.
- In the Port text box, type the port number used to connect to your RADIUS server. The default port number for a RADIUS server is 1821. If you have an older RADIUS server, the default port number might be 1645.
- In the Passphrase and Confirm text boxes, type the shared secret (passphrase) for your RADIUS server.
Configure the Gateway Wireless Controller With the RADIUS Settings
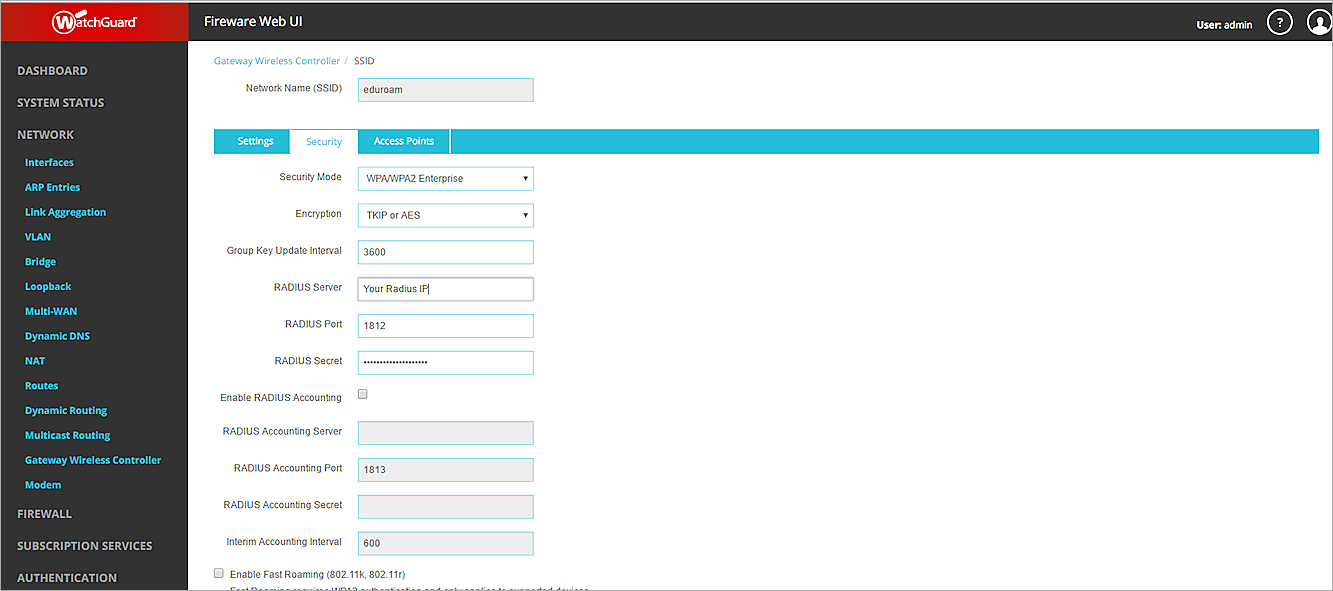
- Select Network > Gateway Wireless Controller.
- If it is not already selected, select the Enable Gateway Wireless Controller check box.
- Select the SSIDs tab and add Eduroam.
- Select the Security tab and add the appropriate settings for your RADIUS Server.
- From the Security Mode drop-down list, select WPA Enterprise.

Create a Static NAT Policy to Allow Communication to Eduroam Servers
- Select Firewall > SNAT.
- Click Add.
- Type a name for your SNAT policy and add a description.
- In the SNAT Members section, click Add.
- Configure the necessary settings to connect to the Eduroam server in your environment.
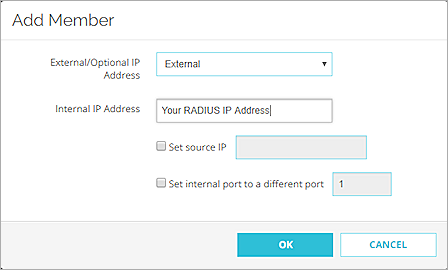
- Click OK.
- Select Firewall > Firewall Policies.
- Click Add Policy.
- Select Packet Filter.
- From the Select a packet filter drop-down list, select a RADIUS policy.
- Click Add Policy.
- Below the To list, click Add.
- From the Member type drop-down list, select Static NAT.
- Select the SNAT policy you created. Click OK.
- Click Save.
Configure AP Devices Managed by WatchGuard Wi-Fi Cloud
Configure SSID Template
- Log in to WatchGuard Wi-Fi Cloud at https://login.watchguard.cloudwifi.com.
- From the Wi-Fi Cloud interface, select Manage.
- Select the Configurations tab.
- Select Device Configuration > SSID Profile.
- To configure a full profile, select Add New Wi-Fi Profile.
- In the Profile Name text box, type a profile name. For example, type WatchGuard_Eduroam.
- In the SSID text box, type eduroam.
- Expand Security.
- From the Security Mode drop-down list, select WPA and WPA2 Mixed Mode.
- Select 802.1X.
- In the Primary Authentication Server section, type the server IP address, port number, and shared secret.
- Configure any additional settings required for your environment.
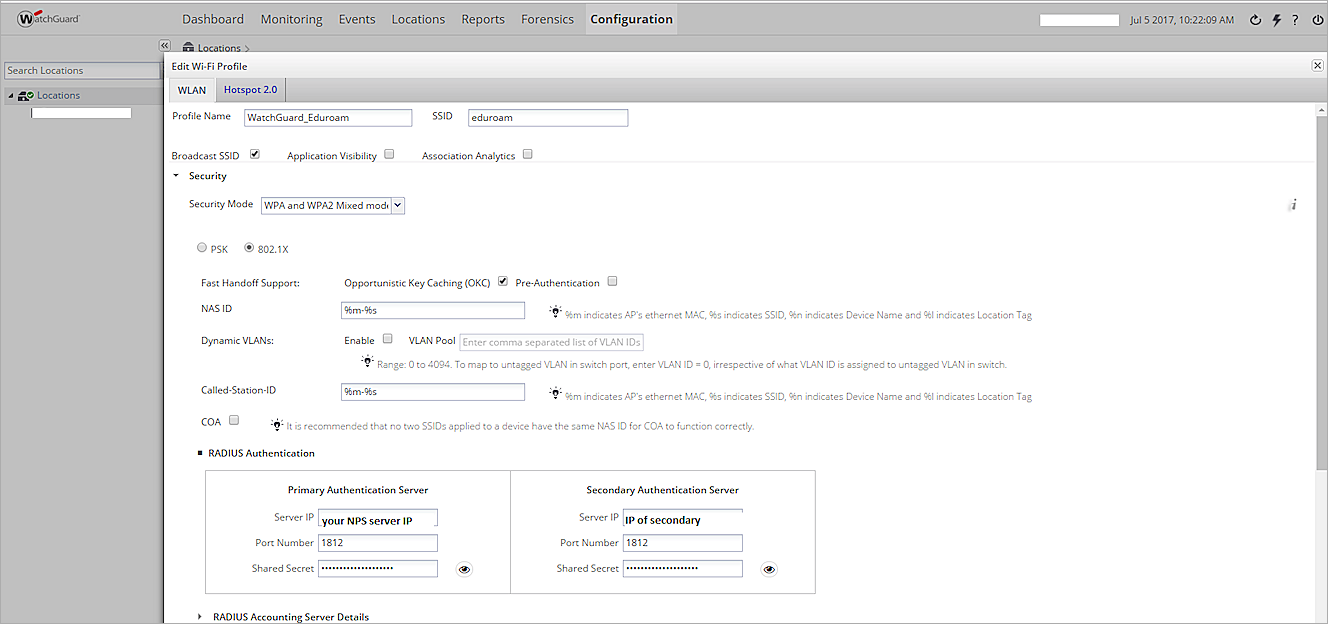
- Click Save.
Configure Device Templates
- From the Locations tab, select the Configurations tab.
- Select Device Configuration > Device Templates.
- Select Add Device Template.
- In the Template Name text box, type a name for your template.
- In the Description text box, type a description or add notes about the template.
- Select Radio Settings > Define settings for model.
- Select Add SSID Profile.
- Select the SSID profile you created.

- Click OK.
- Click Save.
Apply the Template to Your AP Devices
- Select Monitoring > Managed Devices.
- Select AP Device.
- Click
 .
. - From the list of templates, select a device template.
- Click Save.
Set Up Windows Server 2012 R2 with NPS
Generate a Certificate to Distribute to Users
On your Windows server:
- Open MMC.
- Select File > Add/Remove Snap-in.
- In the Available snap-ins section, double-click Certificates.
- Select Computer account.
- Click Next.
- Select Local computer.
- Click Finish.
- Select Certificates > Certificates (Local Computer).
- Select Personal.
- Select Action > All Tasks > Request New Certificate.
- Click Next.
- Select the DomainController certificate template.
- Click Details.
- Click Properties.
- Type the Friendly name for the certificate and add a description.
- Click Apply.
- Click Enroll.
- Send the certificate to your end-users in an email or configure your Active Directory server to push the certificate to your clients.
Configure NPS Radius Clients
On your Network Policy Server (NPS):
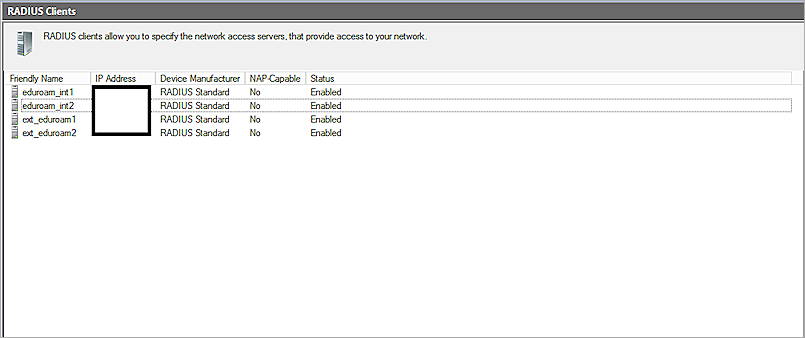
- Right-click Radius Clients and select New.
- Create RADIUS clients for your internal users who authenticate with RADIUS.
- Create RADIUS clients for Eduroam RADIUS servers.
- Add a shared secret and an IP address for each RADIUS client you created.
Configure Remote RADIUS Servers
- Right-click Remote RADIUS Server Groups and select New.
- Create a group name for each Eduroam RADIUS server.

Create Connection Request Policies
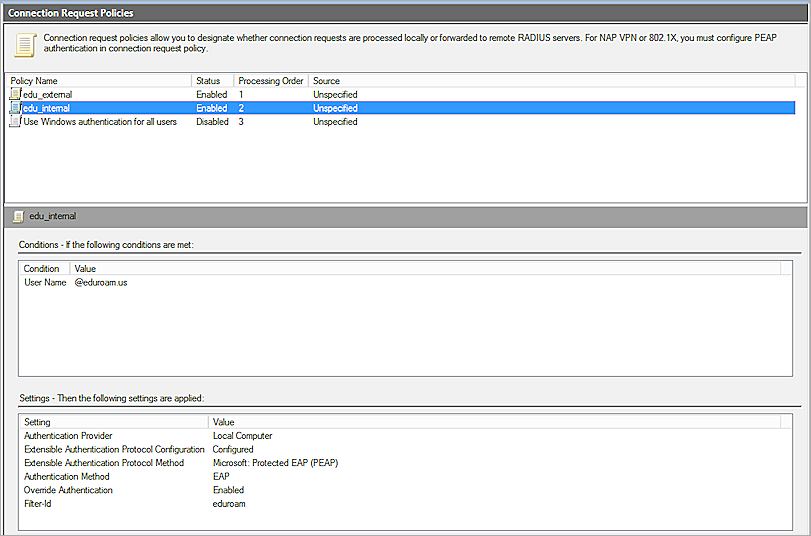
- Right-click Connection Request Policies and select New.
- Configure your CRP policies for external and internal to authenticate against own realms and external to forward requests.

Create Network Policies
- Right-click Network Policies and select New.
- Create network policies to define who is authorized to connect to your network.

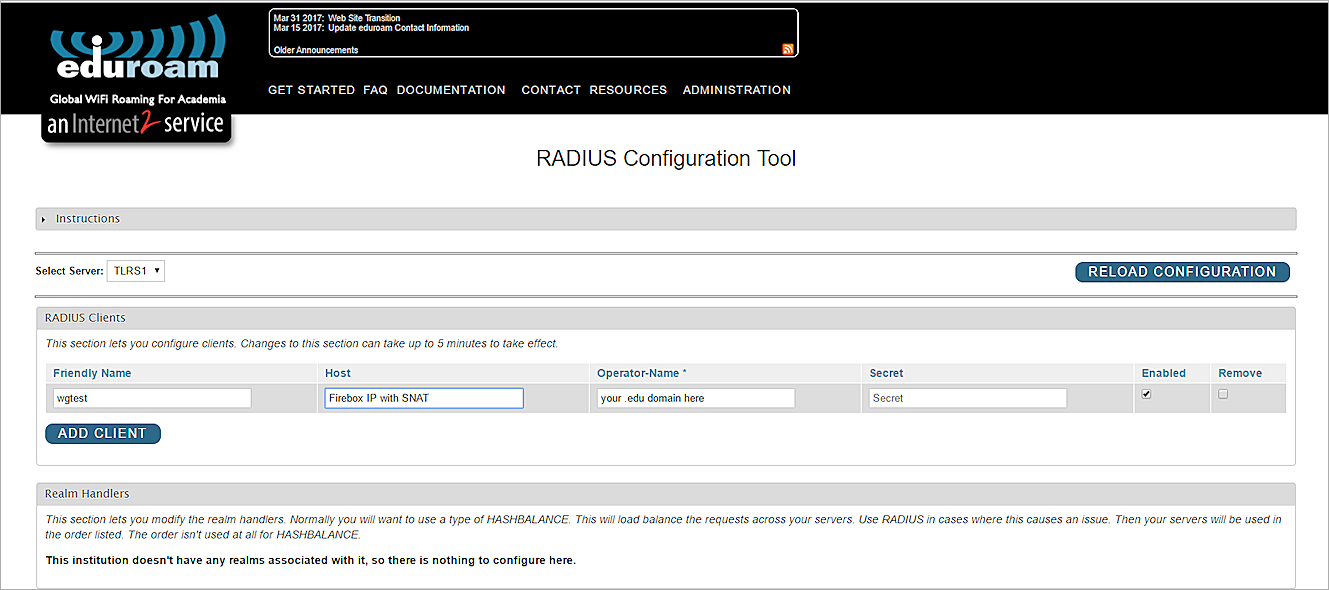
Configure RADIUS Server and Shared Secret with Eduroam
To configure your RADIUS server:
- Log in to Eduroam Administration at https://eduroam.us/admin-login.
- Select the RADIUS Configuration tool.
- In the Friendly Name text box, type a name for your RADIUS servers.
- In the Host text box, type the external IP address used to send authentication requests to Eduroam servers. This could be the Firebox (with SNAT policy) that forwards the RADIUS requests to your NPS server or the AP device if it has an external address. The Operator-Name is your .EDU domain.
To test your authentication settings:
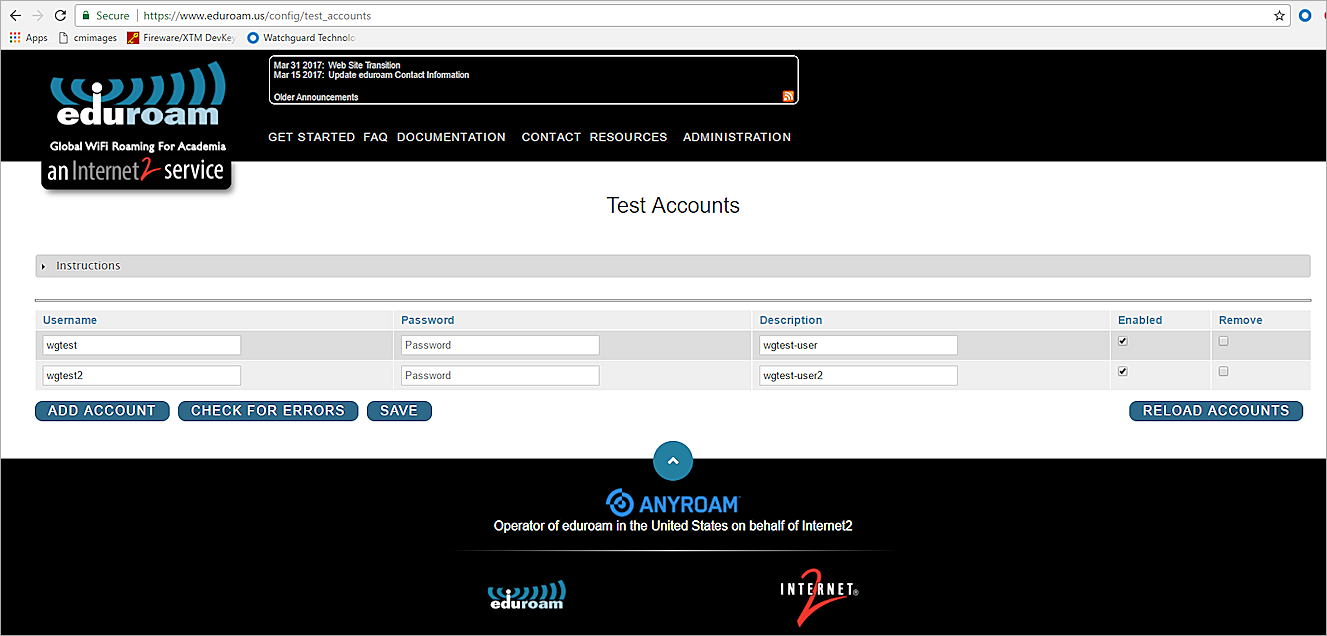
- Create test accounts on the Eduroam website.
- Connect one of the test users (you must also add this user to your Active Directory list of Eduroam users) to your Eduroam SSID.
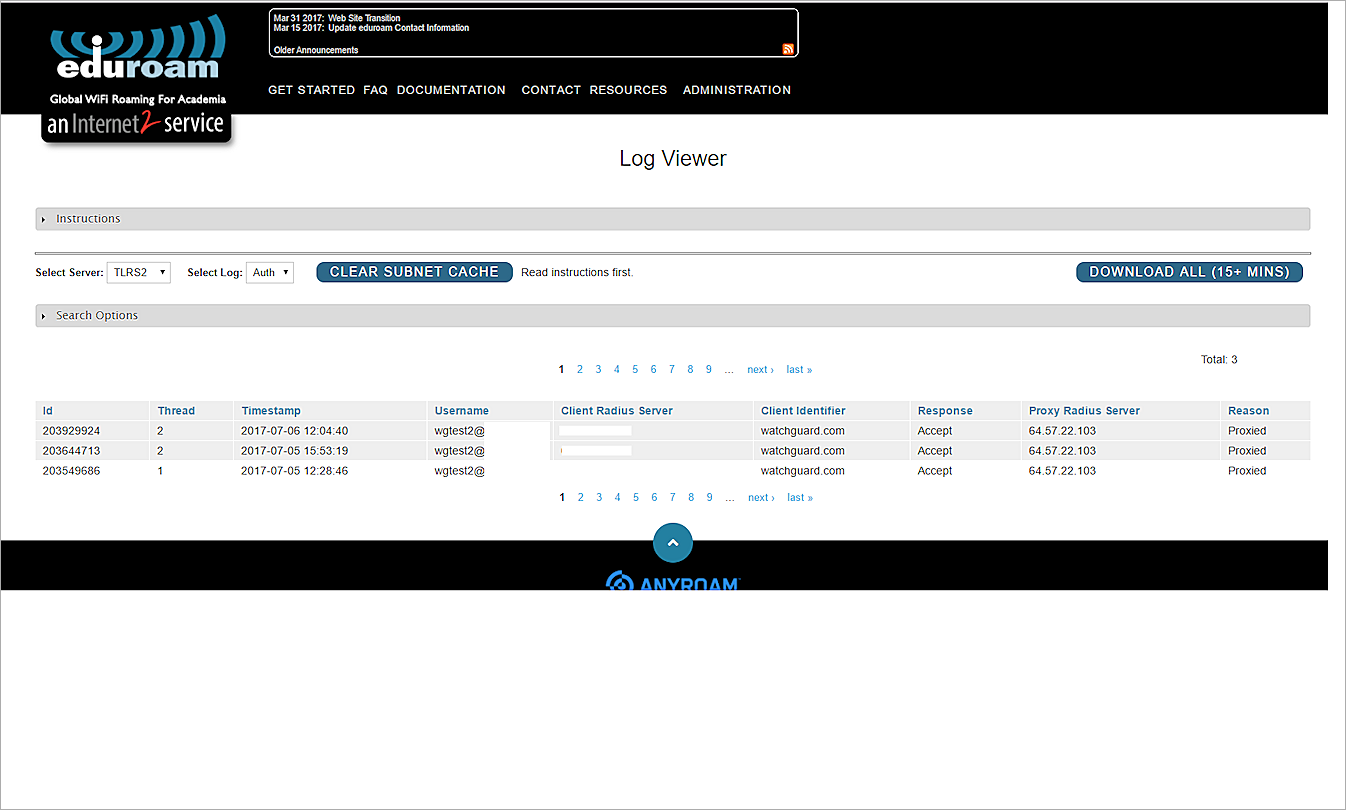
- From the Eduroam Administration Log Viewer, review the log messages.