This integration guide describes how to set up SAML authentication through the Mobile VPN with SSL client with Microsoft Entra ID as the Identity Provider.
In Fireware v12.11 or higher, the SAML authentication server can integrate with several identity providers. After you configure the SAML authentication server on the Firebox, you can use it to integrate with the Mobile VPN with SSL client.
The Mobile VPN with SSL client for Windows supports SAML authentication with v12.11 and higher. The Mobile VPN with SSL client for macOS supports SAML authentication with v12.11.2 and higher. Third-party OpenVPN clients are not supported.
Contents
Integration Summary
The hardware and software used in this guide include:
- Microsoft Entra ID
- You must have a Microsoft Azure global administrator account within the Microsoft Entra ID tenant
- You must have created a user in Microsoft Entra ID or synchronized an on-premises Active Directory user to Microsoft Entra ID
- WatchGuard Firebox with Fireware v12.11 or higher
- WatchGuard Mobile VPN with SSL client for Windows or macOS
- A fully qualified domain name (FQDN) that can resolve to the external IP address of Firebox
Additional charges might apply to use Microsoft Entra ID.
Test Topology
Microsoft Entra ID communicates with various cloud-based services and service providers with the SAML protocol. This integration uses Microsoft Entra ID to communicate with a WatchGuard Firebox over a public Internet connection.

Enable the Firebox SAML Authentication Server
The steps to set up SAML authentication for Mobile VPN with SSL are different based on how you manage your Firebox (cloud-managed or locally managed).
Enable the Locally-Managed Firebox SAML Authentication Server
To enable the Firebox SAML authentication server, from Fireware Web UI:
- Log in to Fireware Web UI at: https://<your Firebox IP address>:8080
- From the navigation menu, select Authentication > Servers.
- Select SAML.
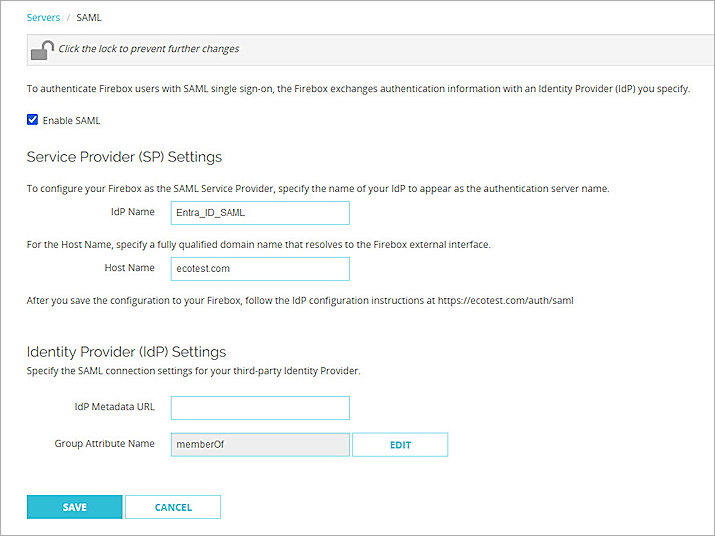
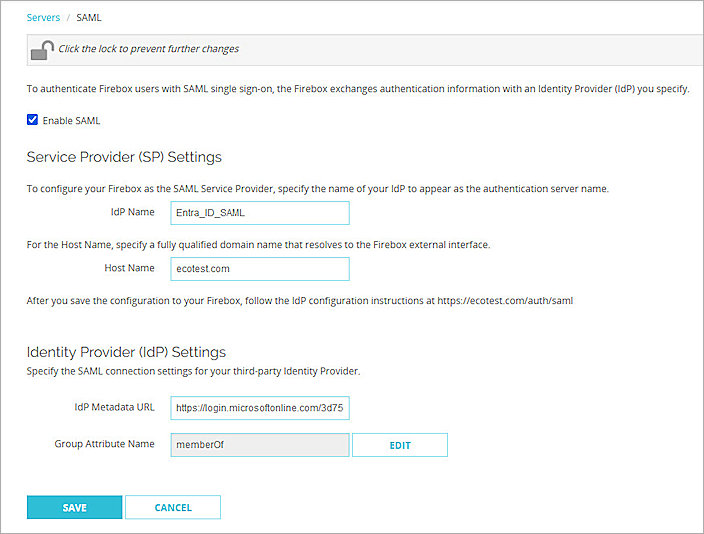
The SAML settings page opens. - Select the Enable SAML check box.
- In the IdP Name text box, type a name for the identity provider. In our example, we type Entra_ID_SAML.
- In the Host Name text box, type an FQDN that resolves to the Firebox external interface.
- Keep the IdP Metadata URL text box blank. We add the IdP settings later.
- Click Save.
The Firebox cannot support multiple IdP applications at the same time. Each IdP application has a unique IdP Metadata URL.
Configure the Locally-Managed Firebox Mobile VPN with SSL
To configure Mobile VPN with SSL on the Firebox, from Fireware Web UI:
- Log in to Fireware Web UI at: https://<your Firebox IP address>:8080
- From the navigation menu, select VPN > Mobile VPN.
- In the SSL section, click Manually Configure.
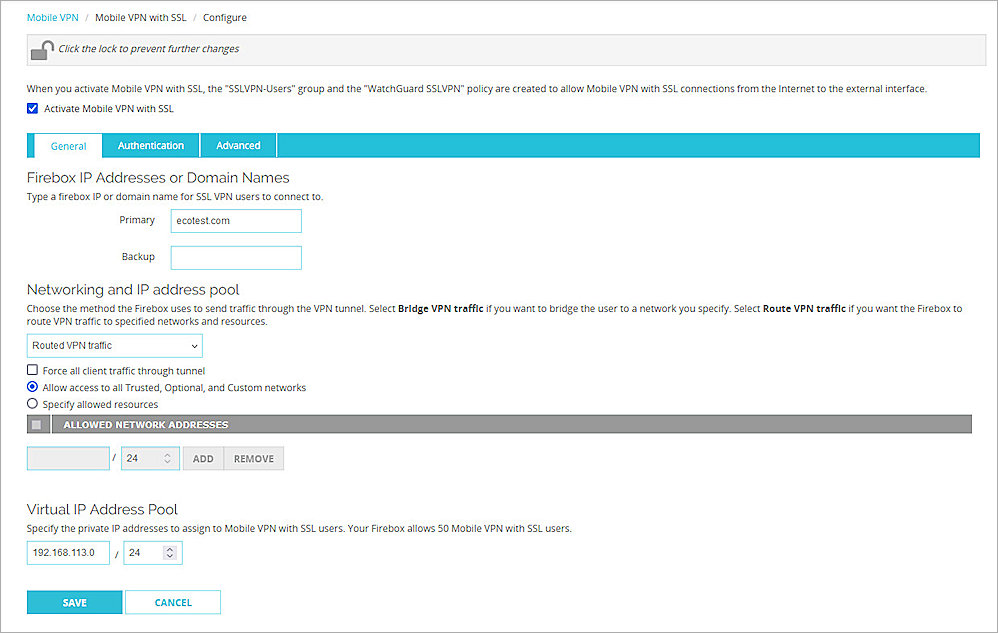
The Mobile VPN with SSL configuration settings open. - Select the Activate Mobile VPN with SSL check box.
- In the Primary text box, type the FQDN that resolves to the Firebox external interface. This is the domain name that Mobile VPN with SSL clients connect to by default and must be the same as the Host Name you configure in the Enable the Locally-Managed Firebox SAML Authentication Server section. In this example, we type ecotest.com.
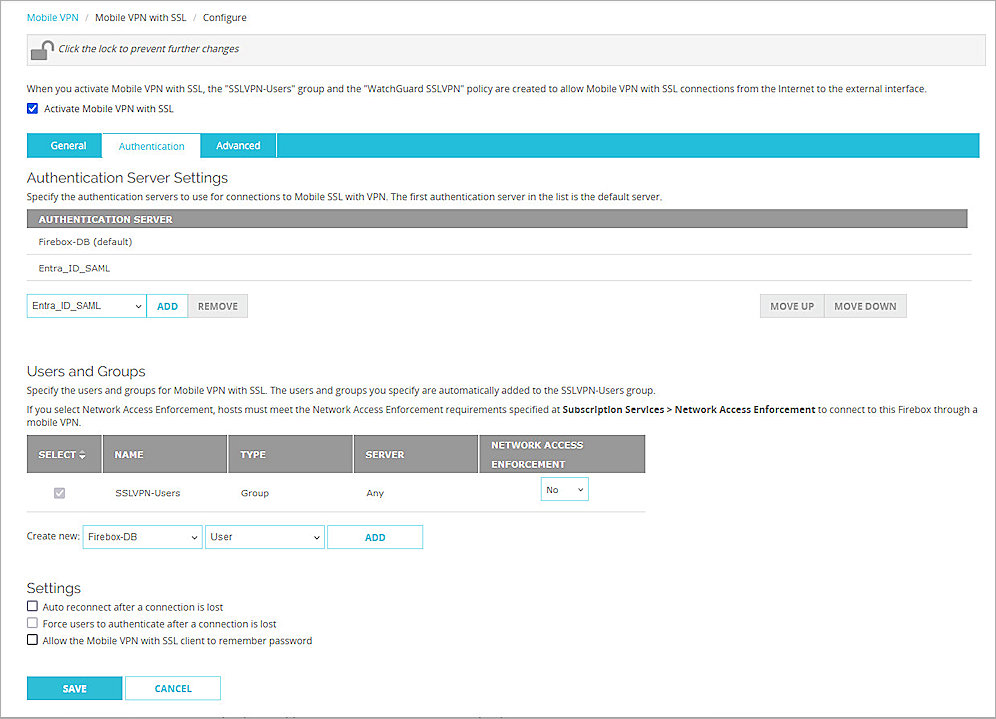
- Select the Authentication tab.
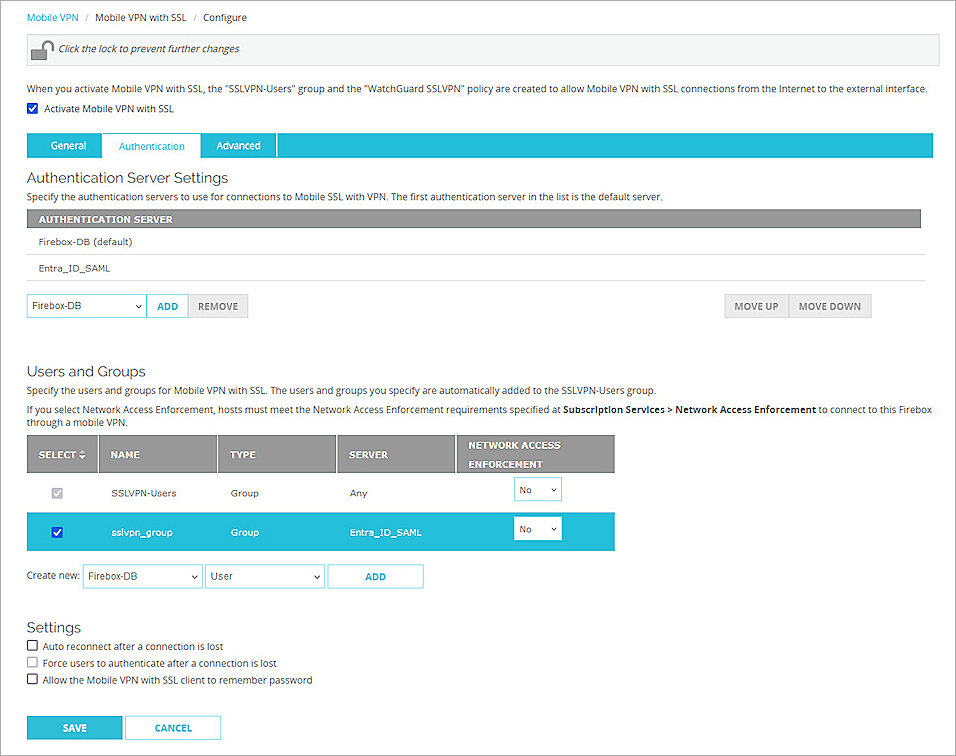
The Authentication settings open. - In the Authentication Server Settings section, from the Authentication Servers drop-down list, select the SAML authentication server you created in the Enable the Locally-Managed Firebox SAML Authentication Server section. In our example, we select Entra_ID_SAML.
- Click Add.
The server appears in the Authentication Server list. - Click Save.
- Copy the SP Metadata URL, then click Done.
The Update IdP configuration page opens. - Open a web browser and go to the SP Metadata URL you copied in the step above:
https://[Host name or Firebox IP address]/auth/saml
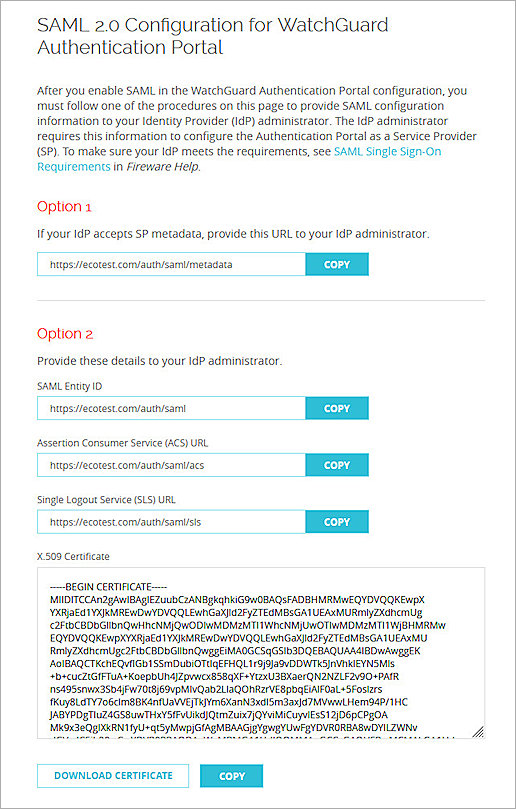
The SAML 2.0 Configuration page opens. - From the Option 2 section, copy the details. You use this information when you configure Entra ID:
- SAML Entity ID in this format:
https://<host name>/auth/saml - Assertion Consumer Service (ACS) URL in this format:
https://<host name>/auth/saml/acs - Single Logout Service (SLS) URL in this format:
https://<host name>/auth/saml/sls - X.509 Certificate: Download or copy and save the certificate.
- SAML Entity ID in this format:

To configure Microsoft Entra ID, complete these steps:
Create a Microsoft Entra ID Group and User
If you already created users and groups in Microsoft Entra ID or synced on-premises users and groups to Microsoft Entra ID, you can skip the steps to create the group and user in Microsoft Entra ID and go to the Configure a SAML Application section.
To create a group in Microsoft Entra ID:
- Log in to the Azure portal with your Microsoft Azure account credentials.
- Click Microsoft Entra ID.
- From the navigation menu, select Manage > Groups.
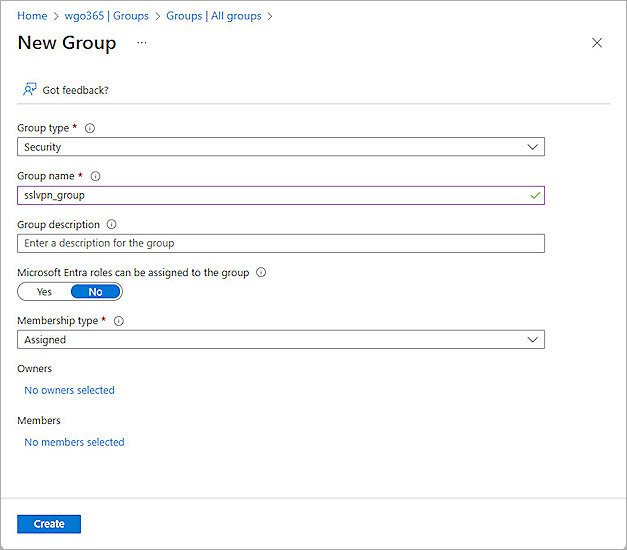
- Click New Group.
The New Group page opens. - From the Group Type drop-down list, select Security.
- In the Group Name text box, type a descriptive group name. For our example, we type sslvpn_group.
- From the Membership Type drop-down list, select Assigned.
- Keep the default values for all other settings.
- Click Create.
To create a user in Microsoft Entra ID:
- Log in to the Azure portal with your Microsoft Azure account credentials.
- Click Microsoft Entra ID.
- From the navigation menu, select Manage > Users.
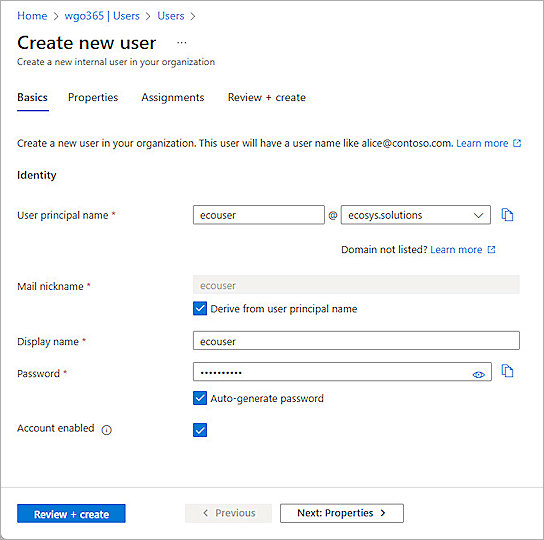
- Select New User > Create New User.
The Create New User page opens. - From the Basics tab, enter the user information.
- From the Assignments tab, to assign the user to the group you created, click Add Group.
- Click Review + Create.
- Click Create.

Configure a SAML Application
To configure a SAML application in Microsoft Entra ID:
- Log in to the Azure portal with your Microsoft Azure account credentials.
- Click Microsoft Entra ID.
- From the navigation menu, select Manage > Enterprise applications.
- Click New Application.
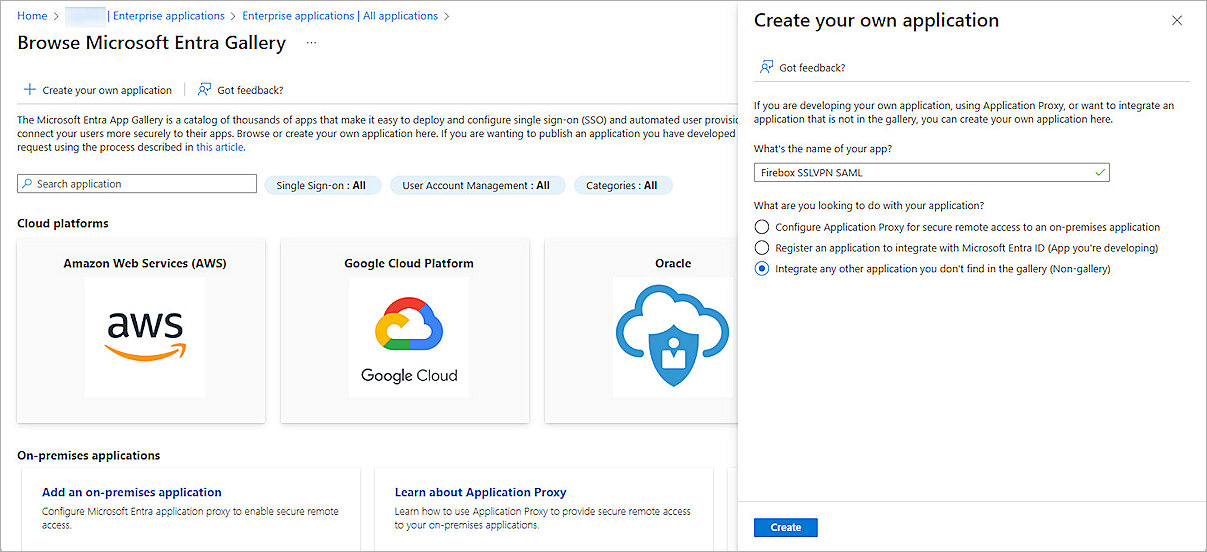
- Click Create Your Own Application.
The Create Your Own Application page opens. - In the What's the name of your app? text box, type a descriptive name. For our example, we type Firebox SSLVPN SAML.
- For What are you looking to do with your application?, select Integrate any other application you don't find in the gallery (Non-gallery).
- Click Create.
- From the navigation menu, select Manage > User and Groups.
- Click Add User/Group.
- From Users and Groups, click None Selected.
The options to select users and groups open. - To assign users and groups to this application, search and select the group you created in the Create a Microsoft Entra ID Group and User section. In our example, we select sslvpn_group.
- Click Select.
- Click Assign.
The group gets assigned to your application. - From the navigation menu, select Single Sign-On.
- For Select a Single Sign-On Method, select SAML.
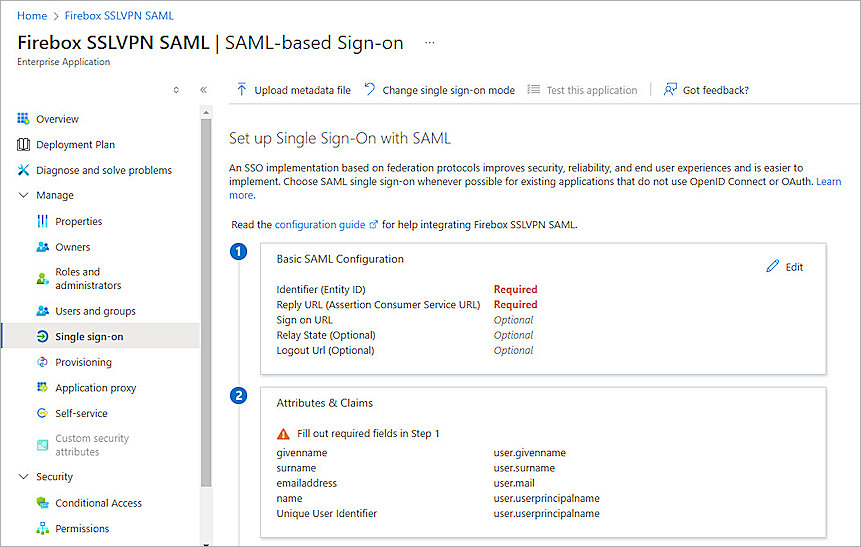
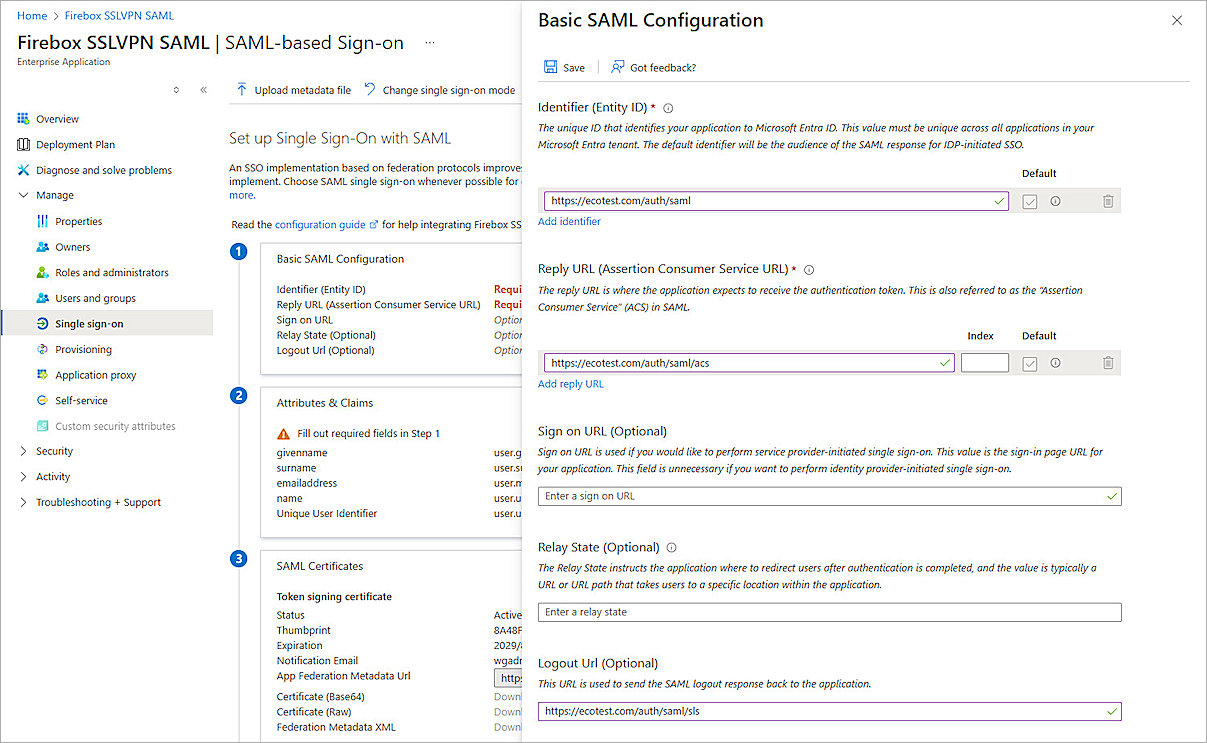
The Set Up Single Sign-On with SAML page opens. - For the Basic SAML Configuration, click Edit.
The Basic SAML Configuration page opens. - Specify the values of these parameters that you copied in the Configure Firebox Mobile VPN with SSL section:
- Identifier (Entity ID) — Enter the SAML Entity ID in the format https://<your Firebox host name>/auth/saml.
- Reply URL (Assertion Consumer Service URl) — Enter the Assertion Consumer Service (ACS) URL in the format https://<your Firebox host name>/auth/saml/acs.
- Logout URL (Optional) — Enter the Single Logout Service (SLS) URL in the format https://<your Firebox host name>/auth/saml/sls.
- To close the Basic SAML Configuration page, click Save, then click
 .
. - In the Test Single Sign-On dialog box, click No, I'll Test Later.
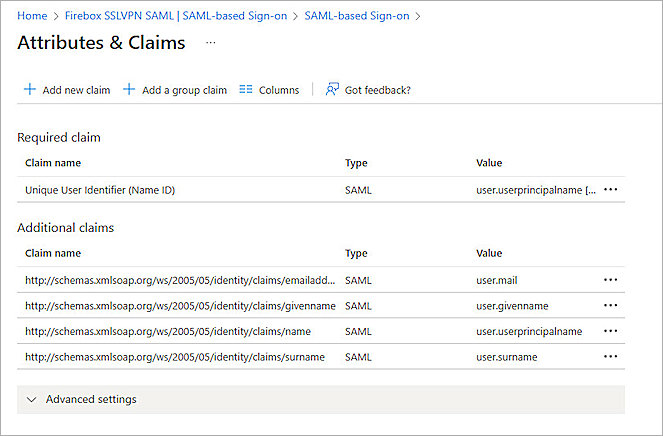
- In the Attributes & Claims section, click Edit.
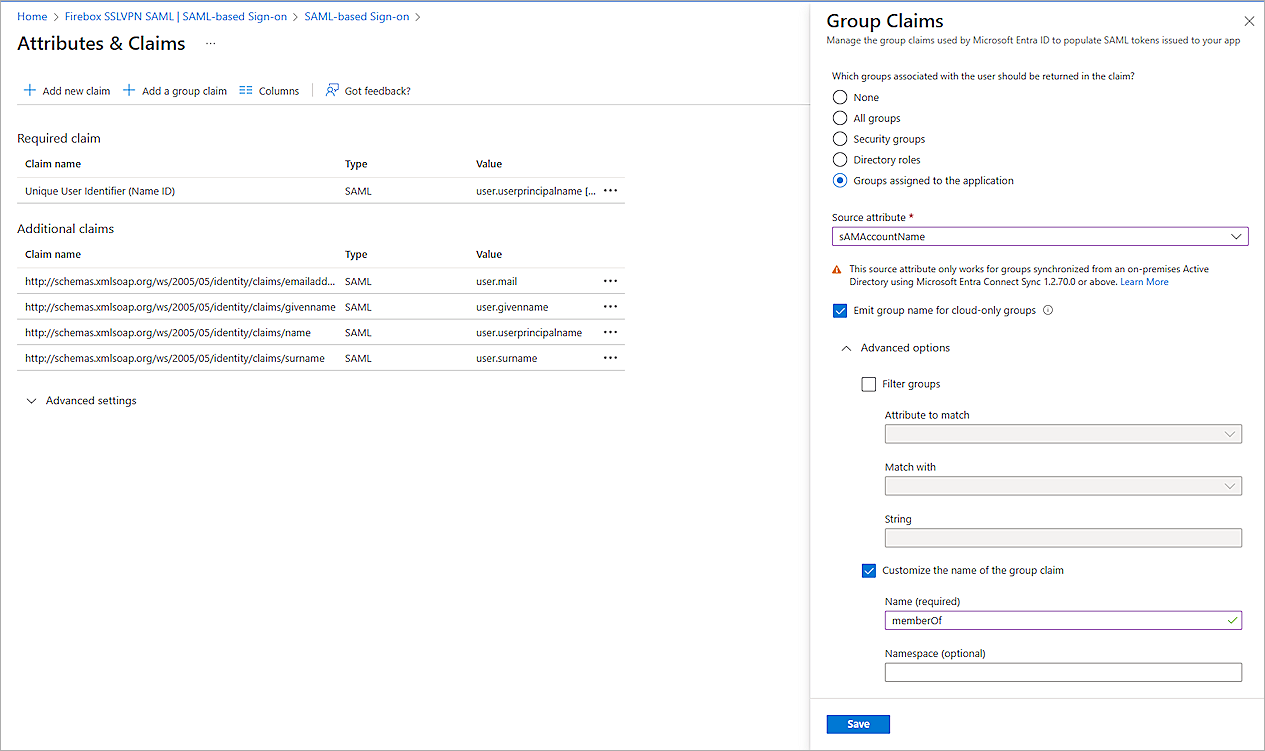
The Attributes and Claims page opens. - To configure the group authentication for Mobile VPN with SSL, click Add a Group Claim.
The Group Claims page opens. - For Which groups associated with the user should be returned in the claim?, select Groups Assigned to the Application.
- From the Source Attribute drop-down list, select one of these options:
- If only Entra ID cloud security groups are assigned to the SAML application, select Cloud-Only Group Display Names.
- If only on-premises AD security groups are assigned to the SAML application, select sAMAccountName and leave Emit Group Name for Cloud-Only Groups blank.
- If both on-premises Active Directory security groups and the Entra ID cloud security group are assigned to the SAML application, select sAMAccountName and select the Emit Group Name For Cloud-Only Groups check box. Select this option if you use AD connect or your on-premises AD is connected to your Microsoft Entra ID account.
- Expand the Advanced Options section, then select Customize the Name of the Group Claim.
- In the Name (required) text box, type memberOf.
- To close the Attributes & Claims page, click Save, then click .
- From the SAML Certificates section, copy the App Federation Metadata Url. You need this URL to complete the SAML authentication server configuration on the Firebox.
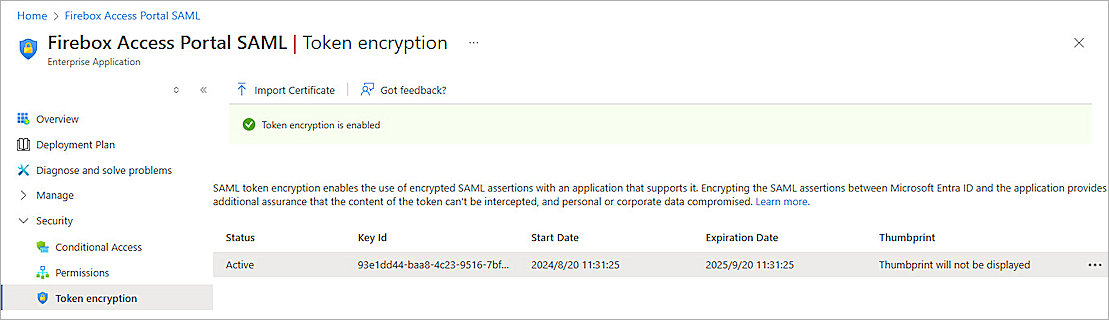
- From the left navigation, select Security > Token Encryption.
The Token Encryption page opens. - To upload the X.509 Certificate you downloaded in the Configure Firebox Mobile VPN with SSL section, click Import Certificate.
- Click
 for the certificate, then click Activate Token Encryption Certificate.
 - From the Activate Token Encryption Certificate dialog box, click Yes.


Complete Locally-Managed Firebox SAML Authentication Server Setup
To complete the SAML authentication server setup, from Fireware Web UI:
- Log in to Fireware Web UI at: https://<your Firebox IP address>:8080
- From the navigation menu, select Authentication > Servers.
- Select SAML.
The SAML settings open. - In the IdP Metadata URL text box, paste the value of the App Federation Metadata Url parameter you copied from the Configure a SAML Application.
- Click Save.
Complete Locally-managed Firebox Mobile VPN with SSL Setup
To complete the Mobile VPN with SSL setup, from Fireware Web UI:
- Log in to Fireware Web UI at: https://<your Firebox IP address>:8080
- From the navigation menu, select Authentication > Users and Groups.
- Click Add.
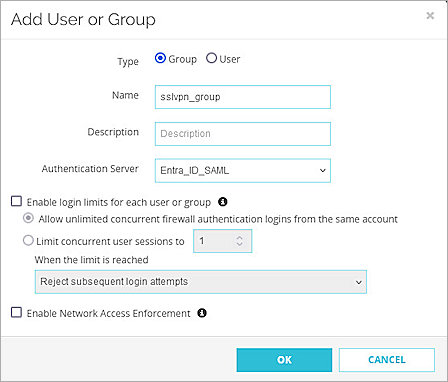
The Add User or Group page opens. - For Type, select Group.
- In the Name text box, type a name for the group. You must type the same group name you created in the Create a Microsoft Entra ID Group and User section.
- From the Authentication Server drop-down list, select the authentication server where the user or group exists.
- Click OK.
- Click Save.
- From the navigation menu, select VPN > Mobile VPN.
- From the SSL section, click Configure.
- Select the Authentication tab.
The Authentication Server Settings open. - From the Users and Groups section, select the groups or users you created. In this example, we select the sslvpn_group group.
- Click Save.
You can add a user for user authentication or a group for group authentication. In our example, we add a group for group authentication. If you want to add a user, the user name must be same as you created in the Create a Microsoft Entra ID Group and User section.
To test the integration of Entra ID SAML authentication with the Mobile VPN with SSL client:
- Open the Mobile VPN with SSL client.
- In the Server text box, type the FQDN that resolves to the Firebox external interface.
- Select the Use SAML Authentication check box.
- Click Connect.
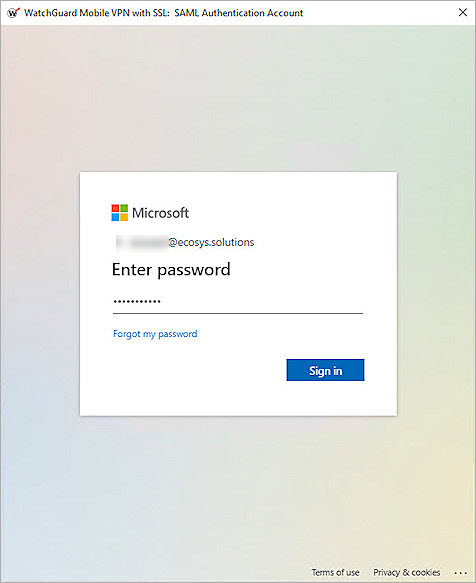
- On the Microsoft Sign in page, type the Microsoft Entra ID user name, then click Next.
- Type the Microsoft Entra ID password for the user, then click Sign In.
- To stay signed in, click Yes.

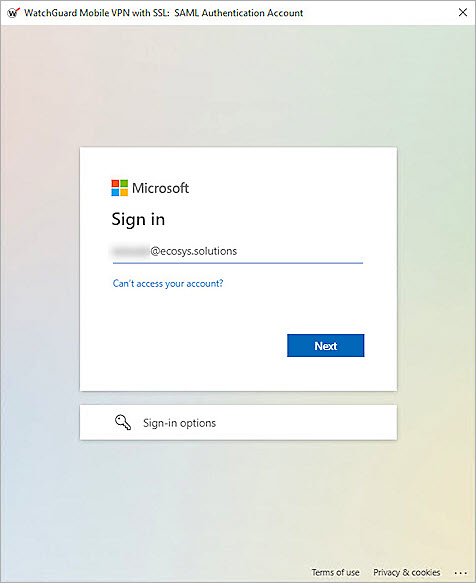
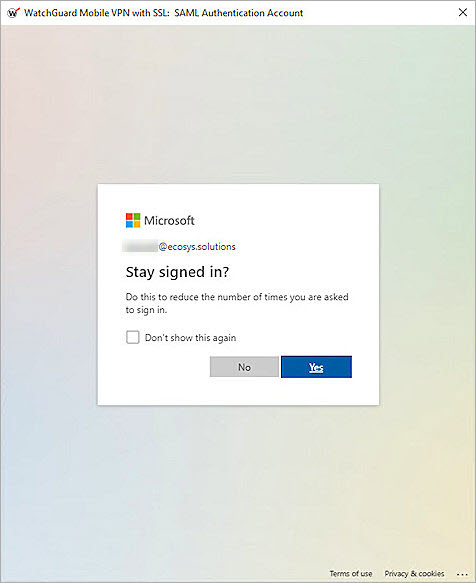
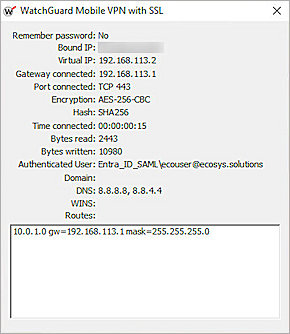
After a successful authentication, you connect to the VPN.
Enable the Cloud-Managed Firebox SAML Authentication Server
- Log in to WatchGuard Cloud.
If you log in with a Service Provider account, you must select a Subscriber account from the Account Manager. - From the top navigation, select Configure > Devices
- From the device list under the subscriber, select the could-managed device you want to configure.
- In the Devices tab, select Device Configuration.
- In the Device Configuration page, select Authentication > Domains.
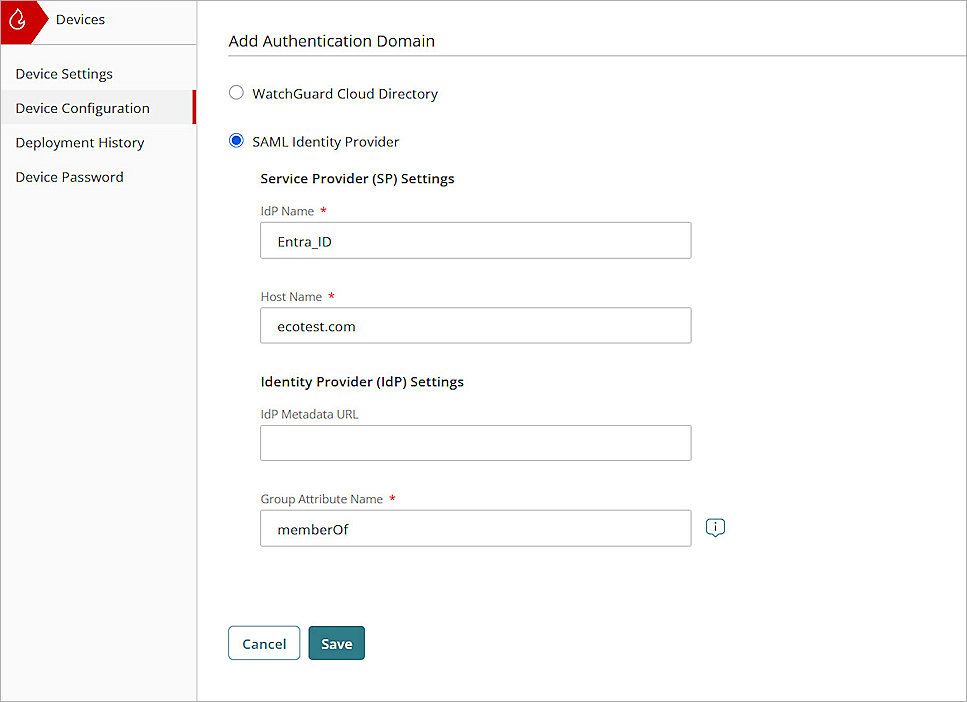
The Authentication Domains configuration page opens. - Click Add Authentication Domain.
- Select SAML Identity Provider.
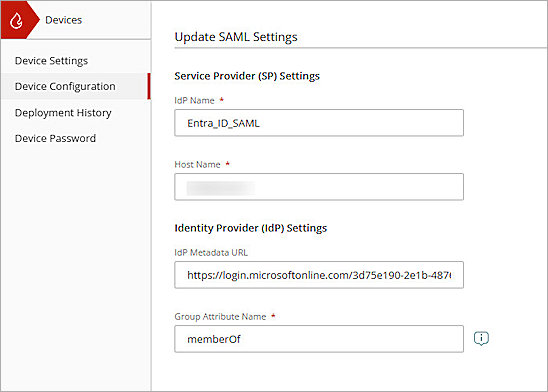
- In the IdP Name text box, type the name of your IdP.
This name appears on the login pages of the Firebox as the authentication server name. - In the Host Name text box, type an FQDN that resolves to the Firebox external interface.
- Keep the IdP Metadata URL text box blank for now. You must complete the steps in the next section before you can get the IdP Metadata URL from your IdP administrator.
- Click Save.
- Click Done.
- Click Back.
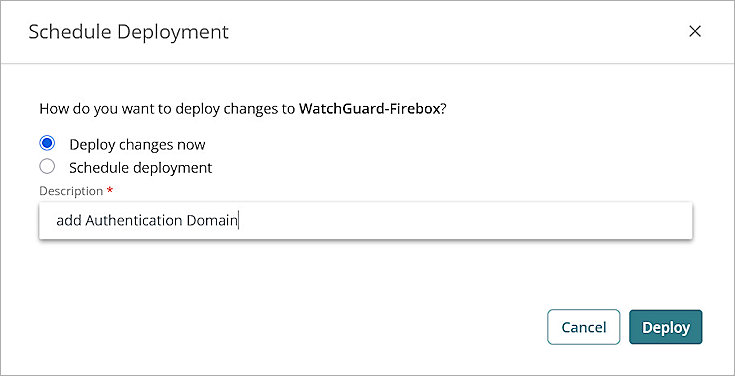
- Click Schedule Deployment to deploy the configuration from cloud to the firebox.
- Select Deploy changes now.
- Add description for the deployment.
- Click Deploy.
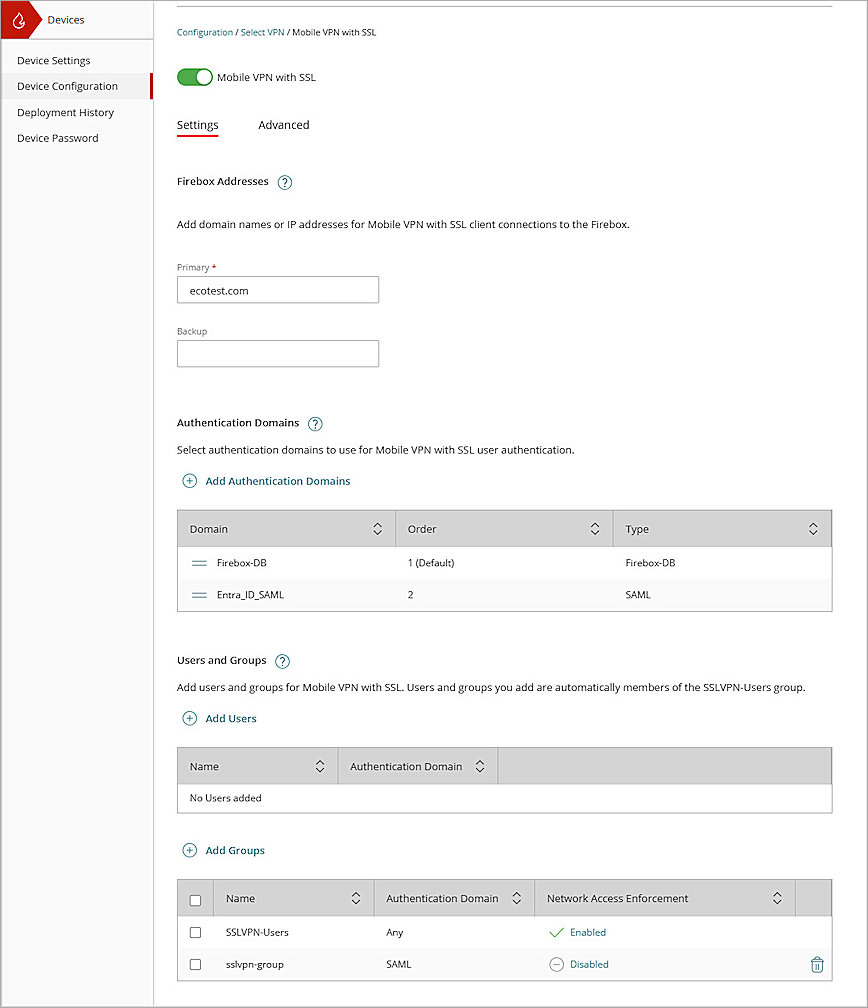
Configure the Cloud-Managed Firebox Mobile VPN with SSL
- Select VPN > Mobile VPN > SSL.
The Mobile VPN Configuration page opens. - Enable Mobile VPN with SSL
- In the Settings tab:
- In the Firebox Addresses section, in the Primary text box, type the domain name of the cloud-managed firebox.
- In the Authentication Domains section, click Add Authentication Domains
- Select the Authentication Domain we created previously.
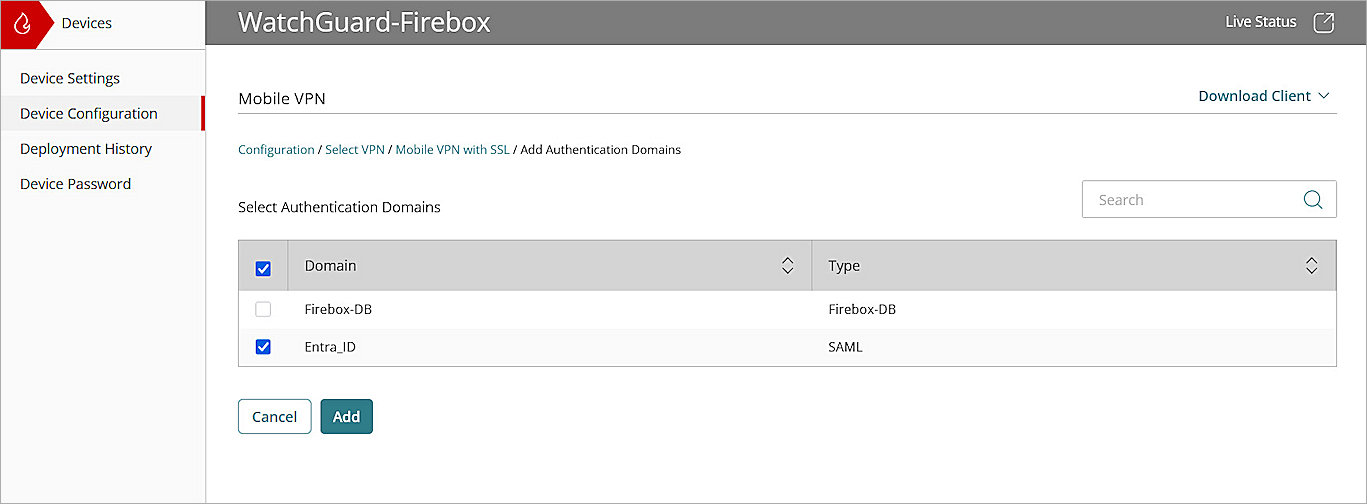
- Click Save.
- Click Done.
- Click Schedule Deployment to deploy the configuration from WatchGuard Cloud to cloud-managed firebox.
- Select Authentication > Domains.
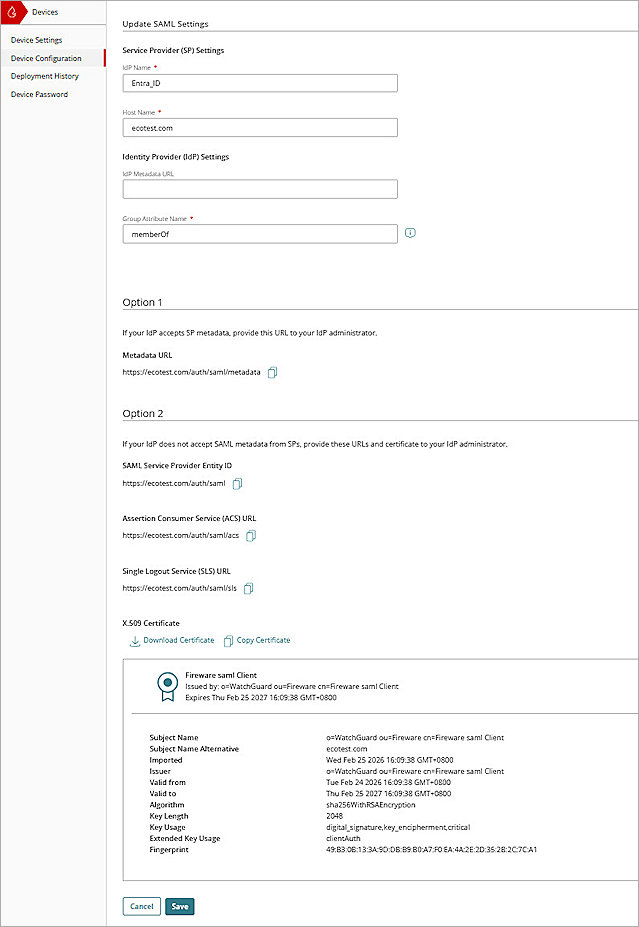
- Select the Authentication we created previously:
- In the Option 2 section, copy the values of SAML Service Provider Entity ID, Assertion Consumer Service (ACS) URL and Single Logout Service (SLS) URL for later use.
- In the Option 2 section, download the certificate for later use.
Configure Microsoft Entra ID
To configure Microsoft Entra ID, complete these steps:
Create a Microsoft Entra ID Group and User
If you already created users and groups in Microsoft Entra ID or synced on-premises users and groups to Microsoft Entra ID, you can skip the steps to create the group and user in Microsoft Entra ID and go to the Configure a SAML Application section.
To create a group in Microsoft Entra ID:
- Log in to the Azure portal with your Microsoft Azure account credentials.
- Click Microsoft Entra ID.
- From the navigation menu, select Manage > Groups.
- Click New Group.
The New Group page opens. - From the Group Type drop-down list, select Security.
- In the Group Name text box, type a descriptive group name. For our example, we type sslvpn_group.
- From the Membership Type drop-down list, select Assigned.
- Keep the default values for all other settings.
- Click Create.
To create a user in Microsoft Entra ID:
- Log in to the Azure portal with your Microsoft Azure account credentials.
- Click Microsoft Entra ID.
- From the navigation menu, select Manage > Users.
- Select New User > Create New User.
The Create New User page opens. - From the Basics tab, enter the user information.
- From the Assignments tab, to assign the user to the group you created, click Add Group.
- Click Review + Create.
- Click Create.
Configure a SAML Application
To configure a SAML application in Microsoft Entra ID:
- Log in to the Azure portal with your Microsoft Azure account credentials.
- Click Microsoft Entra ID.
- From the navigation menu, select Manage > Enterprise applications.
- Click New Application.
- Click Create Your Own Application.
The Create Your Own Application page opens. - In the What's the name of your app? text box, type a descriptive name. For our example, we type Firebox SSLVPN SAML.
- For What are you looking to do with your application?, select Integrate any other application you don't find in the gallery (Non-gallery).
- Click Create.
- From the navigation menu, select Manage > User and Groups.
- Click Add User/Group.
- From Users and Groups, click None Selected.
The options to select users and groups open. - To assign users and groups to this application, search and select the group you created in the Create a Microsoft Entra ID Group and User section. In our example, we select sslvpn_group.
- Click Select.
- Click Assign.
The group gets assigned to your application. - From the navigation menu, select Single Sign-On.
- For Select a Single Sign-On Method, select SAML.
The Set Up Single Sign-On with SAML page opens. - For the Basic SAML Configuration, click Edit.
The Basic SAML Configuration page opens. - Specify the values of these parameters that you copied in the Configure Firebox Mobile VPN with SSL section:
- Identifier (Entity ID) — Enter the SAML Entity ID in the format https://<your Firebox host name>/auth/saml.
- Reply URL (Assertion Consumer Service URl) — Enter the Assertion Consumer Service (ACS) URL in the format https://<your Firebox host name>/auth/saml/acs.
- Logout URL (Optional) — Enter the Single Logout Service (SLS) URL in the format https://<your Firebox host name>/auth/saml/sls.
- To close the Basic SAML Configuration page, click Save, then click .
- In the Test Single Sign-On dialog box, click No, I'll Test Later.
- In the Attributes & Claims section, click Edit.
The Attributes and Claims page opens. - To configure the group authentication for Mobile VPN with SSL, click Add a Group Claim.
The Group Claims page opens. - For Which groups associated with the user should be returned in the claim?, select Groups Assigned to the Application.
- From the Source Attribute drop-down list, select one of these options:
- If only Entra ID cloud security groups are assigned to the SAML application, select Cloud-Only Group Display Names.
- If only on-premises AD security groups are assigned to the SAML application, select sAMAccountName and leave Emit Group Name for Cloud-Only Groups blank.
- If both on-premises Active Directory security groups and the Entra ID cloud security group are assigned to the SAML application, select sAMAccountName and select the Emit Group Name For Cloud-Only Groups check box. Select this option if you use AD connect or your on-premises AD is connected to your Microsoft Entra ID account.
- Expand the Advanced Options section, then select Customize the Name of the Group Claim.
- In the Name (required) text box, type memberOf.
- To close the Attributes & Claims page, click Save, then click .
- From the SAML Certificates section, copy the App Federation Metadata Url. You need this URL to complete the SAML authentication server configuration on the Firebox.
- From the left navigation, select Security > Token Encryption.
The Token Encryption page opens. - To upload the X.509 Certificate you downloaded in the Configure Firebox Mobile VPN with SSL section, click Import Certificate.
- Click for the certificate, then click Activate Token Encryption Certificate.
- From the Activate Token Encryption Certificate dialog box, click Yes.
Complete Cloud-Managed Firebox Authentication Domains Setup
- Log in to WatchGuard Cloud.
If you log in with a Service Provider account, you must select a Subscriber account from the Account Manager. - From the top navigation, select Configure > Devices
- From the device list under the subscriber, select the could-managed device you want to configure.
- In the Devices tab, select Device Configuration.
- In the Device Configuration page, select Authentication > Domains.
- Select the Authentication Domain we created previously.
- In the IdP Metadata URL text box, paste the value of the App Federation Metadata Url parameter you copied from the Configure a SAML Application.
- Click Save.
- Click Schedule Deployment to deploy the configuration from WatchGuard Cloud to cloud-managed firebox.
Complete Cloud-managed Firebox Mobile VPN with SSL Setup
- Log in to WatchGuard Cloud.
If you log in with a Service Provider account, you must select a Subscriber account from the Account Manager. - From the top navigation, select Configure > Devices
- From the device list under the subscriber, select the could-managed device you want to configure.
- In the Devices tab, select Device Configuration.
- In the Device Configuration page, select VPN > Mobile VPN > SSL.
- In the Users and Groups section, click Add Groups.
- Select the group you created previously.
- Click Save.
- Click Schedule Deployment to deploy the configuration from WatchGuard Cloud to cloud-managed firebox.
Test the Integration
To test the integration of Entra ID SAML authentication with the Mobile VPN with SSL client:
- Open the Mobile VPN with SSL client.
- In the Server text box, type the FQDN that resolves to the Firebox external interface.
- Select the Use SAML Authentication check box.
- Click Connect.
- On the Microsoft Sign in page, type the Microsoft Entra ID user name, then click Next.
- Type the Microsoft Entra ID password for the user, then click Sign In.
- To stay signed in, click Yes.
After a successful authentication, you connect to the VPN.