Deployment Overview
This integration guide describes how to configure a BOVPN virtual interface tunnel between a WatchGuard Firebox and Google Cloud Platform.
- This integration guide describes three methods to configure a BOVPN on a Firebox. The methods are equivalent and independent. You can use any one of these methods.
- Fireware Web UI
- WatchGuard System Manager (WSM)
- Cloud-Managed Firebox
WatchGuard provides integration instructions to help our customers configure WatchGuard products to work with products created by other organizations. If you need more information or technical support about how to configure a third-party product, go to the documentation and support resources for that product.
Integration Summary
The hardware and software in this guide include:
- WatchGuard Firebox
- Fireware v12.11.3
- WatchGuard System Manager (WSM)
- 2025.1.0
- WatchGuard Cloud Platform
- Google Cloud Platform
Additional charges might apply for the use of the Google Cloud platform.
Topology
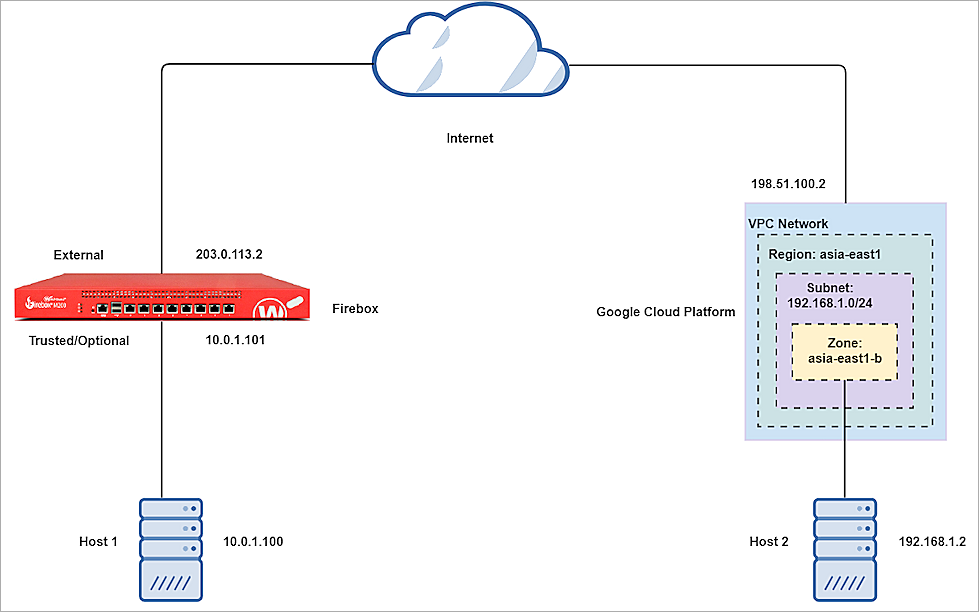
This diagram shows the topology for a BOVPN virtual interface connection between a Firebox and Google Cloud Platform.
Configure the Firebox (WebUI)
To configure a BOVPN virtual interface connection on the Firebox:
- Log in to Fireware Web UI.
- Select VPN > BOVPN Virtual Interfaces.
- Click Add.
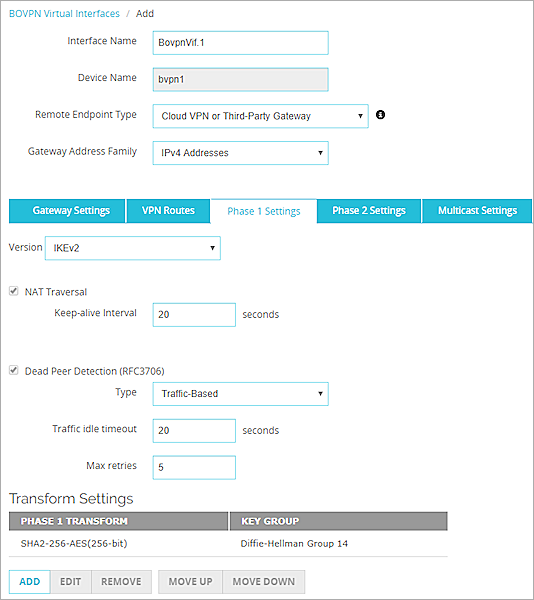
The BOVPN Virtual Interfaces page opens. - In the Interface Name text box, type a name to identify this BOVPN virtual interface.
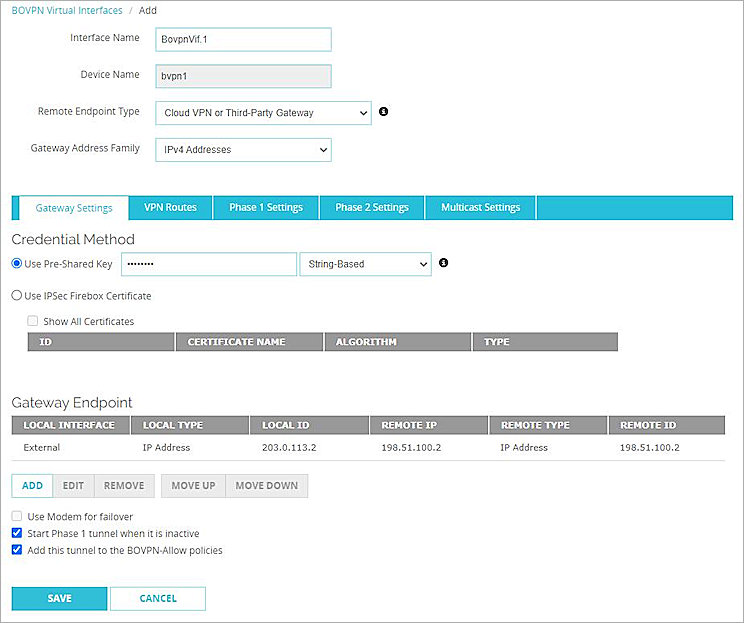
- From the Remote Endpoint Type drop-down list, select Cloud VPN or Third-Party Gateway.
- From the Gateway Address Family drop-down list, select IPv4 Addresses.
- In the Credential Method section, select Use Pre-Shared Key.
- In the adjacent text box, type the pre-shared key.
- Keep the default String-Based setting.
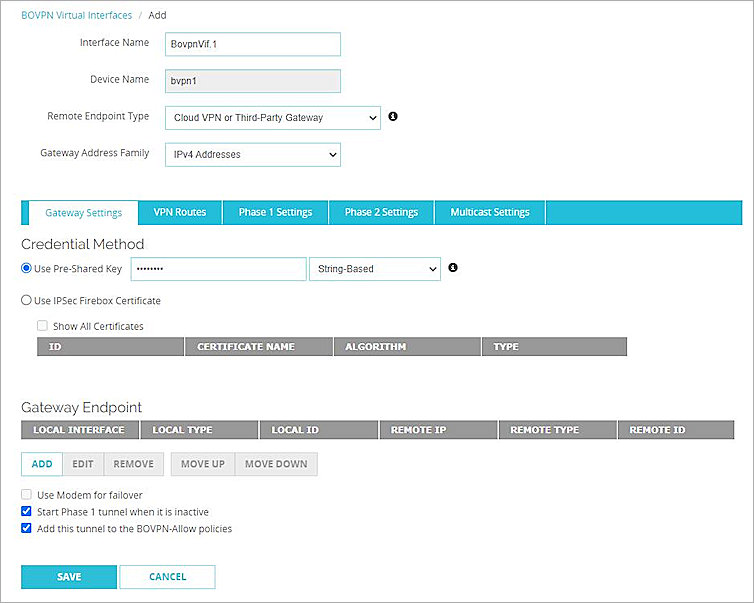
- In the Gateway Endpoint section, click Add.
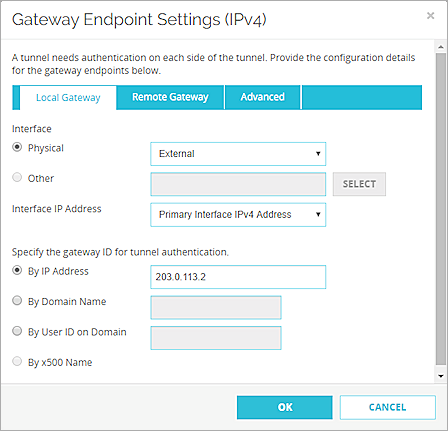
The Gateway Endpoint Settings dialog box opens. - From the Physical drop-down list, select External.
- From the Interface IP Address drop-down list, select Primary Interface IPv4 Address.
The primary interface IP address is the primary IP address you configured on the selected external interface. - Select By IP Address.
- In the adjacent text box, type the primary IP address of the external Firebox interface.
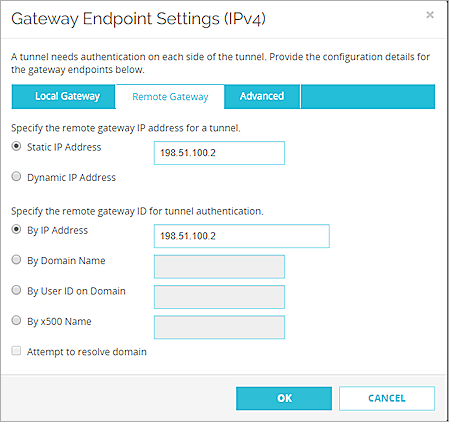
- Select the Remote Gateway tab.
- Select Static IP Address.
- In the adjacent text box, type the external IP address of your Google Cloud connection.
- Select By IP Address.
- In the adjacent text box, type the external IP address of your Google Cloud connection.
- Click OK.
- In the Gateway Endpoint section, select Start Phase 1 Tunnel When It Is Inactive.
- Select Add This Tunnel to the BOVPN-Allow Policies.
Add VPN Routes
To configure VPN routes on the Firebox:
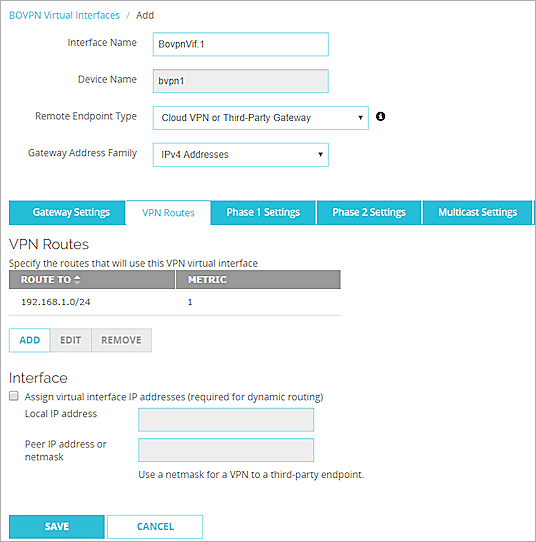
- Select the VPN Routes tab.
- In the VPN Routes section, click Add.
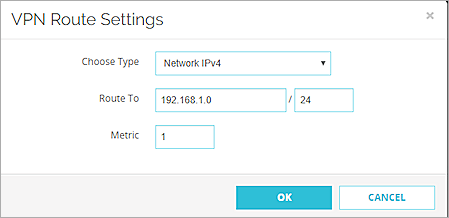
The VPN Route Settings dialog box opens. - From the Choose Type drop-down list, select an address type. In our example, we select Network IPv4.
- In the Route To text box, type the IP address of a route that uses this virtual interface.
- Click OK.
Configure Phase 1 Settings
To configure Phase 1 settings on the Firebox:
- Select the Phase 1 Settings tab.
- From the Version drop-down list, select IKEv2.
- For all other settings, keep the default values.
- Keep the default settings on the Phase 2 Settings tab.
- Click Save.
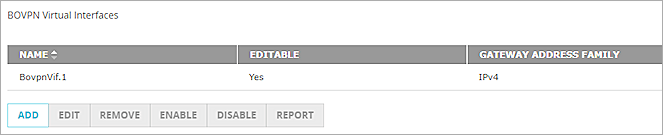
For more information about BOVPN virtual interface configuration on the Firebox, go to Configure a BOVPN Virtual Interface.
Configure the Firebox (WSM)
To configure a BOVPN virtual interface connection on the Firebox:
- Connect to the Firebox from WSM.
- Select Tools > Policy Manager.
- Select VPN > BOVPN Virtual Interfaces.
- Click Add.
The BOVPN Virtual Interface configuration page opens.
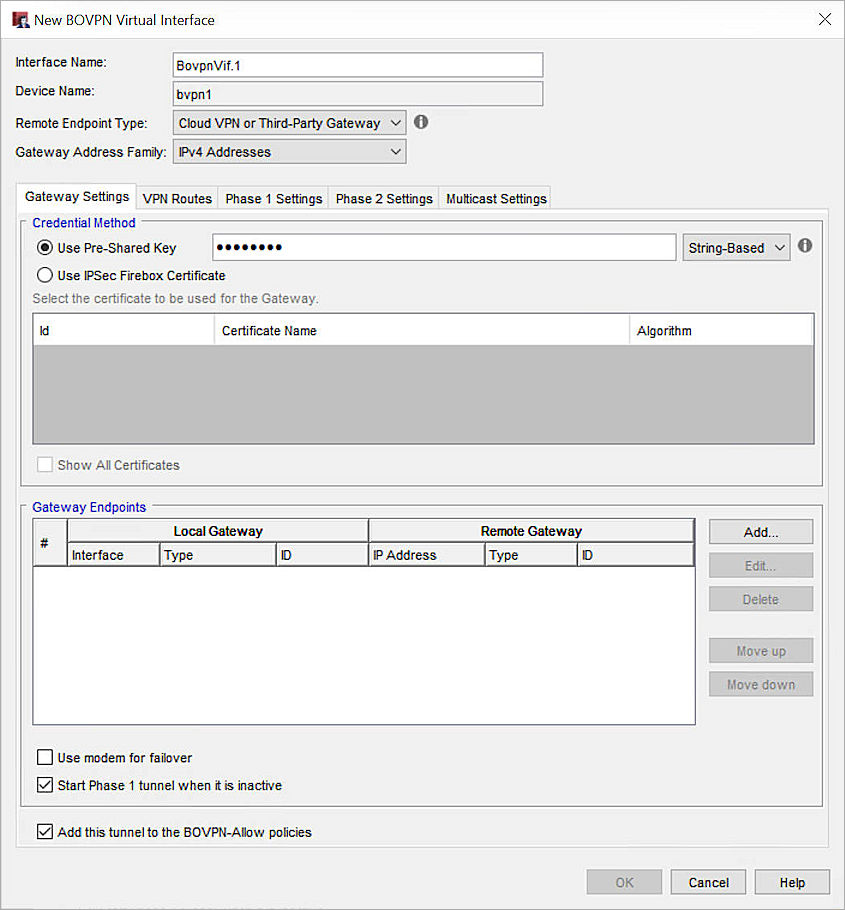
- In the Interface Name text box, type a name to identify this BOVPN virtual interface.
- From the Remote Endpoint Type drop-down list, select Cloud VPN or Third-Party Gateway.
- From the Gateway Address Family drop-down list, select IPv4 Addresses.
- In the Gateway Settings section, from the Credential Method section, select Use Pre-Shared Key.
- In the adjacent text box, type the pre-shared key.
- In the adjacent drop-down list, keep the default String-Based value.
- From the Gateway Endpoint section, click Add.
The Gateway Endpoint Settings dialog box opens.
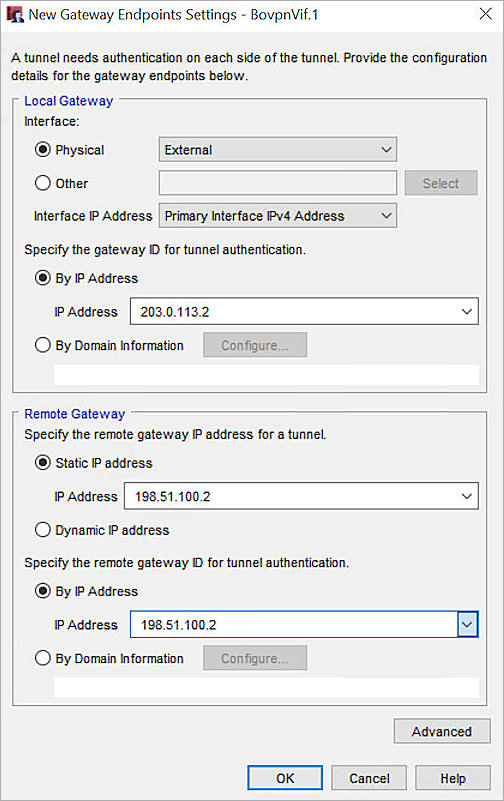
- In the Local Gateway area, from the Physical drop-down list, select External.
- From the Interface IP Address drop-down list, select Primary Interface IPv4 Address.
The Primary Interface IP Address is the primary IP address you configured on the selected external interface. - To specify the gateway ID for tunnel authentication, select By IP Address.
- In the adjacent text box, type the primary IP address of the external Firebox interface.
- In the Remote Gateway area, to specify the remote gateway IP address for a tunnel, select Static IP Address.
- In the adjacent text box, type the external IP address of your Google Cloud connection.
- To specify the remote gateway ID for tunnel authentication, select By IP Address.
- In the adjacent text box, type the external IP address of your Google Cloud connection.
- Keep the default values for all other options.
- Click OK.
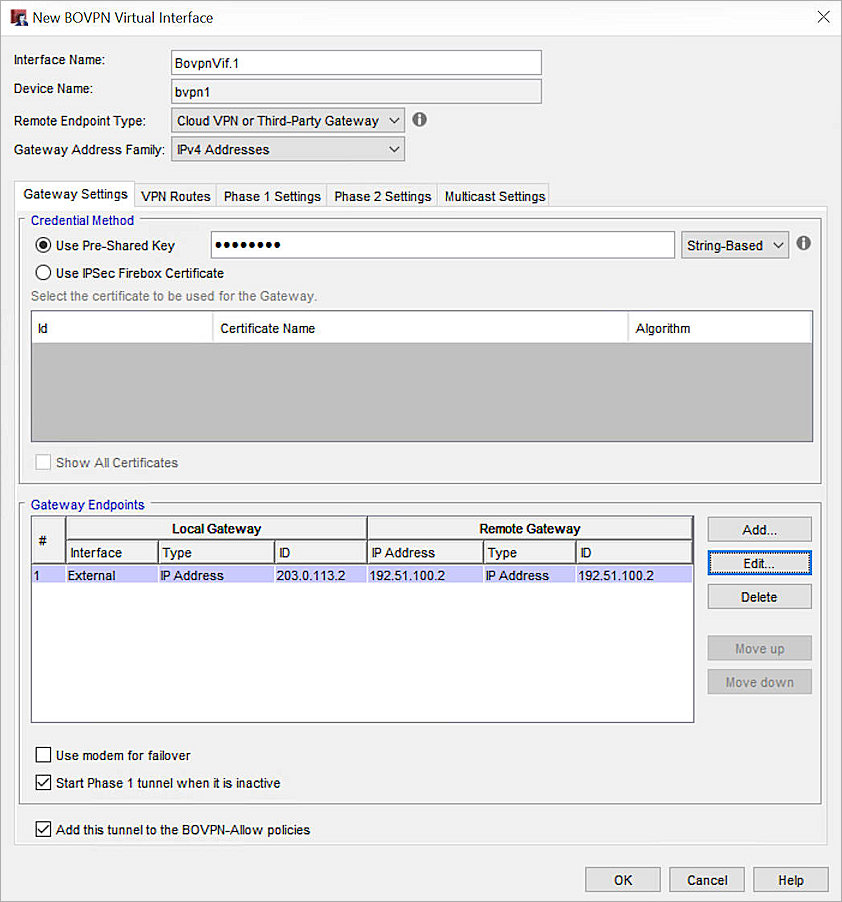
- Select the VPN Routes tab.
- Click Add.
The Add Route Settings dialog box opens.
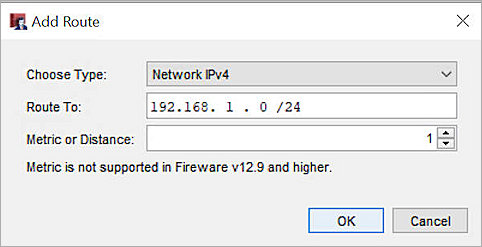
- From the Choose Type drop-down list, select Network IPv4.
- In the Route To text box, type the remote IP segment. This is the local network protected by Google Cloud.
- Keep the default values for all other options.
- Click OK.
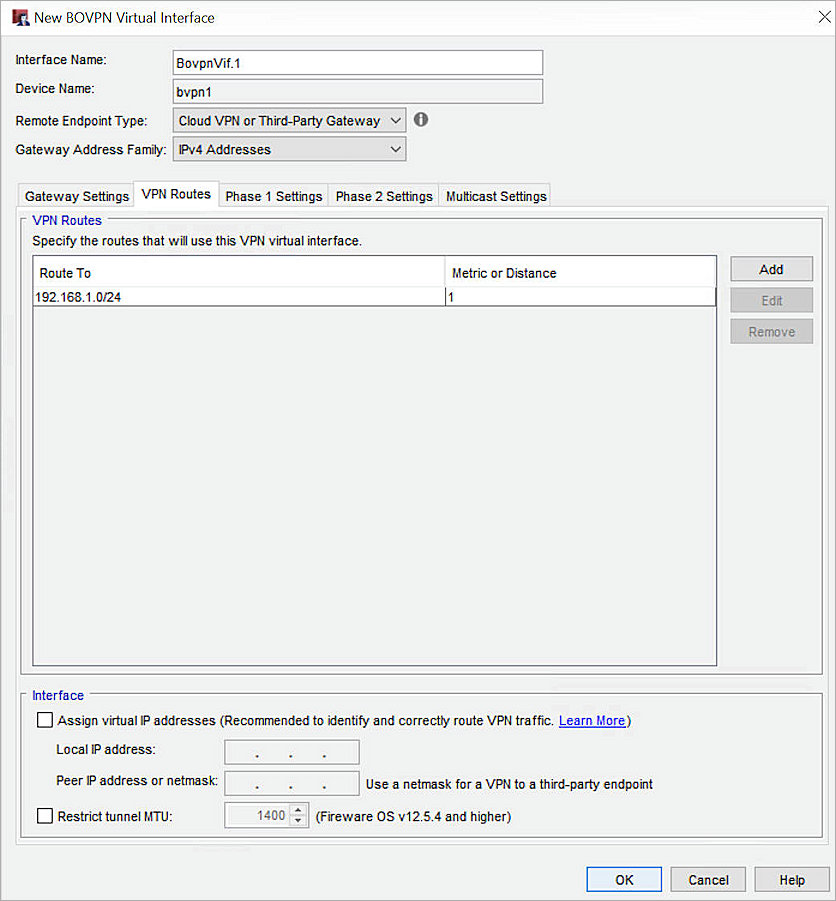
- Select the Phase 1 Settings tab.
- From the Version drop-down list, select IKEv2.
- Keep the default values for all other Phase 1 settings.
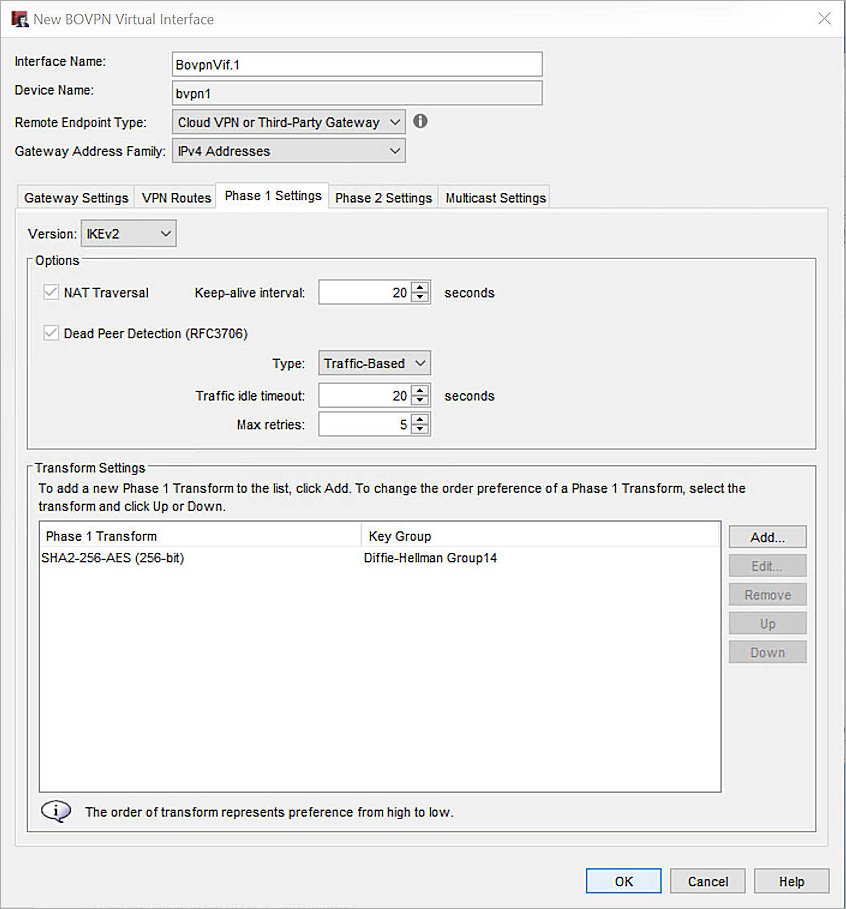
- Click OK.
- Keep the default values for the Phase 2 Settings tab.
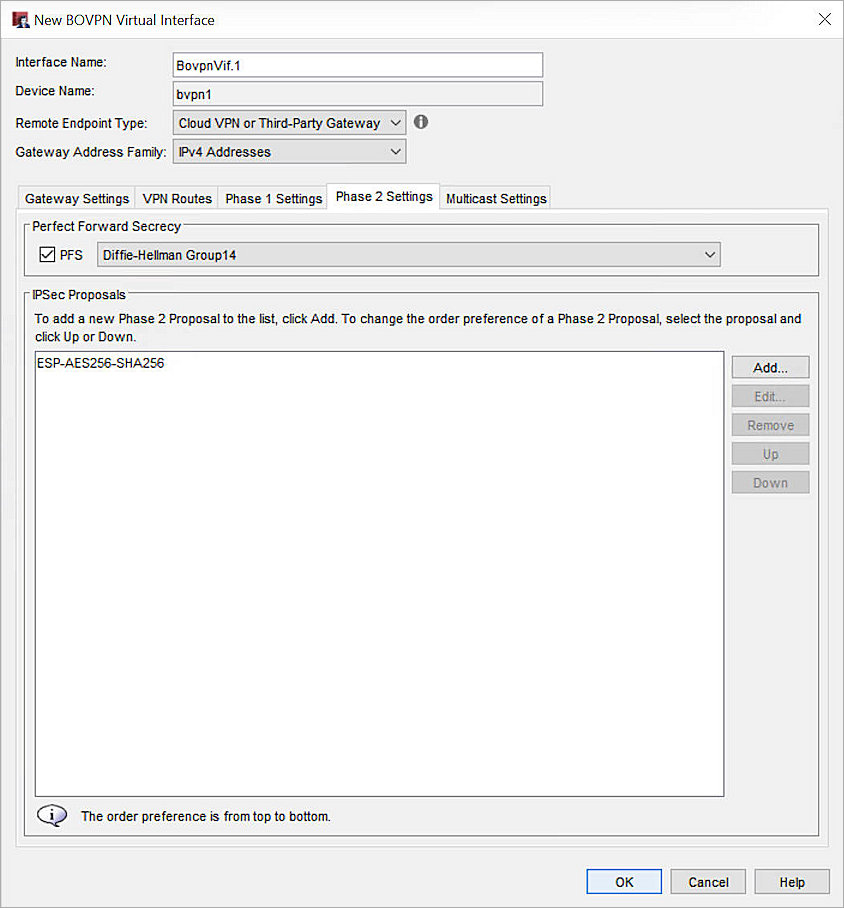
- Click OK.
- Click Close.
- Click Save to Firebox.
Configure The Firebox (Cloud-Managed)
To configure a BOVPN virtual interface connection on the cloud-managed Firebox:
- Log in to WatchGuard Cloud with your WatchGuard Cloud operator account credentials.
If you log in with a Service Provider account, you must select a Subscriber account from the Account Manager. - From the navigation menu, select Configure > Device Configuration > VPN.
- Click Branch Office VPN.
- Click Add BOVPN.
The Add BOVPN page opens.
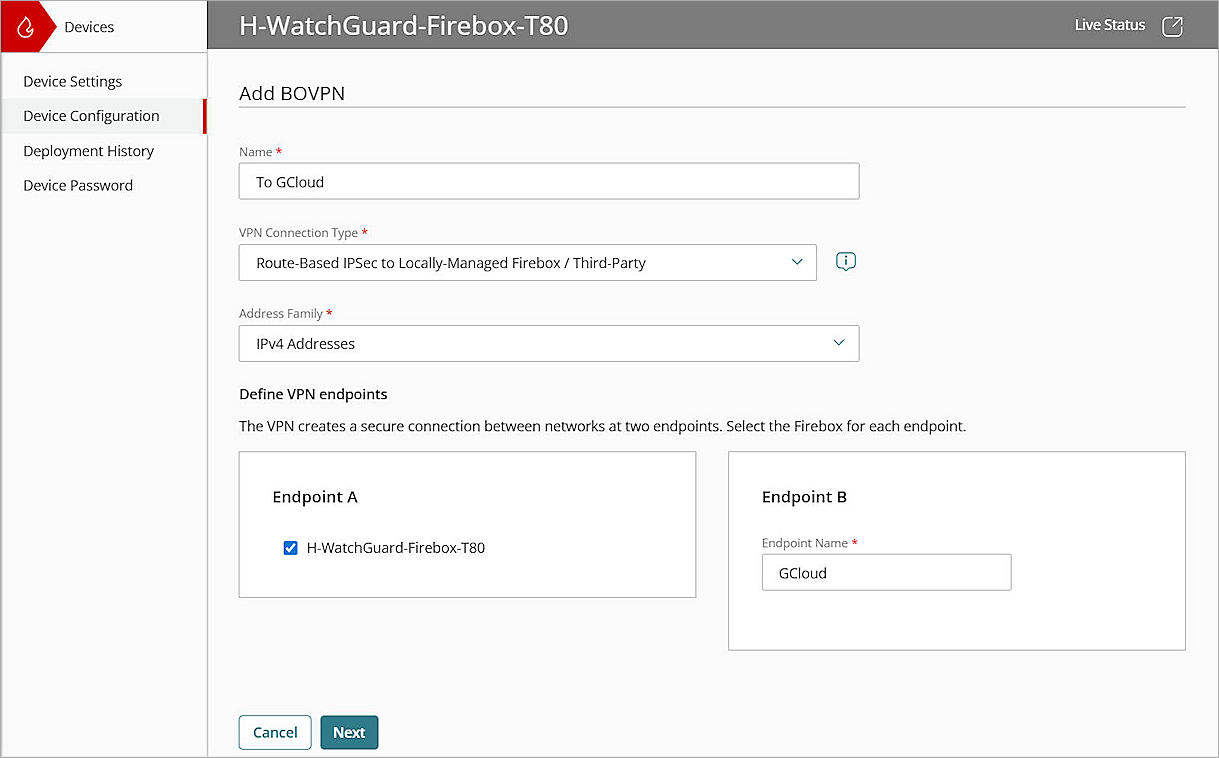
- In the Name text box, type a descriptive name.
- From the VPN Connection Type drop-down list, select Route-Based IPSec to Locally-Managed Firebox / Third-Party.
- From the Address Family drop-down list, select IPv4 Addresses.
- In the Endpoint A section, select your cloud-managed Firebox.
- In the Endpoint B section, in the Endpoint Name text box, type a name to identify the remote VPN endpoint. In our example, we use GCloud.
- Click Next.
The VPN Gateways page opens.
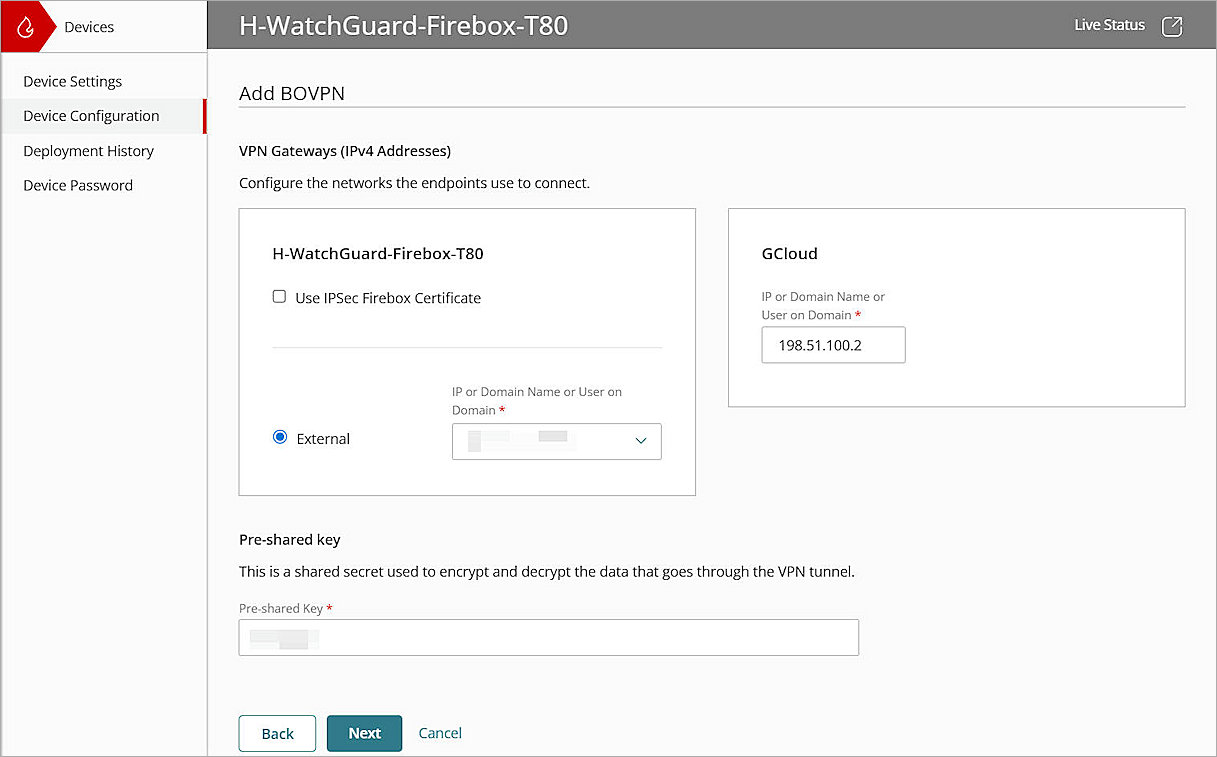
- In the VPN Gateways (IPv4 Addresses) section:
- For your cloud-managed Firebox, select the External network.
- For your GCloud connection, in the IP or Domain Name text box, type the external IP address of your Google Cloud connection.
- In the Pre-Shared Key text box, type the pre-shared key value.
- Click Next.
The Traffic page opens.
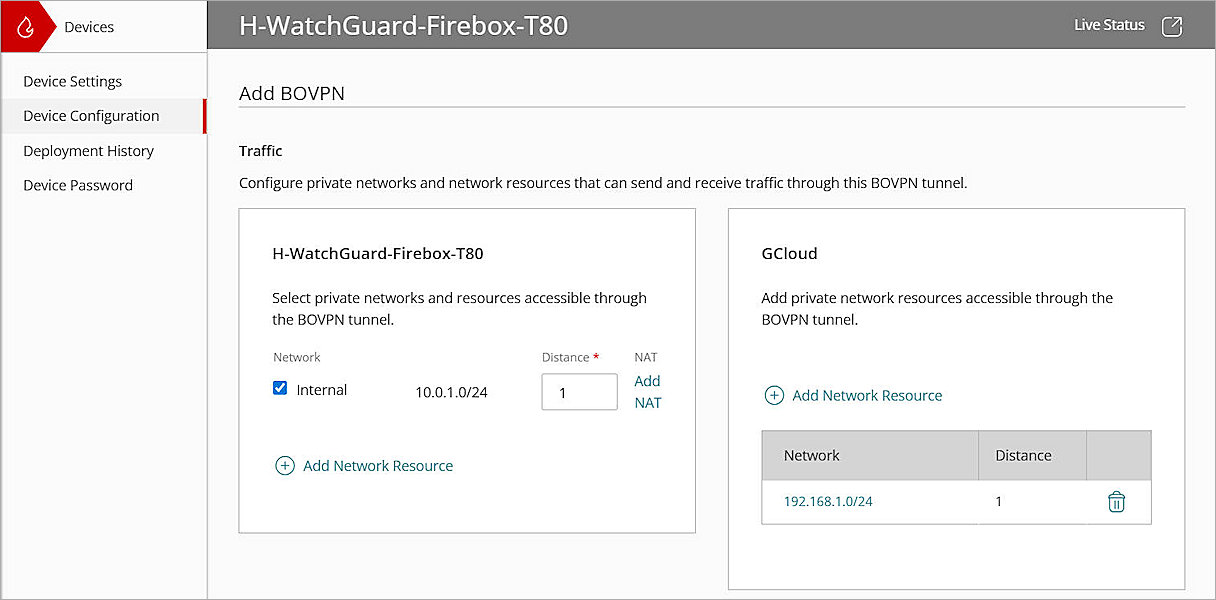
- For your cloud-managed Firebox, select the Internal network that you want to be accessible through the VPN tunnel.
- For your GCloud connection, click Add Network Resource.
- In the Network Resource text box, type the CIDR for your GCloud. In our example, we type 192.168.1.0/24.
- In the Distance text box, enter a number from 1 through 254.
Routes with lower metrics have higher priority. The default value is 1. If this is your second redundant VPN tunnel, type a higher number than the distance for the first VPN tunnel. - Click Add.
- Keep the default value for all other settings.
- Click Next.
The Security page opens.
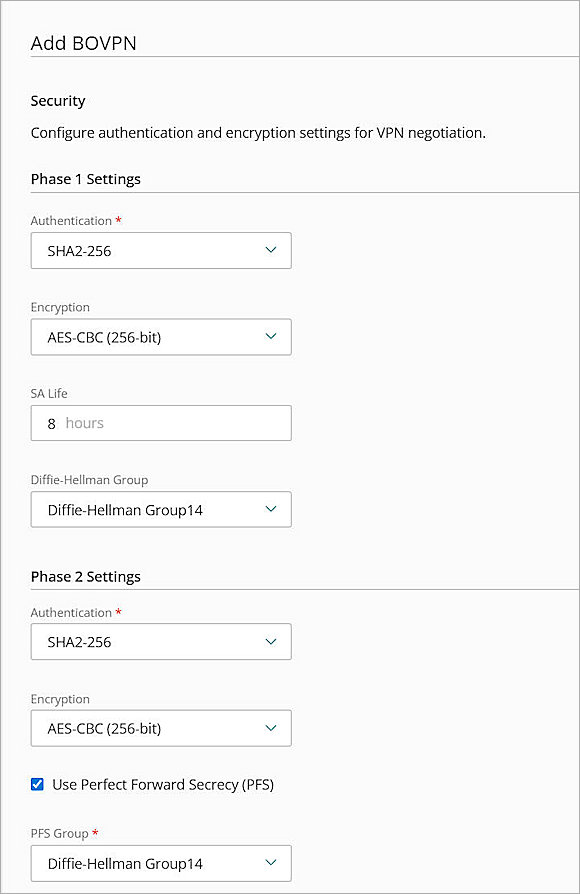
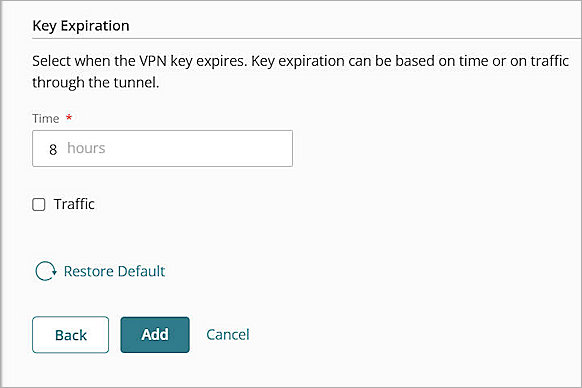
- In the Phase 1 Settings section:
- From the Authentication drop-down list, select SHA2-256.
- From the Encryption drop-down list, select AES-CBC (256-bit).
- In the SA Life text box, type 8.
- From the Diffie-Hellman Group drop-down list, select Diffie-Hellman Group 14.
- In the Phase 2 Settings section:
- From the Authentication drop-down list, select SHA2-256.
- From the Encryption drop-down list, select AES-CBC (256-bit).
- Select the Use Perfect Forward Secrecy (PFS) check box.
- From the PFS Group drop-down list, select Diffie-Hellman Group 14.
- Keep the default value for all other settings.
- Click Add.
- Click Finish.
When you add a BOVPN for a cloud-managed Firebox, WatchGuard Cloud immediately creates and deploys a configuration update for the cloud-managed Firebox.
For more information about BOVPN configuration for a cloud-managed Firebox, go to Manage BOVPNs for Cloud-Managed Fireboxes.
Configure the Google Cloud VPN
To configure the Google Cloud VPN:
- Log in to the Google Cloud Platform.
- Select a project or create a new one. In our example, we use GoogleCloudVPN.
- From the navigation menu, select VPC Network > VPC Networks.
- Click Continue
The Product Details page opens.
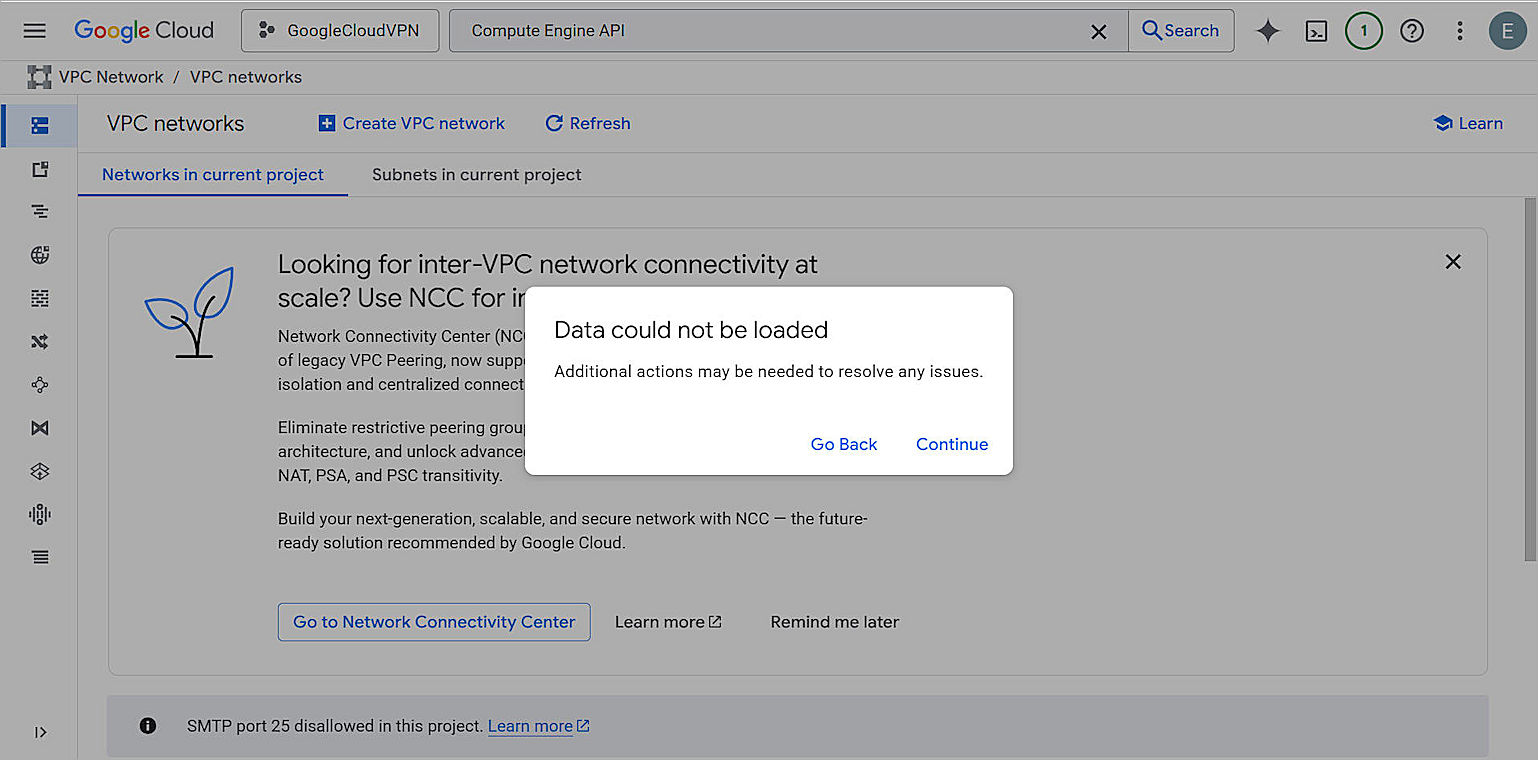
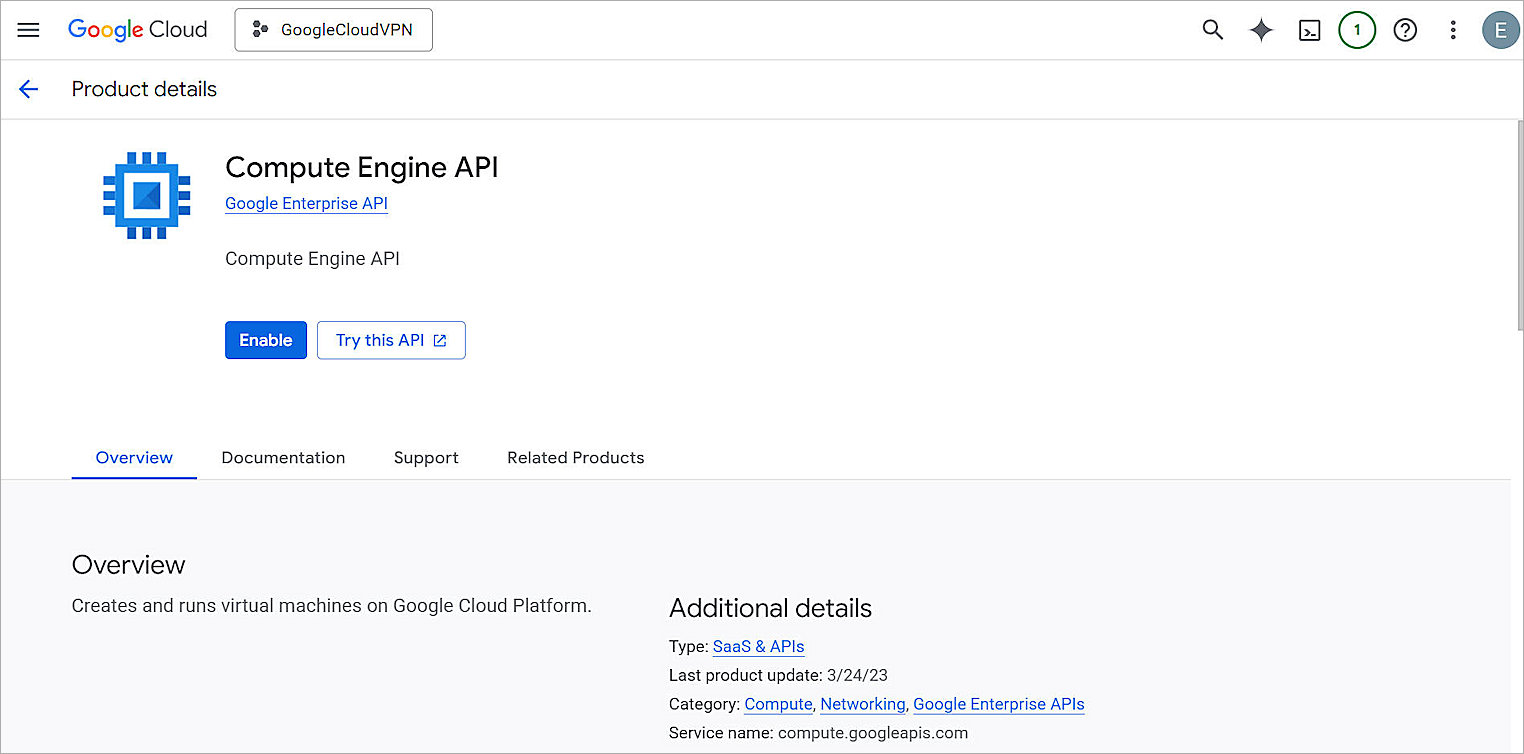
- Click Enable.
The VPC Networks page opens.
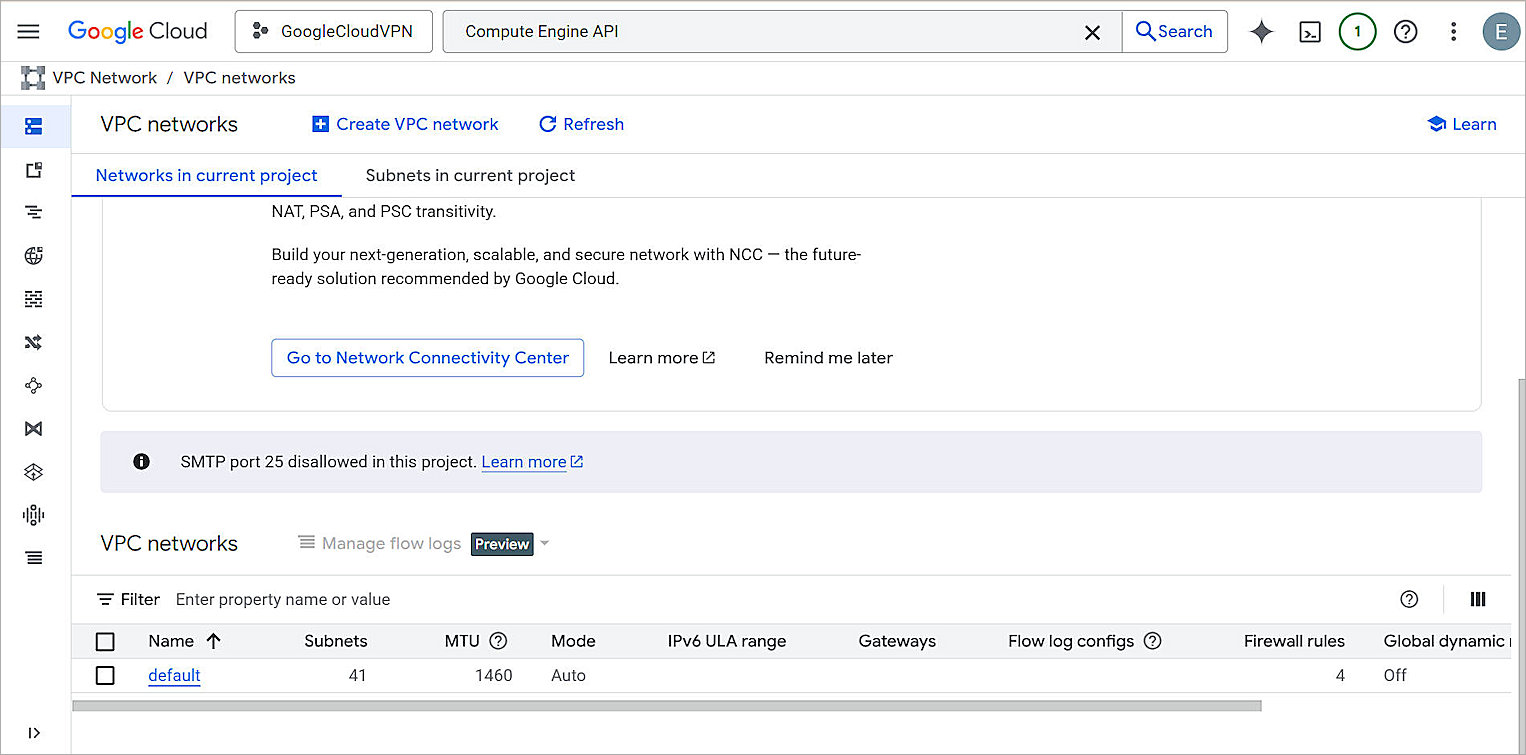
- Click Create VPC Network.
The Create a VPC Network page opens. - In the Name text box, type a name for the VPC network. In our example, we use cloud-vpc-network.
- In the Subnet Creation Mode section, select Custom.
- In the Subnets section, create a new subnet or edit the existing Subnet 1.
- In the New Subnet or Edit Subnet section, in the Name text box, type a name for the subnet. In our example, we use subnet-asia-east1-192-168-1.
- From the Region drop-down list, select the specific geographical location where you want to host your resources. In our example, we select Asia-East1.
- From IP stack type section, select IPv4 (single-stack).
- In the IPv4 Range text box, specify the IP address range for this subnet. In our example, we use 192.168.1.0/24.
- (Optional) For Flow Logs, select On.
- Click Done.
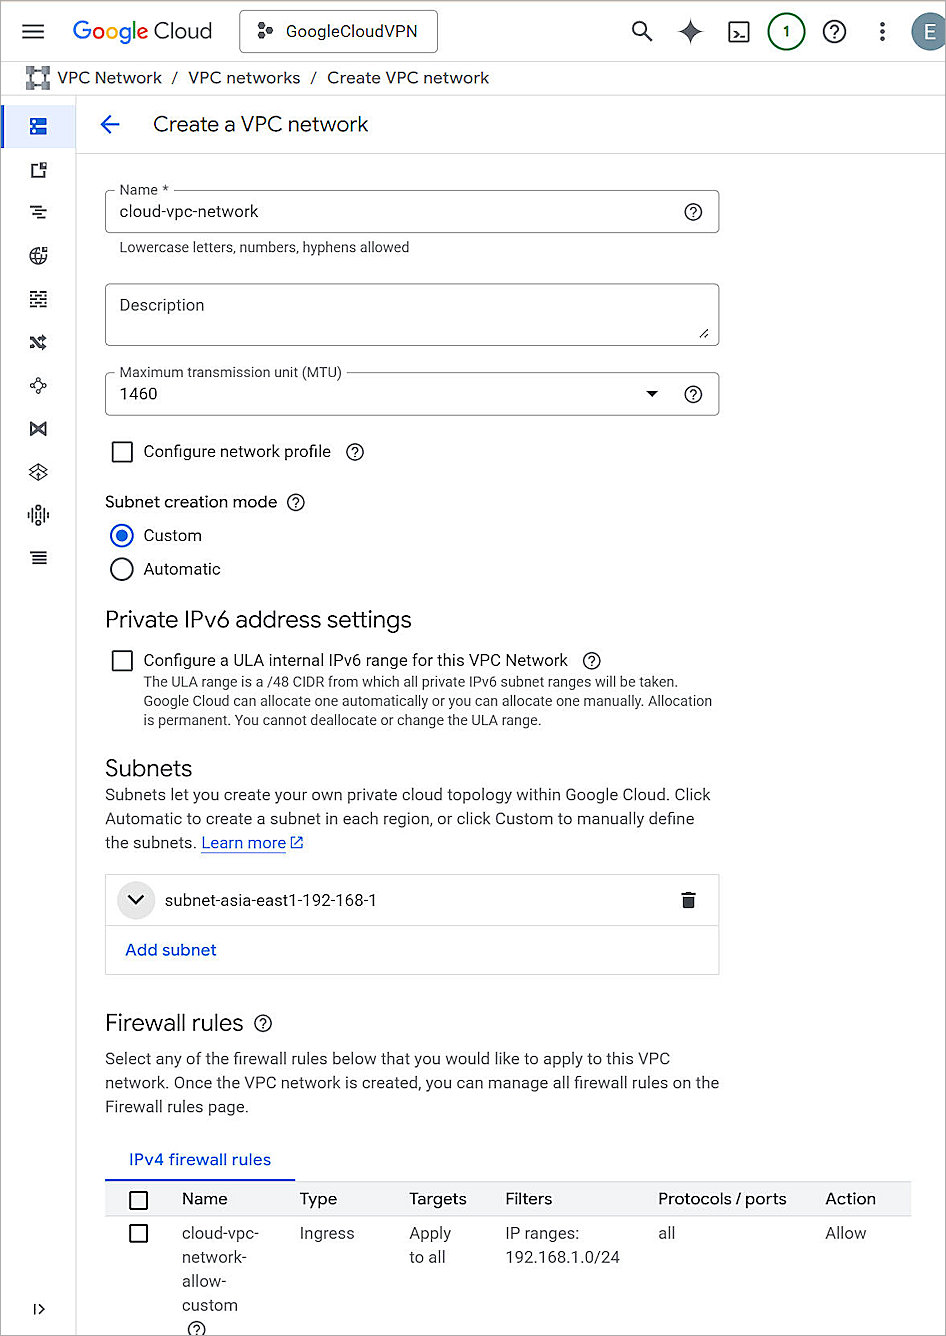
- Keep the default values for all other settings.
- Click Create.
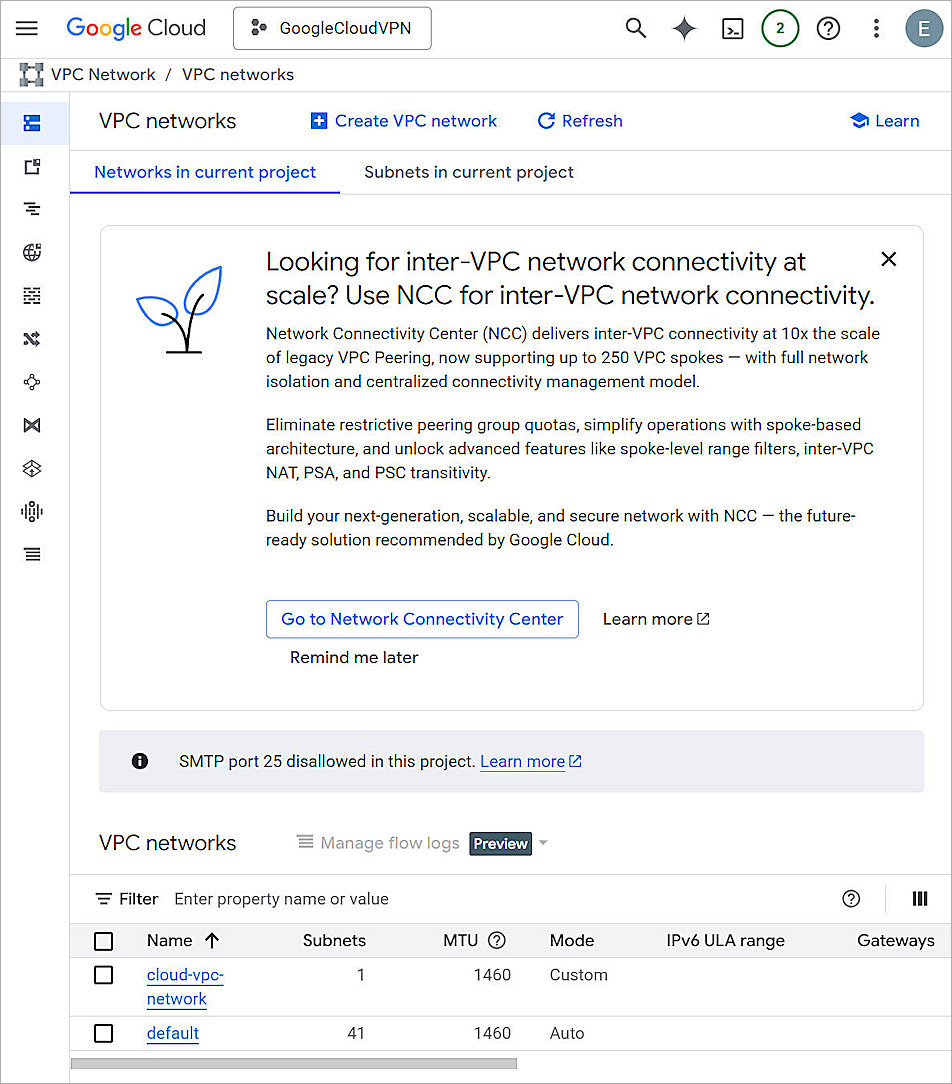
Reserve a Static Address
To reserve a static address:
- From the navigation menu, select VPC Network > IP Addresses.
The IP Addresses page opens.
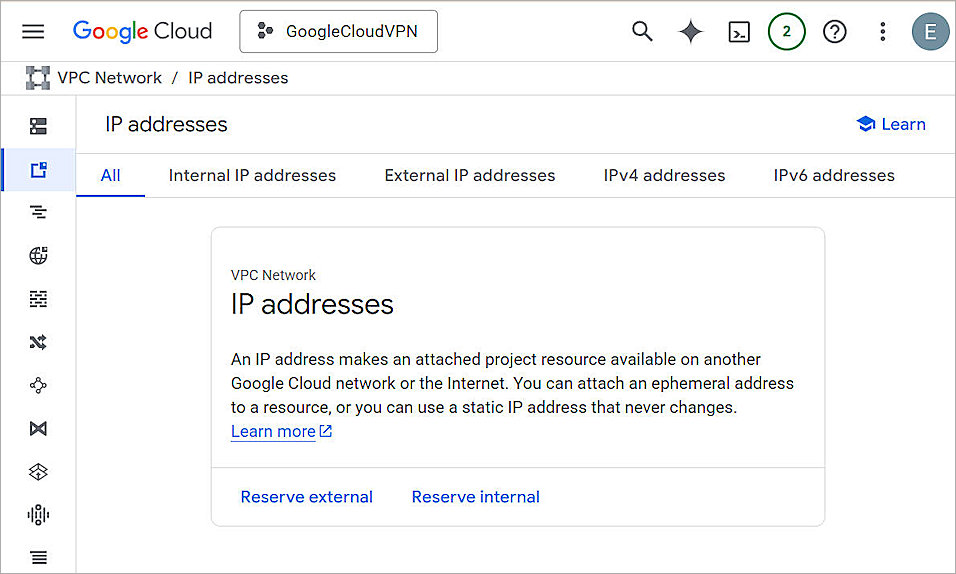
- Click Reserve External.
The Reserve External Static IP Address page opens.
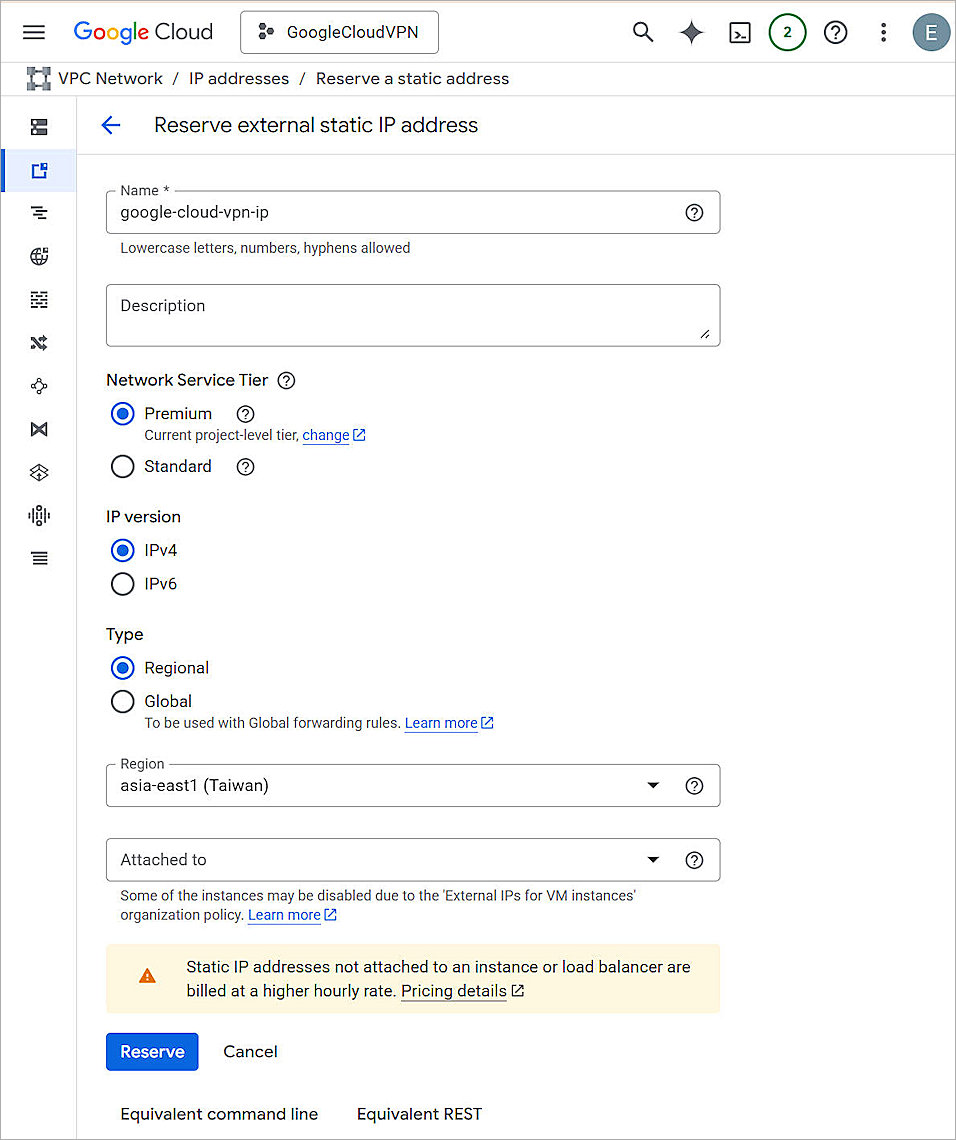
- In the Name text box, type a name for the external IP address. In our example, we use google-cloud-vpn-ip.
- From the Region drop-down list, select the region where you want to create the static address. In our example, we select asia-east1 (Taiwan).
- Keep the default values for all other settings.
- Click Reserve.
Configure the VPN Connection Settings
To configure the VPN connection settings:
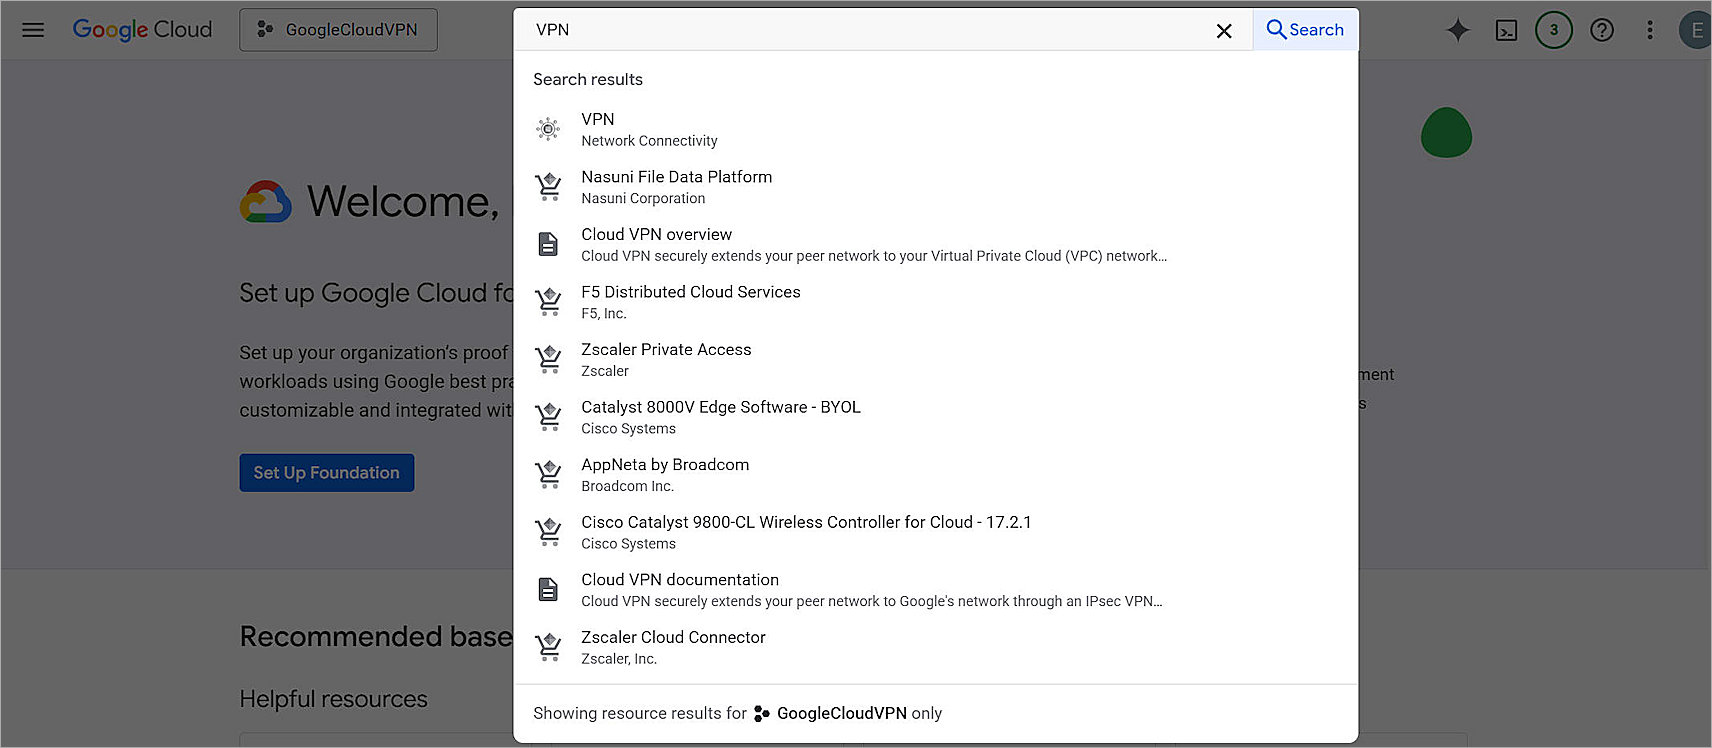
- In the search box, type VPN, then select VPN.
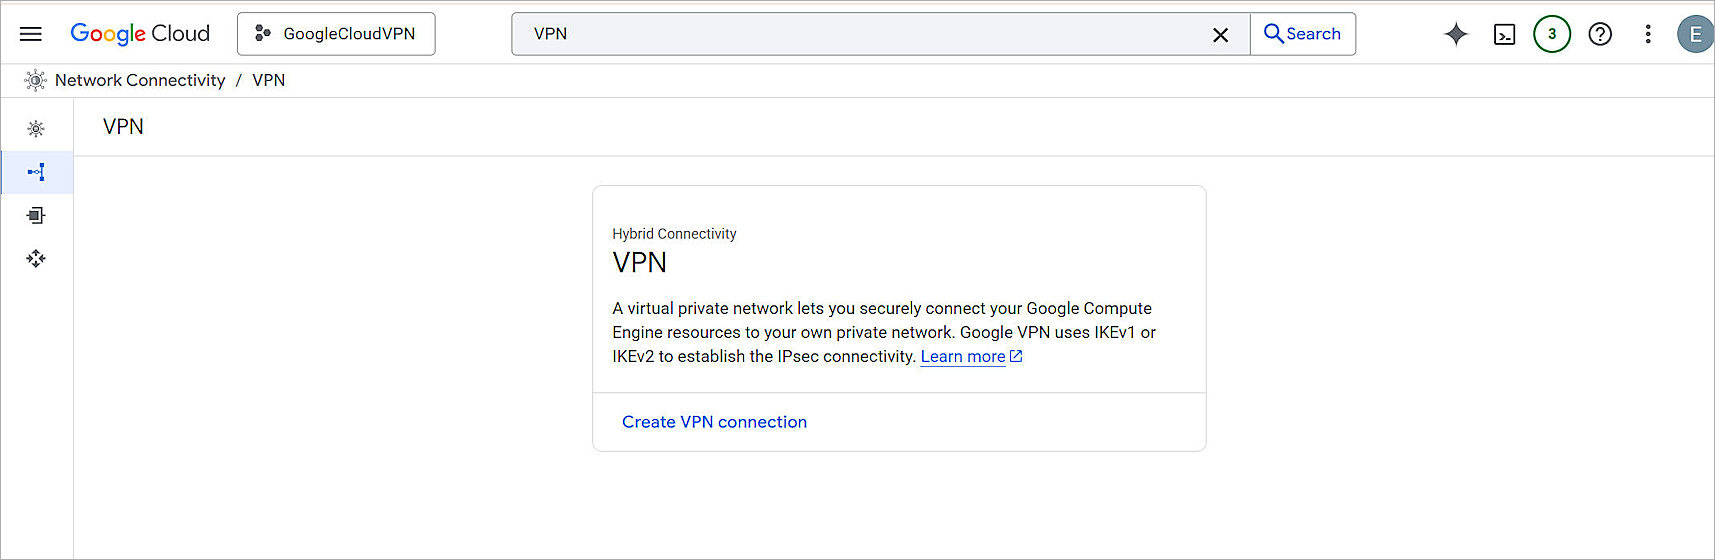
- Click Create VPN Connection.
- In the VPN Options section, select Classic VPN.
- Click Continue.
The Create a VPN Connection page opens.
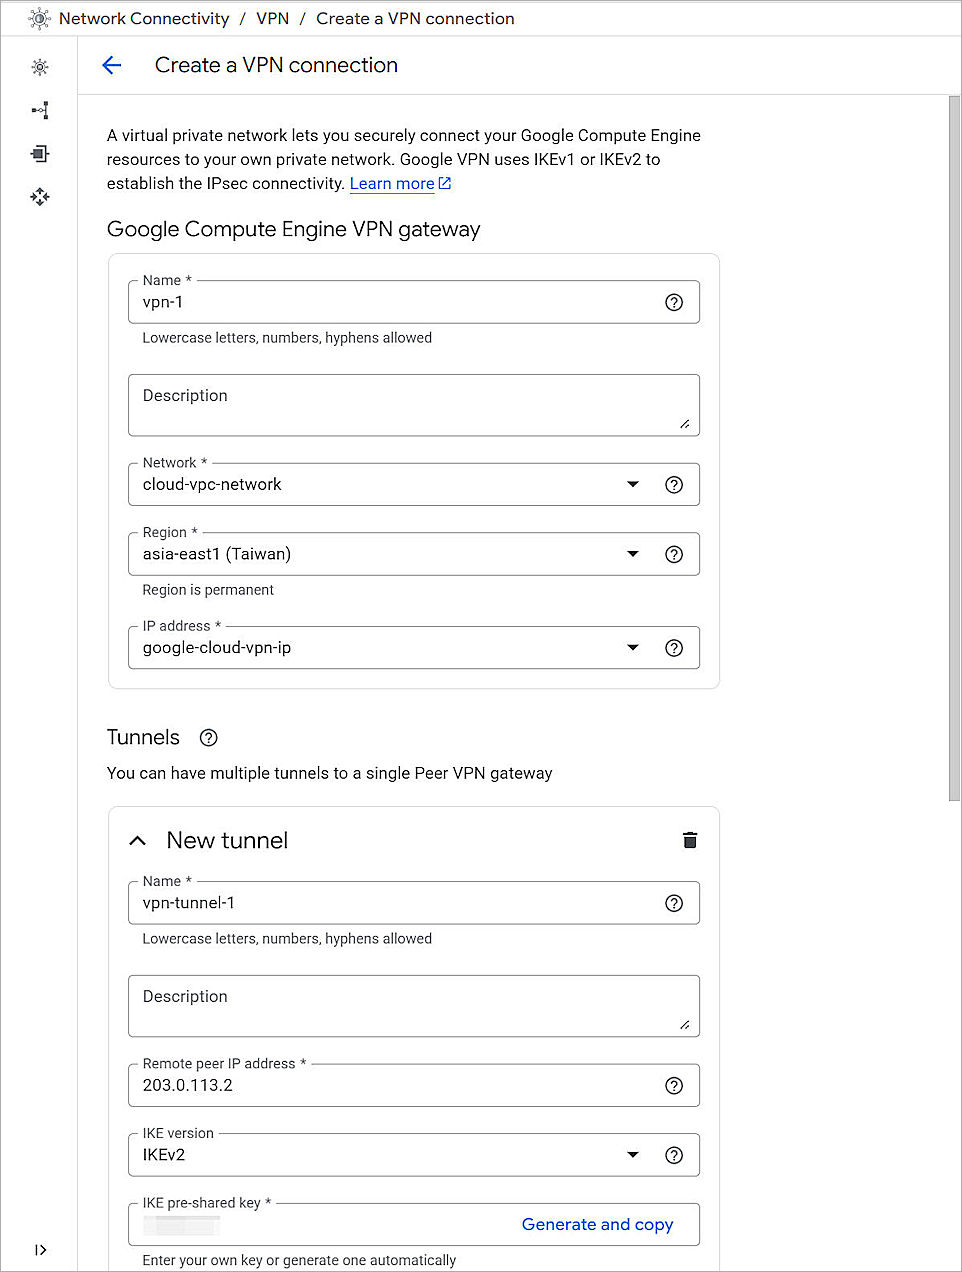
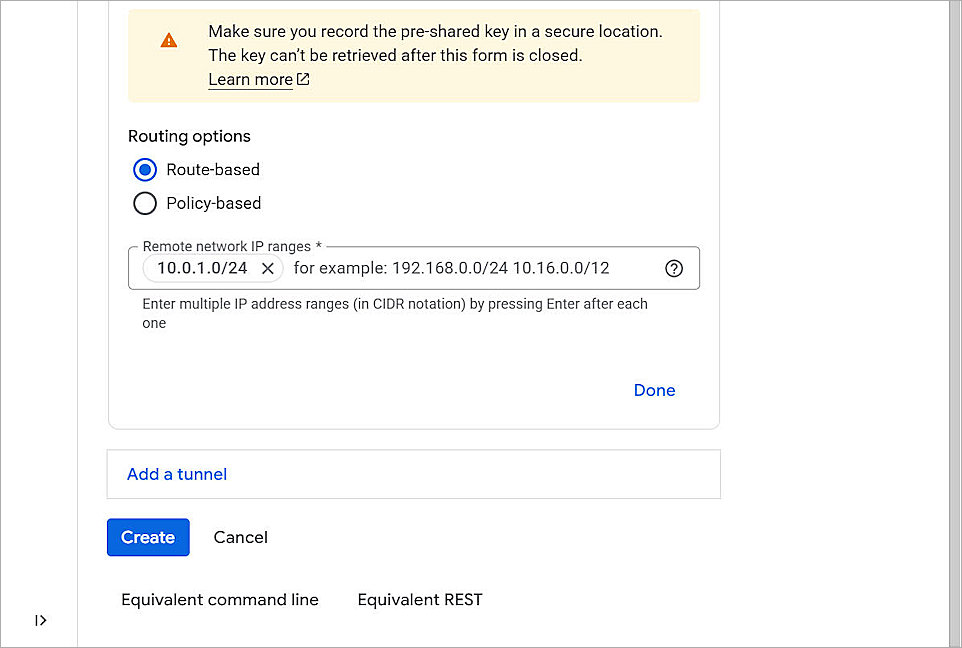
- In the Google Compute Engine VPN Gateway section, in the Name text box, type a name for the VPN gateway.
- From the Network drop-down list, select the network you created. In our example, we select cloud-vpc-network.
- From the Region drop-down list, select a region. In our example, we select asia-east1.
- From the IP address drop-down list, select the IP address you created. In our example, we select google-cloud-vpn-ip.
- In the Tunnels section, in the Name text box, type a name for the tunnel.
- In the Remote Peer IP Address text box, type the external IP address of the remote peer.
- From the IKE Version drop-down list, select IKEv2.
- In the IKE Pre-Shared Key text box, type the IKE pre-shared key for this tunnel.
- For Routing Options, select Route-Based.
- In the Remote Network IP Ranges text box, type the IP address ranges of the remote networks.
- Click Done.
- Click Create.
Create Firewall Rules
To create firewall rules:
- From the navigation menu, select VPC Network > Firewall.
- Click Create Firewall Rule.
The Create a Firewall Rule page opens.
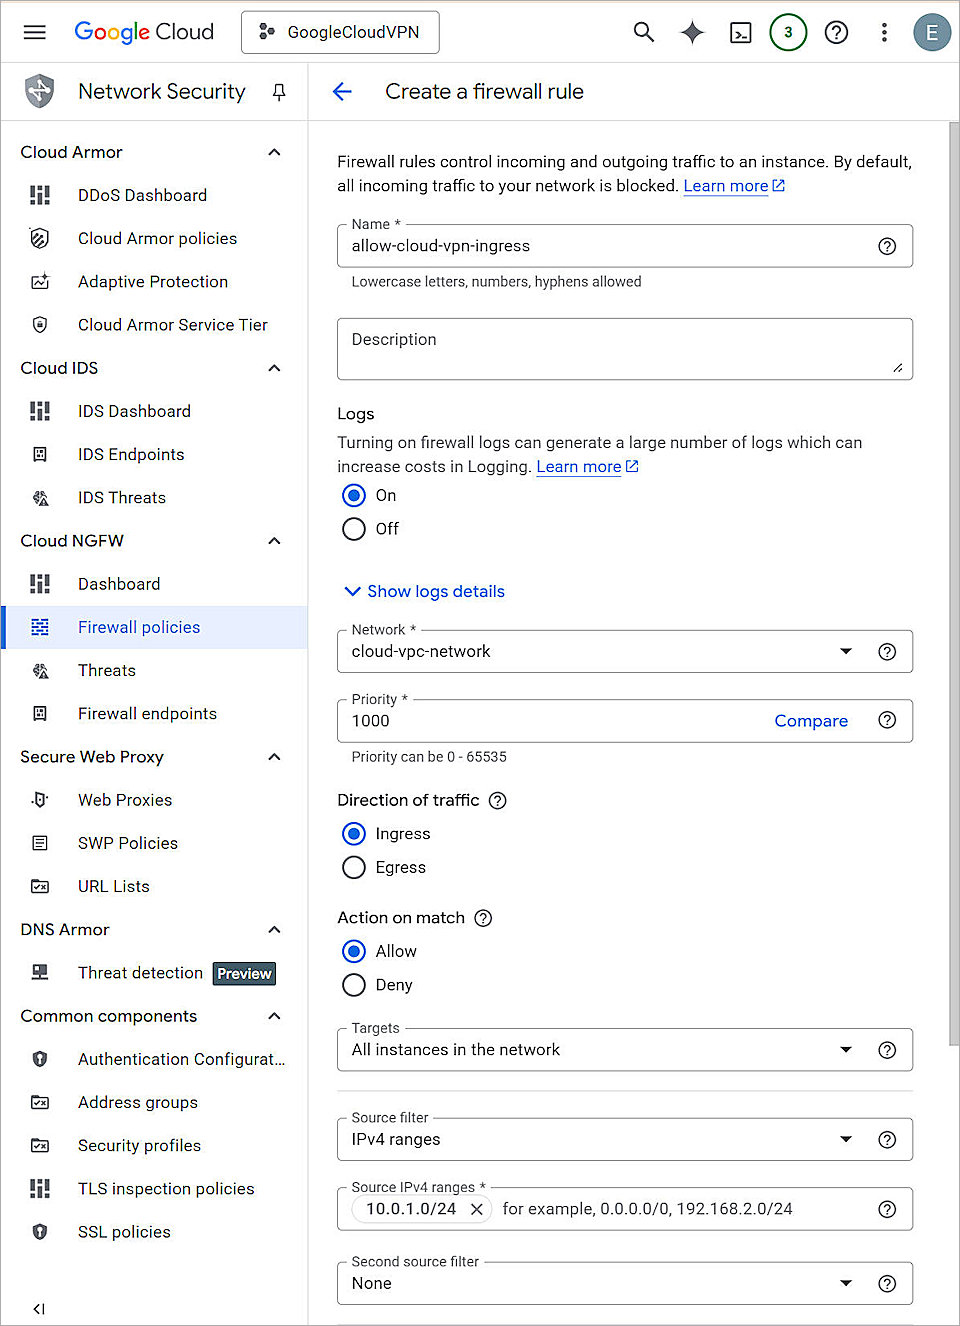
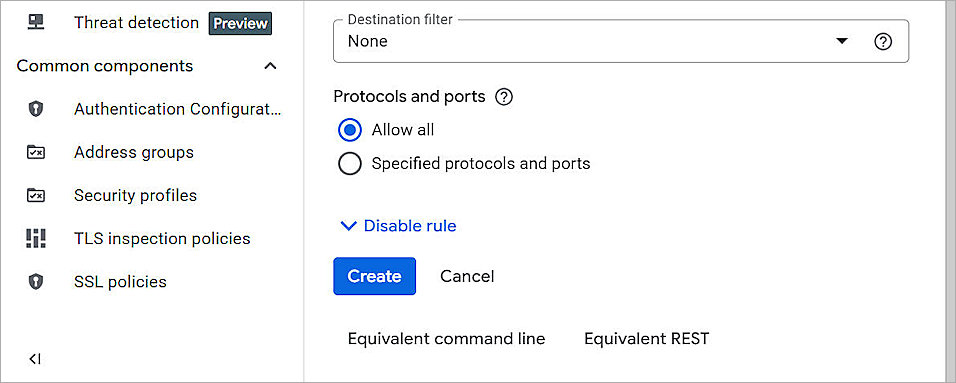
- In the Name text box, type a name for this rule.
- For Logs, select On.
- From the Network drop-down list, select the network you created. In our example, we select cloud-vpc-network.
- For Direction of Traffic, select Ingress.
- For Action on Match, select Allow.
- From the Targets drop-down list, select All Instances In the Network.
- From the Source Filter drop-down list, select IPv4 Ranges.
- In the Source IPv4 Ranges text box, type the IP address ranges of remote internal networks.
- For Protocols and Ports, select Allow All or Specified Protocols and Ports. In our example, we select Allow All.
- Keep the default values for all other settings.
- Click Create.
- To create an egress rule, repeat steps 2-13, but in Step 6, select Egress instead of Ingress
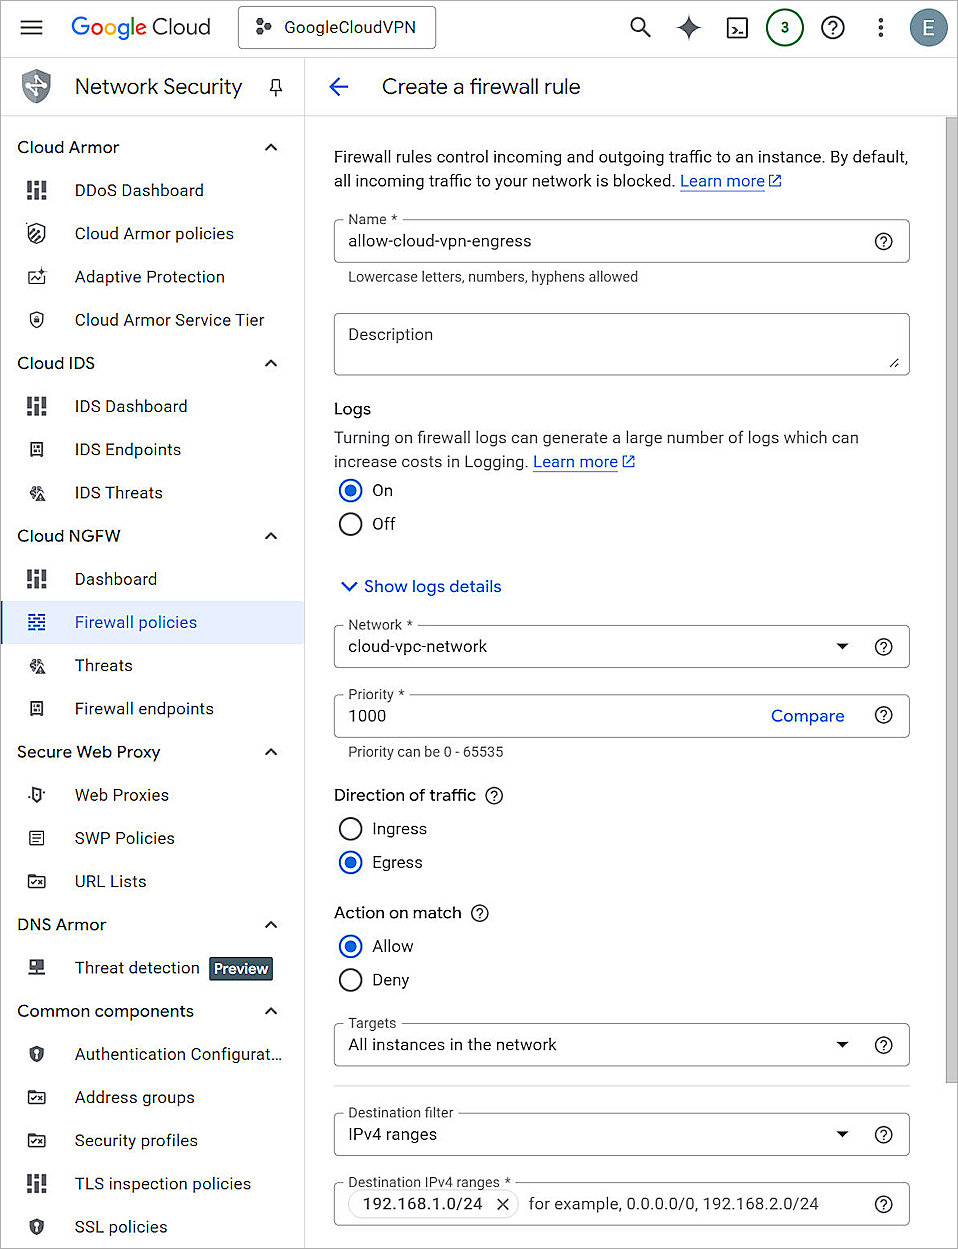
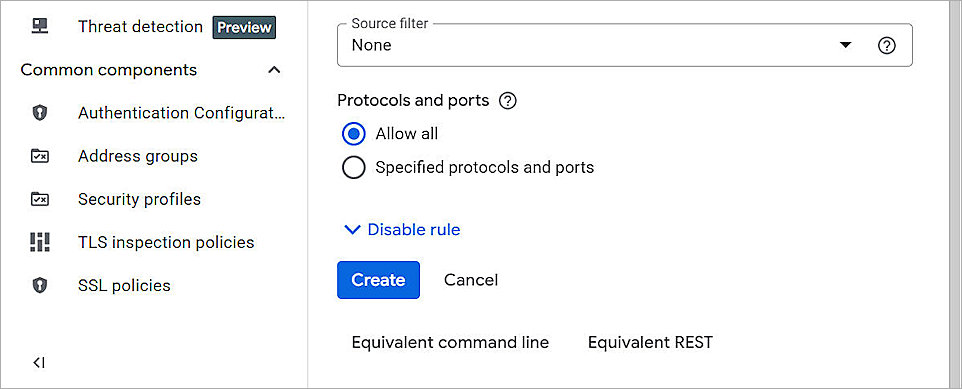
- Click Create.
Google Cloud VPN automatically negotiates the authentication, encryption, and key group with the Firebox. You cannot edit these settings in the Google Cloud VPN configuration.
For more information about Google Cloud VPN configuration and supported IKE ciphers, go to the Google Cloud VPN Documentation.
Test the Integration
To verify the VPN status in Google Cloud:
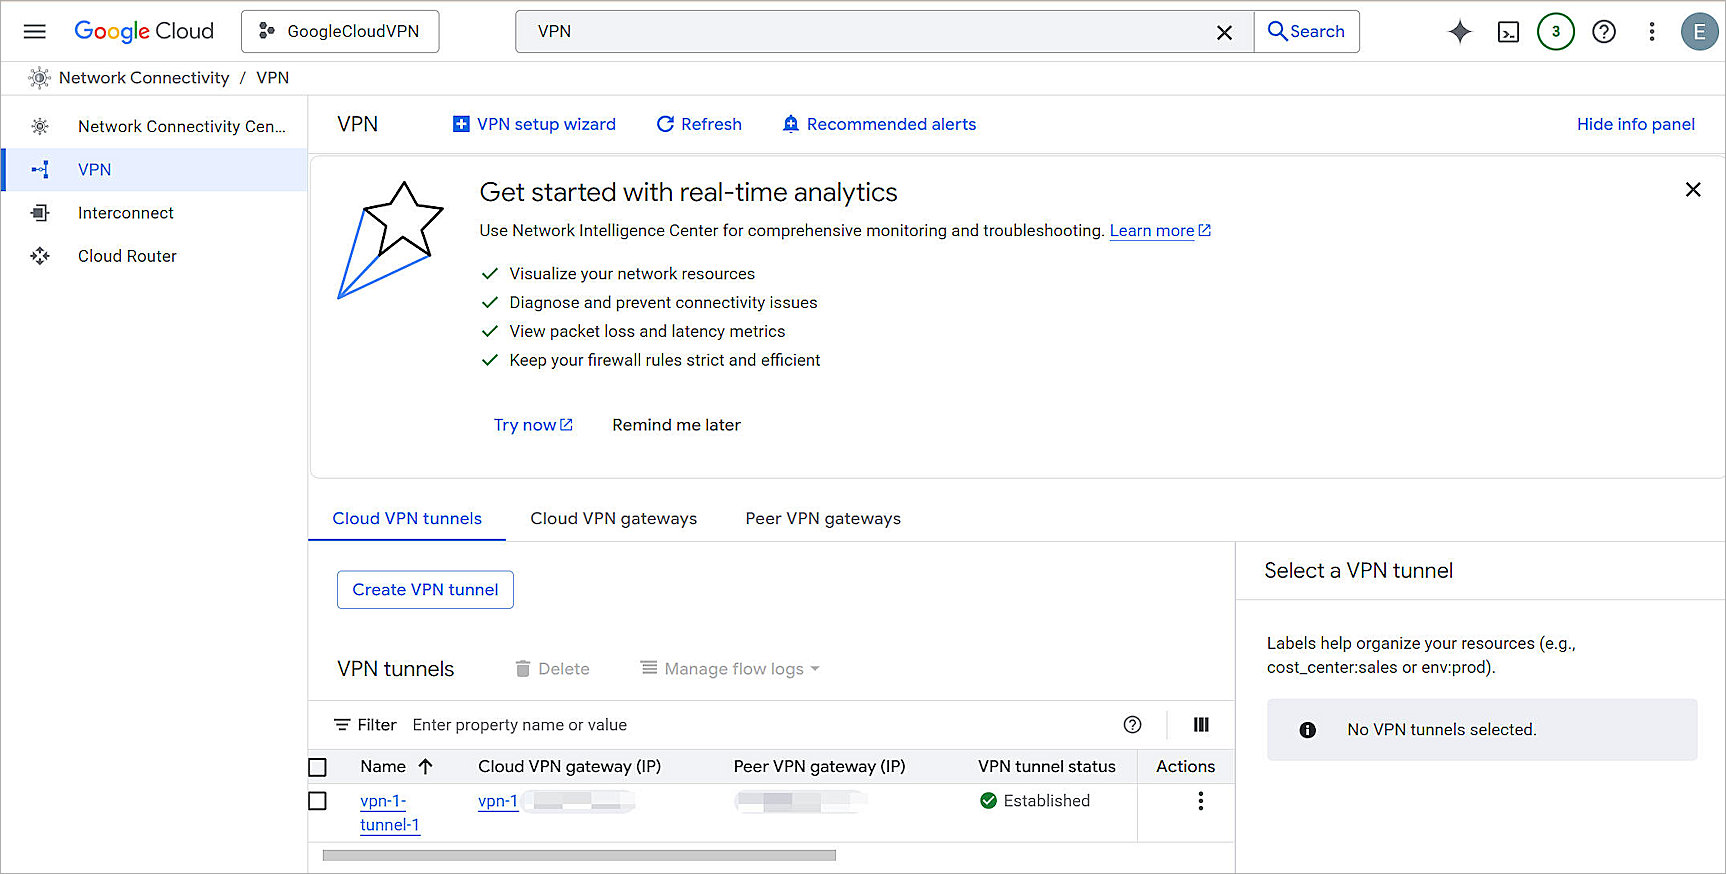
- From the navigation menu, select Networking > Network Connectivity > VPN.
- Select the Cloud VPN Tunnels tab, and verify that the VPN Tunnel Status is Established.
To verify the VPN status in Web UI:
- From Web UI, select System Status > VPN Statistics.
The VPN Statistics page opens.
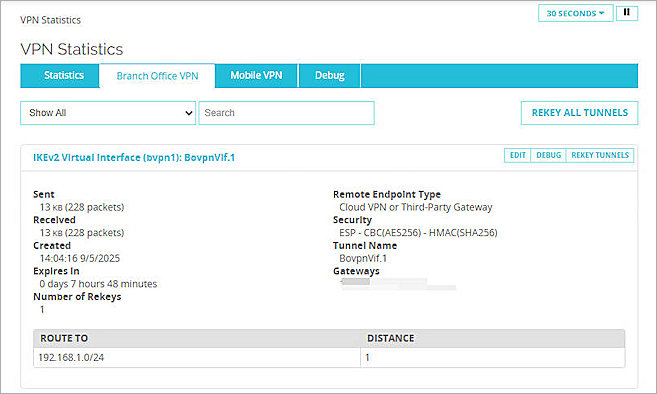
- Select the Branch Office VPN tab, and verify the data shows the VPN as established.
To verify the VPN status in WSM:
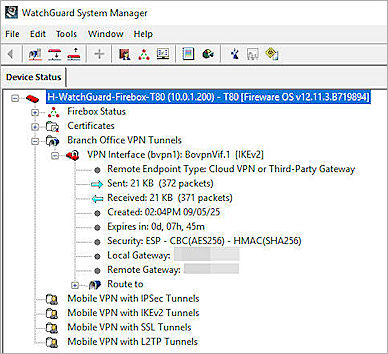
- Connect to the Firebox with WSM.
- Select the Firebox to examine.
- Verify the data shows the VPN as established.
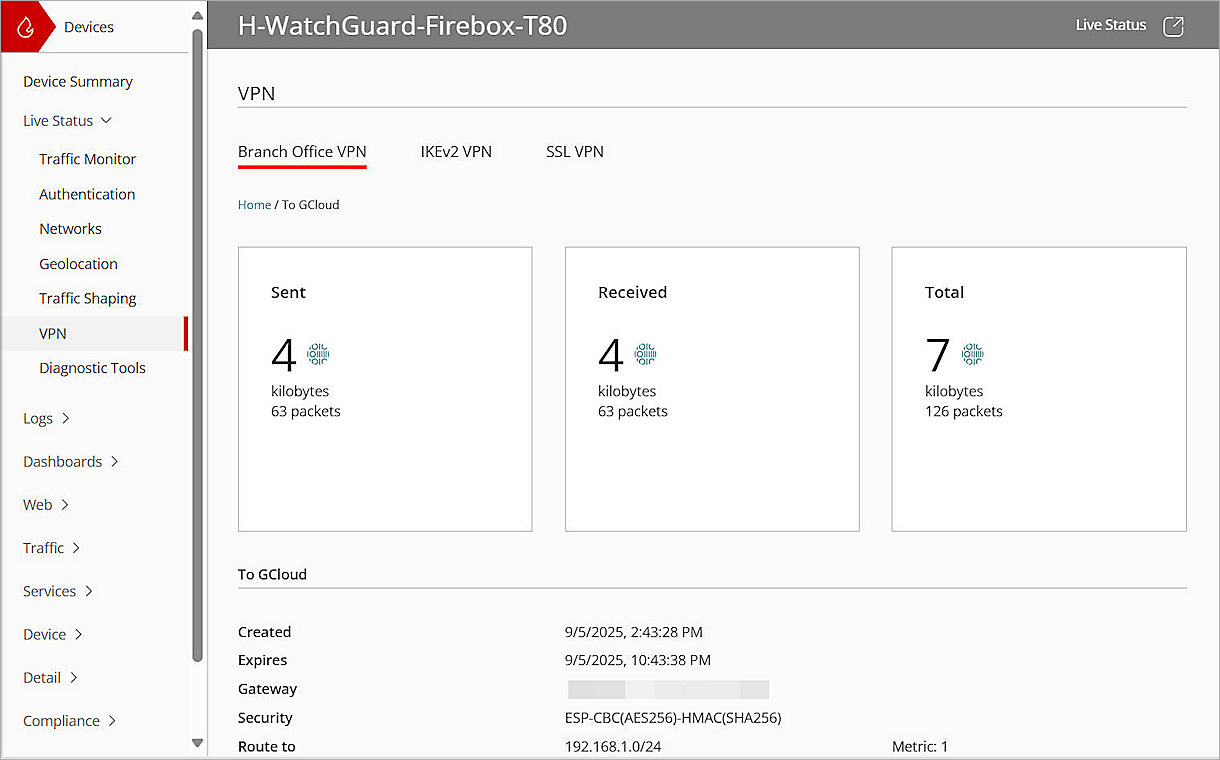
To verify the VPN status in WatchGuard Cloud:
- From the WatchGuard Cloud navigation menu, select Monitor > Devices.
If you log in with a Service Provider account, you must select a Subscriber account from the Account Manager. - Select your cloud-managed Firebox, then select Live Status > VPN > Branch Office VPN.
- Click the BOVPN name, and verify that the VPN is established.