This integration guide describes SAML authentication through the Mobile VPN with SSL client with Duo as the Identity Provider.
The SAML authentication server in Fireware v12.11 or higher can integrate with several identity providers. After you configure the SAML authentication server on the Firebox, you can integrate it with the WatchGuard Mobile VPN with SSL client.
The Mobile VPN with SSL client for Windows supports SAML authentication with v12.11 and higher. The Mobile VPN with SSL client for macOS supports SAML authenticatiopn with v12.11.2 and higher. Third-party Open VPN clients are not supported.
Contents
Integration Summary
The hardware and software used in this guide include:
- Duo administrator account
- Configuration of a server to host the Duo Authentication Proxy
- Service account credentials for the Active Directory
- Domain that your DNS hosting provider can manage to verify the authentication user email domain with a .TXT record
- Token assigned to a user in Duo mobile
- WatchGuard Firebox with Fireware v12.11 or higher
- WatchGuard Mobile VPN with SSL client for Windows or macOS
- Fully qualified domain name (FQDN) that resolves to the external IP address of the Firebox
Additional charges might apply for the use of Duo.
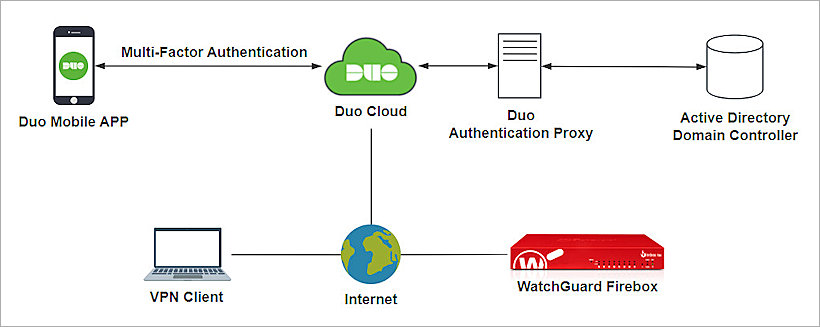
Test Topology
Duo communicates with various cloud-based services and service providers with the SAML protocol. This integration uses Duo to communicate with a WatchGuard Firebox over a public Internet connection.
To configure SAML authentication through the Mobile VPN with SSL client with Duo, complete these steps:
- Enable the Firebox SAML Authentication Server
- Configure Firebox Mobile VPN with SSL
- Configure Duo
- Complete SAML Authentication Server Setup
- Complete Firebox Mobile VPN with SSL Setup
Enable the Firebox SAML Authentication Server
To enable the Firebox SAML authentication server:
- Log in to Fireware Web UI at: https://<your Firebox IP address>:8080
- From the navigation menu, select Authentication > Servers.
- Select SAML.
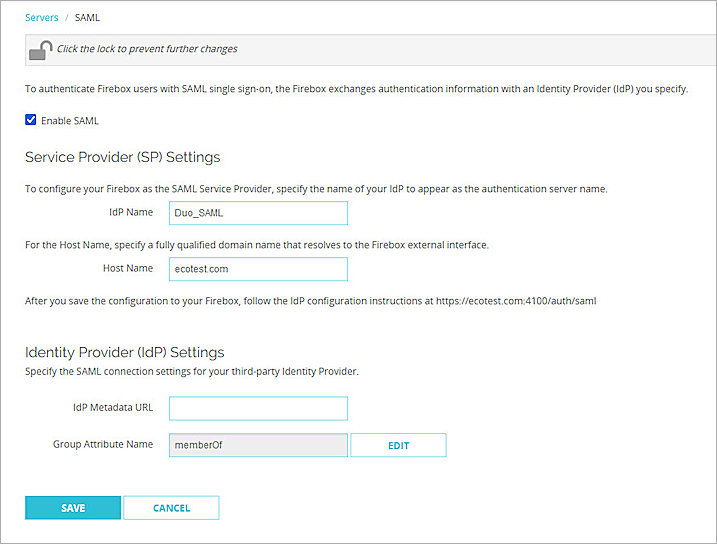
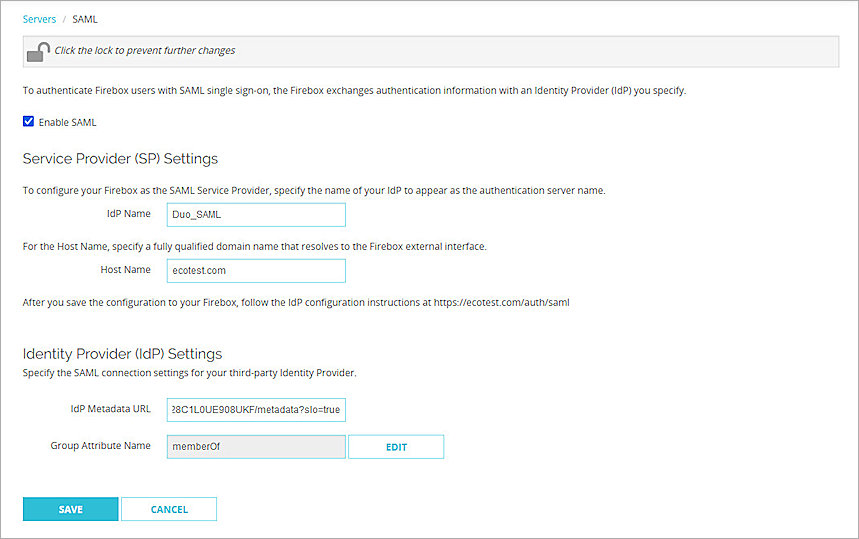
The SAML settings page opens. - Select the Enable SAML check box.
- In the IdP Name text box, type a name for the identity provider. In our example, we type Duo_SAML.
- In the Host Name text box, type an FQDN that resolves to the Firebox external interface.
- Keep the IdP Metadata URL text box blank for now, we add the IdP settings later.
- Click Save.
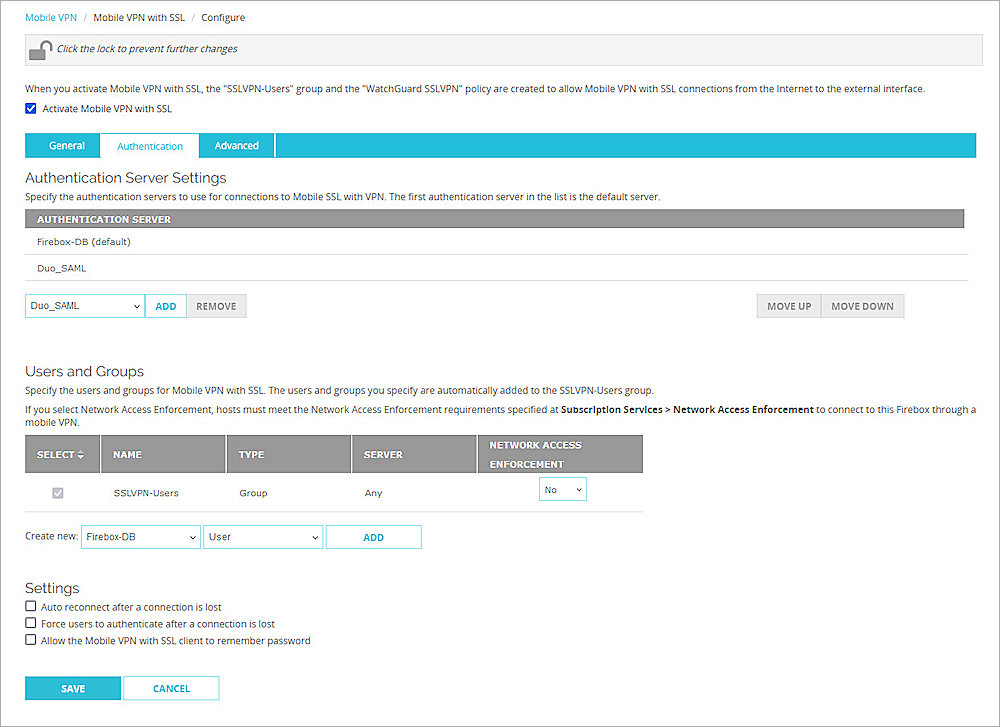
Configure Firebox Mobile VPN with SSL
To configure Mobile VPN with SSL on the Firebox:
- Log in to Fireware Web UI at: https://<your Firebox IP address>:8080
- From the navigation menu, select VPN > Mobile VPN.
- In the SSL section, click Manually Configure.
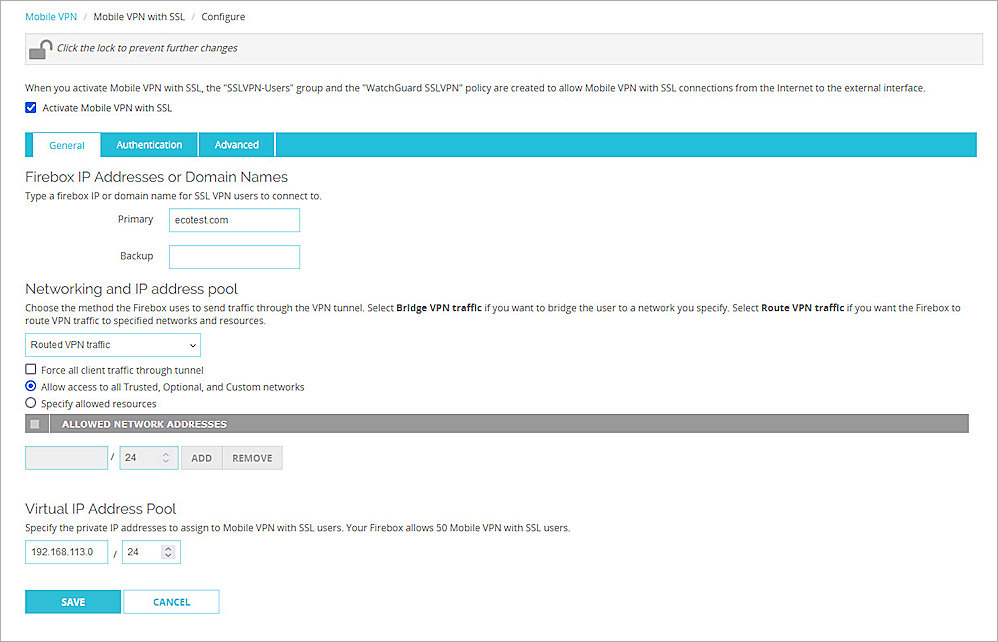
The Mobile VPN with SSL configuration settings open. - Select the Activate Mobile VPN with SSL check box.
- In the Primary text box, type the FQDN that resolves to the Firebox external interface. This is the domain name that Mobile VPN with SSL clients connect to by default. It must be same as the Host Name you configure in the Enable the Firebox SAML Authentication Server section.
- Select the Authentication tab.
The Authentication page opens. - In the Authentication Server Settings section, from the Authentication Server drop-down list, select the SAML authentication server you created in the Enable the Firebox SAML Authentication Server section. In our example, we select Duo_SAML.
- To add the authentication server to the list, click Add.
- Click Save.
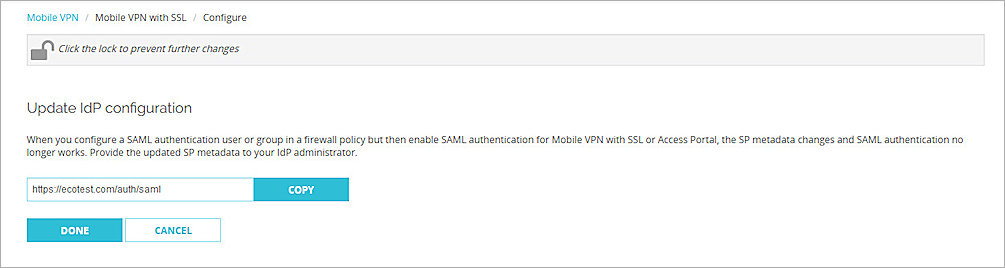
The Update IdP Configuration page opens. - Copy the SP Metadata URL, then click Done.
- From a web browser, go to the SP Metadata URL you copied in the previous step:
https://[Host name or Firebox IP address]/auth/saml
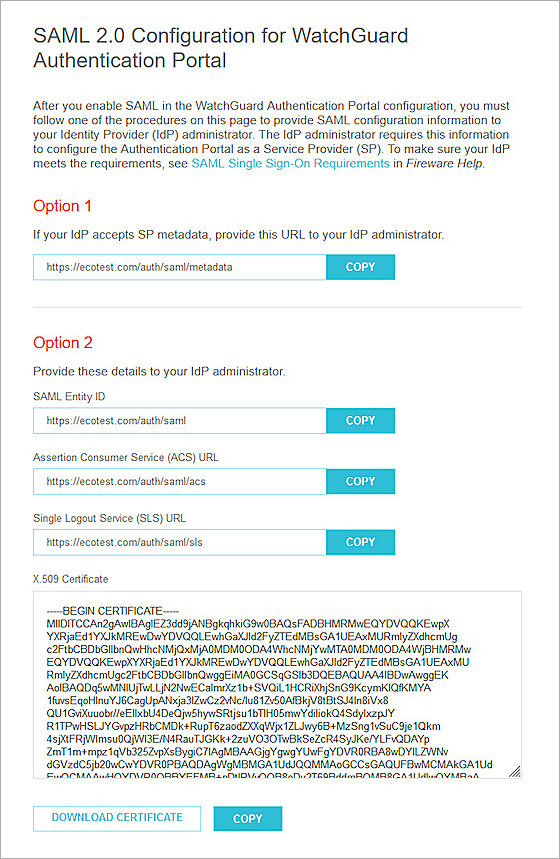
The SAML 2.0 Configuration page opens. - From the Option 2 section, copy the details. You use this information when you Create a SAML Application in Duo:
- SAML Entity ID in this format:
https://<host name>/auth/saml - Assertion Consumer Service (ACS) URL in this format:
https://<host name>/auth/saml/acs - Single Logout Service (SLS) URL in this format:
https://<host name>/auth/saml/sls
- SAML Entity ID in this format:
- To download the X.509 Certificate, click Download Certificate.
Configure Duo
To configure Duo, complete these steps:
- Configure Active Directory for Duo SSO.
- Synchronize Users from Active Directory to Duo.
- Create a SAML Application in Duo.
Configure Active Directory for Duo SSO
The Duo Authentication Proxy receives authentication requests and performs primary authentication against Active Directory. After a successful primary authentication, it performs secondary authentication with Duo.
To configure Active Directory for Duo SSO:
- Install and configure Duo Authentication Proxy on your local network.
Make sure the Authentication Proxy is connected to your directory domain. - Configure Active Directory to authenticate with Duo Single Sign-On.
- To make sure your users log in to the correct sign-on account, add one or more Permitted Email Domains.
Each Permitted Email Domain requires ownership verification. - To test your Active Directory configuration, before you save the configuration, connect to Authentication Proxies.
- From the navigation menu, select Applications > Routing Rules.
The Routing Rules page opens. - From the Use this Authentication Source drop-down list, select the authentication source you added. In our example, we select Active Directory.
- Click Save.
For more information about how to configure Active Directory with Duo Single Sign-on, go to the Duo Single Sign-On documentation.
After you configure Active Directory for Duo SSO, the status of the Active Directory authentication source in Duo is Enabled.

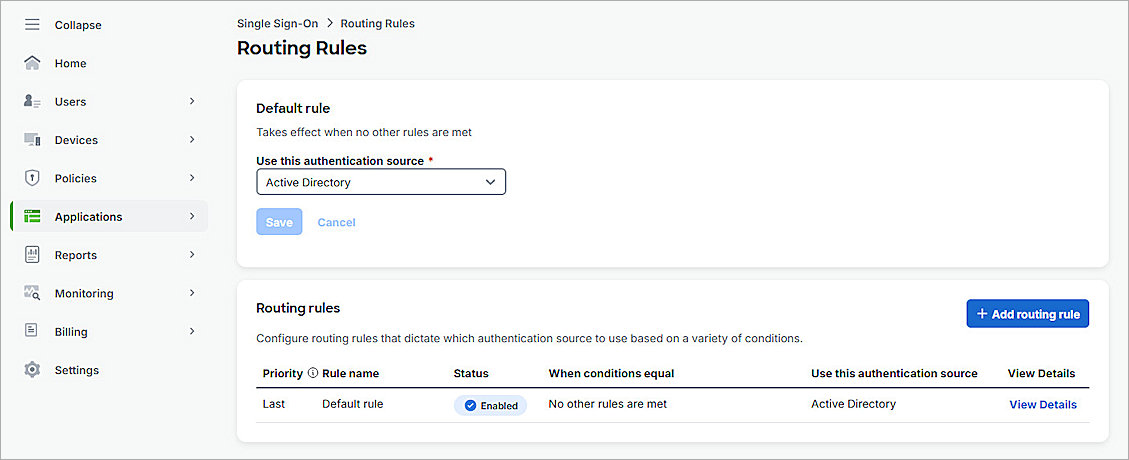
When you add your first authentication source, the default rule is set to your configured authentication source (by name). If you add additional authentication sources after the first source, make sure to set the default rule to the SAML authentication source (by name) you need. Alternatively, you can add a routing rule. For more information, go to How to use Duo Single Sign-On.
Synchronize Users from Active Directory to Duo
Before you synchronize users from Active Directory to Duo, you must:
- Install and configure Duo Authentication Proxy on your local network.
- Configure the Active Directory in Duo.
- Verify the status of the Active Directory authentication source in Duo is Enabled.
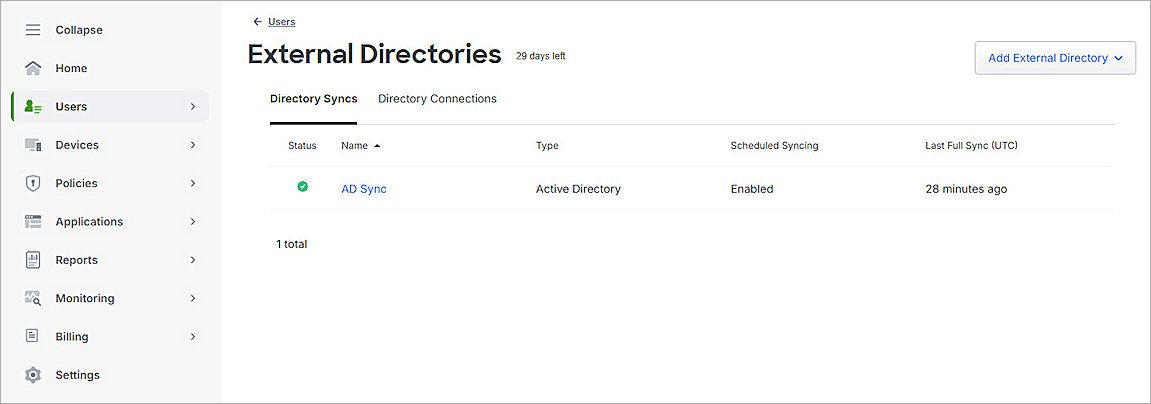
You can sync the complete Active Directory, or the individual users, from Active Directory to Duo. To view the synchronized users or groups in Duo, go to the Users or Groups page.
The users you sync to Duo must have an email address with Permitted Email Domains verified in the Duo SSO configuration.
For more information about how to sync users from Active Directory to Duo, go to Active Directory Sync for Duo Users and Admins.
For more information about how to enroll users and activate Duo Mobile, go to Enroll Users.

Create a SAML Application in Duo
Before you configure the service provider application, make sure you Configure Active Directory for Duo SSO and Synchronize Users from Active Directory to Duo.
To create a SAML application in Duo:
- Log in to the Duo Admin Panel.
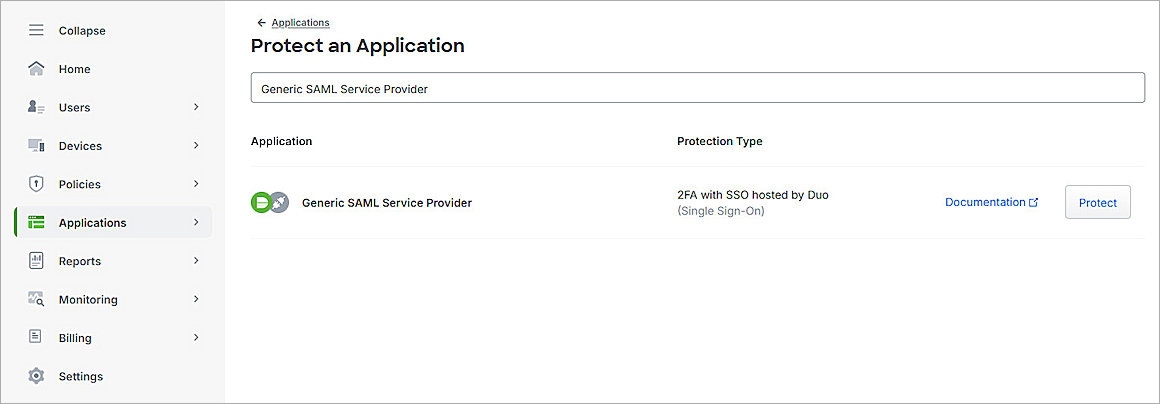
- From the navigation menu, select Applications > Protect an Application.
The Protect an Application page opens. - In the Application list, for the Generic SAML Service Provider item, click Protect.
The Generic SAML Service Provider - Single Sign-On page opens. - (Optional) In the Application Name text box, type a name for this SAML application.
- For User Access:
- Select Enable Only for Permitted Groups.
- Select the group you synced from your Active Directory in the Synchronize Users from Active Directory to Duo section. In this example, we select DuoGroup.
To provide access to all users, select Enable for All Users. By default, no users are assigned to the application. This setting only applies to users who exist in Duo with the Active status.
- From the Metadata section, copy the value of the Metadata URL parameter. You need this URL to Complete SAML Authentication Server Setup.
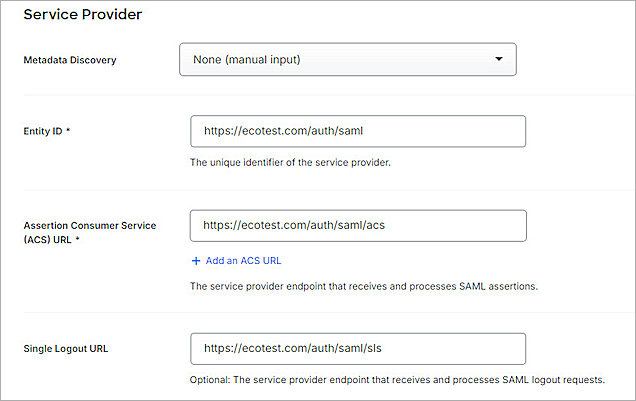
- Scroll down to the Service Provider section.
- From the Metadata Discovery drop-down list, select None (Manual Input).
- In the Entity ID text box, paste the value of the SAML Entity ID parameter you copied from the SAML 2.0 Configuration page in the Configure Firebox Mobile VPN with SSL section.
- In the Assertion Consumer Service (ACS) URL text box, paste the value of the Assertion Consumer Service (ACS) URL parameter you copied from the SAML 2.0 Configuration page in the Configure Firebox Mobile VPN with SSL section.
- In the Single Logout URL text box, paste the value of the Single Logout Service (SLS) URL parameter you copied from the SAML 2.0 Configuration page in the Configure Firebox Mobile VPN with SSL section.
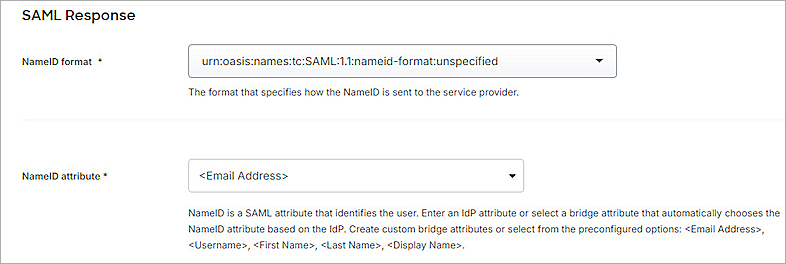
- Scroll down to the SAML Response section.
- From the NameID Format drop-down list, select urn:oasis:names:tc:SAML:1.1:nameid-format:unspecified.
- From the NameID Attribute drop-down list, select <Email Address>.
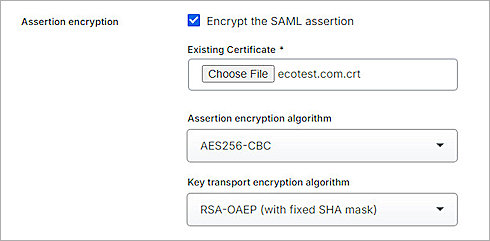
- In the Assertion Encryption section:
- Select the Encrypt the SAML Assertion check box.
- For Existing Certificate, click Choose File, and upload the X.509 Certificate you downloaded from the SAML 2.0 Configuration page in the Configure Firebox Mobile VPN with SSL section.
- From the Assertion Encryption Algorithm drop-down list, select AES256-CBC.
- For user authentication only, additional attributes are not required, and you can skip this step. For group authentication, from the Map Attributes section:
- From the IdP Attribute drop-down list, select memberOf
- In the SAML Response Attribute text box, type memberOf.
- Keep the default values for all other settings.
- From the bottom of the page, click Save.

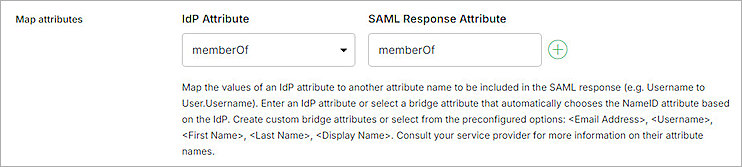
For the SAML Response Attribute parameter, memberOf is the default Group Attribute Name provided by the Firebox when you configure an authentication server on the Firebox. You can edit the name to your preference.
Complete SAML Authentication Server Setup
To complete SAML authentication server setup, from Fireware Web UI:
- Log in to Fireware Web UI at: https://<your Firebox IP address>:8080
- From the navigation menu, select Authentication > Servers.
- Select SAML.
The SAML page opens. - In the IdP Metadata URL text box, paste the value of the Metadata URL parameter you copied in the Create a SAML Application in Duo section.
- Add ?slo=true to the end of the URL.
The URL format is case-sensitive. - Click Save.
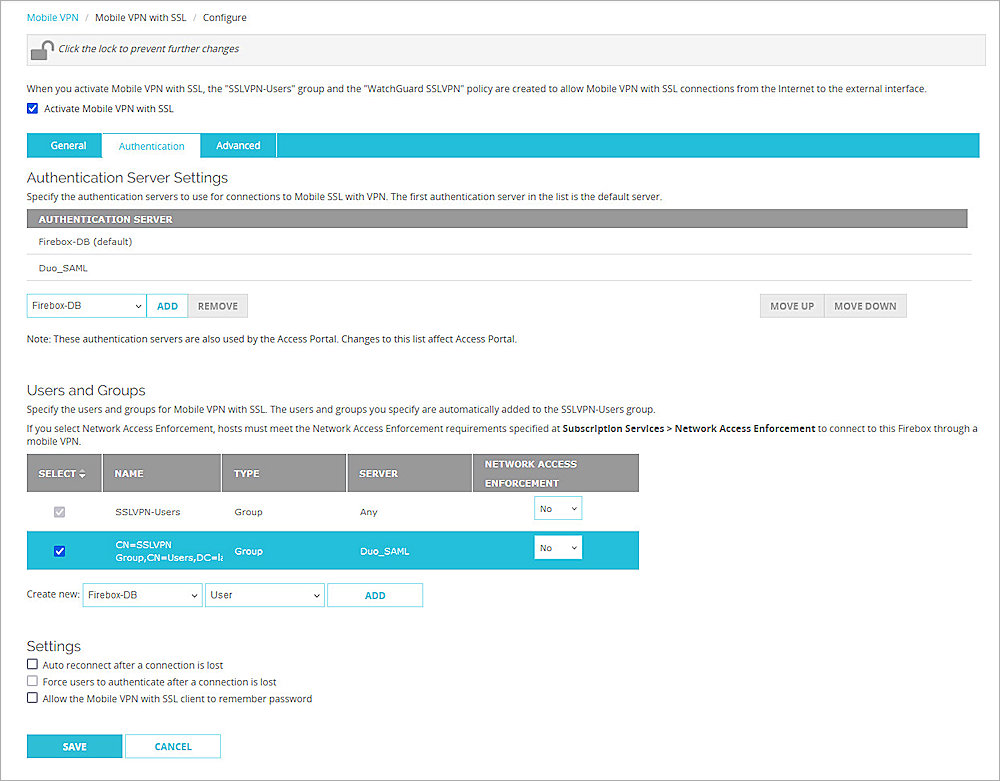
Complete Firebox Mobile VPN with SSL Setup
To complete Firebox Mobile VPN with SSL setup, from Fireware Web UI:
- Log in to Fireware Web UI at: https://<your Firebox IP address>:8080
- From the navigation menu, select Authentication > Users and Groups.
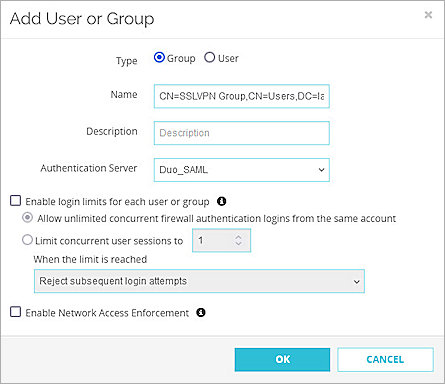
- Click Add.
The Add User or Group page opens. - For Type, select Group.
- In the Name text box, type your group name. The group name must be the same as your Active Directory group distinguishedName value. The distinguishedName value is case-sensitive.
- From the Authentication Server drop-down list, select the authentication server the user or group belongs to.
- Click OK.
- Click Save.
- From the navigation menu, select VPN > Mobile VPN.
- From the SSL section, click Configure.
- Click the Authentication tab.
The Authentication settings open. - From the Users and Groups section, select the groups or users you created previously.
- Click Save.
There are two methods to manage users. You can add a user for user authentication or a group for group authentication. For user authentication, the user name must be the same as the Active Directory user sAMAccountName. For group authentication, the group name must be the same as the Active Directory group distinguishedName. In our example, we add a group for group authentication.
Test the Integration
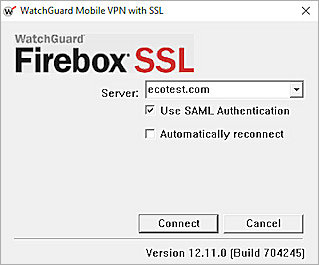
To test the integration of Duo authentication with the Mobile VPN with SSL client:
- Open the Mobile VPN with SSL client.
- In the Server text box, type the host name of your Firebox SAML authentication server.
- Select the Use SAML Authentication check box.
- Click Connect.
- In the Email Address text box, enter the email address associated with your Active Directory user account.
- Click Next.
- In the Password text box, type your user password.
- Click Log in.
The verification code is shown on your login screen. - Enter the verification code in your Duo Mobile app, then click Verify.
If your installed Duo Mobile version does not support verification then you receive a Duo Push request without the code entry field.
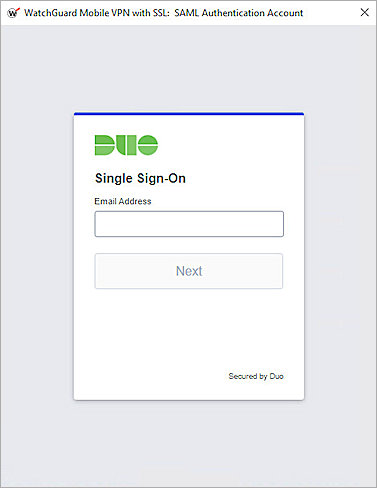
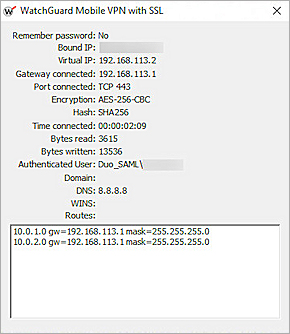
After successful authentication, you connect to the VPN.