This integration guide describes how to configure a policy-based BOVPN tunnel between a WatchGuard cloud-managed Firebox and Virtual Private Cloud (VPC) in Amazon Web Services (AWS).
Contents
Integration Summary
The hardware and software used in this guide include:
- WatchGuard Firebox with Fireware v12.7.1 or higher
- Amazon Web Services
Topology
This diagram illustrates a policy-based BOVPN connection between a cloud-managed Firebox and an AWS VPC.

Before You Begin
Before you begin these procedures, make sure that you have:
- An AWS administrator account.
- Created a VPC environment with a subnet and a security group.
- Created an EC2 instance in your VPC.
- A WatchGuard Cloud account.
- Set a public IP address for your Firebox external interface.
- Added your Firebox to WatchGuard Cloud as a cloud-managed device.
For more information about AWS VPC and EC2, go to Amazon Virtual Private Cloud and Amazon Elastic Compute Cloud in the AWS documentation.
Additional charges might apply for the use of AWS.
Configure Amazon Web Services
To configure AWS:
- Create a Customer Gateway
- Create a Virtual Private Gateway
- Enable Route Propagation for the Virtual Private Gateway
- Create a Site-to-Site VPN Connection
- Edit the Security Group
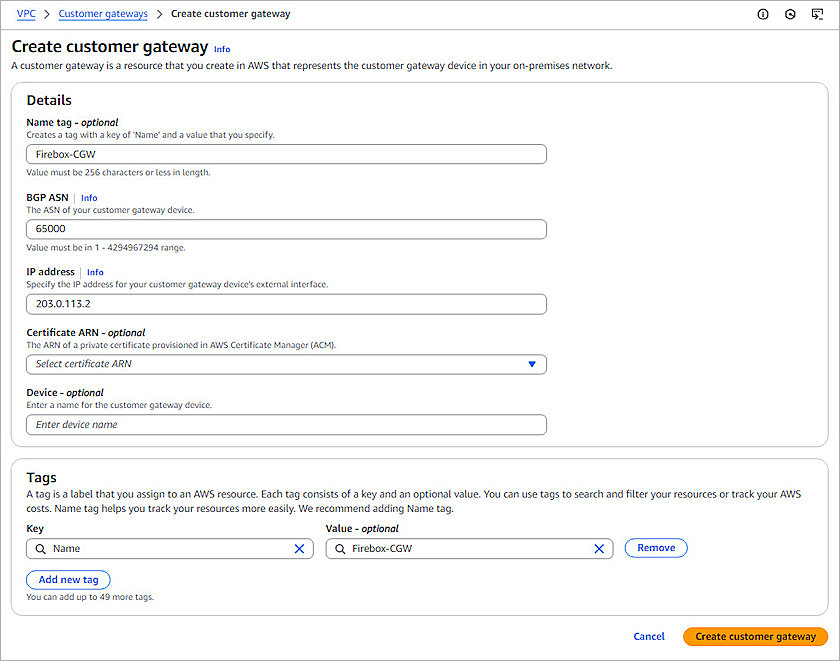
Create a Customer Gateway
A customer gateway is a resource created in AWS that represents your cloud-managed Firebox.
To create a customer gateway:
- Log in to the AWS Management Console.
- From the upper navigation bar, in the Search text box, type and select VPC.
The VPC Dashboard page opens. - From the navigation menu, select Virtual Private Network (VPN) > Customer Gateways.
- Click Create Customer Gateway.
The Create Customer Gateway page opens. - In the Name Tag - Optional text box, type a descriptive name. In our example, we use Firebox-CGW.
- In the IP address text box, type the public IP address of your cloud-managed Firebox.
- Keep the default values for all other settings.
- Click Create Customer Gateway.
The customer gateway is created and added to the Customer Gateways list.
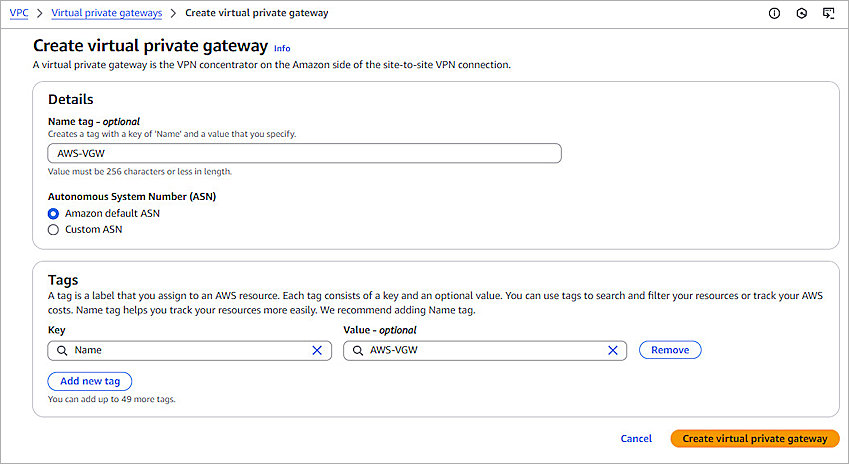
Create a Virtual Private Gateway
A virtual private gateway is the VPN endpoint on the AWS side of the BOVPN tunnel that you connect to your VPC.
- On the VPC Dashboard page, from the navigation menu, select Virtual Private Network (VPN) > Virtual Private Gateways.
- Click Create Virtual Private Gateway.
The Create Virtual Private Gateway page opens. - In the Name Tag - Optional text box, type a descriptive name. In our example, we use AWS-VGW.
- Click Create Virtual Private Gateway.
The virtual private gateway is created and added to the Virtual Private Gateways list. - From the Virtual Private Gateways list, select the gateway you created in the previous steps.
- To attach your virtual private gateway to your VPC, from the Actions drop-down list, select Attach to VPC.
The Attach to VPC page opens. - From the Available VPCs drop-down list, select your VPC.
- Click Attach to VPC.
The virtual private gateway is attached to your VPC. It might take a few minutes to complete the process.


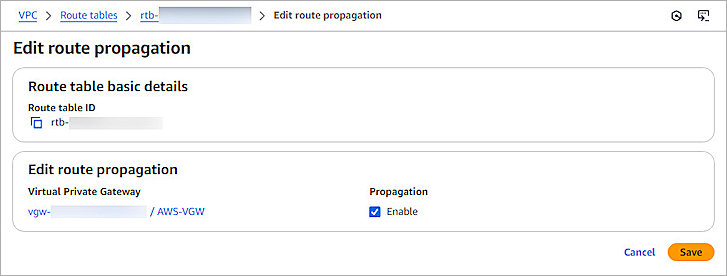
Enable Route Propagation for the Virtual Private Gateway
The VPC route table enables traffic destined for your network to pass through the virtual private gateway and over a VPN tunnel. When you enable route propagation for the virtual private gateway, your network routes are automatically propagated, so you do not have to add routes manually.
To enable route propagation for the virtual private gateway, from the AWS Management Console:
- On the VPC Dashboard page, from the navigation menu, select Virtual Private Cloud > Route Tables.
The Route Tables page opens. - Select the route table used by your VPC.
- From the Actions drop-down list, select Edit Route Propagation.
The Edit Route Propagation page opens. - Enable the Propagation option.
- Click Save.
Propagation is enabled for the virtual private gateway.

Create a Site-to-Site VPN Connection
Create a site-to-site VPN connection in AWS to enable access to your Firebox network from your VPC.
To create a site-to-site VPN connection, from the AWS Management Console:
- On the VPC Dashboard page, from the navigation menu, select Virtual Private Network (VPN) > Site-to-Site VPN Connections.
- Click Create VPN Connection.
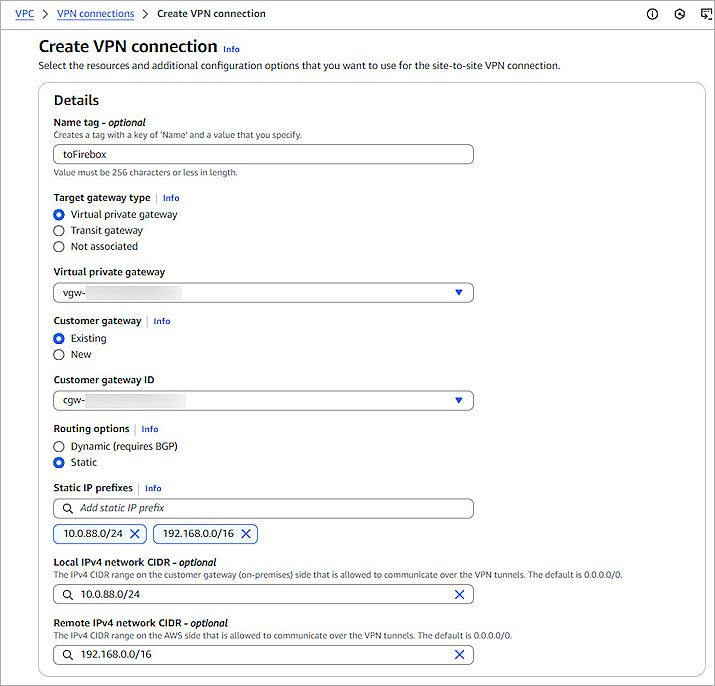
The Create VPN Connection page opens. - In the Name Tag - Optional text box, type a descriptive name. In our example, we use toFirebox.
- For Target Gateway Type, select Virtual Private Gateway.
- From the Virtual Private Gateway drop-down list, select the virtual private gateway you created in the Create a Virtual Private Gateway section.
- For Customer Gateway, select Existing.
- From the Customer Gateway ID drop-down list, select the customer gateway you created in the Create a Customer Gateway section.
- For Routing Options, select Static.
- In the Static IP Prefixes text box, type the prefix of your internal network on the Firebox side and the VPC CIDR on the AWS side. In our example, we type 10.0.88.0/24 and 192.168.0.0/16.
- In the Local IPv4 Network CIDR - Optional text box, type the IPv4 CIDR range of your internal network on the Firebox side. In our example, we type 10.0.88.0/24.
- In the Remote IPv4 Network CIDR - Optional text box, type the IPv4 CIDR range of your VPC on the AWS side. In our example, we type 192.168.0.0/16.
- Keep the default value for all other settings.
- Click Create VPN Connection.
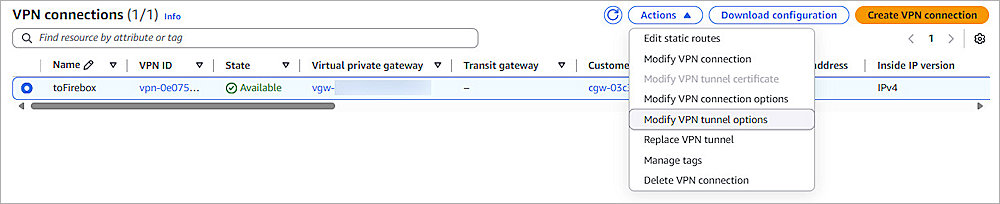
The VPN connection is created, and the State is Pending. It might take a few minutes for the State to change to Available. - From the list of VPN connections, select the VPN connection you created.
- From the Actions drop-down list, select Modify VPN Tunnel Options.
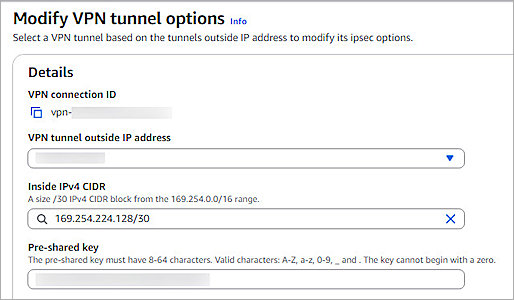
The Modify VPN Tunnel Options page opens. - From the VPN Tunnel Outside IP Address drop-down list, select a VPN tunnel you want to use.
- From the Details section, copy these tunnel details:
- VPN Tunnel Outside IP Address
- Pre-Shared Key
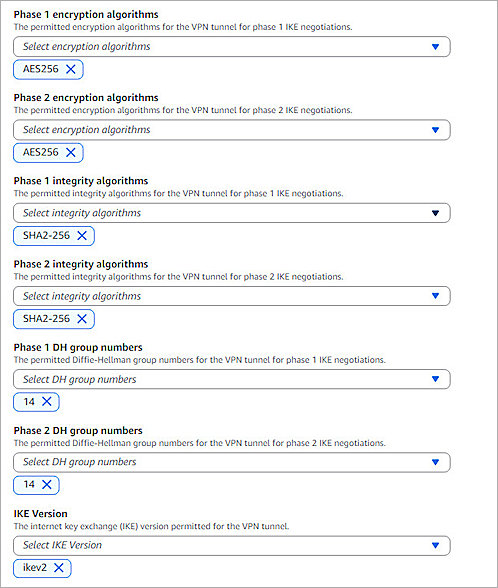
- Specify these settings:
- Phase 1 Encryption Algorithms — AES256
- Phase 2 Encryption Algorithms — AES256
- Phase 1 Integrity Algorithms — SHA2-256
- Phase 2 Integrity Algorithms — SHA2-256
- Phase 1 DH Group Numbers — 14
- Phase 2 DH Group Numbers — 14
- IKE Version — ikev2
- Keep the default value for all other settings.
- Click Save Changes.
The VPN changes are saved. It might take a few minutes for State to change from Modifying to Available. - (Optional) Repeat Steps 14–20 to configure another VPN tunnel if you must use two VPN tunnels for redundancy.

You need this information to Configure a BOVPN in WatchGuard Cloud.
Edit the Security Group
To allow traffic from your Firebox to your AWS VPC, you must edit the inbound traffic rules for the security group used by your VPC.
To edit the security group, from the AWS Management Console:
- On the VPC Dashboard page, from the navigation menu, select Security > Security Groups.
The Security Groups page opens. - Select the security group used by your VPC.
- From the Actions drop-down list, select Edit Inbound Rules.
The Edit Inbound Rules page opens. - To create a new inbound rule, click Add Rule.
A new rule appears in the list. - In the new row:
- From the Type drop-down list, select All Traffic.
- From the Source drop-down list, select Custom.
- In the Source text box, type the IPv4 CIDR range of your internal network on the Firebox side. In our example, we type 10.0.88.0/24.
- In the Description - optional text box, type a description for this rule. In our example, we type From Firebox Internal.
- Click Save Rules.
The inbound rules for the security group are updated.


Configure the Cloud-Managed Firebox
To enable access from your Firebox network to your VPC, you must configure a BOVPN connection in WatchGuard Cloud.
To configure a policy-based BOVPN connection on the cloud-managed Firebox:
- Log in to WatchGuard Cloud with your WatchGuard Cloud operator account credentials.
If you log in with a Service Provider account, you must select a Subscriber account from the Account Manager. - From the navigation menu, select Configure > VPNs.
- Click Add BOVPN.
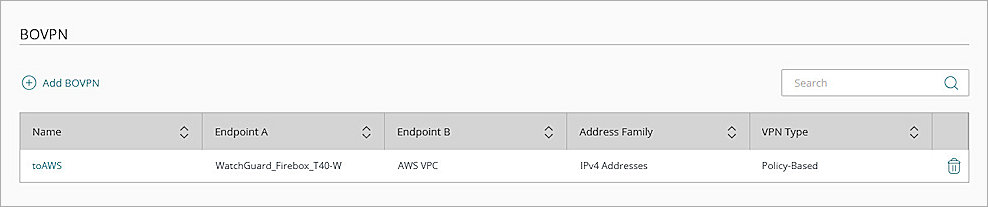
The Add BOVPN page opens. - In the Name text box, type a descriptive name. In our example, we type toAWS.
- From the VPN Connection Type drop-down list, select Policy-Based IPSec to Locally-Managed Firebox / Third-Party.
- From the Address Family drop-down list, select IPv4 Addresses.
- In the Endpoint A section, select your cloud-managed Firebox.
- In the Endpoint B section, in the Endpoint Name text box, type a name to identify the remote VPN endpoint. In our example, we type AWS VPC.
- Click Next.
The VPN Gateways settings page opens. - From the VPN Gateways (IPv4 Addresses) section:
- For your cloud-managed Firebox, select the External network.
- For your AWS VPC connection, in the IP or Domain Name text box, type the VPN Tunnel Outside IP Address you copied from AWS in the Create a Site-to-Site VPN Connection section.
- In the Pre-Shared Key text box, type the value of the Pre-Shared Key you copied from AWS in the Create a Site-to-Site VPN Connection section.
- Click Next.
The Traffic settings page opens. - For your cloud-managed Firebox, select the Internal network that you want to be accessible through the VPN tunnel.
- For your AWS VPC connection, click Add Network Resource.
- In the Network Resource text box, type the CIDR of your AWS VPC. In our example, we type 192.168.0.0/16.
- In the Distance text box, enter a number from 1 through 254.
Routes with lower metrics have higher priority. The default value is 1. If this is your second redundant VPN tunnel, you can enter a higher number than the first VPN tunnel distance. - Click Next.
The Tunnel Routes settings page opens. - In the Tunnel Routes section, keep all the default settings and click Next.
The Security settings page opens. - In the Phase 1 Settings section:
- From the Authentication drop-down list, select SHA2-256.
- From the Encryption drop-down list, select AES-CBC (256-bit).
- In the SA Life text box, type 8.
- From the Diffie-Hellman Group drop-down list, select Diffie-Hellman Group14.
- In the Phase 2 Settings section:
- From the Authentication drop-down list, select SHA2-256.
- From the Encryption drop-down list, select AES-CBC (256-bit).
- Select the Use Perfect Forward Secrecy (PFS) check box.
- From the PFS Group drop-down list, select Diffie-Hellman Group14.
- Keep the default value for all other settings.
- Click Add.
- Click Finish.
- (Optional) Repeat Steps 3–23 to create another VPN tunnel if you must use two VPN tunnels for redundancy.


When you add a BOVPN for a cloud-managed Firebox, WatchGuard Cloud immediately creates and deploys a configuration update for the cloud-managed Firebox.
For more information about BOVPN configuration for a cloud-managed Firebox, go to Manage BOVPNs for Cloud-Managed Fireboxes.
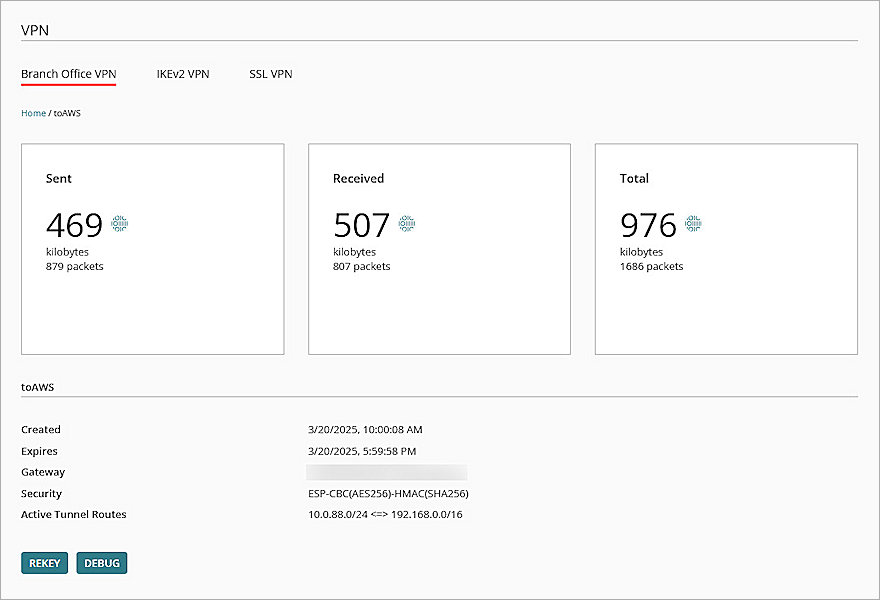
Test the Integration
To test the integration of the BOVPN tunnel with static routing between your cloud-managed Firebox and Amazon VPC:
- Log in to WatchGuard Cloud.
- From the navigation menu, select Monitor > Devices.
If you log in with a Service Provider account, you must select a Subscriber account from the Account Manager. - Select your cloud-managed Firebox, then select Live Status > VPN > Branch Office VPN.
- Click the BOVPN name, and verify that the VPN is established.
- Verify that the hosts behind the Firebox and the EC2 instance in AWS can successfully ping each other.