Gilt für: WatchGuard Advanced EPDR, WatchGuard EPDR, WatchGuard EDR,WatchGuard EDR Core, WatchGuard EPP
Sie können mit dem Product Support Information Tool (PSInfo-Tool) supportbezogene Informationen auf einem betroffenen Endpoint-Computer erfassen. Falls Sie ein Problem melden wollen, können Sie die supportbezogenen Informationen an den Support senden. PSInfo kann die Informationen auch lokal als .7Z-Datei speichern. Sie können die Inhalte der .7Z-Datei auf Ihrem Computer mit dem WatchGuard Endpoint Product Support Info Viewer (PSInfoViewer) einsehen. Weitere Informationen finden Sie unter Über PSInfoViewer.
PSInfo installieren
So installieren Sie PSInfo:
- Geben Sie diese URL in die Adressleiste Ihres Browsers ein:
https://www.pandasecurity.com/psinfo - Drücken Sie auf Eingabe.
Eine ZIP-Datei wird auf Ihren Computer heruntergeladen. - Entpacken Sie die Datei PSInfo.exe an einem Ort Ihrer Wahl.
Falls dazu aufgefordert, öffnen Sie das Archiv mit dem Passwort ‚panda‘.
PSInfo ausführen und Informationen erfassen
So führen Sie PSInfo aus und erfassen supportbezogene Informationen:
- Führen Sie PSInfo.exe aus.
Die Seite License Agreement (Lizenzvereinbarung) wird geöffnet. - Aktivieren Sie das Kontrollkästchen I Accept the Terms of this Agreement (Ich akzeptiere die Bestimmungen dieser Vereinbarung).
- Klicken Sie auf Accept (Akzeptieren).
Das Fenster PSInfo wird geöffnet. - Wählen Sie die Registerkarte General (Allgemein).
- Im Textfeld Account ID (Konto-ID) geben Sie Ihre Konto-ID-Nummer ein, falls sie nicht schon eingetragen ist.
Falls Sie kein Endpoint Security-Produkt installiert haben, wird das Feld nicht vorausgefüllt und Sie müssen Ihre Konto-Nummer manuell angeben. - Wählen Sie, falls nicht bereits eingetragen, in der Dropdown-Liste Product (Produkt) das Produkt aus, für das Sie einen Bericht erstellen möchten.
Wenn Sie kein Endpoint Security-Produkt installiert haben, wird das Feld nicht vorausgefüllt und Sie müssen ein Produkt aus der Produkt-Dropdown-Liste manuell auswählen. - Geben Sie im Textfeld Problem Description (Problembeschreibung) eine Zusammenfassung des Problems ein. Sie können auch eine beliebige zugehörige Supportfall-Nummer eingeben. Eine Fallnummer kann dem Support helfen, Sie zu unterstützen.
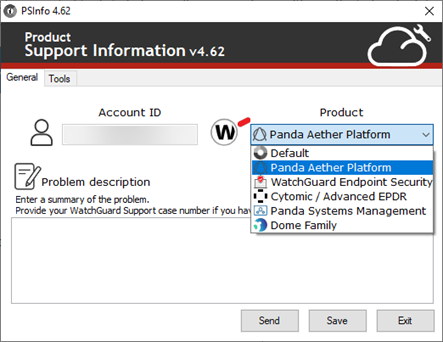
- Wählen Sie, ob Sie die supportbezogenen Informationen an den Support senden oder lokal speichern wollen.
- Klicken Sie auf Send (Senden), um supportbezogene Informationen an den Support zu senden.

Diese Option erstellt supportbezogene Informationen und sendet diese automatisch an die E-Mail-Adresse des Empfängers.
- Im Textfeld Contact Email Address (Kontakt-E-Mail-Adresse) geben Sie eine Kontakt-E-Mail-Adresse für die Kommunikation über den Fall ein.
- Im Textfeld Recipient Email Address (E-Mail-Adresse Empfänger) geben Sie die E-Mail-Adresse Ihres Support-Providers ein. Um PSInfo an den WatchGuard Support zu senden, lassen Sie das Textfeld leer.
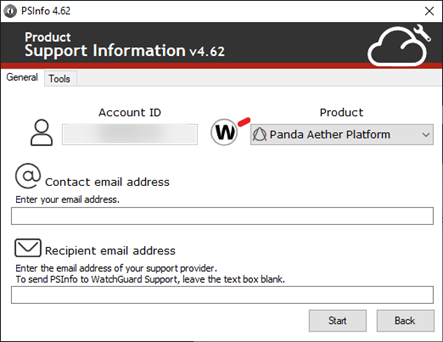
- Klicken Sie auf Start.
PSInfo erfasst supportbezogene Informationen im Hintergrund. Während der Datenerfassung wird im Infobereich der Taskleiste des Computers ein Daten werden erfasst-Symbol angezeigt. Nach Abschluss der Erfassung wird eine entsprechende Meldung im Infobereich der Taskleiste angezeigt. Die supportbezogenen Informationen werden an den Empfänger gesendet.
- Klicken Sie auf Save (Speichern), um die supportbezogenen Informationen lokal zu speichern.
Diese Option generiert und speichert die supportbezogenen Informationen lokal als .7Z-Datei.
- Im Textfeld Save Collected Data (Erfasste Daten speichern) geben Sie den Speicherort ein oder Sie navigieren zum Speicherort.
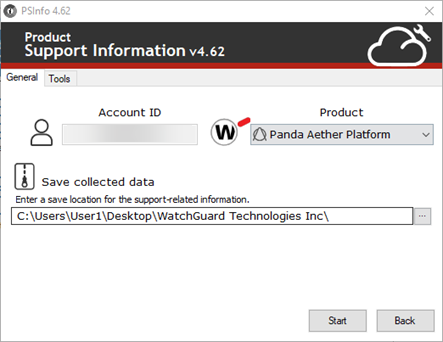
- Klicken Sie auf Start.
PSInfo erfasst supportbezogene Informationen im Hintergrund. Während der Datenerfassung wird im Infobereich der Taskleiste des Computers ein Daten werden erfasst-Symbol angezeigt. Nach Abschluss der Erfassung wird eine entsprechende Meldung im Infobereich der Taskleiste angezeigt. Die supportbezogenen Informationen werden lokal gespeichert. Die supportbezogenen Informationen werden nicht automatisch an den Support-Provider gesendet.
- Im Textfeld Save Collected Data (Erfasste Daten speichern) geben Sie den Speicherort ein oder Sie navigieren zum Speicherort.
Fehlersuche und -behebung
Sie können die folgenden Schritte zur Fehlersuche und -behebung durchführen, wenn es nicht möglich ist, in der PSInfo-Verwaltungsoberfläche eine .7Z-Datei zu generieren.
PSInfo generiert keine .7Z-Datei
In einigen seltenen Fällen nach einem längeren Zeitraum könnte PSInfo keine .7Z-Datei generieren. Falls dies geschieht:
- Navigieren Sie auf Ihrem Computer zum Ordner temp. Wenn Sie zum Beispiel einen Windows-Computer nutzen, navigieren Sie zu:
C:\Windows\Temp - Komprimieren Sie den Ordner PSInfo als 7Z-Datei.
- Senden Sie die 7Z-Datei an den Support.
Falls der Ordner temp keinen Ordner PSInfo enthält, komprimieren und speichern Sie die folgenden Ordner als .7Z-Datei und senden Sie die .7Z-Datei an den Support.
- C:\ProgramData\Panda Security\Panda Aether Agent\Logs
- C:\ProgramData\Panda Security\Panda Aether Agent\Messages
- C:\ProgramData\Panda Security\PSLogs
PSInfo erstellt den Ordner Messages (Meldungen), wenn Sie das PSInfo-Tool Advanced Logs nutzen.
PSInfo wird nicht gestartet oder plötzlich gestoppt
Wenn PSInfo nicht startet oder plötzlich stoppt, können Sie PSInfo über die Befehlszeile ausführen, um supportbezogene Informationen zu erhalten und zu sammeln.
So führen Sie PSInfo über die Befehlszeile aus:
- Öffnen Sie auf einem Windows-Computer die Eingabeaufforderung als Administrator.
- Verwenden Sie im Eingabeaufforderungsfenster den Befehl cd, um zum Stammordner Ihrer PSInfo-Installation zu gelangen. In der Regel gelangen Sie mit dem folgenden Befehl zum Stammordner:
cd C:\Program Files (x86)\Panda Security\Panda Aether Agent\Additional files - Geben Sie in der Eingabeaufforderung Folgendes ein:
PSInfo.exe -local -nogui - Drücken Sie auf Eingabe.
Das PSInfo-Tool startet über die Befehlszeile.

Das Erfassen von Daten kann einige Zeit in Anspruch nehmen. Es wird angezeigt, ob das Tool aktiv Daten aus dem Task-Manager erfasst. Ist der Panda Support Information-Prozess im Task-Manager aktiv, dann erfasst das Tool Daten.

Das Tool zeigt nicht an, dass die Erfassung beendet ist.
- Sobald die Erfassung abgeschlossen ist, speichert das Tool eine .7Z-Datei auf Ihrem Desktop. Sie können die Datei an den Support senden.
PSInfo URL Checker (URL-Prüfer)
PSInfo Enable Advanced Logs (Erweiterte Protokolle aktivieren)