Applies To: ThreatSync, WatchGuard NDR, WatchGuard SaaS DR
As a tier-1 Service Provider, if you enable PSA integration in WatchGuard Cloud, you can configure
For WatchGuard NDR and WatchGuard SaaS DR, you can use notification rules to send data to the PSA tool but you must manually close the ticket in the PSA tool.
Your operator role determines what you can see and do in WatchGuard Cloud. You must be a tier-1 Service Provider and your role must have the Manage Integrations and Manage Tenants permissions to configure this feature. To configure notification rules, your role must also have the ThreatSync permission. For more information, go to Manage WatchGuard Cloud Operators and Roles.
There are three categories of ThreatSync event notifications:
ThreatSync Incidents
For ThreatSync events, you can configure these notifications:
Malicious IP
Generates an alert when ThreatSync detects an IP address associated with malicious activity.
Malicious Access Point
Generates an alert when ThreatSync detects an unauthorized wireless access point connected to your network or operating in your airspace.
Unknown Program
Generates an alert when a program is blocked because it has not yet been classified by WatchGuard Endpoint Security.
Intrusion Attempt
Generates an alert when ThreatSync detects a security event where an intruder tried to gain unauthorized access to a system.
Credential Access
Generates an alert when ThreatSync detects an AuthPoint incident that indicates an attempt to compromise account credentials.
IOA
Generates an alert when ThreatSync detects Indicators of Attack (IOAs), which are indicators that are highly likely to be an attack.
Advanced Security Policy
Generates an alert when ThreatSync detects unauthorized or unexpected activity on your network, including execution of malicious scripts and unknown programs that use advanced infection techniques, traffic to dangerous websites, unauthorized applications and countries, unauthorized incoming traffic, or unauthorized traffic between internal networks.
Exploit
Generates an alert when ThreatSync detects an attack that tries to inject malicious code to exploit vulnerable processes.
Virus
Generates an alert when ThreatSync detects malicious code.
Malware
Generates an alert when ThreatSync detects malicious software designed to damage, disrupt, and gain unauthorized access to computer systems.
PUP
Generates an alert when ThreatSync detects a Potentially Unwanted Program (PUP) that might install when other software installs on a computer.
Malicious URL
Generates an alert when ThreatSync detects a URL created to distribute malware, such as ransomware.
WatchGuard NDR
For WatchGuard NDR events, you can configure these notifications:
DHCP Logs Not Received from Source
Generates an alert when no DHCP logs are received from a source for 120 minutes.
NDR Collector Heartbeat Not Detected
Generates an alert when no heartbeat message is received from a WatchGuard NDR collector for 20 minutes.
NetFlow Logs Not Received
Generates an alert when no NetFlow logs are received by WatchGuard NDR networking devices for 20 minutes.
No NetFlow Logs Received from Source
Generates an alert when no NetFlow logs are received from a source for 20 minutes.
WatchGuard SaaS DR
For WatchGuard SaaS DR events, you can configure these notifications:
Collector Heartbeat Detected
Generates an alert when WatchGuard SaaS DR detects a heartbeat from your SaaS integration. SaaS collectors communicate with Microsoft 365 every 30 minutes to confirm that the integration is working properly.
NDR Collector Heartbeat Not Detected
Generates an alert when WatchGuard SaaS DR does not detect a heartbeat from your SaaS integration for 120 minutes.
Configure ThreatSync PSA Ticketing Notification Settings
You can configure PSA ticketing notification rules for selected accounts, groups of accounts, or all accounts.
You can enable or disable a category of rules and you can select which rules you want to apply to your selected accounts.
For each rule you enable, you select the ticketing properties. Ticketing properties allow you to specify the priority, service board or queue, category, new status, and closed status for the ticket created in the connected PSA tool.
ThreatSync, Endpoint Security, Firebox, License alerts, and WatchGuard Cloud notification rules support closed-loop ticketing. For AuthPoint, access points, FireCloud, WatchGuard NDR, and WatchGuard SaaS DR, you must manually close a ticket in the PSA tool.
For more information about closed-loop ticketing, go to About Closed-Loop Ticketing with PSA Integration.
To configure notification rules for PSA ticketing, from WatchGuard Cloud:
- Select Administration > PSA Ticketing.
The PSA Ticketing page opens.
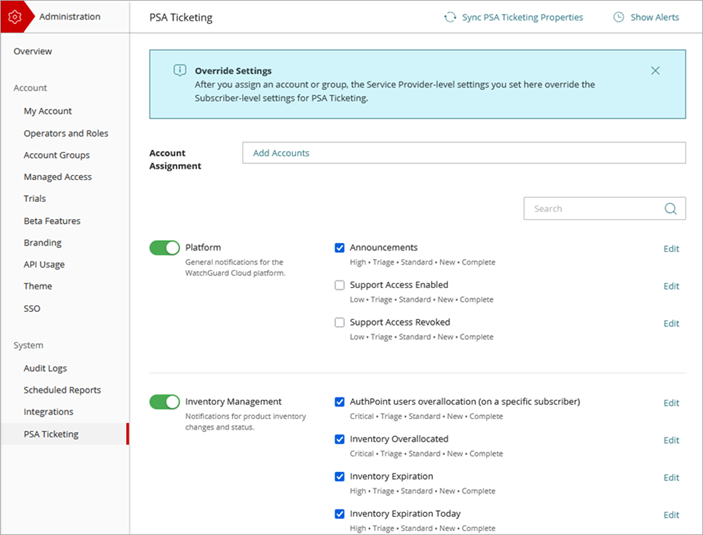
- To get the latest static ticket data from the PSA tool, click Sync PSA Ticket Properties.
WatchGuard retrieves the most recent static ticket data, such as changes in ticket status or priority, from the PSA tool. - In the Account Assignment text box, click Add Accounts.
The Add Accounts and Account Groups dialog box opens.
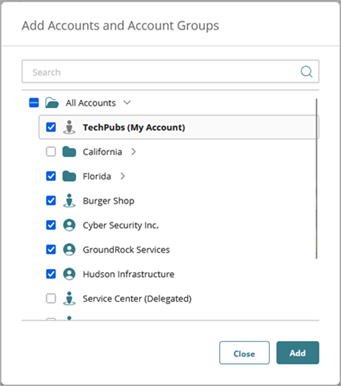
- From the list of accounts, select each account and account group you want to configure the notification rules for. Click Add.
The accounts show in the Account Assignment text box.
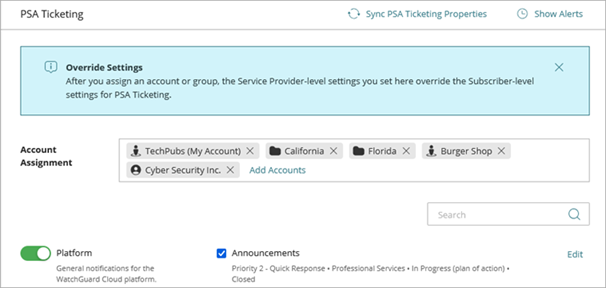
If you select a Service Provider account or group that includes a Service Provider account, the PSA ticketing notifications apply to all of the accounts managed by the Service Provider.
To remove an account assignment, click the X next to the account or account group name.
- Enable the
- Next to each rule you want to enable, select the check box.
The PSA ticketing properties show for each rule.
If the ticketing properties for a rule do not match the properties in the connected PSA tool, a warning icon shows next to the rule. To update the ticketing properties, edit the rule.

If you enable a toggle but do not select any rules for the category, no alerts are generated for the category.
- To change the ticketing properties or alert details for the rule, click Edit.
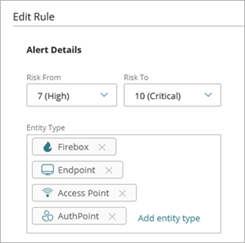
The Edit Rule or Edit Ticketing Properties page opens.- For ThreatSync Incidents notification rules, select these alert details options:
- From the Risk From and Risk To drop-down lists, select the risk level range for the notifications.
- In the Entity Type section, click Add Entity Type and select the entity types for the notifications.
- For ConnectWise ticketing properties, select the Priority, Service Board, and New Status for the ticket sent to the PSA tool. Select the PSA tool Close Status. This is the status that indicates the ticket is closed in the PSA tool and acknowledges the PSA alert notification in WatchGuard Cloud.
- For Autotask ticketing properties, select the Priority, Queue, Ticket Category, and New Status for the ticket sent to the PSA tool. Select the PSA tool Close Status. This is the status that indicates the ticket is closed in the PSA tool and acknowledges the PSA alert notification in WatchGuard Cloud.
- For HaloPSA ticketing properties, select the SLA, Priority, Ticket Type, Ticket Category, and New Status for the ticket sent to the PSA tool. Select the PSA tool Close Status. This is the status that indicates the ticket is closed in the PSA tool and acknowledges the PSA alert notification in WatchGuard Cloud.
To allow WatchGuard Cloud to create the ticket, in Autotask you must edit the Ticket Category and set the default value for Due Date > # of Days From Application to 1 and set the default value for Due Time > # Hours From Application to 0.
- For ThreatSync Incidents notification rules, select these alert details options:
- Click Save.
The PSA Ticketing page opens.