Applies To: FireCloud Internet Access, FireCloud Total Access
This quick start topic reviews the general steps to configure and test FireCloud. This guide introduces FireCloud, reviews the basic components of FireCloud, and helps you get set up.
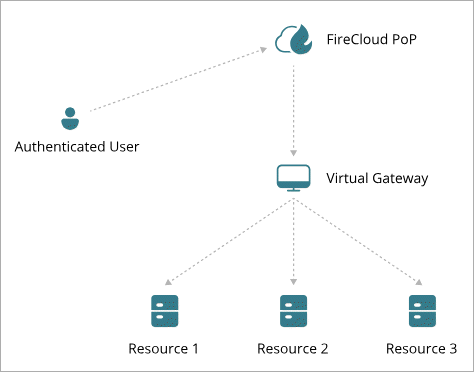
FireCloud is a fully-managed, cloud-based firewall-as a-service that protects your remote users against Internet-based security threats and provides access to local resources on your company network without a VPN. You configure FireCloud in WatchGuard Cloud, and users connect to the service with the WatchGuard connection manager. While the users are connected to FireCloud, they are protected and can safely use their computer and browse the Internet.
Here is a high level overview of the steps in this quick start guide:
- Activate a FireCloud license or start a trial.
- Configure FireCloud authentication settings.
- Configure an Identity Provider
- (SAML Only) Provide FireCloud Information to Your Identity Provider (AuthPoint and SAML Only)
- (WatchGuard Cloud Directory Only) Add a Zero Trust Policy for MFA (WatchGuard Cloud Directory Only)
- (Optional) Control Access to FireCloud
- Review the default settings.
- Download and install the connection manager.
- Connect to FireCloud with the connection manager.
- (Total Access Only) Give users access to resources on the company network.
- (Optional - Service Providers Only) Create and deploy FireCloud templates.
Before you begin, we recommend that you familiarize yourself with these key terms related to FireCloud:
WatchGuard Cloud
WatchGuard Cloud is the platform where you configure, manage, and monitor FireCloud. There are two types of WatchGuard Cloud accounts — Subscriber and Service Provider. Each account type has a different view of WatchGuard Cloud. To learn more, go to About WatchGuard Cloud Account Types.
For Service Providers, the procedures in this quick start guide require additional steps.
Inventory and Allocation
Users purchased by a Service Provider account are stored in your inventory in WatchGuard Cloud. As a Service Provider, you can allocate users to your own account or any account you manage. User allocation is how Service Providers provision an account with licensed users for a security service such as FireCloud.
WatchGuard Connection Manager
The connection manager is an application that you install on end-user computers. Users use the connection manager to connect to FireCloud.
WatchGuard Agent
The WatchGuard Agent handles communication between managed computers on the same network and the WatchGuard server. The agent is installed on each endpoint or computer, and is used to deploy WatchGuard software, such as the WatchGuard connection manager and Endpoint Security software. It has low CPU, memory, and bandwidth usage and uses less than 2 MB of data each day.
When you download the installer from the FireCloud UI, you are downloading the WatchGuard Agent.
Identity Provider
An identity provider is the external database with your users and groups. This is how FireCloud knows what users and groups are authorized, and how the users are authenticated when they connect to FireCloud. You can use any identity provider that supports SAML, such as Okta, Microsoft Entra ID (Azure Active Directory), or AuthPoint.
Directories and Domain Services
Directories and Domain Services is a WatchGuard Cloud feature that enables you to sync external users, groups, and devices to WatchGuard Cloud. You can then use the users, groups, and devices in Directories and Domain Services with products such as FireCloud.
For FireCloud, you can use your existing authentication servers from Directories and Domain services, such as the WatchGuard Cloud Directory, to authenticate your FireCloud users and groups instead of using an identity provider.
WatchGuard Cloud Directory
The WatchGuard Cloud Directory is an authentication domain in Directories and Domain Services where you can add users and groups that are hosted in WatchGuard Cloud. You can then use the users and groups from the WatchGuard Cloud Directory with products such as FireCloud.
Zero Trust in WatchGuard Cloud
With Zero Trust in WatchGuard Cloud, you can create and manage policies and conditions in one place and use them across multiple products and services in WatchGuard Cloud. This centralized management makes it faster and easier to control who can use specific resources and when. With Zero Trust conditions, you can set parameters that must be met for a policy to apply to a user authentication. These parameters enable you to create more granular policies based on factors such as location, time, and user behavior. For more information, go to About Zero Trust in WatchGuard Cloud and About Zero Trust Conditions.
To use Zero Trust with FireCloud, you must configure the WatchGuard Cloud Directory as your FireCloud identity provider or set up AuthPoint as a SAML identity provider.
Activate a FireCloud License or Start a Trial
Before you begin, you must purchase and activate a FireCloud license or start a FireCloud trial.
If you have not already purchased a FireCloud license, we recommend that you start a free FireCloud trial in WatchGuard Cloud. For detailed steps to start a trial, go to Manage Trials – Service Providers or Manage Trials – Subscribers. All trial licenses are valid for 30 days, and can be renewed for another 30 days to a maximum of 60 days.

If you have purchased a FireCloud license, go to https://myproducts.watchguard.com/activate and complete the activation wizard. For more information, go to Activate a FireCloud License.
If you have a WatchGuard Cloud Service Provider account and want to use FireCloud for your own account, after you activate a FireCloud license you must allocate the users to your Subscriber account. For detailed steps, go to Allocate FireCloud Users.
Configure Authentication Settings
Before you can configure FireCloud, you must set up an identity provider. An identity provider is an external system that you use to manage and authenticate your FireCloud users and groups. This is how FireCloud knows what users and groups are authorized, and how the users are authenticated when they connect to FireCloud.
Configure an Identity Provider
To configure an identity provider for FireCloud:
- Log in to WatchGuard Cloud and select Configure > FireCloud.
- Select the type of identity provider to use and enter the required information:AuthPoint

With this option, you can use AuthPoint as a SAML identity provider for FireCloud. This works the same as the third-party SAML option, except that FireCloud only requires the AuthPoint certificate (the other SAML parameters are automatically configured for you).
To configure AuthPoint as a SAML identity provider, you must provide this information:
- AuthPoint Entity ID — Enter a name to identify FireCloud as your service provider. An entity ID is a unique name for an identity provider or a service provider. After you configure this value for FireCloud, you use this entity ID to configure your SAML resource in AuthPoint.
- IDP Certificate — Paste or upload the AuthPoint x.509 certificate from your identity provider. To download the AuthPoint certificate, go to Configure > AuthPoint > Resources > Certificate.
WatchGuard Cloud DirectoryUse the users and groups you add to the WatchGuard Cloud Directory. The WatchGuard Cloud Directory is an authentication domain where you can add users and groups that are hosted in WatchGuard Cloud. To learn more about the WatchGuard Cloud Directory, and how to add WatchGuard Cloud-hosted users and groups, go to About the WatchGuard Cloud Directory.
This option is best for accounts that do not have an external identity provider, accounts that have only a few users, and accounts that want to test FireCloud.
If you select this option and have not set up the WatchGuard Cloud Directory, the WatchGuard Cloud Directory is configured for you.

To require AuthPoint MFA for WatchGuard Cloud Directory users, after you set up your identity provider you must go to Configure > Zero Trust and add a Zero Trust policy that includes the default FireCloud resource from AuthPoint. This is covered in the Add a Zero Trust Policy for MFA (WatchGuard Cloud Directory Only) section.
When you use the WatchGuard Cloud Directory as your FireCloud identity provider, you can only set up AuthPoint MFA for users that belong to the WatchGuard Cloud Directory. To require MFA for Active Directory or Entra ID AuthPoint users, you must set up AuthPoint as a SAML identity provider for FireCloud.
Third-Party SAMLUse any identity provider that supports SAML, such as AuthPoint or Microsoft Entra ID, to authenticate your users and groups. To configure a SAML identity provider, you must provide additional information:
- SAML Service Provider Entity ID — Enter a name to identify FireCloud as your service provider. An entity ID is a unique name for an identity provider or a service provider. After you configure this value for FireCloud, you use this entity ID to configure your identity provider.
- Identity Provider ID — Enter the entity provider ID from your identity provider. Identity providers usually show this value in the UI, but in some cases you might have to download a metadata file and get the value from there. For example, the AuthPoint entity ID would be https://sp.authpoint.cloud.watchguard.com/ACC-1234567 where ACC-1234576 is your WatchGuard Cloud account number.
- Single Sign-On URL — Enter the single sign-on URL for your identity provider. This is usually a URL that contains the identity provider name. For example, the AuthPoint single-sign on URL would be https://sp.authpoint.usa.cloud.watchguard.com/saml/ACC-1234567/sso/spinit, where usa is your WatchGuard Cloud account region and ACC-1234576 is your WatchGuard Cloud account number. You can find the AuthPoint single sign-on URL in the SAML metadata file.
- IDP Certificate — Paste or upload the x.509 certificate from your identity provider. You can download the certificate from some identity providers, while other identity providers include the certificate as a value in the metadata file.
For AuthPoint, you can find the Identity Provider ID and the Single Sign-On URL in the AuthPoint metadata file. To download the AuthPoint metadata certificate and the IDP certificate, in WatchGuard Cloud, go to Configure > AuthPoint > Resources > Certificate.

- Click Save.
You only have to configure an identity provider the first time you set up FireCloud. To edit the settings for your identity provider, or change to a new identity provider, go to the Configure > FireCloud > Settings > Authentication.
Provide FireCloud Information to Your Identity Provider (AuthPoint and SAML Only)
If you configure a SAML identity provider, FireCloud generates a certificate that you can provide to your identity provider. This certificate gives your identity provider the information to identify FireCloud and makes sure that your identity provider responds only to valid authentication requests sent by FireCloud. You can download this certificate from the FireCloud Authentication page.

We recommend that you import the FireCloud certificate to your identity provider and enable signature verification.
Your identity provider might have a different name for signature verification. For example, Okta calls this setting SAML Signed Request and Entra ID calls it Verification Certificates.
If you select to use AuthPoint as your identity provider, you must also create a SAML resource in AuthPoint for FireCloud, and you must add the SAML resource to your existing Zero Trust policies or add new Zero Trust policies for the SAML resource.
- On the FireCloud Authentication page, click Download FireCloud Certificate. You use this certificate when you configure a SAML resource in AuthPoint. You also use the SAML Service Provider Entity ID value.
- Select Configure > AuthPoint > Resources.
- Click Add Resource.
- From the Type drop-down list, select SAML.
- Enter a name for your resource, such as FireCloud.
- From the Application Type drop-down list, select Others.
- In the Service Provider Entity ID text box, enter the SAML Service Provider Entity ID that you specified in Configure an Identity Provider in FireCloud. This is the name you gave to identify FireCloud.
- In the Assertion Consumer Service text box, enter the ACS value for your FireCloud account, based on your WatchGuard Cloud account region.
- North America / Americas — https://authsvc.firecloud.usa.cloud.watchguard.com/v1/acs
- EMEA — https://authsvc.firecloud.deu.cloud.watchguard.com/v1/acs
- APAC — https://authsvc.firecloud.jpn.cloud.watchguard.com/v1/acs
- From the User ID Sent on Redirection to Service Provider drop-down list, select User Name.
- For the certificate, upload your FireCloud certificate.
- From the AuthPoint Certificate drop-down list, select the AuthPoint certificate to associate with your resource. You must select the same certificate that you downloaded the metadata and x.509 certificate from.
- Click Add Attribute.
- In the Attribute Name text box, type groups. This value is case-sensitive.
- From the Get Value From drop-down list, select User Groups.
- Click Save.
AuthPoint saves your custom attribute. - Click Save.
AuthPoint creates your SAML resource. - Go to Configure > Zero Trust and add a new Zero Trust authentication policy for this resource, or add the resource to your existing Zero Trust policies. For more information, go to About Zero Trust Policies.
- To allow users to connect to FireCloud with only their password, your Zero Trust authentication policy must require only the password authentication option.
- To require users to authenticate with MFA when they connect to FireCloud, your Zero Trust authentication policy must require the push, QR code, or OTP authentication options in addition to the password authentication option.
Add a Zero Trust Policy for MFA (WatchGuard Cloud Directory Only)
To require AuthPoint MFA for WatchGuard Cloud Directory users, after you set up your FireCloud identity provider you must add a Zero Trust policy that includes the default FireCloud resource from AuthPoint.
Skip this section if you do not have AuthPoint, or you do not want to require MFA for FireCloud.
- Go to Configure > Zero Trust.
- Click Add Policy.
- Enter a name to identify your policy.
- In the Target section, from the Content drop-down list, select which groups this policy applies to. You can make multiple selections to add multiple groups.
- In the Resources section, select the FireCloud resource. This is the resource with the FireCloud resource type that is automatically created when you allocate FireCloud users to an account that has AuthPoint.
- (Optional) In the Conditions section, select the conditions that apply to this policy. When you add a condition to an authentication policy, the policy applies only to user authentications that match the policy and the policy conditions. For more information about conditions, go to About Zero Trust Conditions.
If you add conditions to a policy, we recommend that you create a second policy for the same groups and resources without the conditions. Assign a higher priority to the policy with the policy objects. For more information about priority, go to About Zero Trust Policy Precedence.
- In the Action section, select Allow.
- Select the check box for each authentication option users can select when they authenticate to FireCloud with MFA.
- Click Save.
Your policy is created and added to the end of the policy list.
Control Access to FireCloud
If you have connected FireCloud to an identity provider that has more users than will actually use FireCloud, you can control access to FireCloud so that only some users can connect to the service and consume a user license. To do this, you can disable the default FireCloud access rule and configure access rules for only the user groups that you want to have access to FireCloud. Users that do not have an access rule cannot connect to the FireCloud service and consume a license. For more information, go to FireCloud Access Rules.
You can also provide the FireCloud connection manager to only the end-users that you want to use the service.
Review the Default Settings
By default, FireCloud has all security services enabled with default configurations, and a default access rule is in place to specify which security services apply to user traffic. This means that you can deploy and use FireCloud immediately, but we recommend that you review the default settings.
Scanning engines protect against spyware, viruses, malicious applications, spam email, and data leakage. Content scanning services are enabled by default with recommended settings. For content scanning to apply to traffic, you must also enable content scanning in FireCloud access rules.
With FireCloud, you can enable content scanning with these services:
Gateway AntiVirus
Gateway AntiVirus protects your users from viruses. You can configure the action Gateway AntiVirus takes when a virus is detected, an error occurs, scanned content exceeds the configured size limit, or scanned content is encrypted.
APT Blocker
An Advanced Persistent Threat (APT) attack is a type of network attack that uses advanced malware and zero-day exploits to get access to networks and confidential data over extended periods of time. APT Blocker identifies the characteristics and behavior of APT malware in files and email attachments that enter your network. You can configure the action APT Blocker takes for each threat level (High, Medium, Low).
You can use FireCloud to monitor and block common security threats, such as botnets, spyware, SQL injections, cross-site scripting, and buffer overflows. FireCloud network blocking security services are enabled by default, with recommended settings.
Botnet Detection
A botnet comprises a large number of malware-infected client computers that a remote server controls and uses to perform malicious acts. The Botnet Detection security service adds a list of known botnet site IP addresses to the FireCloud Blocked Sites List, which enables FireCloud to block these sites at the packet level.
Intrusion Prevention Service
Intrusion Prevention Service (IPS) uses signatures to provide real-time protection against network attacks, including spyware, SQL injections, cross-site scripting, and buffer overflows. Configure the action IPS takes when it detects a threat, as well as the type of scan.
To learn how to configure network blocking, go to Configure Network Blocking in FireCloud.
Geolocation is a security service that enables FireCloud to detect the geographic locations of connections to and from your devices. With FireCloud, you can enable and configure Geolocation to block access to and from specific locations.
The default Geolocation action does not block any countries.
To learn how to configure Geolocation actions, go to Add Geolocation Actions in FireCloud.
Content filtering uses the WebBlocker and Application Control security services to block specific content categories and applications. Content filtering security services are enabled by default with recommended settings.
WebBlocker
WebBlocker helps you control which websites are available to your users. WebBlocker uses a database that groups website addresses into content categories. When a user tries to connect to a website, FireCloud looks up the address in the WebBlocker database and takes the action you specify for the content category.
Application Control
Application Control enables you to monitor and control the use of applications by your users. You can use Application Control to block the use of specific applications, and you can report on application use and use attempts.
To learn how to configure content filtering, go to Content Filtering in FireCloud.
A FireCloud access rule is a policy that determines when FireCloud allows or denies connections and what private resources users can connect to. FireCloud matches each connection to an access rule based on the user groups that the user belongs to. You can configure which security services apply to the traffic each access rule handles.
FireCloud has a Default access rule that applies to all connections. The Default access rule has all security services enabled with the default configurations. You cannot edit or delete the Default access rule.
If you do not want to use the Default access rule, you can disable it. If the Default access rule is disabled and a user connection does not match any other access rules, the connection is denied.
To learn more about FireCloud access rules, go toFireCloud Access Rules.
Download and Install the WatchGuard Connection Manager
For FireCloud to protect your users, they must have the WatchGuard Connection Manager installed on their device and use it to connect to FireCloud.
If you want to install FireCloud on a computer that already has the WatchGuard Agent installed for another product, such as Endpoint Security, you can configure a WatchGuard Agent deployment to install FireCloud. For more information, go to Configure WatchGuard Agent Deployment in WatchGuard Cloud.
To download the WatchGuard Agent, used to install the WatchGuard Connection Manager:
- Log in to WatchGuard Cloud and go to Configure > FireCloud.
- Select Endpoint Installation.
The Endpoint Installation page opens. - Click Add Endpoint.
- Select the operating system for the endpoint where you want to install the agent.
- If you have Endpoint Security, select the group you want to add the computer to.
For endpoints with an Endpoint Security license, the security policies assigned to a computer depend on the group it belongs to. For information about groups for endpoints with an Endpoint Security license, go to Manage Computers and Devices in Groups in Endpoint Security.- To add the computer to a group created in the Endpoint Security management UI, select Add Computers to this Group. From the drop-down list, select a folder.
- To add the computer to an Active Directory group, select Add Computers to their Active Directory Path. Select the network proxy to assign to the computers.
- (Optional) For the Windows installer, to specify an expiration date for the installer, click in the box and select a date from the calendar.
After the expiration date, if users try to run the installer, a message informs them that the installer is expired, and they must download a new one or contact their administrator. - Click Download Installer.
The WatchGuard Agent installer download begins. - If you want to send the installer to your users so they can download and install the agent themselves, click Copy Installer URL. You can send this link to your users.
- Run the downloaded installer.
- Click Install. The installation of the WatchGuard Agent can take several minutes.
- When the installation is complete, click Finish.
- After the WatchGuard Agent is installed, the agent automatically downloads and installs the Connection Manager.
- On mac computers, you are prompted to enable the network extension for the Connection Manager. Open the system settings and go to General > Login Items and Extensions > Network Extensions and enable WatchGuardConnectionManager.
- When the installation is finished, the Connection Manager opens and you are prompted to enter your credentials to connect to FireCloud. You use the credentials for the user account in your identity provider.
Connect to FireCloud with the Connection Manager
While you are connected to FireCloud, you are protected and can safely use your computer and browse the Internet. After you connect to FireCloud for the first time, the agent keeps your session open and you remain connected even if you restart your computer.
If you disconnect from FireCloud, you must manually log in and connect again.
To connect to FireCloud:
- Open the WatchGuard Connection Manager.
- From the system tray, click the WatchGuard Connection Manager, then select Connect.

- Enter your user name or email address, then click Next.

- Enter your password.
You see a success message when you are connected to FireCloud. - Click Log In.
Give Users Access to Resources on the Company Network (Total Access Only)
With FireCloud Total Access, you can give FireCloud users access to local resources on the company network without a VPN.
To do this, you must:
- Deploy a FireCloud Gateway on your network (the Gateway establishes a connection between FireCloud and your network)
- Configure a private resource for each resource that you want to allow remote FireCloud users to have access to, such as a printer or an SMB share
- You add your private resources to access rules to give users access to those resources
With this setup, remote users that are connected to FireCloud can connect to resources on the company network. Your access rules determine which resources users can connect to. Users that do not have an access rule that includes a private resource cannot connect to that resource.
There are currently two kinds of FireCloud Gateways:
Virtual Gateway
With a FireCloud Virtual Gateway, you install the Gateway on a virtual machine and create private resources accessible from the virtual machine.
Firebox Gateway
With a Firebox Gateway, you can use a Firebox as a FireCloud Gateway to give users access to private resources behind the Firebox. In this scenario, FireCloud runs as a service that is already installed on the Firebox, so configuration is minimal, and you do not have to deploy the gateway the way you do with a FireCloud Virtual Gateway.
Configure a Firebox Gateway
To configure a Firebox Gateway:
- From the navigation menu, select Configure > FireCloud. If you have a Service Provider account, you must select an account from Account Manager.
- On the Configuration page, click the Private Resources tile.
- Click Add FireCloud Gateway.
- Select Firebox Gateway.
- Click Next.
- Enter a Name for your Gateway.
- From the list of Fireboxes, select a Firebox to use as your FireCloud Gateway. The list shows only the Fireboxes in your account that meet the requirements.
- Click Next.
- Click Finished.
Configure and Deploy a Virtual Gateway
To configure a FireCloud Virtual Gateway
- From the navigation menu, select Configure > FireCloud. If you have a Service Provider account, you must select an account from Account Manager.
- On the Configuration page, click the Private Resources tile.
- Click Add FireCloud Gateway.
- Select Virtual Gateway.
- Click Next.
- Enter a Name for your Gateway.
- For IP Address Configuration, select whether you want to give the Gateway a static or DHCP IP address.
- If you use a static IP address:
- Enter the Network IP Address and the Network Gateway IP address.
- Enter a DNS server, such as the public Google DNS server 8.8.8.8.
- Click Next.
- Select the type of environment you want to deploy the FireCloud Gateway on, either Hyper-V, VMware ESXi, or Proxmox.
FireCloud only supports Hyper-V generation one.
- Click Next.
- Click Download Gateway Files. When the download is complete, extract the files in the downloaded .zip folder. You will have a .iso file and either an .ova file (ESXi) or a .vhdx file (Hyper-V).
- Complete the steps to deploy the FireCloud Gateway in your chosen environment. Leave the WatchGuard Cloud tab open so that you can test the connection to the Gateway after you have set it up.
- Log in to the Hyper-V server.
- Open the Hyper-V console.
- Select New > Virtual Machine.
The New Virtual Machine Wizard opens.
- Name the virtual machine. Click Next.
- Select Generation 1. Click Next.
- Assign memory to the machine. We recommend at least 512 MB.
- Click Next.
- For Configure Networking, select your network adapter that provides Internet access to your virtual machine. Click Next.
- For Connect Virtual Hard Disk, select Use an existing virtual hard disk.
- Click Browse and select the hard disk image file (.vhdx) you downloaded.
- Click Next.
- Click Finish.
- After the virtual machine is created, right-click the virtual machine and select Settings.
- For Hardware, select the DVD Drive.
- For the DVD drive media, select Image file.
- Click Browse and select the image file (.iso) you downloaded.
- Click Apply, then click OK.
- Power up the virtual gateway from the mounted .iso file (this is the DVD drive you added).
- In WatchGuard Cloud, click Test Connection to make sure that the FireCloud Gateway can connect to WatchGuard Cloud.
- Click Finish.
- In a new tab, go to https://ESXi_Host/UI and connect to the VMware host client. Replace ESXi_Host with the FQDN or IP address of your ESXi host.
- Upload the .iso file to the data store.
- Create a VM and deploy a virtual machine from the downloaded .ova file.
- Edit the settings for your virtual machine and add a CD/DVD drive device. Associate the added CD/DVD drive with the .iso file you uploaded to the data store.
- Power on the virtual machine from the mounted .iso file (this is the CD/DVD drive you added), and let the Gateway install and connect to FireCloud.
You must have ports TCP 443 and UDP 4501 open for the Gateway to connect to FireCloud. The Gateway uses port 443 to authenticate to FireCloud and port 4501 to establish the tunnel that FireCloud uses to connect users to the remote resources behind the Gateway.
- In WatchGuard Cloud, click Test Connection to make sure that the FireCloud Gateway can connect to WatchGuard Cloud.
- Click Finish.
- Connect to ProxMox.
- Go to Datacenter > Storage.
- Select Local and click Edit.
The Edit Directory window opens. - From the Content drop-down list, select Disk Image and Import.
- Click OK.
- For your server, go to local > Import. This is local, not local-vm.
- Click Upload and select the Virtual Gateway file.
- In ProxMox, double-click the Virtual Gateway file.
- Click Import.
- For your server, go to local > ISO images. This is local, not local-vm.
- Click Upload and select the .ISO image for the Virtual Gateway.
- Select the Virtual Gateway and go to Hardware.
- Click Add > CD/DVD Drive.
The Add window opens. - Select Use CD/DVD disc image file (iso).
- From the Storage drop-down list, select local.
- From the ISO image drop-down list, select the Virtual Gateway .ISO file that you uploaded.
- Click Add.
- Power on the Virtual Gateway.
Add Private Resources
- In WatchGuard Cloud, select Configure > FireCloud. If you have a Service Provider account, you must select an account from Account Manager.
- On the Configuration page, click the Private Resources tile.
- Select a Gateway to show the list of resources associated with that Gateway, then click Add Resource.
- Enter a name for your resource.
- In the FQDN text box, specify an FQDN that will be used to connect to this resource. FireCloud uses this FQDN to resolve connections to private resources while users are connected to FireCloud. This is typically a private FQDN, such as internal.company.com.
You cannot use FQDNs that have capital letters.
- In the IP Address text box, enter the internal IP address of the resource.
- In the Protocol drop-down list, select a protocol that is used to connect to this resource.
The Port text box appears. - In the Port text box, enter the port used to connect to this resource with the previously selected protocol. For example, if you want to give RDP access you could select TCP port 3389.
- Click Save.
- To allow users to connect to your private resources, add the private resource to your existing access rules, or add new access rules for this private resource. Access rules specify which private resources users have access to.
When you configure access rules, we recommend that you only add each group to a single access rule. If a group belongs to multiple access rules with different parameters, FireCloud only applies the access rule with the highest priority. This can prevent access to private resources if the access rule with the private resources has a low priority.
Create and Deploy FireCloud Templates (Optional — Service Providers Only)
For Service Providers, FireCloud templates provide a way to manage shared configuration settings for multiple accounts. In a FireCloud template, you can configure FireCloud access rules and services just as you would for your FireCloud account. You can then subscribe your managed accounts to the template so that those accounts inherit configuration settings from the template.
To learn more about FireCloud templates, go to About FireCloud Templates and Manage FireCloud Templates.