Applies To: Endpoint Security Elite, Endpoint Security 360, Endpoint Security Prime, WatchGuard EDR, WatchGuard EDR Core, Endpoint Security Basic
You create and manage endpoint groups on the Computers > My Organization tab in Endpoint Security management UI. Computers move to endpoint groups when you install the WatchGuard Agent on them.
Endpoint groups can be used to configure deployment behavior for products installed by the WatchGuard Agent in the WatchGuard Cloud user interface. For more information, go to Configure WatchGuard Agent Deployment in WatchGuard Cloud.
Your operator role determines what you can see and do in WatchGuard Cloud. Your role must have the Manage Computer Tree permission to view or configure this feature. For more information, go to Manage WatchGuard Cloud Operators and Roles.
Find an Endpoint Group
You can search for an existing endpoint group in the My Organization tab.
To find an endpoint group:
- In WatchGuard Cloud, select Configure > Endpoint Security.
- Select Computers.
- From the left pane, select
 My Organization.
 - Click
 .
.

- In the Search box that appears, type some or all of the group name you want to find.
The list of groups automatically filters to match the search keyword.
Add an Endpoint Group
Add groups to find computers that meet specific criteria for hardware, software, or security. For information on how to create an endpoint group based on the computer's IP address, go to Add an Endpoint Group that Assigns Computers Based on IP Address.
You cannot create an Active Directory group on the My Organization tab. The tree replicates the groups and organizational units that already exist on your Active Directory server.
To add a group:
- In WatchGuard Cloud, select Configure > Endpoint Security.
- Select Computers.
- From the left pane, select My Organization.
- Next to the group in which you want to add a group, click
 .
.
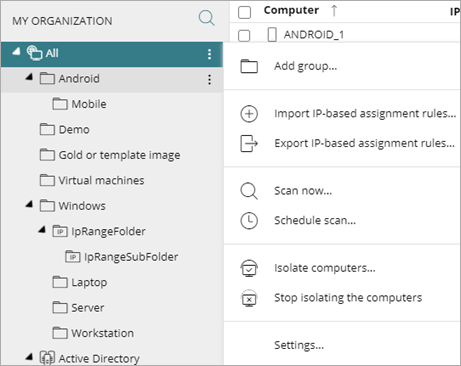
- Select Add Group.
The Add Group dialog box opens.
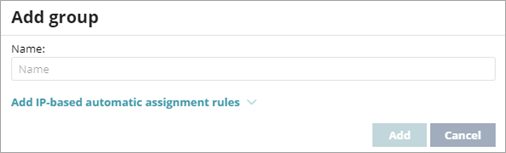
- Type a Name for the group.
- Click Add.
Add an Endpoint Group that Assigns Computers Based on IP Address
To automatically assign computers to an endpoint group when you install the WatchGuard Agent, you can specify the IP addresses or an IP address range for the endpoint group.
To specify the IP addresses for an endpoint group:
- In WatchGuard Cloud, select Configure > Endpoint Security.
- Select Computers.
- From the left pane, select My Organization.
- Next to the group in which you want to create a group, click .
- Select Add Group.
The Add Group dialog box opens.
- Type a Name for the group.
- Click Add IP-based automatic assignment rules.

- In the Add IP Range text box, type the IP addresses of the computers to move to the group.
You can enter individual IP addresses separated by commas, or IP address ranges separated by a dash. - Click Add.
Computers are added to the group when you install the WatchGuard Agent. If the computer IP address changes, the computer remains in the original group.
Delete an Endpoint Group
To delete an endpoint group, it must be empty. If the group contains subgroups or endpoints, an error message appears.
To delete an endpoint group:
- In WatchGuard Cloud, select Configure > Endpoint Security.
- Select Computers.
- From the left pane, select My Organization.
- Make sure that the group is empty.
- Next to the group you want to delete, click .
You cannot delete the All group. - Select Delete.
- Click Delete.
To delete empty Active Directory groups included in another group, next to the group, click![]() and select Delete Empty Groups.
and select Delete Empty Groups.
Edit an Endpoint Group
Edit a group to change the endpoint group name and IP address assignment rules.
You cannot rename the All group or Active Directory groups.
To edit an endpoint group:
- In WatchGuard Cloud, select Configure > Endpoint Security.
- Select Computers.
- From the left pane, select My Organization.
- Next to the group you want to edit, click .
You cannot edit the All root group or any Active Directory groups. - Select Edit.
The Edit Group dialog box opens.

- In the Name text box, type a new name.
- Click Add IP-based automatic assignment rules.
- Enter new IP addresses or a new IP address range, if required.
For individual IP addresses, add a line per address in this format: .\Group\Group\Group (tab) IP . For IP address ranges, add a line per range in this format: .\Group\Group\Group (tab) StartIP-EndIP. - Click OK.
Move an Endpoint Group
On the My Organization tab in Endpoint Security, you can create a hierarchy that includes endpoint groups and subgroups. Move an endpoint group from one folder to another to create the hierarchy. The maximum number of levels in the hierarchy is 10.
You cannot move the All group or any Active Directory groups.
To move an endpoint group:
- In WatchGuard Cloud, select Configure > Endpoint Security.
- Select Computers.
- From the left pane, select My Organization.
- Next to the group you want to move, click .
- Select Move.
The Move to dialog box opens.

- Select the target group.
- Click Move.
An inheritance settings dialog box opens.

- Click Yes to replace the current settings inherited by the group with the destination group settings. Click No to keep the current settings.