
Related Topics
WatchGuard AP Deployment Overview
When you add one or more WatchGuard Access Point (AP) devices to your network, you manage and configure the APs from the Gateway Wireless Controller on a Firebox. It is not necessary to connect directly to the AP to configure the device settings.
To deploy any AP on your Firebox network you must:
- Enable the Gateway Wireless Controller on the Firebox.
- Connect the AP to your network.
If your network has a DHCP server, the AP automatically gets an IP address. - From the Gateway Wireless Controller:
- Configure the SSIDs for your AP to use.
- Pair the AP with the Firebox.
- Configure the AP settings and select the SSIDs to use.
- Check the AP status.
About Automatic Deployment
If you plan to deploy a large number of WatchGuard APs on your network, and all the APs will be assigned the same SSIDs and do not require unique configurations, you can enable automatic deployment on specific SSIDs. The Gateway Wireless Controller automatically deploys unpaired APs and configures them with the specified SSID.
For more information, see About AP Automatic Deployment.
About VLAN Tagging
You can optionally enable VLAN tagging in the SSIDs for your AP. If you enable VLAN tagging, you must configure the necessary VLANs on your Firebox. For information about when to enable VLAN tagging and how to configure VLANs, see Configure VLANs for WatchGuard APs.
You can optionally enable the AP to use a tagged VLAN for management connections from the Firebox. But, you must configure an untagged VLAN that the Firebox can use to initially discover and connect to the AP.
The next sections provide a more detailed overview of the steps to deploy an AP with and without VLAN tagging enabled.
Deploy APs Without VLAN Tagging
To deploy an AP without VLAN tagging, you must enable the Gateway Wireless Controller, configure SSIDs on your Firebox, pair your AP with your Firebox, and configure your AP.
For a configuration example that demonstrates this type of deployment, see AP Deployment with a Single SSID.
Step 1 — Enable the Gateway Wireless Controller
Before your Firebox can discover and manage an AP, you must enable the Gateway Wireless Controller on the Firebox.
- Connect to Fireware Web UI for your Firebox.
- Select Network > Gateway Wireless Controller .
The Gateway Wireless Controller page appears. - Select the Enable the Gateway Wireless Controller check box.
The WatchGuard AP Passphrase dialog box appears. - Type the WatchGuard AP Passphrase that you want all your APs to use after they are paired.
- Start Policy Manager for your Firebox.
- Select Network > Gateway Wireless Controller .
The Gateway Wireless Controller dialog box appears. - Select the Enable the Gateway Wireless Controller check box.
The WatchGuard AP Passphrase dialog box appears. - Type the WatchGuard AP Passphrase that you want all your APs to use after they are paired.
- Save the configuration to the Firebox.
For more information, see Configure APs with the Gateway Wireless Controller.
Step 2 — Connect the AP
Use one of these options to connect the AP to your trusted, optional, or custom network. By default, the AP automatically requests an IP address from a DHCP server on the local network.
To enable the Gateway Wireless Controller to discover an AP on a custom zone network, you must modify the WatchGuard Gateway Wireless Controller policy to allow traffic from the custom zone.
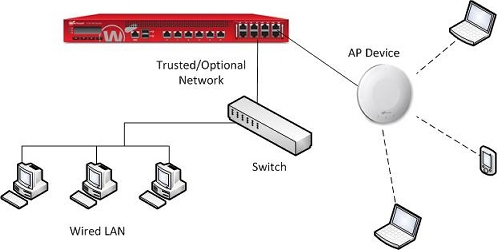
Option 1 — Connect the AP to a Firebox interface
If you have an available trusted, optional, or custom interface on your Firebox, you can connect the AP directly to one of those interfaces.
- Select Network > Interfaces.
The Network Interfaces page appears.- Select a trusted, optional, or custom interface, and enable DHCP on that interface.
- Connect the AP to the interface you configured.
- Select Network > Configuration.
The Network Configuration dialog box appears.- Select a trusted, optional, or custom interface, and enable DHCP on that interface.
- Save the configuration to the Firebox.
- Connect the AP to the interface you configured.
For more information about interface configuration, see Common Interface Settings.
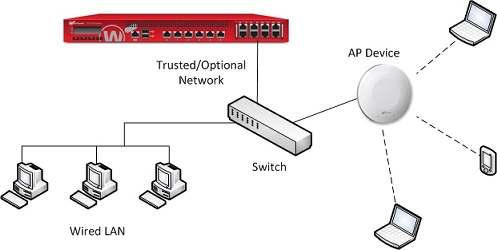
Option 2 — Connect the AP to a switch
If you have a switch that connects to a trusted, optional, or custom interface on your Firebox, you can connect the AP to that switch. With this option, you do not have to change the network settings on the Firebox interface.
Step 3 — Configure the SSIDs
Configure the SSIDs for your wireless users to connect to. You can configure up to eight SSIDs for each radio.
- In the Gateway Wireless Controller settings, select the SSIDs tab.
- Click Add to add an SSID.
- Configure the SSID (network name) and wireless security settings.
For more information, see Configure WatchGuard AP SSIDs.
Step 4 — Pair the AP
When you first connect the AP to your network, it is an unpaired access point. This means it is not yet managed by a Firebox.
To discover an unpaired AP and pair it with your Firebox:
- In the Gateway Wireless Controller settings, select the Access Points tab.
- Click Refresh.
The unpaired AP appears in the Unpaired Access Points list.
For more information, see WatchGuard AP Discovery and Pairing. - From the Unpaired Access Points list, select the AP and click Pair.
Step 5 — Configure the AP
After you pair the AP with your Firebox, configure the AP settings.
- On the Access Points tab, select the AP, and click Edit.
- Configure the radio settings for each radio.
- Add the SSID you created in Step 3 to the SSID list.
For more information, see Configure AP Radio Settings.
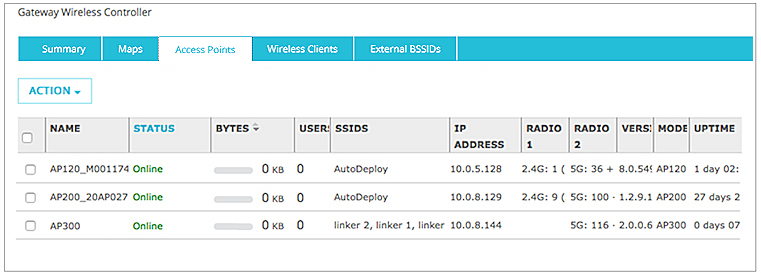
Step 6 — Check the AP Status
Go to Dashboard > Gateway Wireless Controller > Access Points to see the status of your paired APs.
Make sure the device status is Online.
If your AP status is Not Trusted, you must make sure this AP is a known AP in your deployment before you trust the device.
To trust an AP, select the device, click Action, then select Mark Trusted.
Deploy APs With VLAN Tagging Enabled
To set up an AP with VLAN tagging enabled in the SSIDs, you must configure VLANs and enable VLAN tagging in your SSIDs.
For a configuration example that shows this type of deployment, see AP Deployment with VLANs and Guest Network.
Step 1 — Configure VLANs on the Firebox
To enable VLAN tagging in your SSIDs, you must configure VLANs and enable them on a Firebox interface. The AP uses tagged VLANs to identify traffic for each SSID. The Firebox uses an untagged VLAN to pair with the AP.
To configure VLANs on the Firebox:
- Add one VLAN for each SSID.
These VLANs are used for tagged VLAN traffic for each SSID. - Add one VLAN for management communication connections to the AP.
This VLAN is used for untagged management communications connections to the AP. - Enable DHCP server or DHCP relay for each VLAN.
- Configure the Firebox interface to pass tagged traffic for the VLANs for each SSID.
- Configure the Firebox to pass untagged traffic for the AP management communications VLAN.
For an example VLAN configuration, see Configure VLANs for WatchGuard APs.
Step 2 — Enable the Gateway Wireless Controller
For the Firebox to discover and manage an AP, you must enable the Gateway Wireless Controller on your Firebox.
- Connect to Fireware Web UI for your Firebox.
- Select Network > Gateway Wireless Controller .
The Gateway Wireless Controller page appears. - Select the Enable the Gateway Wireless Controller check box.
The WatchGuard AP Passphrase dialog box appears. - Type the WatchGuard AP Passphrase that you want all your APs to use after they are paired.
- Start Policy Manager for your Firebox.
- Select Network > Gateway Wireless Controller .
The Gateway Wireless Controller dialog box appears. - Select the Enable the Gateway Wireless Controller check box.
The WatchGuard AP Passphrase dialog box appears. - Type the WatchGuard AP Passphrase that you want all your APs to use after they are paired.
- Save the configuration to the Firebox.
For more information, see Configure APs with the Gateway Wireless Controller.
Step 3 — Connect the AP
Select one of these options to connect the AP to your trusted, optional, or custom network. By default, the AP automatically requests an IP address from a DHCP server on the local network.
Option 1 — Connect the AP to a Firebox interface
You can connect the AP directly to the Firebox interface that you configured as a VLAN interface in Step 1.
Option 2 — Connect the AP to a 802.1Q switch
You can connect the AP to an 802.1Q switch that has the necessary VLANs configured.
To configure the VLANs on the switch:
- Add VLANs to the switch with the same IDs as the VLANs you configured on the Firebox.
- Configure the switch interfaces that connect to the Firebox VLAN interface and the AP to:
- Send and receive tagged traffic for the VLANs assigned to each SSID.
- Send and received untagged traffic for the VLAN you use for AP management.
For more information about VLAN configuration, see Configure VLANs for WatchGuard APs.
Step 4 — Configure the SSIDs
Configure the SSIDs for your wireless users to connect to. You can configure up to eight SSIDs per radio.
- In the Gateway Wireless Controller settings, select the SSIDs tab.
- Click Add to add an SSID.
- Configure the SSID (network name) and wireless security settings.
- In each SSID, enable VLAN tagging, and select the VLAN ID to use.
For more information, see Configure WatchGuard AP SSIDs.
Step 5 — Pair the AP
When you first connect the AP to your network, it is an unpaired access point. This means it is not yet managed by a Firebox.
To discover an unpaired AP and pair it with your Firebox:
- In the Gateway Wireless Controller settings, select the Access Points tab.
- Click Refresh.
The unpaired AP appears in the Unpaired Access Points list.
For more information, see WatchGuard AP Discovery and Pairing. - From the Unpaired Access Points list, select the AP and click Pair.
Step 6 — Configure the AP
After you pair the AP with your Firebox, configure the AP settings.
- On the Access Points tab, select the AP, and click Edit.
- Configure the radio settings to use for each radio.
- Add the SSID you created in Step 4 to the SSID list.
For more information, see Configure AP Radio Settings.
Step 7 — Check AP Status
Go to Dashboard > Gateway Wireless Controller > Access Points to see the status of your paired APs.
Make sure the device status is Online.
If your AP status is Not Trusted, you must make sure this AP is a known AP in your deployment before you trust the device.
To trust an AP, select the device, click Action, then select Mark Trusted.