
Related Topics
Configure WatchGuard AP SSIDs
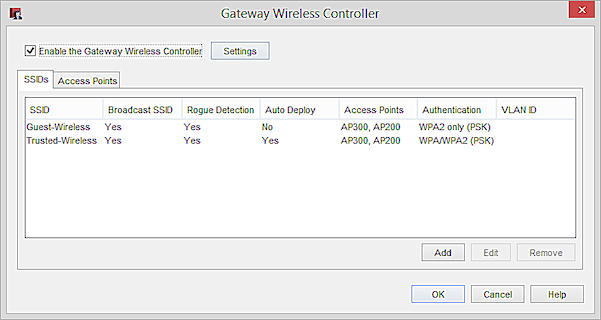
Before you can assign an SSID to a WatchGuard AP, you must add the SSID to the Gateway Wireless Controller.
Each radio on a WatchGuard AP supports up to 8 SSIDs.
You can also enable VLAN tagging on each SSID. If you enable VLAN tagging, the SSID uses the VLAN ID you specify to connect to a VLAN that is configured on the network between your AP and Firebox. For more information about when and how to use VLAN tagging with your AP, see Configure VLANs for WatchGuard APs.
Add an SSID
- Select Network > Gateway Wireless Controller.
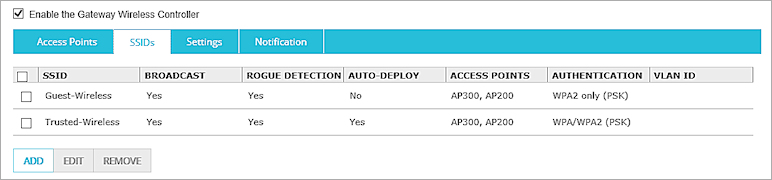
- Click Add.
The SSID configuration settings appear.
- Configure the SSID settings, as described in the next section.
- Select Network > Gateway Wireless Controller.
- Click Add.
The Add SSID dialog box appears.
- Configure the SSID settings, as described in the next section.
Configure SSID Settings
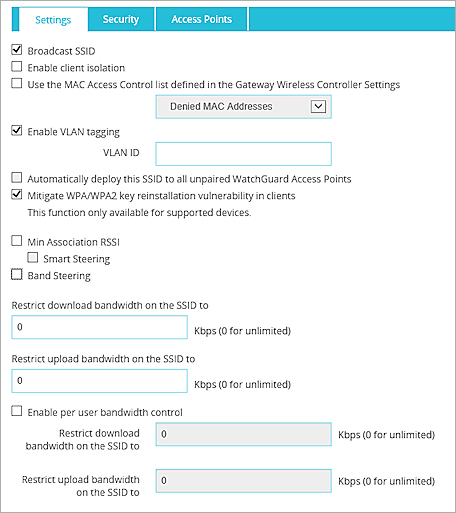
To configure the SSID settings, on the Settings tab:
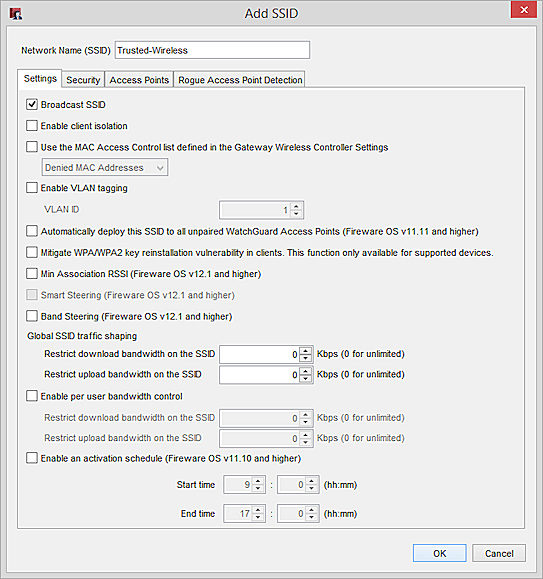
- In the Network Name (SSID) text box, type the SSID name.
- To specify that your APs do not broadcast the SSID name, clear the Broadcast SSID check box.
- To specify that wireless clients connected to this SSID cannot send traffic to each other through the AP, select the Enable client isolation check box. For more information, see About AP Client Isolation.
- To use the MAC Access Control list for your APs, select the Use the MAC Access Control list defined in the Gateway Wireless Controller Settings check box. For more information, see Configure MAC Access Control.
- To use tagged VLANs to separate the traffic between multiple SSIDs, select the Enable VLAN tagging check box.
- If you enabled VLAN tagging, in the VLAN ID text box, type or select the ID of the tagged VLAN to use for this SSID.
If you enable VLAN tagging and try to configure an SSID to use a VLAN ID that is not configured on the Firebox, a warning message appears with the information that the VLAN ID you configured in the SSID settings does not exist. Make sure you configure a tagged VLAN for this SSID. In most network configurations, you create the tagged VLAN for each SSID, and one untagged VLAN for management connections to the AP.
- To enable this SSID for use with automatic deployment, select the Automatically deploy this SSID to all unpaired WatchGuard APs check box. For more information. see About AP Automatic Deployment.
- To mitigate KRACK WPA/WPA2 vulnerabilities in unpatched wireless clients, select the Mitigate WPA/WPA2 key reinstallation vulnerability in clients check box.
This option blocks handshake messages that can potentially exploit clients and forces clients to re-authenticate. This re-authentication typically does not require the user to re-enter credentials, but it may add a few seconds to the connection time of the client. This option is disabled by default. This mitigation logic can trigger for other similar dropped packet symptoms, for example, natural frame errors during a handshake or dropped packets when a client roams from one AP to another or roams beyond the range of the current AP connection. This can result in some client authentication connections to fail and be re-established. WatchGuard recommends you enable this mitigation feature until you have updated all your client software to address the client vulnerabilities, and evaluate the impact to your client environment and user experience.
This option only applies to AP120, AP320, AP322, and AP420 devices with AP firmware version 8.3.0-657 and higher.
- (Fireware v12.0.2 or lower) To enable this SSID for use in telecommuter mode when deployed in a remote location, select the Enable telecommuter mode on this SSID when used remotely check box.
The telecommuter option is only supported for AP100, AP102, AP200, and AP300 devices in Fireware v12.0.2 and lower. For more information, see About AP Remote VPN Deployment.
- To configure a minimum signal strength required for a client to associate with an AP, enable the Min. Association RSSI check box.
The RSSI (Received Signal Strength Indicator) is used as a threshold to determine if clients can associate to an AP. The value is expressed in dBm (decibel milliwatts), for example, the default value is -70 dBm. The closer the value is to 0, the stronger the signal. For more information on signal strength, see Wireless Signal Strength and Noise Levels.
You can configure the Steering RSSI Threshold in the settings for an AP. For more information, see Configure AP Settings.
- To proactively steer clients to an AP with a stronger signal than their current AP, select the Smart Steering check box.
This prevents clients from staying connected to their current AP when the signal degrades as the client roams. The Min. Association RSSI option must be enabled before you can enable Smart Steering. You can configure advanced parameters for Smart Steering in the settings for an AP. For more information, see Configure AP Settings.
- To help distribute wireless clients between the 2.4 GHz and 5 GHz bands for an SSID, select the Band Steering check box.
When an SSID is configured in both the 2.4 GHz and 5 GHz bands, clients can be steered towards the less congested 5 GHz band to balance the load on the AP. Clients are steered to the 5 GHz band if the client's signal strength in 5 GHz is higher than the steering RSSI threshold. You can configure the Steering RSSI Threshold in the settings for an AP. For more information, see Configure AP Settings.
Band Steering is usually not required in an environment where most wireless devices are newer devices that are already optimized to choose the 5 GHz band.
Disable Band Steering if clients experience connection problems when Smart Steering is also enabled at the same time. Clients steered to the 5 GHz band might have a drop in RSSI that can cause a disconnection because of the Steering RSSI threshold.
- To configure traffic shaping upload and download bandwidth limits for this SSID configure the Global SSID traffic shaping settings:
In the Restrict download bandwidth on the SSID to text box, type a limit in Kbps. Type 0 for unlimited.
In the Restrict upload bandwidth on the SSID to text box, type a limit in Kbps. Type 0 for unlimited.
- To configure bandwidth limits on a per user basis for this SSID, select the Enable per user bandwidth control check box.
In the Restrict download bandwidth on the SSID to text box, type a limit in Kbps. Type 0 for unlimited.
In the Restrict upload bandwidth on the SSID to text box, type a limit in Kbps. Type 0 for unlimited.
AP100, AP102, AP200, and AP300 devices only support download restrictions.
- To activate this SSID for a specific time period, select the Enable an activation schedule check box. This feature limits access to this SSID based on the times you configure.
Set the Start time and End time in 24 hour format (hh:mm).
SSIDs that are not active in the schedule do not appear in the Gateway Wireless Controller monitoring pages in Fireware Web UI or Firebox System Manager.
- To check your wireless network for access points that do not belong to your network, select the Enable rogue access point detection check box.
A rogue access point is any wireless access point within range of your network that is not recognized as an authorized access point. When you enable rogue access point detection, the Gateway Wireless Controller scans wireless channels to identify unknown wireless access points. For more information, see Enable Rogue Access Point Detection.
Use the Wireless Deployment Maps feature of the Gateway Access Controller to view any external BSSIDs (Broadcast SSIDs) and potential rogue access points. For more information, see View Wireless Deployment Maps.
You can configure exceptions to the rogue access points list so that the Firebox does not identify a known access point (identified by MAC address) as a rogue access point. Click Add to add a MAC address of a known access point. Click Remove to remove a device from the list.
The Rogue Access Point Detection feature for the Gateway Wireless Controller and managed WatchGuard APs is different than the Rogue Access Point Detection feature designed for Firebox wireless devices with built-in wireless capabilities.
For information about the differences between Firebox wireless devices and WatchGuard APs, see WatchGuard Wireless Solutions. For information about Rogue Access Point Detection for Firebox wireless devices, see Rogue Access Point Detection.
Add AP Radios
When you add an SSID, you can assign the SSID to one or more AP radios.
To assign an SSID to an AP radio:
- From the SSID configuration, select the Access Points tab.
- In the Access Points with this SSID list, add the AP radios to use with this SSID.
You can also assign SSIDs to an AP radio when you edit the AP radio settings. For more information, see Configure AP Radio Settings.
Configure Security Settings
To configure the wireless security settings for the SSID:
- Select the Security tab.
- From the Security Mode drop-down list, select the security protocol to use for this SSID.
- Complete the settings to configure the selected security protocol.