
Related Topics
Import and Install a Third-Party Web Server Certificate
When users connect to your Firebox with a web browser, they often see a security warning. This warning occurs because the default Web Server certificate is not trusted, or because the certificate does not match the IP address or domain name used for authentication. You can replace the default Web Server certificate with a signed CA certificate that will be automatically trusted by web browsers.
If you use a signed CA certificate, you must import this certificate to your Firebox before you can select it as the current Web Server certificate. In most cases, this certificate signed by a Certificate Authority (CA) requires one or more root and intermediate certificates to complete the chain of trust for the current certificate. These certificates must be imported to your Firebox in the proper order before you install the new Web Server certificate so that the chain of trust is established.
To import and install a new Web Server certificate, you must follow these steps:
- Create a Certificate Signing Request (CSR) for a new Web Server certificate.
- Have the CSR signed by a trusted Certificate Authority.
- Import the CA certificates required for the chain of trust for your signed certificate to your Firebox.
- Import the new signed Web Server certificate to the Firebox.
- Configure the Firebox to use the new Web Server certificate.
If you create a certificate with third-party software such as OpenSSL, the EKU field in the certificate must be populated with the values for TLS Web Server Authentication and TLS Web Client Authentication. These values are required for any web server certificates imported on the Firebox. A CSR generated on the Firebox automatically includes these EKU values.
Create a CSR
To create a certificate management request:
- Open WatchGuard System Manager and connect to your Firebox.
- Select Tools > Firebox System Manager.
- Select View > Certificates.
- Click Create Request.
- Click Next.
- Select IPSec, Web Server, Other.
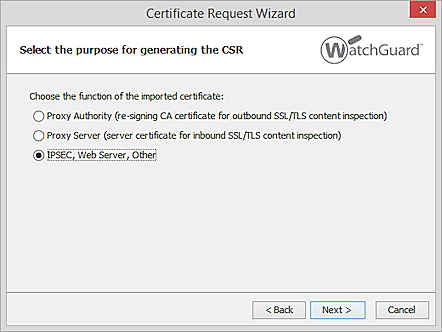
- Click Next.
- Type the identification information for the certificate applicable to your Firebox.
- Common Name (CN) — The CN field must match the host and domain name of the Firebox (such as firebox.company.com).
- Department Name (OU) — The department in which your Firebox belongs (if applicable).
- Company Name (O) — The organization or company that your Firebox belongs to.
- The City, State, and Country for the location of the Firebox.
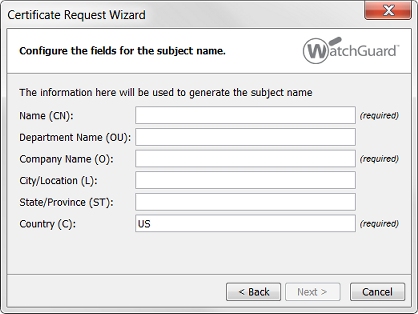
- Click Next.
- Type the DNS Name and IP address for the certificate applicable to your Firebox.
- Subject Name — This will be already filled in based on the previous step.
- DNS Name — The FQDN (Fully Qualified Domain Name) of the Firebox.
- IP Address — The IP address of the Firebox.
- User Domain Name — Email address of the Firebox administrative user.

- Click Next.
- Select RSA and 2048 for the Algorithm and Length options.
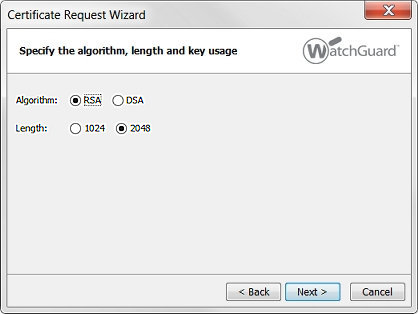
- Click Next, then type your admin passphrase.
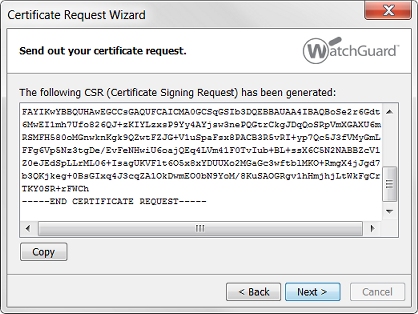
- Click OK to view the completed CSR.
- Copy the text of the Base-64 encoded PEM contents to a text file.
This is the CSR that you will provide to your trusted Certificate Authority to sign your Web Server certificate.
- Click Next, then click Finished.
Import the CA Certificates to your Firebox
You must import the CA certificates required for the chain of trust for your new signed Web Server certificate to your Firebox.
First, you must download the CA certificate chain that was used to sign your new Web Server certificate. This usually includes a root certificate and one or more intermediate certificates. Depending on your Certificate Authority, they may have multiple options for downloading their CA certificates, including individual Base-64 encoded PEM files and PFX certificate file bundles.
When you import these certificates to your Firebox, they must be imported in the proper order to establish the certificate chain of trust. Read the instructions from your Certificate Authority carefully for the certificates you require. Import the Root CA certificate first, then install any intermediate certificates.
To import certificates:
- Open WatchGuard System Manager and connect to your Firebox.
- Select View > Certificates.
- Click Import Certificate / CRL.
- From the Certificate Type drop-down list, select Base64 (PEM) certificate or PFX file.
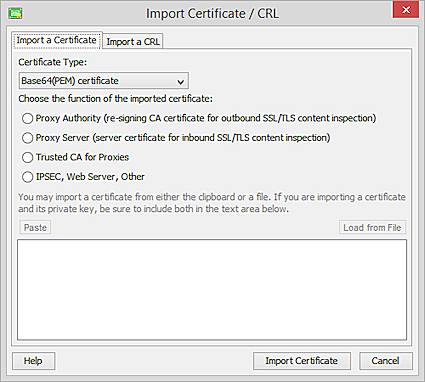
- Select the IPSEC, Web Server, Other option.
If you selected Base64 (PEM) certificate as the Certificate Type, you can load the certificate from a file, or copy and paste the PEM certificate contents in the text box.
If you selected PFX file as the Certificate Type, type the PFX File Password, and click Browse to select the PFX file to upload.
The first file you upload should be the Root CA certificate.
- Click Import Certificate.
- Repeat this procedure for any intermediate certificates, and import the certificates in the proper order of trust.
Import the New Signed Web Server Certificate to your Firebox
To import the new signed Web Server certificate to your Firebox:
- Open WatchGuard System Manager and connect to your Firebox.
- Select View > Certificates.
- Click Import Certificate / CRL.
- From the Certificate Type drop-down list, select Base64 (PEM) certificate or PFX file.
- Select the IPSEC, Web Server, Other option.
If you selected Base64 (PEM) certificate as the Certificate Type, you can load the certificate from a file, or copy and paste the PEM certificate contents in the text box.
If you selected PFX file as the Certificate Type, type the PFX File Password, and click Browse to select the PFX file to upload.
- Click Import Certificate.
If the import is successful, you can select this new imported certificate as the Web Server certificate for your Firebox.
Select the New Web Server Certificate
To select a new Web Server certificate:
- Open Policy Manager.
- Select Setup > Authentication > Web Server Certificate.
- Select Third Party Certificate.
- From the drop-down list, select the new imported certificate, then click OK.
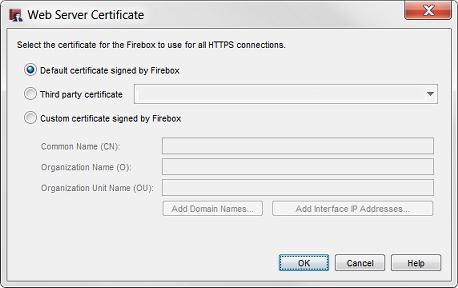
- Save your configuration.
- Reboot your Firebox.
To verify that your Firebox properly responds with the new certificate, go to https://[Firebox IP address or name]/sslvpn.html
See Also
Manage Device Certificates (WSM)