
Related Topics
Configure Management Tunnels
If you have remote Fireboxes that are behind a NAT gateway device, to enable your Fireboxes to connect to your WSM Management Server, you can set up a Management Tunnel.
Before You Begin
Make sure to carefully follow the instructions in each section to correctly set up a Management Tunnel.
To use Management Tunnels for connections to your remote devices, you must:
- Configure your gateway Firebox as the hub device for the Management Tunnel before you enable Management Tunnels on your remote devices.
- Set up each remote device and add it to your Management Server as a managed device.
- Make sure the private IP address of the Management Server is included in the Distribution IP Address list and the Managed Device Settings dialog box, as described in the Management Tunnel over SSL Resources section of the About Management Tunnels topic.
- Configure the remote devices to enable a Management Tunnel from each remote (spoke) device to the hub device.
Before you begin the procedures to set up a Management Tunnel, make sure you have read the entire About Management Tunnels topic.
Configure the Management Tunnel Gateway Firebox
When you set up a Management Tunnel, your gateway Firebox must be configured before you configure the remote devices. The external IP address of the gateway Firebox must not be a dynamic address. You can choose to use IPSec, SSL, or a combination of the two, to secure the Management Tunnels to your gateway Firebox. The configuration options are different for each security option.
To configure Management Tunnel settings on your gateway Firebox:
- In WSM, connect to your Management Server.
- Expand the Devices tree and select the device that is your gateway Firebox.
The Device page appears. - In the Device Information section, click Configure.
The Device Properties dialog box appears with the Connection Settings tab selected.
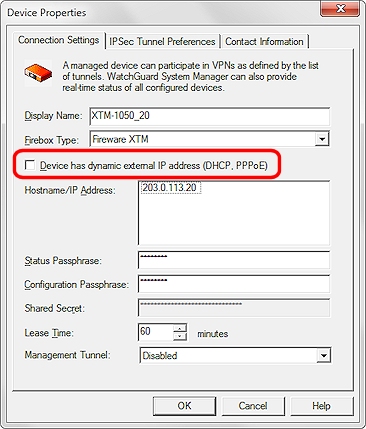
- Make sure that the Device has dynamic external IP address (DHCP, PPPoE) check box is not selected.
- From the Management Tunnel drop-down list, select Server.
The Management Tunnel Settings tab appears.
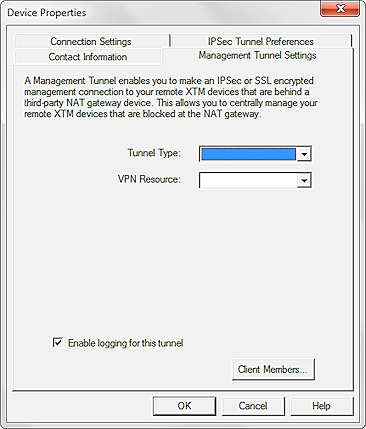
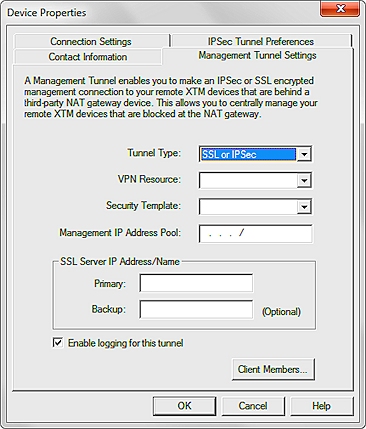
- From the Tunnel Type drop-down list, select a tunnel security option:
- IPSec Only
- SSL Only
- IPSec or SSL
- Configure the settings for the Tunnel Type you selected:
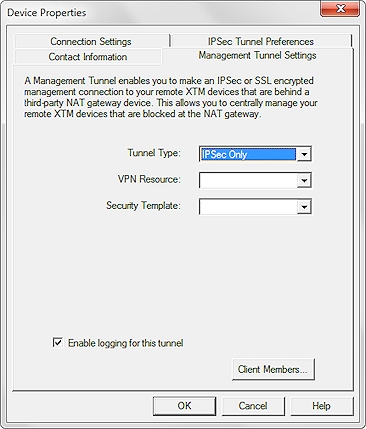
- From the VPN Resource drop-down list, select the VPN resource for the management network where your Management Server is installed.
For example, select Trusted Network. - From the Security Template drop-down list, select the security template to use for the Management Tunnel.
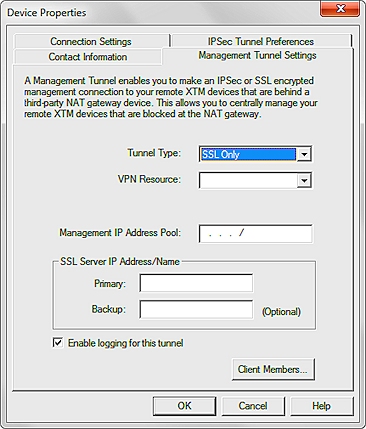
- From the VPN Resource drop-down list, select the VPN resource for the management network where your Management Server is installed.
For example, select Trusted Network. - In the Management IP Address Pool text box, type the network IP address to use for the Management Tunnel. TipMake sure the private IP address of the Management Server is included in the Distribution IP Address list and the Managed Device Settings dialog box, as described in the "Management Tunnel over SSL Resources" section. If you use a different network IP address than the address already specified for the Virtual IP Address Pool, the new network IP address will also be used for the Mobile VPN with SSL configuration, which could cause problems with your Mobile VPN with SSL connections.
If Mobile VPN with SSL is enabled in the gateway Firebox configuration, make sure to use the same IP address specified in the Mobile VPN with SSL configuration for the virtual IP address pool. - In the SSL Server IP Address/Name section, type the IP address of the Primary and Backup (optional) SSL servers.
- From the VPN Resource drop-down list, select the VPN resource for the management network where your Management Server is installed.
For example, select Trusted Network. Tip!We recommend that you do not select the Hub Network VPN Resource. When you select the Hub Network VPN Resource, all traffic to the Internet is sent through the Management Tunnel, which results in slower Internet for the remote site. - From the Security Template drop-down list, select the security template to use for the Management Tunnel.
- In the Management IP Address Pool text box, type the IP address to use for the Management Tunnel.
Make sure to specify an IP address from the subnet you selected for the Management Network. - In the SSL Server IP Address/Name section, type the IP address of the Primary and Backup (optional) SSL servers.
- From the VPN Resource drop-down list, select the VPN resource for the management network where your Management Server is installed.
- To enable log messages to be sent for traffic through this Management Tunnel, select the Enable logging for this tunnel check box.
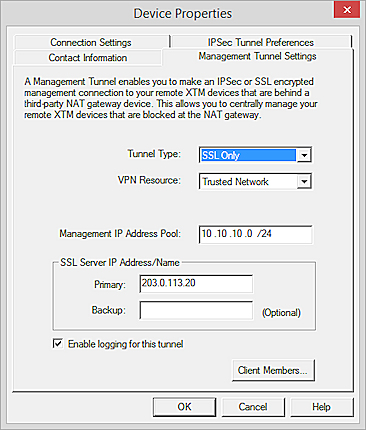
Example of completed Management Tunnel settings for an SSL Only tunnel.
- Click OK to save your changes.
When the lease on the gateway Firebox expires, the Firebox contacts the Management Server to get the new configuration details. The Firebox is then available as the Management Tunnel gateway (the hub device) on the management network side of the Management Tunnel. For a Management Tunnel with IPSec, if you disable the Management Tunnel on the hub device, the Management Server automatically runs an expire lease task for the hub device.
Deploy Remote Devices
The deployment process for your remote Fireboxes includes two steps:
- Initial setup of the remote device.
- Add the remote device to management.
Step 1 — Set Up the Remote Device
Before you deploy your remote devices behind the third-party Firewall NAT gateway, each device must be configured correctly.
- Start the Quick Setup Wizard for a device with factory-default settings.
- Complete the Quick Setup Wizard:
- Make note of the name and the passphrases you assign to the device.
- Set the external interface to DHCP or PPPoE.
- Configure the Management Server settings:
- Specify the private IP address of the Management Server as it appears in the Management Server settings.
Make sure that the private IP address of the Management Server is the first IP address included in the Management Server settings, in the Distribution IP Address list.
For more information, see Configure the Certificate Authority on the Management Server. - Make note of the shared secret
- Specify the private IP address of the Management Server as it appears in the Management Server settings.
By default, when the remote device is updated by the Management Server, the IP address that appears in the Distribution IP Address list is added to the device settings. If the private IP address of the Management Server is not the first IP address included in the list, the private IP address of the Management Server that you specify in the wizard is removed from the device settings, and when the tunnel is built, the device cannot communicate with the Management Server. To avoid this, you must make sure to include the private IP address of the Management Server in the in Distribution IP Address list. For more information, see the Management Tunnel over SSL Resources section in About Management Tunnels.
For more information about the steps to complete the Quick Setup Wizard, see About Firebox Setup Wizards.
Step 2 — Add the Remote Device to Management
After you configure your remote device, you add the device to the Management Server so that it can be managed after it is installed at the remote location.
- In WSM, connect to your Management Server.
- Right-click the Devices folder and select Insert Device.
The Add Device Wizard appears. - Click Next to start the wizard.
The Enter the device's IP address and passphrase page appears. - Select I don't know the device's current dynamically allocated IP address (DHCP/PPPoE). Click Next.
The Enter a name for the device page appears. - Type the device name and shared secret you specified for the device in Step 1. Click Next.
The Enter the device's status and configuration passphrases page appears. - Type the status and configuration passphrases you specified for the remote device in Step 1. Click Next.
The Select the tunnel authentication method page appears. - Select Auto-generated shared key. Click Next.
- Complete the wizard.
After the wizard completes, your remote device can be deployed. When you connect the device to power and the Internet, it contacts the Management Server for the final device configuration file, and any pending updates are applied to the device.
We recommend that before you send the device to the remote location, you complete the steps to set up a Management Tunnel for the device. When Management Tunnels are enabled on the device before it is deployed, all management options are available as soon as the device is deployed.
If your remote device also has the Access Portal feature enabled, make sure that the automatically generated WatchGuard SSLVPN policy either includes the interface for the VPN resource you selected for the Management Tunnel over SSL (for example, the Any-External alias) in the From list of the policy, or that the VPN Portal Settings include the alias for that VPN resource in the Interfaces list. For more information about the Interfaces list for the VPN Portal, see Configure the VPN Portal Settings.
If you do not configure the Management Tunnel settings for the device before you install the device in a remote location, the management options are limited. Direct connections to the device are not permitted, but these functions are available:
- Logging and Reporting
- Heartbeat monitoring
- Drag and Drop VPN
- Policy Manager configuration (Fully Managed Mode only)
- Device Configuration Template updates (Fully Managed Mode only)
Configure a Management Tunnel Remote Device
After you enable the gateway Firebox as the Management Tunnel gateway (hub) device, you use the information from the gateway Firebox to configure each remote Firebox (spoke device). The configuration settings for each remote device are different for a Management Tunnel over IPSec and a Management Tunnel over SSL.
- The management IP address:
- Must be a virtual IP address
- Must be unique among the Fireboxes managed by the same Management Server
- Must be on a different network from the VPN resource you specified when you enabled the Management Tunnel gateway on your gateway Firebox
- Is used as the 1-to-1 NAT IP address (external IP address) for the Management Tunnel, and is used to create the tunnel on the remote device side
- Is a single IP address, not a network address a subnet mask
- Traffic from the management network to the management IP address must be routed through the gateway Firebox
- Before the remote device can be used in a Management Tunnel over IPSec, you must configure the Connection Settings for each remote device and select the Device has dynamic external IP address option
- The management IP address pool must be on a different network from the VPN resource you specified when you enabled the Management Tunnel gateway on your gateway Firebox.
- Traffic from the management network management IP address pool must be routed through the gateway Firebox.
- The Managed Device Settings for the remote device must specify the private (internal) IP address of the Management Server for the Management Server IP address, not the external IP address of the gateway Firebox. If more than one Management Server IP address is included in the Managed Device Settings, the device always tries to connect to the first IP address in the list.
For more information, see Configure a Firebox as a Managed Device.
Included in the configuration settings for a Management Tunnel over SSL are the SSL tunnel ID and password. You specify the values for these settings when you configure the remote device. The Management Server then updates the gateway Firebox configuration with the SSL tunnel ID and password.
To enable a Management Tunnel for a remote device:
- In WSM, connect to your Management Server.
- Expand the Devices tree and select one of your remote devices.
The Device page appears. - In the Device Information section, click Configure.
The Device Properties dialog box appears with the Connection Settings tab selected. - Make sure the Device has dynamic external IP address (DHCP, PPPoE) check box is selected.
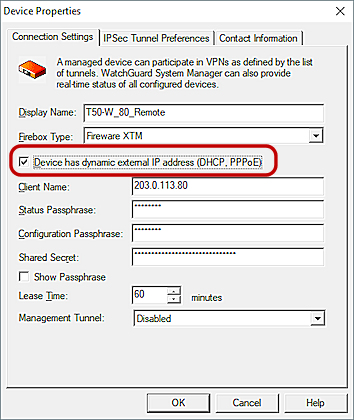
- From the Management Tunnel drop-down list, select Client.
The Management Tunnel Settings tab appears.
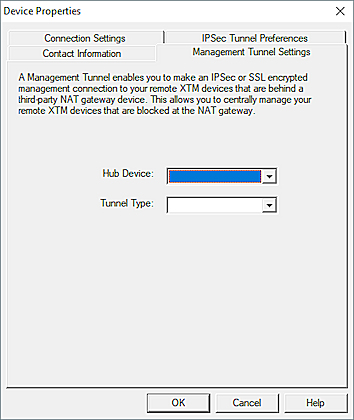
- From the Hub Device drop-down list, select the name of your gateway Firebox that you configured as the Management Tunnel hub device in the previous section.
- From the Tunnel Type drop-down list, select the same tunnel type that you specified on the Management Tunnel hub device for this Management Tunnel:
- IPSec
- SSL
Only the tunnel type options that you specified for the Management Tunnel on the hub device appear in the Tunnel Type list.
- Configure the settings for the Tunnel Type you selected:
- In the SSL Tunnel ID text box, type the Device Name of the remote device, or another unique name for the Management Tunnel over SSL.
- In the SSL Tunnel Password text box, type the password the remote device must use for the Management Tunnel over SSL.
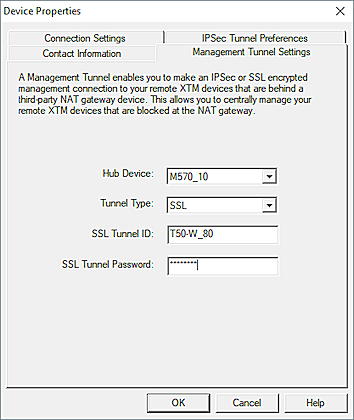
The Management Server will also update the gateway Firebox configuration with these authentication settings.
In the Management IP Address text box, type the management IP address for your management network.
For more information about the management IP address, see the details for a Management Tunnel over IPSec. - Click OK.
The device properties are updated.
Expire the Lease
If you complete the settings for the remote device before you deploy the device to the remote location, the Management Tunnel is created as soon as the device is powered on and connected to the Internet. If you do not complete the remote device settings until after the device has been deployed, the new settings take effect on the remote device when the lease on the device expires and it checks in with the Management Server for updated information. This can take up to an hour. After the initial configuration is complete, any time the remote device contacts the Management Server to request a configuration update, the Management Server modifies the remote device configuration file to add or update details for the Management Tunnel.
The tunnel routes for a Management Tunnel over IPSec are configured to use these IP addresses:
- Local — 1-to-1 NAT from the trusted interface IP address to the management IP address
- Remote — Hub device VPN resource
If you make a change to the trusted or optional IP addresses on a remote device, and that IP address is used by a Management Tunnel over IPSec, the Management Tunnel goes down and must be rebuilt. If the device is in Fully Managed Mode, the device configuration is automatically updated on the remote device the next time it contacts the Management Server for the most recent information. We recommend that you configure all your remote devices that are used in a Management Tunnel over IPSec in Fully Managed Mode.
For a Management Tunnel over SSL, the IP addresses are chosen from the IP address pool and can change each time the tunnel is built.
If the device is in Basic Managed Mode, you must force the remote device to contact the Management Server for the update before the Management Tunnel can be rebuilt. After the configuration details are changed, but before the Management Tunnel is updated, the device management options are limited, as described in a previous section.
To force a remote device in Basic Managed Mode to contact the Management Server:
- In WSM, on the Device page for your remote device, click Configure.
The Device Properties dialog box appears. - Do not make any changes to the configuration settings. Click OK.
- On the Device page for the remote device, click Expire Lease to prompt the device to contact the Management Server for updated information.
When the remote device contacts the Management Server, it gets the updated Management Tunnel information and the management tunnel is rebuilt.
Configure a Deployed Remote Device for a Management Tunnel over SSL
If your remote Firebox is already deployed to a remote location behind a third-party NAT device, and you want to enable a Management Tunnel over SSL for the remote device, you can connect directly to the remote device to manually configure the Managed Device Settings for the remote device. This option is useful when the remote device cannot contact the Management Server through the Management Tunnel over SSL because the connection is blocked by the third-party NAT device.
Before you complete the steps in this procedure to configure your remote device for a Management Tunnel over SSL, you must complete the steps in the section Step 2 — Add the Remote Device to Management to add your device to the Management Server.
To configure the remote Firebox for a Management Tunnel over SSL, from Policy Manager:
- Start Policy Manager for the remote device.
- Select Setup > Managed Device Settings.
- Make sure the Enable Centralized Management check box is selected.
- Select the Management Tunnel tab.
- Select the Use an SSL tunnel for remote management check box.
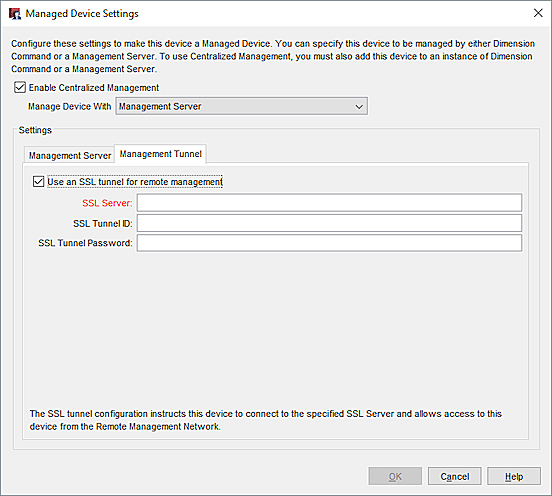
- In the SSL Server text box, type the IP address of the OpenVPN server.
This is the IP address of your Management Tunnel gateway Firebox (hub device). - In the SSL Tunnel ID text box, type the Device Name of the remote device, or another unique name for the Management Tunnel over SSL.
- In the SSL Tunnel Password text box, type the password to use for the Management Tunnel over SSL.
- Click OK.
- Save the configuration to the remote device.
To configure the remote Firebox for a Management Tunnel over SSL, from Fireware Web UI:
- Connect to Fireware Web UI for the remote device.
- Select System > Managed Device.
- Make sure the Enable Centralized Management check box is selected.
- Select the Management Tunnel tab.
- Select the Use an SSL tunnel for remote management check box.
- In the SSL Server text box, type the IP address of the OpenVPN server.
This is the IP address of your Management Tunnel gateway Firebox (hub device). - In the SSL Tunnel ID text box, type the Device Name of the remote device, or another unique name for the Management Tunnel over SSL.
- In the SSL Tunnel Password text box, type the password to use for the Management Tunnel over SSL.

- Click Save.
You can also use Fireware Web UI or the WatchGuard Command Line Interface to configure the remote device for a Management Tunnel over SSL. For more information, see the Fireware Web UI Help or the Command Line Interface Reference.
Verify the Status of the Management Tunnel
After the Management Tunnel is built between the Management Tunnel Gateway (hub) Firebox and the remote (spoke) Firebox, you can see the status of the Management Tunnel on the Firebox System Manager Front Panel tab for the hub or spoke device.
For more information about how to use the Front Panel tab, see Basic Device and Network Status (Front Panel).
When you connect to the Management Server in WSM and select one of the managed devices at either end of the Management Tunnel, the device page appears with the Management Tunnel Information section, which includes this information about the settings for the Management Tunnel:
- Type — IPSec Only, SSL Only, or IPSec or SSL
- Hub Device — The name of the hub device
- Tunnel ID — The name of the Management Tunnel
For more information about the device page, see About the Device Management Page.
Review the Client Members List
In the device properties for the hub device (gateway Firebox), you can see a list of all the client devices (remote devices) configured for the Management Tunnels to the hub device. The Device Properties dialog box for the hub device includes devices that use both SSL and IPSec to build a Management Tunnel.
If Mobile VPN with SSL is activated for your hub device, and you have configured Management Tunnels over SSL for your hub device, you can also see the list of client devices that connect to the hub device with a Management Tunnel over SSL.
See All Client Members
To review the list of client members for Management Tunnels to the hub device (gateway Firebox):
- In WSM, on the Device page for your hub device, click Configure.
The Device Properties dialog box appears. - Select the Management Tunnel Settings tab.
The Management Tunnel settings appear.
- Click Client Members.
The Client members dialog box appears.
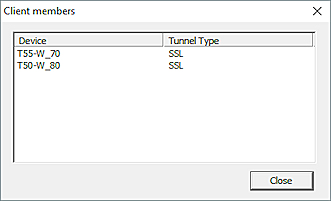
- Review the list of client devices.
- Click Close.
See Management Tunnel Over SSL Client Members
If your hub device is configured for a Management Tunnel over SSL, at the top of the Mobile VPN with SSL Configuration dialog box, a message that the Management Tunnel feature is enabled appears, with the Client Members button.
To review the list of client members for the Management Tunnel over SSL to the hub device (gateway Firebox):
- Click Client Members.
The Client Members dialog box appears.
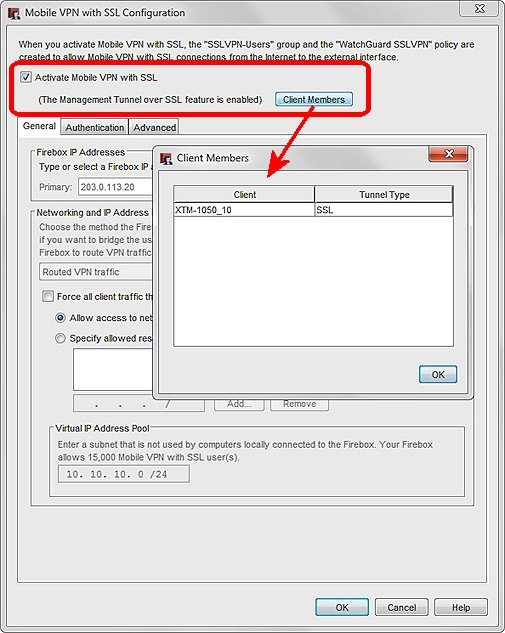
- Review the list of client devices.
- Click OK.
Manage a Remote Device
After you have configured a Management Tunnel to your remote Firebox, you can use WSM on the management computer in your management network (where your Management Server and WSM client are installed), to connect to the remote device and make changes to the remote device configuration.
To make changes to the configuration of a remote device from a computer other than the management computer in your management network (such as from a remote location or from a computer on a different subnet), you must make an RDP connection to the management computer, or use another remote access tool (such as terminal services), to connect to the management computer. You can then use WSM on the management computer to manage your remote device.
See Also
Managed Branch Office VPN Tunnels (WSM)
Make Managed Tunnels Between Devices