
Related Topics
Save the Configuration File
If you make a new configuration file or change a current configuration file and want your changes to take effect on the Firebox, you must save the configuration file directly to the Firebox.
You can also save the current configuration file to any local drive or any network drive to which your management computer can connect. If you plan to make one or more major changes to your configuration file, we recommend that you save a copy of the old configuration file first. If you have problems with your new configuration, you can restore the old version.
Save a Configuration File Directly to the Device
You can use Policy Manager to save your configuration file directly to the Firebox.
- Select File > Save > To Firebox.
The Save to Firebox dialog box appears.
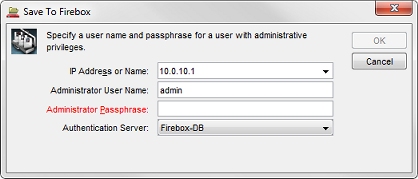
- In the IP Address or Name text box, type or select an IP address or name. If you use a name, the name must resolve through DNS.
When you type an IP address, type all the numbers and the periods. Do not use the TAB or arrow keys. - In the Administrator User Name and Administrator Passphrase text boxes, type the credentials for a Device Administrator (read-write) user account.
- From the Authentication Server drop-down list, select the correct authentication server for the user account you specified.
- If you use an Active Directory server for authentication, in the Domain text box, type the domain name of your Active Directory server.
- Click OK.
Save a Configuration File to a Local or Network Drive
You can use Policy Manager to save your configuration file to a local or network drive.
- Select File > Save > As File.
You can also use CTRL-S. A standard Windows save file dialog box appears. - Type the name of the file.
The default location is the My Documents\My WatchGuard\configs directory. You can also save the file in any folder you can connect to from the management computer. For better security, we recommend that you save the files in a safe folder that no other users can get access to.
- Click Save.
The configuration file is saved to the directory you specify.
Save a Configuration File for a Specific Fireware Version
You can use Policy Manager to save a configuration file for a specific Fireware version. This is useful when you want to create a configuration file for RapidDeploy or save a configuration file for a Firebox with a different version of Fireware.
To save the configuration file for a specific Fireware version:
- Select File > Save > As Version.
The Save As Version dialog box appears.
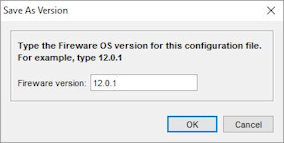
- Type the Fireware OS version for the configuration file.
The version you specify must be in the range of versions in the configured OS Compatibility settings. Tip! The Fireware version a Firebox was manufactured with appears on the Product Details page in the WatchGuard portal.
For information about compatibility settings, see Configure Fireware OS Compatibility. - Click OK.
If any feature in the configuration is not compatible with the version you specify, an error message appears with information about what you must change before you can save the configuration as the specified version.
For information about how to create a file and select the version for RapidDeploy, see Create a Configuration File for RapidDeploy.
Automatically Create Configuration File Backups
Each time you save configuration changes to a local file, the file replaces the previous copy of the file. You can configure Policy Manager to automatically save a backup copy of the configuration file each time you save changes to a file. The backup copy includes a timestamp in the file name. This makes it easier for you to keep a record of the configuration changes made over time. This backup option is not enabled by default.
To enable the automatic creation of backup configuration files:
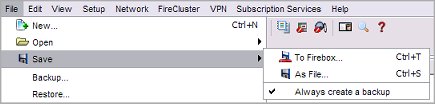
- Select File > Save.
- Select Always create a backup.
Adjacent to Always create a backup, a check mark appears. - To verify the feature is enabled, select File > Save.
- Make sure a check mark appears adjacent to the Always create a backup menu item.
A check mark appears only when the option is enabled.
After you enable the backup option, each time you save the configuration to a file, Policy Manager saves a second copy of the configuration file in the same location, with the date and timestamp added to the file name. The backup file name includes the original file name, plus the date (year-month-day) and the time (hour-minute-second).
For example, if you save a configuration file named HQ-XTM1050 on March 30, 2011 at 11:30 AM , Policy Manager saves two files:
HQ-XTM1050.xml
HQ-XTM1050_2011-3-15_11-30-00.xml
A backup file is automatically created only when you select File > Save > As File to save the configuration to a file. Policy Manager does not create a backup file when you select File > Save > To Firebox.
To disable the creation of automatic backup configuration files:
Select File > Save > Always create a backup.
The checkmark is removed and automatic backup configuration files are no longer saved when you save configuration changes.