N-able N-sight 用 WatchGuard Endpoint Security プラグインをインストールする
N-able N-sight 用 WatchGuard Endpoint Security プラグインをインストールするため、WatchGuard は、WatchGuard API に接続し、WatchGuard と N-able N-sight の間でクライアントをマッピングするためのオンボーディング アプリケーションを提供します。インストール プロセスは以下の手順で構成されています:
- 開始する前に
- WatchGuard Cloud で API アクセスを有効化する
- プラグインをダウンロードする
- WatchGuard Cloud と N-able N-sight の間の接続を構成する
- クライアントをマッピングする
開始する前に
N-able N-sight 用 WatchGuard Endpoint Security プラグインをダウンロードしてインストールする前に、以下を確認してください:
- 有効な WatchGuard Endpoint Security ライセンスがある。
- Administrator のロールと All アクセス グループを持つ N-able N-sight アカウントがある。
- コンピュータが Windows 8 以降を実行している。
権限に関する問題を回避するため、N-able サービス組織 (SO) が WatchGuard Endpoint Security プラグイン オンボーディング アプリケーションを実行することをお勧めします。
WatchGuard Cloud で API アクセスを有効化する
WatchGuard パブリック API は、トークンベースの認証に Open Authorization (OAuth) 2.0 認証フレームワークを使用します。Endpoint Security 管理 API を使用するには、まず WatchGuard Cloud アカウントで API アクセスを有効化してプラグインの構成に必要なパラメータを取得する必要があります。詳細については、WatchGuard Cloud で API アクセスを有効化する を参照してください。
WatchGuard Cloud で API アクセスを有効化するには、以下の手順を実行します:
- WatchGuard Cloud にログインする。
Service Provider の場合は、アカウント マネージャー から マイ アカウント または管理アカウントを選択します。 - 管理 > 管理アクセス の順に選択します。
- API アクセスを有効化する をクリックします。

- API アクセスの認証情報として使用する 読み書き および 読み取り専用 パスワードを指定します。

パスワードには大文字、小文字、数字および特殊文字を含める必要があります。読み書き 用のパスワードと 読み取り専用 のパスワードは異なったものである必要があります。
プラグイン構成には 読み書き アクセス ID とパスワードを使用する必要があります。
- I agree to the terms and conditions in the WatchGuard APIs License Agreement チェック ボックスを選択します。
- Save をクリックします。
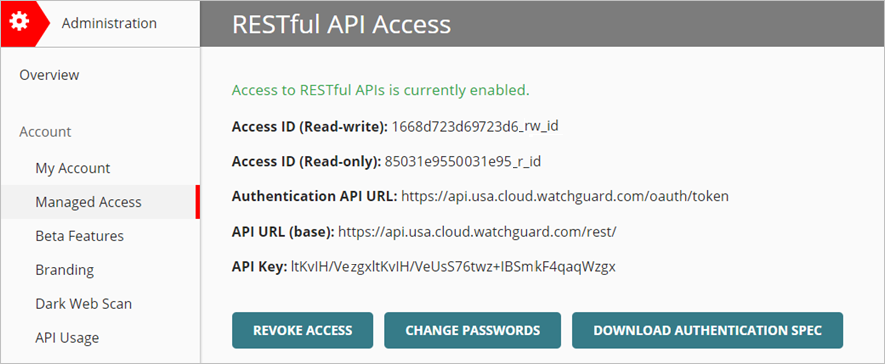
API アクセスを有効化すると、プラグインのオンボーディング アプリケーションで指定する必要があるパラメータが表示されます。WatchGuard Cloud で、管理 > 管理アクセス の順に移動したページで、これらのパラメータを表示することができます。
ベース URL は地域によって異なります。この例は、米国にあるサーバーを示しています。
プラグインをダウンロードする
N-able N-sight 用 WatchGuard Endpoint Security プラグイン オンボーディング アプリケーションを WatchGuard Software Downloads ダウンロード ページからダウンロードするには、以下の手順を実行します:
- Software Downloads ページ に移動します。
- Endpoint Software をクリックします。
- N-able N-sight Plug-in リンクをクリックします。
- N-able N-sight Plug-in (Latest) をクリックして Nsight .ZIP ファイルをダウンロードします。
- Nsight.ZIP .ZIP ファイルをコンピュータに保存します。
- Nsight.ZIP ファイルの内容を抽出します。
Nsight フォルダには以下のファイルが含まれています:
- N-able N-sight 用 WatchGuard Endpoint Security オンボーディング アプリケーションの .EXE
- Windows スクリプト:
- WatchGuard Endpoint Security – Install agent in Windows.PS1
- WatchGuard Endpoint Security - Scan Windows device.PS1
- WatchGuard Endpoint Security - Monitor Windows device.PS1
- macOS スクリプト:
- WG-Install-Mac.SHWG-Install-Mac.SH (WatchGuard Endpoint Security – Install agent on Mac device)
- WG-Monitor-Mac.SH (WatchGuard Endpoint Security – Monitor Mac device)
- WG-Scan-Mac.SH (WatchGuard Endpoint Security – Scan Mac device)
- Linux スクリプト:
- WG-Install-Linux.SH (WatchGuard Endpoint Security – Install agent on Linux device)
- WG-Monitor-Linux.SH (WatchGuard Endpoint Security – Monitor Linux device)
オンボーディング アプリケーションを開くには、Nsight フォルダで、NableOnboarding.EXE をダブルクリックします。
オンボーディング アプリケーションが開きます。
オンボーディング アプリケーションは、開いた際に、最新バージョンに自動的に更新されます。
オンボーディング アプリケーションには、ナビゲーション ウィンドウに以下のオプションがあります:
- API Connection — WatchGuard Cloud と N-able N-sight の間の接続を構成するには、このページを使用します。
- Map Clients — N-able N-sight クライアントを管理対象の WatchGuard Cloud アカウントに関連付けるには、このページを使用します。このページを使用するには、WatchGuard Cloud と N-able N-sight の間に正常な接続を確立する必要があります。
- WatchGuard Cloud — Web ブラウザで WatchGuard Cloud を開くには、このリンクをクリックします。
WatchGuard Cloud と N-able N-sight の間の接続を構成する
WatchGuard Cloud と N-able N-sight の間に接続を確立するのに必要な情報は、API アクセスを有効化した後、WatchGuard Cloud の管理アクセス ページに表示されます。WatchGuard Cloud での API アクセスの詳細については、Enable API Access を参照してください。
オンボーディング アプリケーションで API 接続情報を入力する際には、エラーを回避するため、WatchGuard Cloud の管理アクセス ページから API パラメータを直接コピーして貼り付けることをお勧めします。
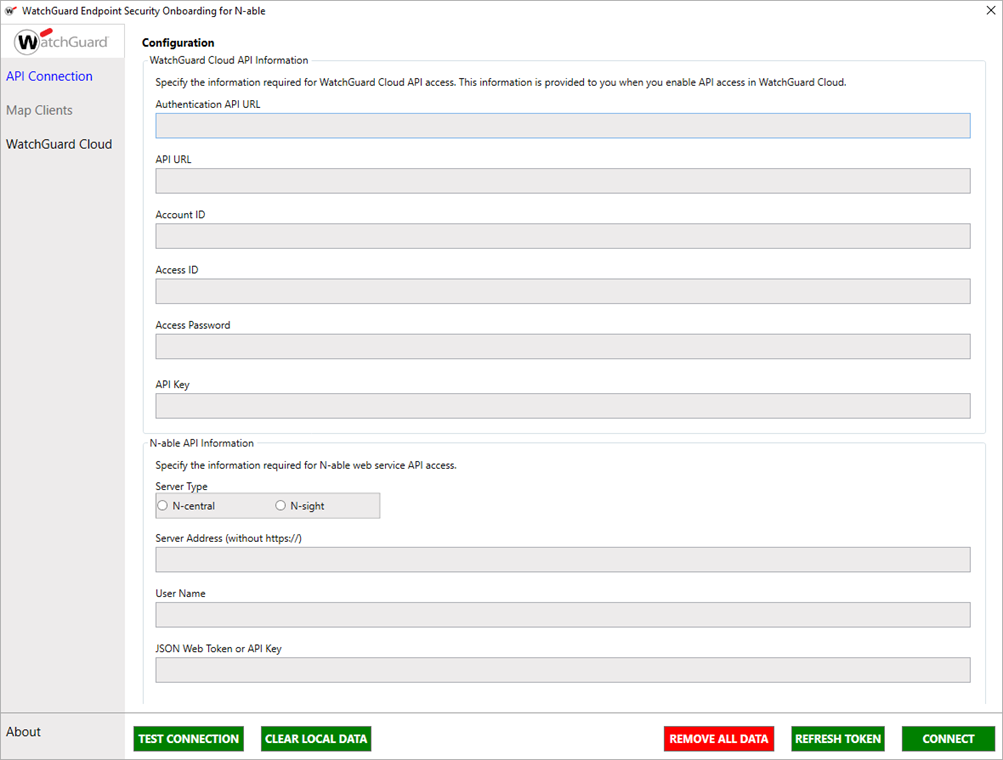
WatchGuard Cloud と N-able N-sight の間の接続を確立するには、オンボーディング アプリケーションから以下の手順を実行します:
- API 接続 を選択します。
- WatchGuard Cloud の API 情報を入力します:
- 認証 API URL — WatchGuard Cloud への API アクセスを認証するための URL を入力します。URL は地域によって異なります。
- アジア太平洋地域 — https://api.jpn.cloud.watchguard.com/oauth/token
- 欧州・中東・アフリカ地域 — https://api.deu.cloud.watchguard.com/oauth/token
- NA/北米地域 — https://api.usa.cloud.watchguard.com/oauth/token
- API URL — Endpoint Security API のベース URLを入力します。URL は地域によって異なります。
- アジア太平洋地域 — https://api.jpn.cloud.watchguard.com/rest/endpoint-security/management
- 欧州・中東・アフリカ地域 —https://api.deu.cloud.watchguard.com/rest/endpoint-security/management
- NA/北米地域 — https://api.usa.cloud.watchguard.com/rest/endpoint-security/management
- アカウント ID — API リクエストを行う管理対象アカウントの WatchGuard Cloud アカウント ID を入力します。
- アクセス ID — WatchGuard Cloud への 読み書き API アクセスのためのアクセス ID を入力します。
- アクセス パスワード — WatchGuard Cloud への API アクセス用に指定した 読み書き アクセスID のパスワードを入力します。
- API キ — WatchGuard Cloud アカウントと関連付けられた API キーを入力します。
- 認証 API URL — WatchGuard Cloud への API アクセスを認証するための URL を入力します。URL は地域によって異なります。
- N-able の API 情報を入力します:
- サーバーの種類 — N-sight を選択します。
- N-able サーバー アドレス (https:// は省略) — N-able サーバー アドレスの URL を、https:// を含めずに入力します。
- ユーザー名 — N-able N-sight への API アクセス用のユーザー名を入力します。
- JSON Web トー クンまたは API キー — N-able N-sight への API アクセス用 API キーを入力します。
N-able N-sight プラグインおよび N-able N-central プラグインでは、同じオンボーディング アプリケーションが使用されます。API キーを使用して、N-able N-sight プラグインに接続します。JSON Web トークンを使用して、N-able N-central プラグインに接続します。

- Test Connection をクリックします。
テスト接続が成功すると確認メッセージが表示されます。
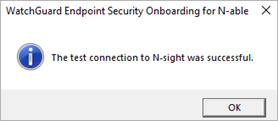
- OK をクリックします。
- Connect をクリックします。
接続が成功すると確認メッセージが表示されます。
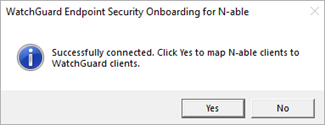
- Yes をクリックします。
クライアントをマッピングする
WatchGuard Cloud と N-able の間で接続が正常に確立されたら、N-able N-sight クライアントを WatchGuard Cloud で管理しているアカウントにマッピングする必要があります。
N-able クライアントを WatchGuard Cloud アカウントに関連付けるには、オンボーディング アプリケーションから以下の手順を実行します:
- Map Clients を選択します。
- リストから N-able クライアントを選択します。
- WatchGuard Client ドロップダウン リストから、N-able クライアントに関連付ける WatchGuard Cloud アカウントを選択します。WatchGuard Cloud アカウントを選択すると、WatchGuard Cloud ID と License 列のデータが自動的に入力されます。
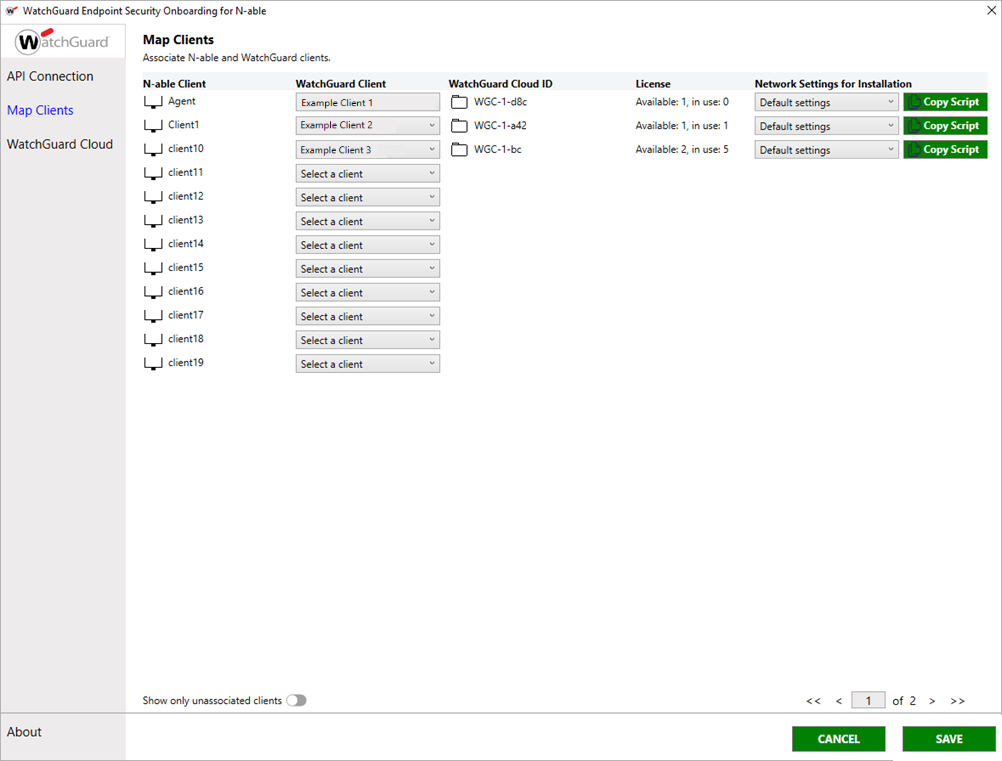
- Network Settings for Installation ドロップダウン リストから、このクライアントに割り当てる Endpoint Security ネットワークの設定プロファイルを選択します。
- Save をクリックします。
確認メッセージが表示されます。
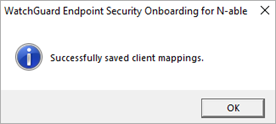
保存すると、正常に保存されたマッピングの右側に Copy Script オプションが表示されます。N-sight で自動配備とタスクを構成する際に Copy Script を使用します。詳細については、次を参照してください:N-able N-sight でのタスクと自動配備。
- OK をクリックします。
- マッピングするすべてのクライアントについてこの手順を繰り返します。