Windows デバイスのタスクは、N-central では自動化ポリシーとして作成されます。以下の自動化ポリシーが Windows デバイスで使用可能です:
- WatchGuard Endpoint Security – Windows へのエージェントのインストール (自動配備または手動のインストール)
- WatchGuard Endpoint Security – Scan Windows device
- WatchGuard Endpoint Security – Isolate Windows device
- WatchGuard Endpoint Security – Un-isolate Windows device
- WatchGuard Endpoint Security – Uninstall agent in Windows
自動配備
WatchGuard エージェントを 1 つ以上のクライアントの Windows デバイスに自動配備するよう、N-central を構成することができます。
Windows デバイスへの自動配備を構成するには、N-central から以下の手順を実行します:
- Configuration > Scheduled Tasks > Profiles の順に選択します。
Scheduled Tasks Profiles ページが開きます。

- 追加 をクリックします。
Add Scheduled Task Profile ページが開きます。

- スケジュール タスクのプロファイルの名前を入力します。
- Add ドロップダウン リストから、Automation Policy を選択します。
Automation Policy Task ページが開きます。

- タスク名を入力します。
- Repository Item ドロップダウン リストから、WatchGuard Endpoint Security - Install agent in Windows を選択します。
Input Parameters セクションが開きます。

- WatchGuard Endpoint Security Integration - API Key 入力パラメータで Select a Property オプションを選択し、続いてドロップダウン リストから WatchGuard Endpoint Security Integration - API Key を選択します。
- WatchGuard Endpoint Security Integration Client Account ID 入力パラメータで Select a Property オプションを選択し、続いてドロップダウン リストから WatchGuard Endpoint Security Integration - Client Account ID を選択します。
- WatchGuard Endpoint Security 統合 - 配備設定 ID 入力パラメータで プロパティを選択してください オプションを選択し、続いてドロップダウン リストから WatchGuard Endpoint Security 統合 - 配備設定 ID を選択します。
- WatchGuard Endpoint Security Integration - Installer URL 入力パラメータで Select a Property オプションを選択し、続いてドロップダウン リストから WatchGuard Endpoint Security Integration - Installer URL を選択します。
- WatchGuard Endpoint Security Integration - Service Provider Account ID 入力パラメータで Select a Property オプションを選択し、続いてドロップダウン リストから WatchGuard Endpoint Security Integration - Service Provider Account ID を選択します。
- Targets タブを選択します。
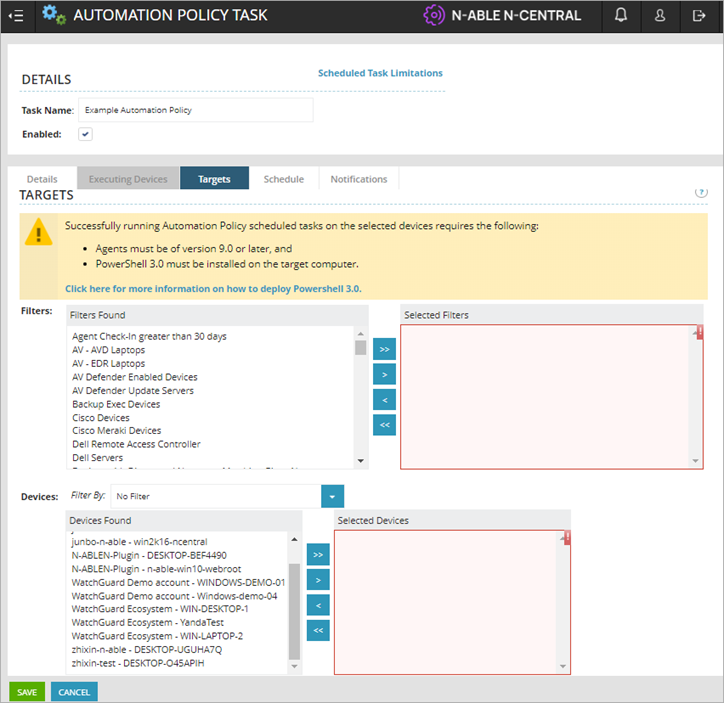
- Filters セクションで、Filters Found 列から顧客アカウントを選択し、Selected Filters 列に移動します。
- Devices セクションで、Devices Found 列から顧客デバイスを選択し、Selected Devices 列に移動します。
- Schedule タブを選択します。

- このタスクを実行する日時を構成します。
- Notifications タブを選択します。

- (成功時または失敗時の) 通知をいつ行うかを選択します。Recipients Found 列から受信者を選択し、Selected Recipients 列に移動します。
- Save をクリックします。
スケジュール タスクが、スケジュールされた時刻に、クライアントの現在の Windows デバイスに WatchGuard エージェントをインストールします。新しい Windows デバイスが追加されると、それらは自動的に検出され、N-central にインポートされます。
手動インストール
手動でタスクを実行し、Windows デバイスに WatchGuard Endpoint Security をインストールすることができます。プラグインのインストールにより、WatchGuard Endpoint Security をインストールするのに使用されるスクリプトが作成されます。
1 つ以上の Windows デバイスに WatchGuard Endpoint Security を手動でインストールするには、N-central で以下の手順を実行します:
- Actions > Run an Automation Policy の順に選択します。
Automation Policy Task ページが開きます。
- タスク名を入力します。
- Repository Item ドロップダウン リストから、WatchGuard Endpoint Security - Install agent in Windows を選択します。
Input Parameters セクションが開きます。
- WatchGuard Endpoint Security Integration - API Key 入力パラメータで Select a Property オプションを選択し、続いてドロップダウン リストから WatchGuard Endpoint Security Integration - API Key を選択します。
- WatchGuard Endpoint Security Integration Client Account ID 入力パラメータで Select a Property オプションを選択し、続いてドロップダウン リストから WatchGuard Endpoint Security Integration - Client Account ID を選択します。
- WatchGuard Endpoint Security 統合 - 配備設定 ID 入力パラメータで プロパティを選択してください オプションを選択し、続いてドロップダウン リストから WatchGuard Endpoint Security 統合 - 配備設定 ID を選択します。
- WatchGuard Endpoint Security Integration - Installer URL 入力パラメータで Select a Property オプションを選択し、続いてドロップダウン リストから WatchGuard Endpoint Security Integration - Installer URL を選択します。
- WatchGuard Endpoint Security Integration - Service Provider Account ID 入力パラメータで Select a Property オプションを選択し、続いてドロップダウン リストから WatchGuard Endpoint Security Integration - Service Provider Account ID を選択します。
- Targets タブを選択します。
- Filters セクションで、Filters Found 列から顧客アカウントを選択し、Selected Filters 列に移動します。
- Devices セクションで、Devices Found 列から顧客デバイスを選択し、Selected Devices 列に移動します。
- Save をクリックします。
このタスクは、選択したデバイスに WatchGuard エージェントを直ちにインストールします。
Windows デバイスをスキャンする
プラグインのインストールにより、Windows デバイスをスキャンするタスクのスクリプトが作成されます。
Windows デバイスのスキャンを構成するには、N-central で以下の手順を実行します:
- Actions > Run an Automation Policy の順に選択します。
- タスク名を入力します。
- Repository Item ドロップダウン リストから、WatchGuard Endpoint Security - Scan Windows device を選択します。

- WatchGuard Endpoint Security Integration - API Key 入力パラメータで Select a Property オプションを選択し、続いてドロップダウン リストから WatchGuard Endpoint Security Integration - API Key を選択します。
- WatchGuard Endpoint Security Integration Client Account ID 入力パラメータで Select a Property オプションを選択し、続いてドロップダウン リストから WatchGuard Endpoint Security Integration - Client Account ID を選択します。
- WatchGuard Endpoint Security Integration - Service Provider Account ID 入力パラメータで Select a Property オプションを選択し、続いてドロップダウン リストから WatchGuard Endpoint Security Integration - Service Provider Account ID を選択します。
- Targets タブを選択します。

- Filters セクションで、Filters Found 列から顧客アカウントを選択し、Selected Filters 列に移動します。
- Devices セクションで、Devices Found 列から顧客デバイスを選択し、Selected Devices 列に移動します。
- Save をクリックします。
タスクが保存され、選択した単数または複数のデバイスが次回サーバーに接続した際に WatchGuard Endpoint Security はそのデバイスをスキャンします。
デバイスを隔離および隔離解除する
リスクのあるコンピュータを隔離して、コンピュータとの間の通信をブロックすることができます。コンピュータを隔離すると、WatchGuard Endpoint Security により、必要な通信を除くすべての通信がブロックされます。プラグインのインストールにより、Windows デバイスを隔離および隔離解除するタスクのスクリプトが作成されます。
選択した Windows デバイスを隔離または隔離解除するには、N-central から以下の手順を実行します:
- Actions > Run an Automation Policy の順に選択します。
- タスク名を入力します。
- Repository Item ドロップダウン リストから、WatchGuard Endpoint Security - Isolate Windows device または WatchGuard Endpoint Security - Unisolate Windows device を選択します。

- WatchGuard Endpoint Security Integration - API Key 入力パラメータで Select a Property オプションを選択し、続いてドロップダウン リストから WatchGuard Endpoint Security Integration - API Key を選択します。
- WatchGuard Endpoint Security Integration Client Account ID 入力パラメータで Select a Property オプションを選択し、続いてドロップダウン リストから WatchGuard Endpoint Security Integration - Client Account ID を選択します。
- WatchGuard Endpoint Security Integration - Service Provider Account ID 入力パラメータで Select a Property オプションを選択し、続いてドロップダウン リストから WatchGuard Endpoint Security Integration - Service Provider Account ID を選択します。
- Targets タブを選択します。
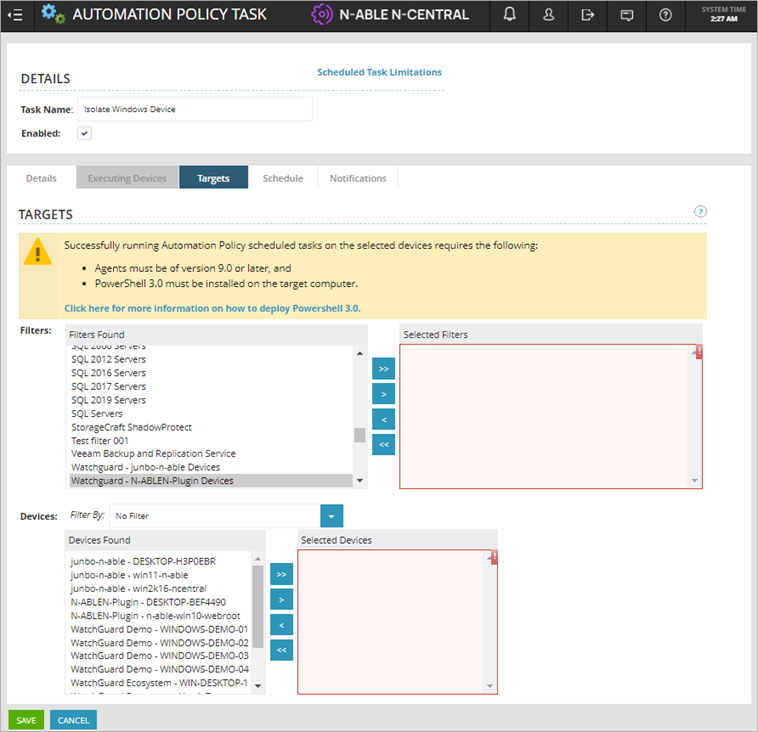
- Filters セクションで、Filters Found 列から顧客アカウントを選択し、Selected Filters 列に移動します。
- Devices セクションで、Devices Found 列から顧客デバイスを選択し、Selected Devices 列に移動します。
- Save をクリックします。
選択したデバイスは WatchGuard Endpoint Security から隔離または隔離を解除するコマンドを受信します。
WatchGuard Endpoint Security をアンインストールする
WatchGuard Endpoint Security のアンインストール タスクは、選択したデバイスから WatchGuard エージェントをアンインストールします。
WatchGuard Endpoint Security をアンインストールするには、N-central から以下の手順を実行します:
- Actions > Run an Automation Policy の順に選択します。
- タスク名を入力します。
- Repository Item ドロップダウン リストから、WatchGuard Endpoint Security - Uninstall agent in Windows を選択します。

- WatchGuard Endpoint Security Integration - API Key 入力パラメータで Select a Property オプションを選択し、続いてドロップダウン リストから WatchGuard Endpoint Security Integration - API Key を選択します。
- WatchGuard Endpoint Security Integration Client Account ID 入力パラメータで Select a Property オプションを選択し、続いてドロップダウン リストから WatchGuard Endpoint Security Integration - Client Account ID を選択します。
- WatchGuard Endpoint Security Integration - Service Provider Account ID 入力パラメータで Select a Property オプションを選択し、続いてドロップダウン リストから WatchGuard Endpoint Security Integration - Service Provider Account ID を選択します。
- Targets タブを選択します。

- Filters セクションで、Filters Found 列から顧客アカウントを選択し、Selected Filters 列に移動します。
- Devices セクションで、Devices Found 列から顧客デバイスを選択し、Selected Devices 列に移動します。
- Save をクリックします。
このタスクは即時に実行され、選択したデバイスから WatchGuard エージェントがアンインストールされます。
N-able N-central 用 WatchGuard Endpoint Security プラグインについて