Applies To: WatchGuard Patch Management
WatchGuard Patch Management uses tasks to install patches and updates. To install patches on computers, you must add a task.
You can either add a task to install a patch immediately or schedule a task to run at a specific time. When you run a task immediately, Patch Management downloads and installs the patch in real time but does not restart the Windows or Linux computer, even if the installation requires a restart. Some Mac patches automatically restart the computer (for example, _SoftwareUpdate.pkg).
Scheduled tasks enable you to configure all settings related to the patch installation and start the task at the time you want. You can also add tasks to uninstall previously installed patches if they cause issues.
For more information, go to these sections:
- Download Patches
- Add Patch Installation Tasks
- Configure a Scheduled Patch Installation Task
- Uninstall Patches
- Review Installation Task Results
- View Installation History
Download Patches
Before Patch Management installs a patch, the computer downloads it from the software vendor. The download occurs in the background on each computer when a patch installation task starts.
To minimize bandwidth usage, Patch Management uses cache computers on the network to download and disseminate patches and updates.
- Windows or macOS operating system: Computers can download patches from cache computers and the Internet. They cannot download patches from the WatchGuard proxy.
- Linux operating system: Computers use the distribution package manager to download patches from the Internet. They cannot download patches from the WatchGuard proxy or cache computers.
Patch installation tasks might have to download patches from a software vendor if cache or repository computers do not already have the patches. Quick tasks start to download patches as soon as you create the task. This can result in high bandwidth usage if the task applies to many computers or the patches are large.
Scheduled patch installation tasks start to download the patches when you configure the task. If the start time of multiple tasks coincides, Patch Management delays tasks up to 2 minutes to prevent simultaneous downloads and minimize bandwidth usage.
Cache computers store patches for up to 30 days, after which patches are deleted. If a computer requests a patch from a cache computer, but the cache computer does not have the patch in its repository, the computer waits for the cache computer to download it. The wait time depends on the size of the patch to download. If the cache computer cannot download the patch, the target computer tries to download the patch instead.
You can also manually download a patch and copy it to the cache computer. For more information, go to Download Patches Manually.
Add Patch Installation Tasks
You can add a task to install patches from the Available Patches list, the Computers page, or the Tasks page.
Software vendors define the importance of the security patches they make available to address vulnerabilities. Patch classifications are not universal and vary by vendor. To determine whether you want to install a patch, we recommend that you review its description, especially for patches that a vendor does not classify as Critical.
Your operator role determines what you can see and do in WatchGuard Cloud. Your role must have the Install, Uninstall and Exclude Patches permission to view or configure this feature. For more information, go to Manage WatchGuard Cloud Operators and Roles.
- In WatchGuard Cloud, select Monitor > Endpoint Security.
- Select Status > Patch Management.
- In the Available Patches tile, click View All Available Patches.
The Available Patches list opens.
- Click Filters and filter the list to review the patches you want to install (for example, filter by operating system, computer type, patch type, installation option, criticality, installation status, or program vendor).
- In the results, select the check boxes for the computers and patches you want to install.
The icon shows next to computers designated as a test computer for patch installation.
 - In the toolbar:
- To install the patches immediately, click Install. In the dialog box that opens, click Install Patch.
Patch Management adds a patch installation task and starts it immediately. - To install the patches at a specific time, click Schedule Installation. In the dialog box that opens, click Schedule Installation.
The Edit Task page opens. Follow the steps to Configure a Scheduled Patch Installation Task.
- In WatchGuard Cloud, select Configure > Endpoint Security.
- Select Computers.
The Computers page opens. - From the left pane, select
 My Organization.
 - Select the computer or group you want to install patches on.
The icon shows next to computers designated as a test computer for patch installation. - From the options menu
 for the computer or group, select Schedule Patch Installation.
The Edit Task page opens. Follow the steps to Configure a Scheduled Patch Installation Task.
- In WatchGuard Cloud, select Configure > Endpoint Security.
- Select Tasks.
The Tasks page opens. - Click Add Task.
- Select Install Patches.
The New Task page opens. - Follow the steps to Configure a Scheduled Patch Installation Task.
Configure a Scheduled Patch Installation Task
After you add a scheduled patch installation task, you must configure the task and publish it. To avoid or postpone the installation of problematic patches on computers you manage, you can configure scheduled tasks with installation conditions:
- Patch released more than n days ago — Delay the installation of patches a specified number of days after their release.
- Patch installed successfully on a minimum n endpoints — Delay the installation of patches until they have been installed on a specified number of computers.
- Patch installation failed on fewer than n endpoints — Install patches if installation has failed on less than a specified number of computers.
- Patch installed successfully on the first endpoint more than n days ago — Install the patch if the first successful installation was a specified number of days ago.
For Service Providers accounts, these installation conditions can be evaluated for a single account or in all accounts. For example, when the condition requires the patch to be installed successfully on a minimum of 5 endpoints in the account, then the patch is installed on 5 endpoints in the account where the task is assigned before it is installed on remaining endpoints in the account.
When the condition requires the patch to be installed successfully on a minimum of 5 endpoints in all managed accounts, then the patch is installed on 5 endpoints in all of the accounts managed by the partner before it is rolled out to the rest of the endpoints in the account where the task is assigned.
You can also schedule patch installation tasks with or without test computers.
To schedule patch installation tasks with test computers, create two separate tasks, one for each type of computer:
- Task for test computers: Task without conditions to test patch installation. The result enables or disables the execution of the second task. To designate test computers, go to Designate Computers as Test Computers for Patch Installation.
- Task for normal computers: Task with conditions assigned. Depending on the result of the task for test computers, this task either installs or does not install patches on normal computers.
To schedule patch installation tasks without test computers, create a task for normal computers with specified conditions. Some conditions cannot be met unless you install patches manually. For example, the condition Patch installed successfully on a minimum n endpoints cannot be met unless there is an automatic task to install patches on a group of computers, or if you do not successfully install the patch on a sufficient number of computers.
To configure a scheduled patch installation task:
- In the New Task or Edit Task page, in the Name text box, type a name for the task.

- In the Description text box, type a description of the task.
- Specify when the task will start.
- To start the task as soon as possible, select the As Soon as Possible check box.
- To start the task at a specific time, select the date and time.
-
To specify the time based on the time on the discovery computer, select the Computer's Local Time check box.
If you do not select this check box, the time is based on WatchGuard server time.
- (Subscribers only) Select an option to specify when to run the task if the computer is turned off at the scheduled time.
- From the Frequency drop-down list, select how often you want the task to run (One Time, Daily, Weekly, Monthly).
- If you select Weekly, specify the days of the week to run the task each week.
- If you select Monthly, specify the day or date to run the task each month.
-
Select the check box for each condition you want the patches to meet prior to installation and enter an appropriate value (n):
- Patch released more than n days ago
- Patch installed successfully on a minimum of n endpoints
- Patch installation failed on fewer than n endpoints
- Patch installed successfully on the first endpoint for at least n days
- Select the importance of the Security Patches to install (Critical, Important, Moderate, Low, or Unspecified).

- To install patches that are not security-related, enable Other patches (non-security related).
This category includes patches with bug fixes and feature enhancements for Mac and Linux computers. - To install service packs, enable Service Pack.
Windows Service Packs are not applied to Mac or Linux computers or devices. - To specify which operating system and products to install patches for, in the Install Patches for the Following Products section, select or clear check boxes next to specific operating systems, software vendors, software products, and patches. To install all available patches, select the All check box.

If you select macOS, a warning message prompts you to confirm that you want to include patches for Mac computers. Some macOS patches automatically restart the computer (_SoftwareUpdate.pkg). We recommend that you close and save any open files.
Patches for Mac computers require the user to enter the volume owner user name and password. This does not include Intel Mac computers. If the patch installation task for a Mac computer includes patches that do not require credentials, the patches proceed to install.
- In the Restart Options section, select an option to specify whether computers restart automatically after patches install.
- If you select Do Not Start Automatically, users see a message that their computer must restart and can select whether to restart immediately or later.
- If you select an Automatically Restartoption, select whether you want to Restart only during defined maintenance windows. For more information on maintenance windows, go to Configure Maintenance Windows in Endpoint Security.
- If you select Delay Restart, from the drop-down list, select the amount of time allowed before Patch Management forces a restart (from 5 minutes, up to 7 days).
When you configure a maintenance window, the settings override the restart settings defined in patch installation tasks. For information on how to configure maintenance windows, go to Configure Maintenance Windows in Endpoint Security.
- In the upper-right corner, click Save.
- Select the task and assign recipients to it.
- In the Recipients text box, to add computers, click the recipients or click No Recipients Selected Yet.
The Recipients page opens. - To add computer groups and computers:
- To assign the task to test computers only in the groups you select, enable Run the task only on test computers. This option is disabled by default. If you do not enable this option, the task runs for all computers, including test computers. For information on how to identify test computers, go to Configure Patch Management Settings.
- Click
 .
. - Select the computer groups or computers you want.
- Click Add.
- In the Recipients text box, to add computers, click the recipients or click No Recipients Selected Yet.
- Click Back.
- Click Save.
- Publish the task. For more information, go to Publish a Task.
Uninstall Patches
You cannot uninstall Linux and Mac computer patches.
Sometimes, the patches that software vendors publish do not work correctly and can cause issues. Patch Management enables you to uninstall (roll back) installed patches.
You can uninstall installed patches when the patch supports the uninstall feature. If the software vendor does not allow you to uninstall a patch, the text Non-uninstallable patch shows on the Patch Installed details page and you cannot uninstall the patch.
Patches that you uninstall appear again in the Available Patches list, and will reinstall when a scheduled patch installation task runs. If you never want to install a specific patch on your computers, you can exclude it. For more information, go to Exclude Patches.
We recommend that you test patches on a small number of computers before you install the patches across your network. You can designate computers as test computers for patch installation. For more information, go to Configure Patch Management Settings.
To uninstall a patch:
- In WatchGuard Cloud, select Configure > Endpoint Security.
- Select Status > Patch Management.
The Patch Management dashboard opens. - In the Available Patches or Last Patch Installation Tasks tile, click View Installation History.
The Installation History list opens.
- Click the row of the patch you want to uninstall.
The Patch Installed details page opens.
- Click Uninstall the Patch, if available.
The Uninstall Patch dialog box opens.
- Select an option to specify whether to uninstall the patch from the selected computer or all computers on the network.
- Click Uninstall the Patch.
Patch Management creates a task to uninstall the patch.
If uninstallation requires a restart, the user receives a prompt to restart their computer.
Review Installation Task Results
After a patch installation or uninstallation task runs, you can review the results.
Only endpoints of the relevant operating system receive the task and appear as recipients.
To view the installation task results:
- In WatchGuard Cloud, select Configure > Endpoint Security.
- Select Tasks.
The Tasks page opens. - In the installation or uninstallation task row, click View Results.
The Task Results page opens and shows the status of the task for each computer.
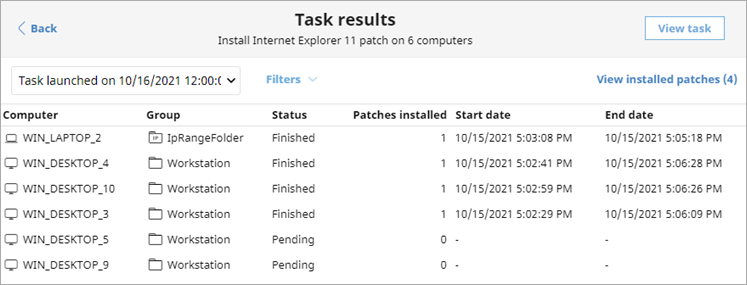
Installation Status Values
The task results table can include these status values:
- Available — Task has not been launched and requires action. From the Installation History list, you can select a pending task to review the results and corresponding error, if any. For more information, go to View Installation History and Patch Management Installation Errors.
- In progress — Task is currently running.
- Finished — Task finished successfully.
- Failed — Task failed and returned an error.
- Canceled (the task could not start at the scheduled time) — Target computer was not accessible at the time the task was set to start or during the specified time period.
- Canceled — Task was manually canceled.
- Canceled (maximum run time exceeded) — Task was automatically canceled because it exceeded the configured maximum run time.
View Installation History
The Installation History list shows the details of patches that Patch Management installed and tried to install in the specified time period.
To review installation history:
- In WatchGuard Cloud, select Configure > Endpoint Security.
- Select Status > Patch Management.
The Patch Management dashboard opens. - In the Available Patches or Last Patch Installation Tasks tile, click View Installation History.
The Installation History list opens. -
To filter the Installation History list, click Filters.
- Dates — Select whether you want to view results for the last 24 hours, 7 days, or month.
- Platform — Select the operating system platform you want to filter the list for.
- Computer Type — Select the check box for each type of endpoint you want to filter the list for (for example, workstation, laptop, or server).
- Computer, Program, Patch — Enter the name of the Computer, Program, or Patch you want to filter the list for.
- Installation Attempts — Select whether you want to filter the list to show all attempts or only the last attempt (for example, Show All Attempts or Show Only the Latest Attempt).
- Patch Installation — Select the check box for the patch installation option you want to filter the list for (for example, Patch installation enabled, Test computer for patch installation, or Patch installation disabled).
- Criticality — Select the check box for the patch severity you want to filter the list for (for example, Critical, Important, Medium, Service Pack, and more).
- Installation — Select the check box for the installation status you want to filter the list for (for example, Installed, Requires Restart, Download Error, and Installation Error). If the status was Requires Restart and the patch successfully installs on the computer after it restarts, the table dynamically updates to Installed.
- CVE — Enter the patch CVE ID (for example, CVE-2018-2790).
- Click Filter.
- The Installation column shows the installation status. To review the installed patches, in the row for a computer, click and select View Installed Patches on the Computer.
- To view all computers with the same patch installed, in the row for a computer, click and select View Computers with Patch Installed.
- To export a .CSV file of the installation history, click
 .
.- Select Export to export the information in the table to a .CSV file.
- Select Extended Export to export the information in the table, as well as information on the task (name, launch date, start date, and end date) and latest installation attempt, to a .CSV file.