AP Groups
Applies To: Wi-Fi Cloud-managed Access Points (AP125, AP225W, AP325, AP327X, AP420)
This is useful if you want to group APs based on specific device or radio settings that should not apply to other APs in a location folder.
For example, you may need to create a configuration for dual-radio APs configured as dedicated WIPS Sensors, and a different configuration for dual-radio APs configured as dedicated Wi-Fi access points in your deployment.
You must use AP groups when you want to create a mesh network profile. For more information, see Create a Wireless Mesh Network with Discover.
After you create a group and add APs to the group, you can configure the settings to apply to the group. To configure a group, you can enable an SSID configuration for the group, or copy settings from another location or group. Each group has a single Wi-Fi configuration. APs that are not part of any group inherit the Wi-Fi configuration of the location where they were created.
When you delete a location, any groups at the deleted location are deleted and devices assigned to the group are moved to their parent location.
Add a Group
To add a group:
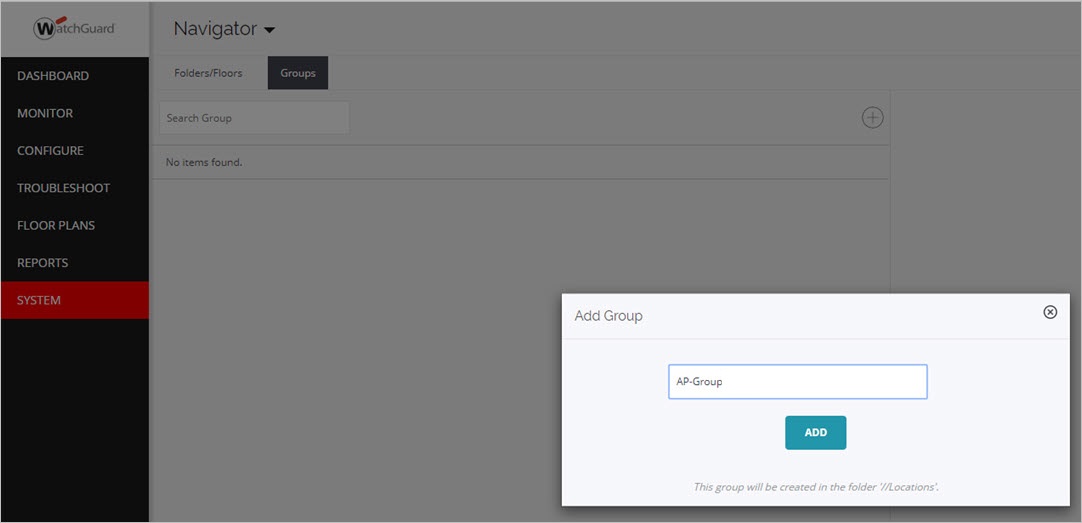
- Select System > Navigator.
- From the Navigator, select a location where you want to add the group.
WatchGuard recommends you create groups at the top-level location folder so that the group is available across your location tree. - Select the Groups tab.
- Click the
 icon to add a group.
The Add Group dialog box appears in the selected location. - Type a name for the group and click Add.
Add APs to a Group
To add APs to a group:
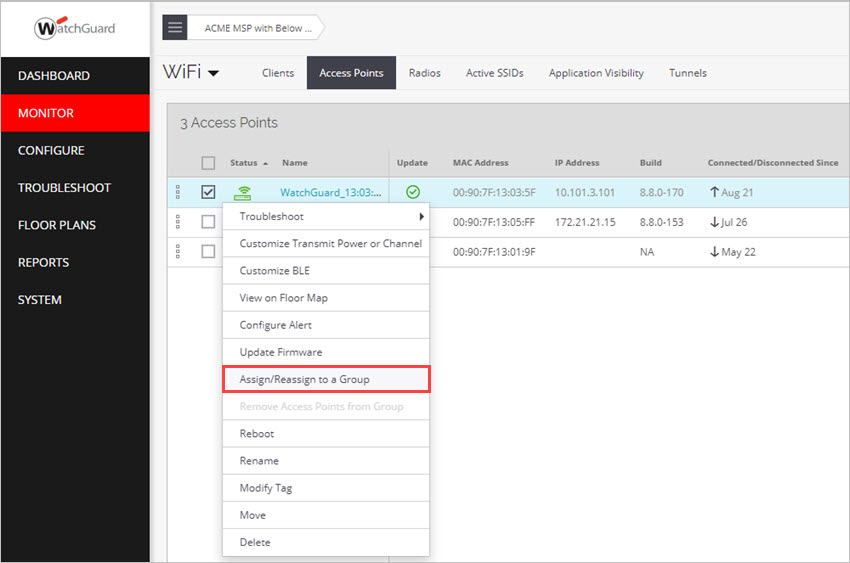
- Select Monitor > WiFi, then click the Access Points tab.
- Right-click on the AP you want to assign to a group.
- Select Assign/Reassign to a Group.
- Select the group, then click Assign.
Show Assigned Devices
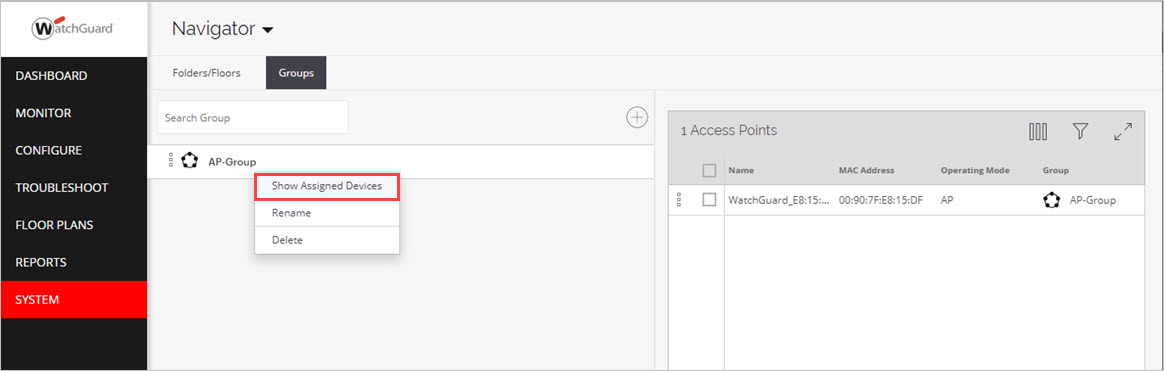
To show a list of APs assigned to a group:
- Select System > Navigator > Groups.
- Right-click on the name of the group, then click Show Assigned Devices.
APs that are assigned to the group appear in the right pane.
Configure a Group
You can configure a group in two ways.
- Enable an available SSID for the group. This applies the configuration of the SSID to the group. If you do not want to enable the SSID, you can configure and save the Device and Radio Settings to apply these settings to the group.
- Copy the configuration settings from another location or group and apply it to the AP group.
Apply a Configuration to a Group with an SSID
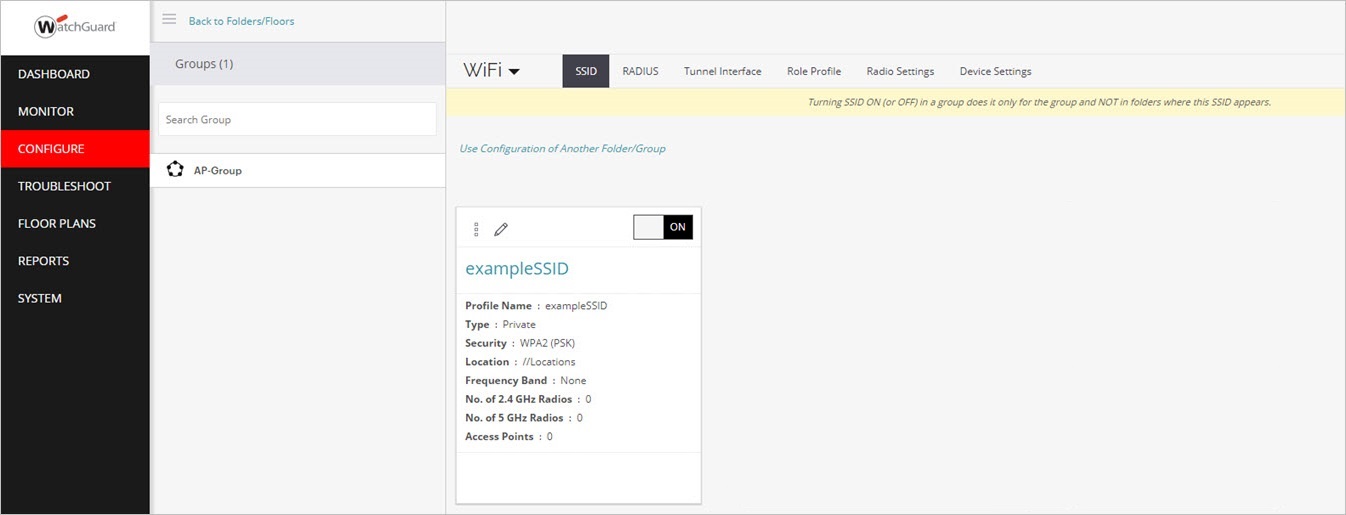
If you enable an SSID for a group, it applies the configuration of the SSID to the group.
- Select Configure > WiFi .
- Open the Navigator.
- Expand the list of groups available at the bottom of the Navigator window.
- Select the group to which you want to apply the configuration.
- From the list of SSIDs, turn ON the SSID settings you want to apply to the AP group.
The configuration of the SSID is applied to the selected AP Group.
Copy Configuration from a Folder or Group
You can copy Wi-Fi configuration settings from a folder or group to another folder or group.
To copy the settings to a different location or group:
- Select Configure > WiFi.
- Open the Navigator.
- Select the Group where you want to copy the Wi-Fi settings to, and click Use Configuration of another Folder/Group.

- Select the location folder or group that contains the settings you want to copy.
- Click Apply Configuration to copy the Wi-Fi configuration from the selected location or group to the selected AP group.
- Click Continue to confirm.
Rename a Group
To rename a group:
- Select System > Navigator > Groups.
- Right-click on the name of the group, then click Rename.
- Type the new name of the group, then click Rename to save.
Delete a Group
When you delete a group, APs assigned to that group use the default Wi-Fi configuration of their location folder. If you delete a location folder, any groups that were created in that folder are also deleted, and the devices use the default Wi-Fi configuration of their current folder.
To delete a group:
- Select System > Navigator > Groups.
- Right-click on the name of the group you want to delete, then click Delete.
- Click Yes to confirm.