Applies To: Cloud-managed Fireboxes
You can add an authentication domain to the Firebox so that you can specify users and groups from your authentication server in firewall policies, aliases, and mobile VPN settings.
- Add a WatchGuard Cloud Authentication Domain
- Add the WatchGuard Cloud Directory (OpenID Connect)
- Add a SAML Authentication Domain
Note: Before you can add an Active Directory or RADIUS authentication domain to the Firebox you must add it to your WatchGuard Cloud account Shared Configurations settings. For more information, go to WatchGuard Cloud Authentication Domains.
Add a WatchGuard Cloud Authentication Domain
To add an authentication domain to the Firebox configuration:
- Select Configure > Devices.
- Select a Firebox.
Status and settings for the selected Firebox appear. - Select Device Configuration.
- Click the Authentication Domains tile.
The Authentication Domains page opens.

- Click Add Authentication Domain.
The Add Authentication Domain page opens. - Select Directories and Domain Services.
The Add Authentication Domain page opens.

- From the Select an Existing Authentication Domain drop-down list, select the authentication domain.
Note: To add a new Authentication Domain to your WatchGuard Cloud account, or to edit the domain server settings, go to the Configure > Authentication Domains page. For more information, go to WatchGuard Cloud Authentication Domains.
- From the Type drop-down list, select the authentication server type.
- From the Primary Server drop-down list, select the primary server address to use for authentication.
- From the Backup Server drop-down list, select the backup server.
- Click Save.
Add the WatchGuard Cloud Directory (OpenID Connect)
Some of the features described in this topic are available only to participants in the WatchGuard Cloud Beta program. If a feature described in this topic is not available in your version of WatchGuard Cloud, it is a beta-only feature.
Note: This is different from the AuthPoint authentication server that you enable with a Firebox resource in AuthPoint.
You can configure your Firebox to use AuthPoint and the WatchGuard Cloud Directory for OIDC authentication. With this setup, the users you add to AuthPoint and the WatchGuard Cloud Directory can authenticate to:
- The Access Portal (this includes reverse-proxy actions that use Access Portal login)
- Mobile VPN with SSL (the client opens a browser for the login)
- The Firebox Authentication Portal
WatchGuard Cloud Directory authentication does not support Mobile VPN with IKEv2, Mobile VPN with L2TP, Mobile VPN with IPSec, Guest Administrators, or Fireware Web UI administrator login.
If you do not have an AuthPoint license, this authentication server only supports authentication for WatchGuard Cloud Directory users.
Note: When you set up AuthPoint and the WatchGuard Cloud Directory as an authentication server for a cloud-managed Firebox, AuthPoint automatically creates a Firebox OIDC resource for you. For locally-managed Fireboxes, you must create the OIDC resource yourself.
To enable WatchGuard Cloud Directory authentication for a cloud-managed Firebox:
- Select Configure > Devices.
- Select a cloud-managed Firebox.
Status and settings for the selected Firebox appear. - Select Device Configuration.
- Click the Authentication Domains tile.
The Authentication Domains page opens. - Add or enable WatchGuard Cloud Directory authentication for OpenID Connect.
- Type the Firebox host name (FQDN) that resolves to the device (for example, firebox.example.com).
- Select the WatchGuard Cloud Directory users or groups that can authenticate.
- Deploy the configuration to the Firebox.
After you deploy, confirm that the Firebox OIDC resource appears in AuthPoint. For MFA users, add the resource to a Zero Trust policy.
Note: If you regenerate the Client Secret in AuthPoint, redeploy or sync the Firebox configuration from WatchGuard Cloud.
Add a SAML Authentication Domain
You can use a Security Assertion Markup Language (SAML) authentication domain to authenticate users with your cloud-managed Firebox. With SAML, you can exchange data between an identity provider (IdP) and a service provider (SP).
When you can add a SAML authentication domain to the Firebox to authenticate users, you do not add it to your WatchGuard Cloud account Shared Configurations settings. In the SAML configuration on the Firebox, you configure the Firebox as the SP and a third-party service as the IdP.
Your IdP must meet the WatchGuard requirements for SAML 2.0 communication. For more information about SAML requirements, go to SAML Requirements for Identity Providers.
Note: SAML authentication requires Fireware v12.11 or higher and is disabled by default.
The Firebox supports passwordless authentication for IdP initiated SSO. You configure passwordless authentication in your identity provider
You can use SAML to authenticate with:
- Authentication Portal
- Mobile VPN with SSL
Note: Fireware v12.11 expands support for SAML authentication and includes Firebox authentication. The Mobile VPN with SSL v12.11 client for Windows, and the Mobile VPN with SSL v12.11.2 client for macOS, support SAML authentication. Because SAML authentication for Mobile VPN with SSL requires a client update that supports integration with an embedded web browser that can interact with an IdP, lower versions of the Mobile VPN with SSL client and third-party OpenVPN clients are not supported.
Note: When you configure a SAML authentication user or group in a firewall policy but then enable SAML authentication for Mobile VPN with SSL or Authentication Portal, or when you configure a SAML authentication user or group in a firewall policy and Mobile VPN with SSL or Authentication Portal but later disable SAML authentication for Mobile VPN with SSL or Authentication Portal, the SP metadata changes and SAML authentication no longer works. You must provide the updated SP metadata to your IdP administrator.
To add a SAML authentication domain to a cloud-managed Firebox configuration, from WatchGuard Cloud:
- Select Configure > Devices.
- Select a cloud-managed Firebox.
Status and settings for the selected Firebox appear. - Select Device Configuration.
- Click the Authentication > Domains tile.
The Authentication Domains page opens.
- Click Add Authentication Domain.
- Select SAML Identity Provider.
The SAML Service Provider (SP) Settings page opens.
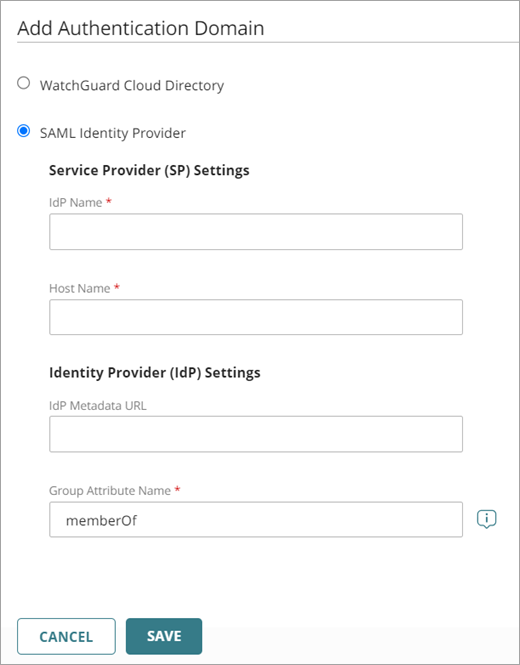
- In the IdP Name text box, type the name of your IdP.
This name appears on the login pages of the Firebox as the authentication server name. - In the Host Name text box, type an FQDN that resolves to the Firebox external interface.
- Keep the IdP Metadata URL text box blank for now. You must complete the steps in the next section before you can get the IdP Metadata URL from your IdP administrator.
Note: The Firebox cannot support multiple IdP applications at the same time. Each IdP application has a unique IdP Metadata URL.
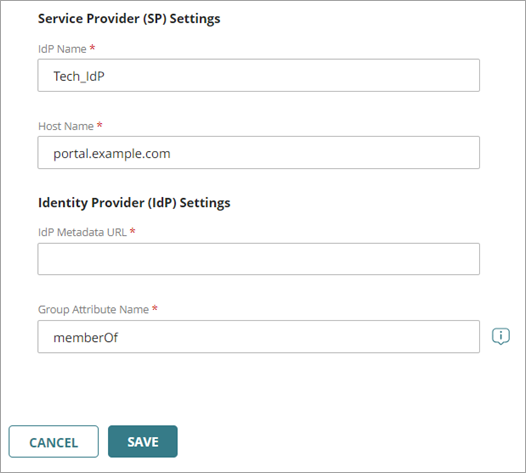
Note: The Group Attribute Name text box defaults to memberOf. If your IdP administrator uses a different name, you can type that name.
- Click Save.
WatchGuard Cloud generates authentication domain URLs and certificate information.
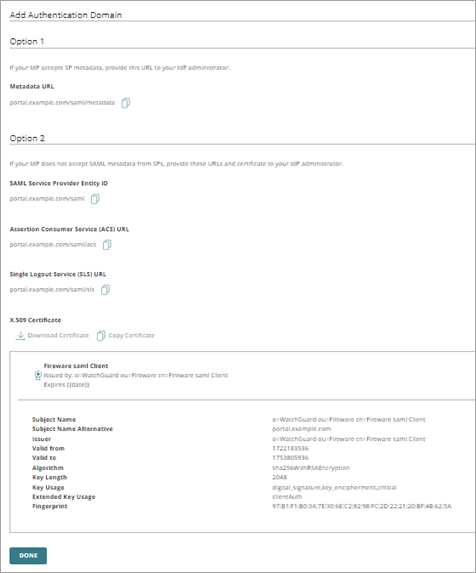
After you save the SAML configuration, WatchGuard Cloud automatically generates a page that includes additional SAML configuration and certificate information. You must give this information to your IdP administrator. The administrator can then configure the account settings for your company on the IdP website.
Note: The Fireware SAML Client certificate that WatchGuard Cloud creates shows in Device Certificates for your cloud-managed device. For more information, go to About Device Certificates.
Follow the instructions for either Option 1 or 2.
Note: You must deploy the SAML configuration to the cloud-managed Firebox before your IdP can use the Metadata URL.
Option 1 — Automatic Configuration
If your IdP accepts SAML metadata from SPs, give the Metadata URL in the Option 1 section to your IdP Administrator.
Option 2 — Manual Configuration
If your IdP does not accept SAML metadata from SPs, give the URLs and certificate in the Option 2 section to your IdP Administrator.
Configure the SAML Identity Provider Settings
You must now return to the SAML configuration and complete the configuration with the information that your IdP provides.
To complete the SAML configuration, from WatchGuard Cloud:
- Select Configure > Devices.
- Select a Firebox.
Status and settings for the selected Firebox appear. - Select Device Configuration.
- Click the Authentication Domains tile.
The Authentication Domains page opens. - Select a SAML domain.
The SAML configuration information opens. - In the IdP Metadata URL text box, type the metadata URL provided by your IdP.
- (Optional) To change the Group Attribute Name, type the new Group Attribute Name. Tip!
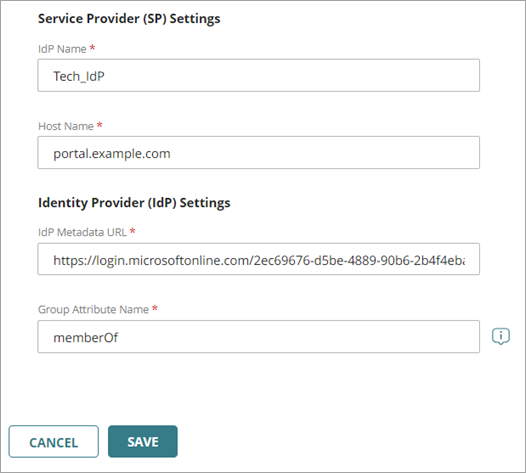
- Click Save.
- Deploy changes.
Edit a SAML Service Provider Authentication Domain
When you edit a SAML configuration, you must regenerate the SAML configuration information that you give to your IdP administrator.
To update a SAML configuration, from WatchGuard Cloud:
- Select Configure > Devices.
- Select a Firebox.
Status and settings for the selected Firebox appear. - Select Device Configuration.
- Click the Authentication Domains tile.
The Authentication Domains page opens.
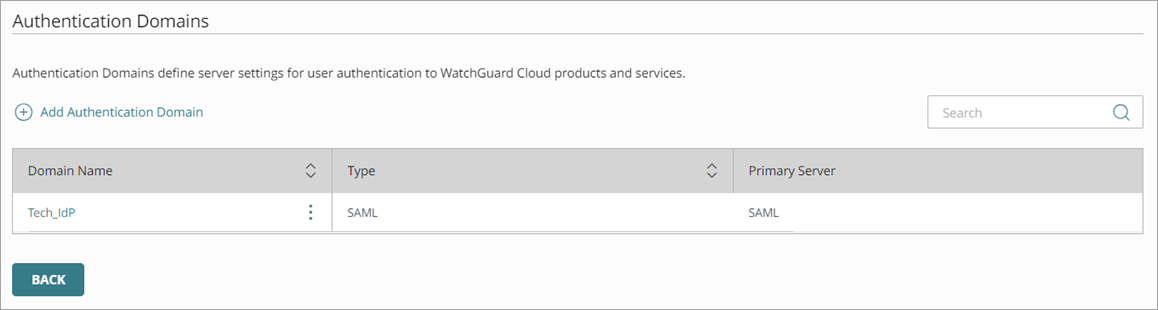
- Select a SAML domain.
The SAML settings page opens.

- Make any necessary changes.
Note: When you save edits to the Host Name in the SAML settings, the information in Option 1 and 2 updates to show the changes.
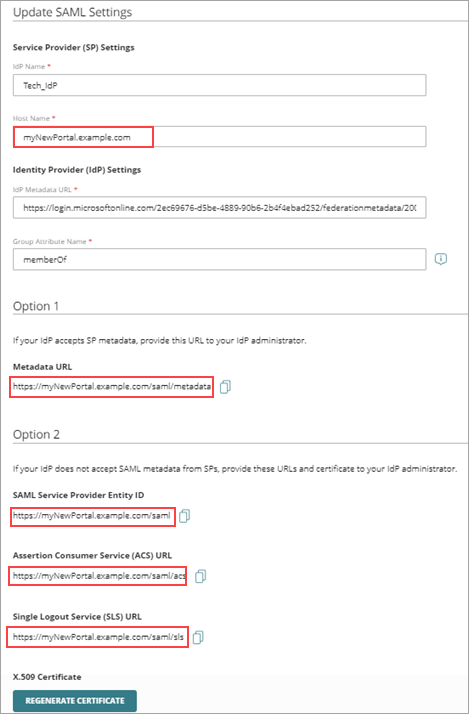
- Click Regenerate Certificate.
- Click Save.
- Follow the instructions for either Option 1 or 2.
Authentication Domain Users and Groups
To authenticate, users can connect to the Firebox authentication page, select the domain, and specify their username and password. For information, go to Connect to the Firebox Authentication Portal.
After you add the authentication domain, you can specify domain users and groups in policies and aliases. For more information, go to: