Applies To: DNSWatch in WatchGuard Cloud
References to DNSWatch in this topic relate to DNSWatch in WatchGuard Cloud. To learn about the legacy DNSWatch UI, go to About WatchGuard DNSWatch in Fireware Help.
When a user tries to visit a malicious or filtered domain, a security block page or content filtering block page appears in the browser. DNSWatch in WatchGuard Cloud provides default block pages that you can customize.
The security block page appears when DNSWatch determines that a domain is malicious. Malicious domains are domains found in the Global Domain Feed or defined when you block a domain in a DNSWatch configuration and mark it as malicious. For more information, go to About the Global Domain Feed in DNSWatch in WatchGuard Cloud and Add a DNSWatch Configuration in WatchGuard Cloud.
The content filtering block page appears when DNSWatch determines that the content is blocked by filtering rules. Filters are defined when you set the content filter rules in a DNSWatch configuration, and when you block a specific domain in a configuration, but do not mark it as malicious. For more information, go to About Content Filter Categories in DNSWatch in WatchGuard Cloud.
By default, the security and content filtering block pages use the branding associated with your account. You can customize the images and logos used by DNSWatch in WatchGuard Cloud to reflect the specific needs of your company. Branding for DNSWatch in WatchGuard Cloud block pages is configured in the Images section of the Configure Security Block Page and Configure Content Filtering Block Page. For more information about custom branding, go to Add Custom Branding.
Customize the Security Block Page
Your operator role determines what you can view and do in WatchGuard Cloud. Your role must have the DNSWatch permission to view or configure this feature. For more information, go to Manage WatchGuard Cloud Operators and Roles.
The security block page appears when a user tries to connect to a malicious domain while on a protected network or Firebox.
To customize the security block page, in WatchGuard Cloud:
- From Account Manager, select a Subscriber account.
- Select Configure > DNSWatch.
The DNSWatch page opens.
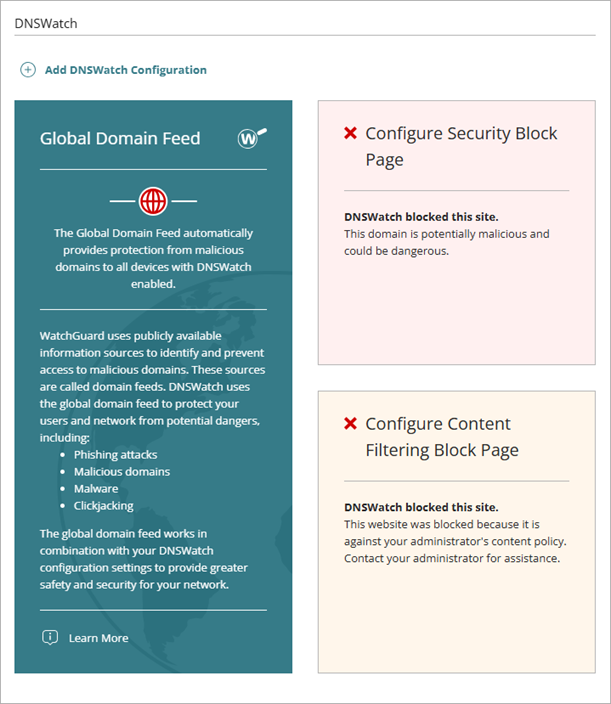
- Click Configure Security Block Page.
The Configure Security Block Page page opens.
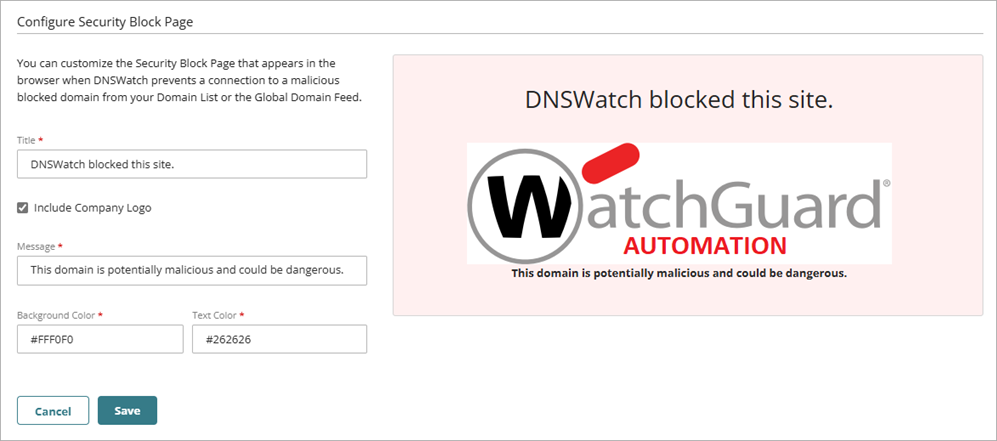
- To customize the default Company Logo, Background Image, or Thumbnail Image, in the Images section, drag an image file from your computer to the appropriate tile, or click Or click here to select the file and select an image file. To restore the default images, click Restore Default Branding Settings.
- In the Settings section, in the Title text box, enter the title you want to appear on the block page. For example, enter DNSWatch blocked this site.
- In the Message text box, enter the message you want to appear after the title on the block page. For example, enter This domain is potentially malicious and could be dangerous.
- Select No Video if you do not want to include a video on the block page.
- Select Default WatchGuard Video if you want users to view the WatchGuard educational video on the block page.
- Select Custom Video to use a custom video on your block page. In the Video Embed Link text box, enter the embed link for the video you want to use.
For YouTube, Vimeo, and Dailymotion videos, you can enter an embed link or a direct URL. For all other videos, you must enter an embed link.
- To include your company logo on the block page, select Include Company Logo.
- To include your thumbnail image on the block page, select Include Thumbnail Image.
- Select Background Image to use the background image from your custom branding as the background for your block message.
- Select Custom Background Color to use a custom background color instead of a background image. In the Custom Background Color text box, enter the hexadecimal color you want as the background color on the block page.
- Verify that the preview of the page appears correctly.

- Click Save.
- On the DNSWatch page, verify that your customized block page appears.

Customize the Content Filtering Block Page
Your operator role determines what you can view and do in WatchGuard Cloud. Your role must have the DNSWatch permission to view or configure this feature. For more information, go to Manage WatchGuard Cloud Operators and Roles.
The content filtering block page appears when a user tries to connect to a domain in a content category that is blocked by the DNSWatch configuration.
To customize the content filtering block page, in WatchGuard Cloud:
- From Account Manager, select a Subscriber account.
- Select Configure > DNSWatch.
The DNSWatch page opens.
- Click Configure Content Filtering Block Page.
The Configure Content Filtering Block Page page opens.

- To customize the default Company Logo, Background Image, or Thumbnail Image, in the Images section, drag an image file from your computer to the appropriate tile, or click Or click here to select the file on the appropriate tile and select an image file. To restore the default images, click Restore Default Branding Settings.
- In the Settings section, in the Title text box, enter the title you want to appear on the block page. For example, DNSWatch blocked this site.
- In the Message text box, enter the message you want to appear after the title on the block page. Information in this message can include contact information so that users can contact you if they believe that DNSWatch incorrectly blocked a site. For example, This website was blocked because it is against your administrator's content policy. Contact your administrator for assistance.
- Select No Video if you do not want to include a video on the block page.
- Select Default WatchGuard Video if you want users to view the WatchGuard educational video on the block page.
- Select Custom Video to use a custom video on your block page. In the Video Embed Link text box, enter the embed link for the video you want to use.
For YouTube, Vimeo, and Dailymotion videos, you can enter an embed link or a direct URL. For all other videos, you must enter an embed link.
- To include your company logo on the block page, select Include Company Logo.
- To include your thumbnail image on the block page, select Include Thumbnail Image.
- Select Background Image to use the background image from your custom branding as the background for your block message.
- Select Custom Background Color to use a custom background color instead of a background image. In the Custom Background Color text box, enter the hexadecimal color you want as the background color on the block page.
- Verify that the preview of the page appears correctly.

- Click Save.
- On the DNSWatch page, verify that your customized block page appears.

About DNSWatch in WatchGuard Cloud